Adjusting Work to Fit the Page
Most of the time, what you see on your screen is how it will look on paper if it's printed. However, don't mistake most of the time for all the time. It's always best to make sure that what you wanted printed will be printed the way you want before you do it.
As with other versions of Windows, you use the Page Setup dialog box to determine how your work will actually look on paper. To access the Page Setup dialogue box, go to File in nearly any program you can think of, then choose Page Setup, Print Preview then Page Setup, or Print Setup from the dropdown box. You'll then see something similar to the box pictured below.
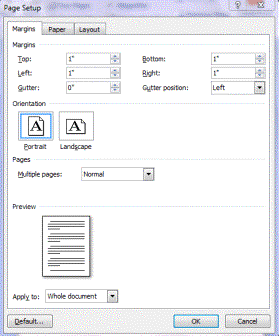
If you click the paper tab, you can select the size of paper you're going to print on. You can also select the source of the paper. This is very helpful if you have a printer that accepts paper from more than one tray because you can specify the tray.
Click on the layout tab and you can set headers and footers.
The margins tab allows you to set margins, as well as specify if you want portrait or landscape.
Keep in mind that these features may be under different tabs (or under the same one) with the Page Setup in different programs. However, whichever program you use, Print Setup will allow you to do the same things. In an image program, you'll be allowed to specify how many copies of your picture print on the same page, as well as the size.
Making Adjustments to Your Printer Settings
Whenever you choose print, Windows gives you one last opportunity to make changes to the printed page. You'll see a window very similar to the one below whenever you click Print within a program.
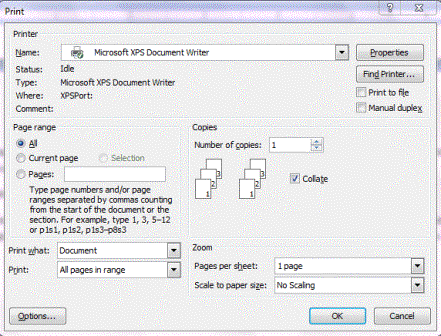
Using this dialogue box, you can specify the printer you want to use. You can also choose which pages or range of pages that you want to print, as well as how many copies. You can also zoom to put more than one page on a printed sheet.
If you click Properties, you can specify the paper size and the type of printing you want to do. By this, we mean that you can select options that will use less ink, print faster, etc.
You can also click Find Printer to find printers that are available for you to use.
Keep in mind that PDF writers, faxes, and other printing methods will be included in this dialogue box.
How to Cancel a Print Job
Oops, we've all done it. We've sent a document to the printer, but it wasn't really the document that we wanted to print. Aside from hurrying up and doing an improper shut down on your computer to stop the printer from going off (which will just delay printing), pulling the paper out of the tray (again, just a delay), or saying French words at the top of our lungs and offending those around us, what else can you do to stop a print job?
The answer is you can cancel it.
To erase a print job from your printer's memory, go to the Start>Devices and Printers. You'll find this on the right side of your Start menu.
Now, right click on the name of your printer (or the icon) and select See What's Printing.
Find your document, right click on it, then select Cancel. This cancels your print job. It may take a few minutes for the document to be removed from queue, and if you don't have any other print jobs lined up ahead of it, a few pages may print before it stops. But that's okay. It's better that one or two pages print accidentally then 50 -- if you have a large document.
How to Print a Web Page
We've done it, and we're sure you have. You stumble upon a web page that you really want to print out. Maybe you want to pass it on to others, or perhaps you want to save it for yourself. Either way, the actual task of printing the web page is easy, but getting that web page to look as good on paper as it does on your screen (without using all your printer's ink) can be a problem.
Let us tell you how to fix it.
o Web pages are not formatted for paper. This is something you must realize. They are not designed to print neatly on your standard sheets of paper. Some web pages, however, offer a print friendly version -- or a button that says Print This Page (or something similar). Some will also offer text versions or printer friendly versions. It's good practice to always use these. Not only will they be formatted to print to paper, they won't contain the things that suck up your printer ink, such as brightly colored ads.
o Use Print Preview before you print. This is available under File on the Menu Bar in your browser. You can make sure the page will look good on paper, and you can also control the quality of printing to save ink.
o Use copy and paste. If you don't need the entire web page, copy and paste the portions you want to use into WordPad or another program. Adjust the margins, remove anything you don't want that's still there, then print. You'll save ink -- and hassles. You can also copy the whole page.
o Email the page to yourself. Internet Explorer allows you to send pages by email. Go to Page on the right side of the screen (shown below), then select Send Page by Email from the dropdown menu. Emails are usually more print friendly than web pages.

Troubleshooting
When your printer won't print, when that error light starts flashing on the printer, or when the computer tells you it can't communicate with the printer, what do you do? Aside from pulling your hair out, how do you fix whatever is wrong -- and quickly?
First, let's start out with the basics.
o Is your printer plugged in to the wall? It happens to all of us. Someone goes behind us (or before us) and unplugs the printer. Make sure that your printer is plugged in.
o Is there paper in the printer? Most printers will flash with an error if there isn't paper, if the paper isn't fed into it correctly, or if there's a paper jam. Check for all of these things.
Is the printer hooked to your computer? Check to make sure.
If all these basic things do not fix your problem, then there's still no need to worry. We're going to tell you what to do next.
o Check to make sure there is still ink in the cartridge. Although in an ideal world the printer would warn you of this in advance, that isn't always the case. You can always try to print a test page if you want, just to be sure.
o Are your drivers updated? This sounds like something you'd need a techie to do, but it's not. Go to your printer's website, download the latest drivers, and install them. While you're on the website, you'll quickly realize if your drivers do need updated just by seeing the updated drivers file.
o Check your print queue, especially if you have children who could "play" on the computer. It's happened to others before. There will be fifty jobs in queue and the printer's memory gets a "headache." Try cleaning out the queue and starting again.
The Internet and Email
If you bought a computer ten years ago, the Internet was something you had to go through and set up. Although computers at that time were certainly Internet compatible to some degree, that wasn't their main purpose in life. That's changed, however. The Internet is a part of our daily lives, and we rely on our computers to connect us to it. In hearing the consumer demand, Microsoft now creates computers that start looking for an Internet connection even when the operating system is being installed because it uses that connection to set your clock and to check for updates to programs and software.
Needless to say, to get the most of your computer, you'll need the Internet. The Internet is a big, virtual world that contains at least some of things you need, maybe in your life and maybe in the life of your computer. Things such as software updates, virus scans, and things of that nature will all rely on your access to the Internet to deliver the service and performance that you expect from them.
Connecting to the Internet
Once you get your computer set up, purchase Internet access from an Internet Service Provider (or ISP). Although you'll need Internet Explorer (as we've talked about several times already) to surf the Internet, you'll need an ISP to connect you to the Internet so that you can surf.
If you've never had an ISP before, then shop around for the best price and deal. Dial up providers are still out there. But you can also check with your cable or phone company for a higher speed, broadband Internet service.
Once you have your ISP, it's time to connect to the Internet. We'll teach you how to do this.
If you already have Internet access through a wireless connection or Wi-Fi hotspot, Windows 7 will detect this connection and, most of the time, connect you to the Internet without you having to do a thing. It may prompt you for a network password, but anything it may prompt you for will be something you'll know.
If you're new to this, then relax If you purchase high speed Internet, most broadband providers make connecting to the Internet easy. They'll send you a modem and, once you hook that up using their step-by-step instructions, your computer will recognize the connection. All you'll have to do is click the Internet Explorer icon. At the most, though, you'll have a CD that will install your ISP's software for you. Just follow the instructions. It's easy.
If you choose to use dial-up, a little more work may be required on your end. The first thing you'll need is a modem. Most computers still come with modems pre-installed. Check to make sure yours does.
Then, let's install the connection. (For broadband users who are having problems connecting, you can follow these instructions as well.)
Go to Start>Control Panel>Internet Options. You'll see the window below. Click on the Connections tab.
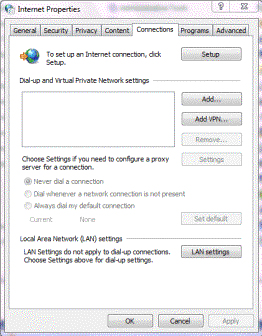
Broadband users should click Setup. This tells you the Internet connections available to you. You may need to simply connect by pushing a button. If not, Windows will walk you through troubleshooting your connection.
Dialup users should click Add in the Dialup and Virtual Private Network Settings section of the above dialogue box.
You'll then see the window pictured in the following snapshot.
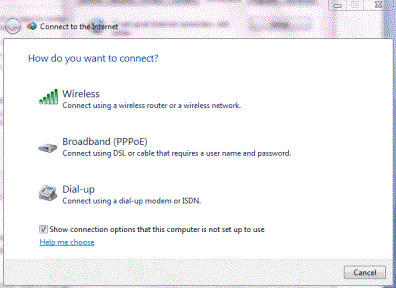
Select Dial-up.
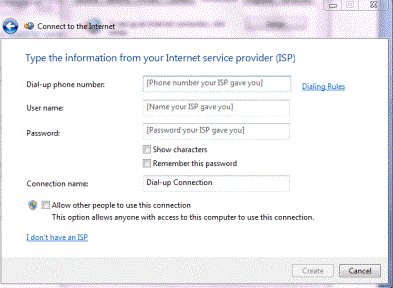
Enter in the required information. Your username and password will be provided by your ISP. The Connection Name can be one that you select so you recognize the connection.
When you're finished, click Create. You should now be able to connect to the Internet. To browse the web, click on the Internet Explorer icon  in the taskbar.
Internet Explorer
Now that you're ready to browse the Internet, let's learn about Internet Explorer. To reach a web page, you can either type in its web address (which is usually in this format: http://www.abc.com). Or you can click a link from on another web page. Links are usually blue -- or at least a different color than the other text on the page. In the following snapshot, all text that is blue and underlined is a link. If we click on one of the links, Internet Explorer will take us to the corresponding web page.
You can also use the toolbar in Internet Explorer to navigate the web.

To make it easy for you to navigate Internet Explorer, we've broken down the various aspects of the toolbar.
o  The Forward and Backward arrows at the top left side of the browser window will take you backward and forward. The first arrow, or the backward arrow, will take you to the previous page you were visiting. Once you click the backward arrow, you can click the forward arrow to return you to the page you started from.
o  Favorites reveals your list of favorite websites. You can also add a web page to this list by clicking Favorites and then adding it to your Favorites list.
o  Click this to add a web page that you're viewing to your Favorites list.
o  This feature is turned off by default. When you turn it on, Internet Explorer records your browsing habits, then suggests sites it thinks you might enjoy.
o  This takes you to your home page. The home page is the first page you see when you fire up Internet Explorer. To change your home page, click the downward arrow next to the icon, then select Add or Change Home Page.
o  When this button is orange, it's telling you that the site you're visiting offers RSS or Real Simple Syndication. This is a quick way to read the headlines without visiting the website itself. To view the headlines, click Favorites, then the Feed tab.
o  This will allow you to check your email... once you install an email program.
o  This allows you to print the web page you're viewing.
o  This allows to execute commands that pertain to the page you're viewing. You can alter the font size or save it as a file.
o  You can use this to delete your browsing history, browse in private, or check websites for danger.
o  This will lead to several other menus that will allow you to adjust your pop up blocker and numerous other things.
o  This will bring you to Internet Explorer's help menu.
Email Options in Windows 7
When it comes to email and Windows 7, you have dozens of options as far as email programs or email providers go. But honestly, the types of email that you can have breaks down into just two categories: web based and computer based. In this section, we're going to discuss the two so that you can make an intelligent decision.
Let's start by talking about web based email. Most ISP providers automatically provide you with a web based email account, although you can make it computer based if you want. A web based email account simply means that you go to a web address to check your mail. All emails that you save and all folders that you create to save these emails will be stored online. You will never be able to access them from your computer unless you go online.
The good thing about a web based email is you don't have to worry about computer crashes. If you're the type of person who frequently saves emails to your computer, either for business or personal reasons, one computer crash can cost you a lot of information. When you're using a web based email program, you don't have to worry about it because all the emails you've saved are online.
But at the same time a web based email program offers more security, it can also offer more hassle. With a computer based email program (such as Outlook or Windows Live Mail that you configure to work for your email address), all your emails are downloaded straight to your computer. The emails you download, as well as the ones you save, are stored on your hard drive. This means that you can access them whenever you want, whether you're connected to the Internet or not. Again, however, if a computer crash would happen, those emails would be gone forever.
Whether you use a web based or computer based email program is totally up to you. It's just important that you know the differences, then select whichever will work best for your situation.
Windows Live Mail
Windows Live Mail is a computer based email program that you can download to your computer by going to www.download.live.com. Although it is not the purpose of this article to promote this email program, we will tell you that it is free to download, and it will work with any email address that allows you to use a computer based program to check email.
When you start to download Windows Live Mail, you will be downloading the installation program. Save this to your Downloads folder, which you can see from the Navigation Pane. When the file is completely downloaded, double click the installation file inside the folder. It will be named wlsetup-web. If you get a warning screen, don't worry. Click Yes. Windows Live Mail is a Microsoft product. You can trust it.
Here's where you have to beware, though. When you start to install Windows Live Mail, Microsoft will also try to get you to install all of their Live programs. If you want all these programs, that's great. But if you don't, make sure you uncheck the ones you don't want and leave Microsoft Live Mail checked.
Also, watch out that you don't agree to let Microsoft change your home page and search provider. Uncheck those boxes if you don't want to change these things.
Once you have the program installed, you're ready to set it up for use. This is easy once you know exactly what to do.
Start out by, of course, opening Windows Live Mail. If you don't see it on the desktop, go to the Start menu and click All Programs. You'll find it there. The window below should appear automatically. If it doesn't, click Add E-mail Account in the upper left side of the program's window. There should be a link in the Quick Views Pane on the left too (if you have that showing.)
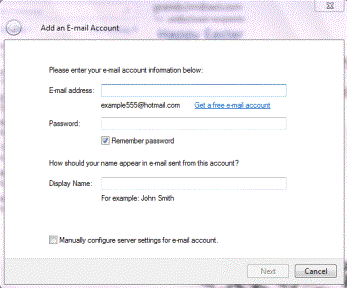
Enter the email address that you want to use. Then, enter a password. This MUST be the password that your email provider gave you in order to allow you to check mail. Make sure the Remember Password box is checked; otherwise, you'll have to enter your password in each time you check email. That can be a pain!
Next, decide what name you want on your emails. When someone sees your email in their inbox, what name do you want them to see? Type that into the Display Name box.
Put a check in the box that says Manually Configure Server Settings For Email Account and press Next.
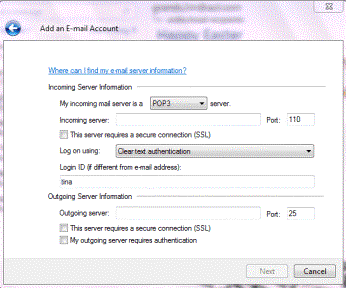
Now it's time to enter your email server information. This is information your ISP or email provider will give you. You can check their website and look for help setting up email for this information -- or ask them directly by calling technical support if you need to. However, we hope to be able to provide you with a lot of the information you're going to need.
The first thing you need to do in the above window is type in your incoming server's name. You also must specify whether it's a POP3, IMAP, or HTTP. We'll provide a chart below for some of the major email providers that will give you that answer as well as the incoming server name.
Next, enter your outgoing server name. Again, we will provide the outgoing server name for the major email providers later in this article.
Enter your Login ID. Windows Live Mail automatically enters the first portion of your email address in this box. Don't change it unless your ISP or email provider tells you to.
Some servers will require SSL or authentication. This is information that your ISP or email provider will give you.
The chart below provides incoming and outgoing server addresses for some of the major email providers.
|
Email Provider |
Email Type |
Incoming Server |
Outgoing Server |
|
Google Gmail |
POP3 |
pop.gmail.com |
smtp.gmail.com |
|
America Online AOL |
IMAP |
imap.aol.com |
smtp.aol.com |
|
Yahoo! Mail Plus |
POP3 |
plus.pop.mail.yahoo.com |
plus.smtp.mail.yahoo.com |
You should now be set up to send and receive emails with Windows Live Mail.
Manage Your Contacts
Without a doubt, your address book is one of the most prized possessions you can have when it comes to emails. Windows Live Mail helps to make it easy to keep your address book up-to-date by automatically adding anyone who you respond to three times. This means that if Aunt Betty emails you, and you respond each time, the third time you answer her email, Windows Live Mail will add her to your address book for you.
You can also import addresses from old address books. To do this, open your address book. You can find it by going to Go in the Menu Bar, then selecting Contacts. Windows Live Mail will allow you to import address books that are in these formats: WAB, VCF, CSV, or Outlook. Once you have your address book open, go to File>Import and select the format you're going to import. For example's sake, we've chosen CSV, which is an Excel file.
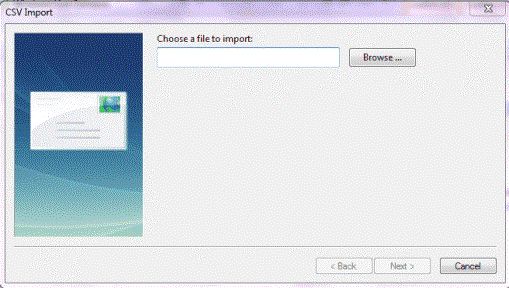
As you can see in the snapshot above, Windows now asks you to locate the file that you want to import. Click the browse button and find the file on your computer or external drive. Then click Next.
Next, it's going to ask you what fields you want to import, as shown below.
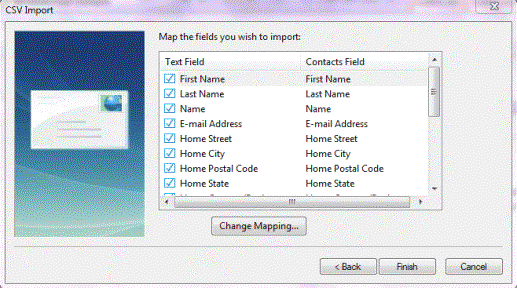
Choose the fields, then click Finish. Windows Live Mail will import your contacts for you.
You can also add contacts manually. To do this, open the address book and click New>Contact. The New option is shown below. Type in the person's name, email address, and any other information you want to add. Click OK when you're finished.