Many households nowadays have more than one computer. In fact, it's not at all unusual for each member of a household to have his or her own. Creating a network to connect those computers makes it possible to easily share files, folders, internet connections, and even printers.
o In the past, setting up one of these networks, and actually sharing anything, could be a frustrating process, but with Windows 7, Microsoft has made the process incredibly easy.
Understanding Networks
So what is a network? A network is just a bunch of computers connected to each other so that they can communicate with each other and share things like pictures or printers or internet connections.
Types of Networks
There are really only two types of networks:
o Wired Networks-computers that are connected together with wires, usually Ethernet cables
o Wireless networks-computers that are connected wirelessly using radio waves
The simplest type of network would be just two computers connected together with a single cable. More complex networks require a router and a modem.
A router is the central device that all computers on a network connect to. It's like a bus terminal-all the busses must come to the same location to pick up passengers, before trundling off to different parts of the city. This is a much more efficient system than simply connecting one computer to another in a big circle.
If you are going to connect to the internet, you will also need a modem. A modem is the box that communicates with the internet. So it goes like this: the computers are plugged into (or linked with) the router and the router is plugged into the modem. In some cases, the modem and router are combined into a single unit.
Setting Up a Small Network
To set up a small network, you are going to need a router and a modem and a way to connect them. Each computer will also need an adapter. The adapter is a device that allows the computer to communicate with the router. Almost all computers sold today have an Ethernet (wired) adapter built right into them. Ethernet cables look like oversized old-fashioned phone jacks. Most laptops built today have wireless adapters built into them.
Don't worry though, because you don't have to pick one type of network over the other, wireless or wired. Most networks use a mixture of the two. In fact, most wireless routers also have places you can plug Ethernet cables into and it's not at all unusual to have the main computer in a household connected directly to the router with wires, and all the rest of the computers connected via Wi-Fi.
So an ordinary network may look like this: The modem is plugged into the phone line or cable to allow access to the internet. It is then connected directly to a router with an Ethernet cable. The router is then plugged directly into one computer, and simultaneously transmitting a radio signal that all the other computers in the house with Wi-Fi adapters can communicate with.
Now that all the computers are connected, you'll have to configure them with Windows to get them to communicate with each other. But don't worry. Like I said at the beginning of this article, Windows 7 makes this process incredibly easy.
Setting Up a Homegroup
So the next step is to select which computers you want to communicate with. You do this by creating what's called a Homegroup. You can think of this like giving each member of your family a key to your house. This is important because I'm sure you don't want any stranger to be able to gain access to your personal files.
So let's launch the Control Panel and see how to do this. Click Network and Internet and then Homegroup. Windows will automatically check to see if another Homegroup is already available on this network. If it is, you can choose to join it, or create your own.
In this example, there aren't any other Homegroups on our network, so we're going to create one. Click "Create a Homegroup."
A new window will open asking you which items you'd like to share with other members on this Homegroup. If you'd like to share a printer (which we'll talk about in more detail shortly), make sure that box is checked, then click "Next."
In the final step of this process, you'll be given a password. You will need this to connect other computers to your network so write it down.
Now, on all of the other computers, you will have to go to Networks and Internet and select Homegroup. Windows will tell you that a Homegroup is already available and asks if you'd like to join. Go ahead and join it on those other computers, and enter the Homegroup password when asked. You will also be given the opportunity to select which files and printers you'd like to share on each of those other computers.
Sharing Files with XP and Vista
Microsoft really went through a lot of trouble to improve and streamline the process of creating a network. However, most of the best features are only available to other Windows 7 machines. To connect with computers that are running Windows XP or Vista, you will have to do a little bit more work.
After you have created a Homegroup on Windows 7, go into the computers running Windows XP and Vista and set up a new network.
Now go back to your Windows 7 PC to connect to the network you just created and launch the Control Panel. Then click "Network and Internet" and launch the Network and Sharing center. On this screen click "Change advanced sharing settings" then make sure these items are turned on:
o Network Discovery
o File and Printer Sharing
Password Protected Sharing must be turned off. If it is not, the computers running XP and Vista will be asked to enter a name and password before they can connect.
Now click Save Changes.
Sharing a Printer
Nowadays, many homes and offices have several computers, but usually only one printer. Windows 7 makes it incredibly easy for every computer on the network to share that one printer.
To do this, simply plug a printer into any computer on your homegroup. Windows 7 automatically tells all of the other computers in that homegroup that a printer is available. To find it, simply click the start menu and select "Devices and Printers". You may have to install the driver on each computer manually before you can use it.
Troubleshooting Network Problems
Once the network has been set up correctly, it should work fine without any further action, but if it doesn't, there are a few things you can try before pulling your hair out.
The first, of course, is to ask Windows itself to try and diagnose the problem. To do this, right-click on the network icon in the taskbar and select "Troubleshoot Problems". A wizard will launch to guide you through the process.
If that doesn't work, go back and make sure that every computer has the same workgroup name.
Common Complaints with Windows 7 -- and Their Fixes
If there is one true maxim when it comes to personal computers, it's got to be "You can't please all of the people all of the time." Microsoft tried hard to streamline Windows 7 to make it more pleasing to look at and much easier to use. In many instances, they succeeded. In fact, the most common complaints and frustrations with Windows 7 stem from not being familiar with the new way of doing things. We were used to the old way of doing things, durnit.
In this article, we'll go over the most common complaints, and explain why they exist and how to change them if you want to.
Annoying Permission Screens
If you used Windows Vista, you're probably well aware of those annoying permission screens. They're the ones that pop up every time you try to install some kind of software or make a major change to Windows, and ask you if you really want to do that. To tell the truth, there isn't really a good solution to them. If you turn them off, you leave your computer open to all sorts of malicious software, such as spyware and worms and viruses.
If you don't want to turn them off altogether, you can still set them to a different level so they don't pop up as frequently.
To do so, click System and Security in the Control Panel and then select "Change User Account Control Settings." You'll see a screen that looks like this:
If you drag the little rectangle in the middle upward, you'll have the most secure system, but you'll see a permission screen any time a change is made to Windows, whether you initiated it or not. If you drag the rectangle downward, you won't see the permission screens, but you also won't be notified when any change is made to windows. That means a virus can install itself on your computer and you'd never realize it.
Copying Music to iPods and Other Devices
Copying music to most MP3 players is incredibly easy. Windows recognizes them as just another disk drive. You can easily navigate to the device and drag your music into it. iPods, on the other hand, are not quite as simple. You can only move music and movies to your iPod through iTunes, which is Apple's proprietary software. But don't worry, it is Windows compatible and is available for free from the iTunes website. iTunes also organizes and plays your music and movies in much the same way that Windows Media Player does.
Missing Menus
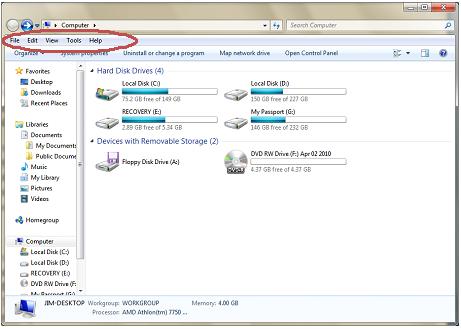
It's like an old building that gets torn down in your neighborhood-after 6 or 8 months, you almost forget it was ever there in the first place.
If you have been missing these menus, though, you can view them easily (and temporarily) by pushing the Alt key.
If you'd like to turn these menus back on permanently, click the Organize button then choose Layout > Menu Bar.
Special Effects and Computer Performance
There's no doubt that Windows 7 has an attractive interface and some of the effects are pretty cool. Those effects come with a price, however-they use up a bit of your computer's processor and memory. This hit to performance is negligible on high end machines, but older or low-end computers may really feel it.
If you don't think Windows 7 is running as fast as it could be, you might try turning these effects off. To do so, launch the Control Panel and click "System and Security" then "System." Now click "Advanced System Settings." You'll see a new window that looks like this:
Select "Settings." A new Window will open up.
From here you can choose to disable individual effects, or disable all of them by selecting "Adjust for best performance." Click Apply.
Having to Log into Windows Constantly
When you walk away from your computer for a period of time and your screensaver "kicks in," you may discover that when you return, you have to log back into Windows. It doesn't have to be this way. You can easily set it so that when you wake your computer up from the screensaver, your computer returns you to whatever program you had open. Asking you to sign back in is just a security feature -- one that's easily enough undone.
To fix it so you don't have to log into Windows constantly:
o Right click on a blank area in your desktop and choose Personalize.
o Click Screen Saver in the bottom right corner (as shown above).

o Uncheck the On Resume, Display Logon Screen to deactivate this security feature.
o Click OK.
When the Taskbar Moves or Disappears
The taskbar, you may remember, is that strip that's usually at the bottom of the screen. Unless the taskbar is locked, you may find yourself accidently moving it all over the place. To lock the taskbar, right-click on it and select "Lock the taskbar." You'll have to unlock the taskbar again before you can "pin" or "unpin" icons to it.
Another problem is the disappearing taskbar. This happens if the "Auto-hide" function is active. In this case, unless you move your mouse to the bottom of the screen, the taskbar will not show.
To fix this, move your mouse to the bottom of the screen so you can see the task bar. Now right-click on it and select "Properties."
Make sure the "Auto-hide the taskbar" box is not checked. You can also use this menu to further personalize the taskbar. You can select its position on the screen, how large the icons are, and more. I'd suggest trying out each setting to see if you like it.
Losing Track of Open Windows
Keeping track of all your open windows doesn't have to be aggravating! There's a secret key that Windows doesn't tell you about. Simply hold down the ALT key and press the Tab key. A little bar will appear and display all the icons for your open windows. Keep pressing Tab until the window you want is highlighted. Release the keys and the window will pop up.
Lining Up Windows on the Screen
It is possible to line several windows up perfectly on the screen. To do so, make sure both of the windows you want to line up are visible and make sure all other windows have been minimized to the task bar. Now, right click in an empty area of the taskbar and select "Show windows side by side." If you have two windows open, this will show them side by side, perfectly proportioned. If you have three, as in the example below, they will appear in three equal columns.
You can also arrange windows the long way, on on top of each other, by choosing "Show windows stacked" as in the following example.
If the Print Screen Key Doesn't Work
This is actually more of a problem with labeling than a problem with Windows. The Print Screen key (or Prt Scrn on some keyboards) doesn't actually send a picture of the screen to the printer. It should be labeled "Copy Screen" because that's more accurate. When you push the Print Screen button, Windows simply saves an image of that screen to the Clipboard. You can then paste it into a document. If you're dead set on printing a copy of the screen, you can open a program like Microsoft Paint or MS Word and paste the image into it, then print it from that program.