Welcome to Windows 7, the operating system introduced by Microsoft. Chances are, you were just getting used to Vista when this came out. And, most likely, some of you are still bound to the old and familiar (now) XP. The thought of having to get used to a new system can be aggravating. It's like moving into a new house with brand new furnishings. But take a deep breath and relax! Whether you're considering an upgrade to Windows 7, have already upgraded, or got "stuck" with it on a new computer that you've bought recently, you'll be pleased to know that Windows 7 just might arguably be the best operating system that Microsoft has yet to create. While Windows ME is considered a big mistake by a lot of people, Windows 7 is being hailed as the best yet.
Better than Vista? Really?
Windows 7 is what Vista should have been. Imagine taking a cake out of the oven before it's completely done, and you have Vista. Now imagine waiting to take that cake out of the oven until it's completely baked and ready to enjoy. That's Windows 7. Although it certainly isn't perfect, it's a blessing to Vista users.
Here's why.
o Windows 7 offers an easy way to upgrade. If you're unhappy with Vista, Microsoft seems truly apologetic. You can upgrade to 7 simply by putting the upgrade DVD into your CD ROM drive. All your programs, your printer, and almost everything else that you used with Vista will work with Windows 7.
o The nag screens are gone. Remember how Vista always had a pop up window that asked if you're sure you really want to do something? Those things are annoying! With Windows 7, they're gone. It only warns you if something drastic is about to happen. You can even set the warning levels.
o The controls are streamlined. In Vista, shutting down your computer was simply a chore! You had to go to the Start menu, click an icon, then an arrow, and then do the hokey pokey and turn yourself around. It's not that much of a hassle with 7. It has a simple shut down key. Easy!
o Improved backup. If you wanted to backup your computer with Vista, you had to backup everything, even if you were only interested in backing up a few files. Windows 7 gives you the option of just backing up the things you want.
o Better for laptops. If you worked on a laptop with Vista, you know how nightmarishly slow it could be. You'll find that Windows 7 is much friendlier to laptops -- and not as frustrating to you.
But What About XP?
If you're an XP lover or so familiar with XP that you are hesitant to try 7 -- or like it, please reconsider. Of course, XP is a great operating system, and if you don't want to upgrade to 7, you certainly don't have to. However, 7 does offer some features (in addition to being another great system) that might make you consider the switch -- or just realize that you do like 7.
Some of these features are:
o DVD burning. You can burn DVDs using Windows 7. You can't with XP without installing third-party software.
o Search for files easier than before. As great as XP is, it's file search is as slow as Christmas. Windows 7 finds your files quicker because it creates an index of every word on your hard drive. This means it doesn't take it long to find the files you need.
o Internet Explorer. Internet Explorer 8 makes it easier, as well as more secure, to search the web. It still has the old features that you love, such as tabbed browsing, RSS feeds, and filters, but it's much easier and safer to use than older versions you may be running with XP.
o The Media Center. With Windows 7, you can watch TV on your PC. You can even record shows onto your hard drive. (Upgrades may be required for recording.)
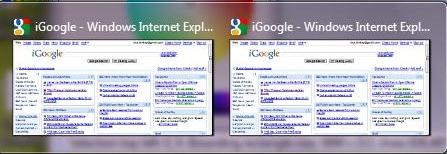
o Taskbar. A new taskbar in Windows 7 makes working on your desktop or surfing the web so much easier. With XP, if you had several windows open, you could see the minimized windows on the taskbar, but you couldn't see what was contained in those windows unless you restored it to the desktop. Windows 7 gives you pop-up thumbnails to make it easier to see what you're working on. Just take a look at the snapshot below. When you simply mouse over the Internet Explorer icon in the task bar, it shows you thumbnails of the windows you have open.
The Versions of Windows 7
Where Windows 7 gets a bit complicated is with the several versions available. XP only had two: one for the home and one for the office. Vista has five different versions. Deciding which one you need can be confusing. Windows 7 has six versions, but don't let that scare you. Unlike with Vista, Microsoft made these versions easier to figure out so you can select the right one.
|
Version |
Purpose |
|
Windows 7 Starter |
This is a basic version of the operating system and is mostly used on netbooks. |
|
Windows 7 Home Basic |
This was designed for developing countries. It has everything from the starter version, but also has better graphics, connection sharing, and settings for those who have more powerful laptops. |
|
Windows 7 Home Premium |
This is the version that is meant to match most consumers' needs. On it, you can watch and record TV and create DVDs from your camcorder. |
|
Windows 7 Professional |
For businesses, this version contains everything you'll find in Premium but also has extra networking features and other business tools. |
|
Windows 7 Enterprise |
This version is for larger businesses. It's sold in bulk. |
|
Windows 7 Ultimate |
Quite honestly, this version is for the technological wizards. If you need this version, chances are you don't need this article! |
As you can see, although there are six versions, selecting the one that's right for you isn't hard to do. Finally, Microsoft has made it simple. And if you currently have one version and want to upgrade to another? That's easy enough. If you have a credit card, you can unlock features for a different version. Best yet, unlike with Vista, you keep all the features of one version when you upgrade to another. So if you like the version you have, but just want to be able to access the features of a more deluxe version, all you have to do is upgrade. There's no longer a need to stress what you'll lose because you won't lose a thing.
Let's Talk About User Accounts
When you're first getting started with Windows 7, one of the first things you're going to want to do is set up user accounts. If you share your computer with several people, this is a way to insure you can keep your files private and keep unwanted eyes away. A user account also gives you the ability to customize the computer for your use. You can do such things as select a desktop background, select menu choices, programs, and files. Although you won't be able to see files from other users, they won't be able to see yours either.
But before you can start to create user accounts, it's important that you learn the different types of user accounts that exist. The type of user account you assign to yourself and subsequently everyone who'll use your computer will determine what they can do when they sign in, including who can download new programs.
The Administrator account should be given to the owner of a computer -- or a parent who wants to have a bit of control over what their child can do on the PC. The administrator controls the entire computer. They get to decide who can use the computer, as well as what users can do when they're on it. It's the administrator who is responsible for setting up user accounts.
A standard user account is for almost everyone else who will access your computer on a regular basis. What a standard user can access and do will be up to the administrator. However, the standard user will still be able to customize their computing experience. You can assign names to standard user accounts. For example, Jane Doe might be the name for Jane Doe's user account. When Windows 7 loads, she'll sign into her account. We'll cover that in just a minute.
Guest user accounts are created for people who might use your computer once or twice. If you have a temp working in the office or a guest staying in your home, having a guest user account can be very helpful. It protects your privacy - and your computer -- while giving others the freedom of using it. Anyone can logon to the guest account. It's great for browsing the Internet, but doesn't allow much more.
Passwords can be assigned to user accounts to create privacy and security.
When You're Ready to Setup Your Account...
Setting up your user accounts is easy. Simply to go the Start menu, select Control Panel, then choose User Accounts. You'll see the dialogue box below.
To create a new user account, select Manage Another Account.
You'll then see this dialogue box:
Click Create New Account

Now simply create a name for this user account, then select if it's a standard or administrator account. Click Create Account when you're finished.
If you want to protect the account with a password, simply click on the account once it's been created and choose Create a Password.
Meet Your Desktop
The desktop is where all your work takes place. You can pin important program icons to the desktop, and it's also where you'll see all the files and programs when you have them open. If you're unsure as to what exactly your desktop is, then let's make it really simple. It's your monitor screen when Windows is completely booted.
Your desktop is yours to customize much like your desk that you are probably sitting at right now. You get to decide where everything goes. Files and folders can be created to place on the desktop, and you can arrange those on the screen in the fashion that you want. Everything you need to access when you're on the computer can be right there... on the desktop. And whenever you open those things that you need, such as files or programs, they'll appear in windows ON TOP of the desktop.
Now, your desktop has four main parts.
o The first is the Start menu. It's located in the lower left hand corner of your monitor screen. To access it, click on the  icon to the left of the taskbar. The Start menu shows you all of your menus.
o The Taskbar is located to the right of the Start menu. It displays icons for favorite programs as well as the programs you currently have open. Take a look at ours:

o The Recycle Bin. The icon that looks like a waste basket is your Recycle Bin. All files that you delete are stored here -- in case you didn't mean to delete them.
o Gadgets. Gadgets are programs that stick to the desktop, kind of like magnets. You can add weather gadgets, instant message gadgets, etc.
Sorting Desktop Icons
For now, let's talk about the icons that you see on your desktop. These are programs and files that have either been put there by Microsoft or the manufacturer before you bought your computer -- or that you have put there yourself. If you want, you can reorganize the icons by right clicking anywhere on the desktop and selecting Sort By from the menu that appears.
These are the sorting options for your icons:
o Name. This will arrange all your icons in vertical rows in alphabetical order.
o Size. The smallest icons will be placed at the top of the rows.
o Item Type. Icons are arranged by type. Word files will be grouped together, as will websites. You get the idea.
o Date Modified. This will arrange icons by the date that they were last changed by either you or your PC.
If you right click on your desktop and click View, you can change the size of the icons and also organize your desktop using these selections:
o Auto Arrange Icons. Arranges all icons on the desktop into vertical rows.
o Align Icons to Grid. This creates an invisible grid on your desktop and all icons are aligned using the grid.
o Show Desktop Icons. Keep this turned on or you won't be able to see your icons on your desktop at all. Windows will hide them if this is off.
Change the Desktop Background
The desktop background is the picture or graphic you see on your monitor screen. You can change this at anytime either to a picture or graphic of your choice -- or to one Windows provides.
To change the background, right click on the desktop. Select Personalize and click Desktop Background.
Click any of the pictures shown, or choose browse to find a picture on your computer or external hard drive.
Click on Save Changes when you're finished.
Getting Started with the Start Menu
We already learned where the Start button was located. Now let's learn about the Start menu, pictured in the next snapshot.
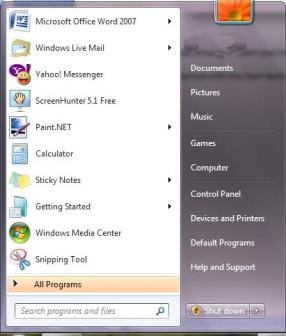
The Start menu ultimately contains access to all your programs, files, and folders. When you learn how to use the Start menu, it makes it easy to locate anything you want on your computer.
The Start menu has two sides. On the left, or white side, you'll see icons to your most frequently used programs. You can right click on a program and remove it from this list. You'll also see All Programs. When you click on this, it will display all programs on your computer. For XP users, this is also where you would access Accessories.
The right side contains places on your computer. By clicking on any word on the right side, you will be taken to a certain place, such as the Control Panel or Documents. We'll learn more about this below.
o The Start menu starts with your name, or your user name. This is located on the right (gray) side of the menu above Documents.
o Next, we have Documents. Clicking this will take you to your Documents Library, where you might store Word documents, etc.
o Pictures. When you click this, you'll be taken to all your stored digital pictures and images. Your images will appear as thumbnails.
o Music. Access your digital music.
o Games. Windows 7 gives you several of the same games as Vista, including chess. Although it left out Inkball, it brought back Internet Checkers and Internet Backgammon. When you play these, you can compete with players worldwide.
o Computer. This will allow you to access the storage areas on your computer, including any external storage drives and your CD or DVD rom.
o Control Panel. When you go to the Control Panel, you can adjust your computer's settings.
o Device and Printers. This place on your computer will list your printers, monitor, mouse, and all attached gadgets so you can make sure they're working properly.
o Default Programs. Use this to tell Windows which programs to use when it opens files. For example, maybe you'd prefer Paint open your images instead of Windows.
o Help and Support. This will take you to the place where you can get help and support with your computer.
o Shut Down. As we said earlier, Windows 7 makes shutting down your computer easier than ever before! Just click the Shut Down button. If instead you want to hibernate, stand by, or switch users, click the arrow beside Shut Down for options.
o Search Box. Search for files and folders on your computer. Remember, since 7 indexes the words you use when you name files and folders, this will be quick, easy, and painless because you won't want to pull your hair out while you wait.
Using Start to Start Programs
To start a program from the Start menu, click the icon or search All Programs until you find the one you want, then click on it.
If you don't see the program you want, type its name in the Search Box. (Whenever you install a program, it's automatically added to the Start menu.)
If there is a program that you want to pin to the Start menu so you don't have to dig for it, you can pin that program where your frequently used programs are currently shown. Just right click on the icon for the program, then select Pin to Start Menu. It's that simple!
Customizing the Start Menu
You can customize the Start menu by changing its properties. To do this, right click on the Start menu button and choose Properties.
Click the Customize button in the dialogue box that shows (pictured above).
Check the boxes next to the options you want. Deselect the ones you don't. Click OK.
If you mess up, don't worry. Simply click Default Settings to restore your Start menu to its original state.
Say Hello to the Taskbar
Earlier in this article, we gave you a brief introduction to the Taskbar. However, it's important that we spend a little more time discussing it because it can be a huge convenience for you when you use your computer.
Remember, the taskbar is located to the right of the Start menu. It features programs you have open as well as favorites. The reason the taskbar looks different in , Windows 7 is because it's been overhauled to make it easier for you to see what you have open and to find the files, folders, or windows you need to access. If you need to, just scroll up in this article and see the thumbnails the taskbar showed us just by mousing over an icon, giving us a quick glimpse of all the Internet Explorer windows we had open.
Here's what else you need to know about the taskbar:
o If you want to open a program or window listed on the taskbar, simply click on it. It will then enlarge and appear on your desktop.
o Any program that you open will appear on the taskbar.
o To close a window on the taskbar, right click its icon and select Close.
o You can move the taskbar by dragging it. If that doesn't work, right click on the taskbar and make sure it isn't locked by clicking Lock the Taskbar.
o The new taskbar replaces the Quick Launch Toolbar.
Here are some other neat features:
o To send a window to the taskbar, simply minimize it. It will then be in the taskbar.
o If you right click on an icon in the taskbar, you can jump to different tasks. For example, if you right click on the Internet Explorer icon in the taskbar, you can jump to pages you've visited recently, but shut down. There's no longer any need to type the addresses in the address bar on Internet Explorer because they're right there in your recent history on the taskbar.
About Toolbars and the Taskbar
Did you know that you can also customize the taskbar? You can add an address bar to it or other buttons and menus to make your computing experience easier. Toolbars are used to customize your taskbar.
To access a toolbar or turn one off, right click in the taskbar area. Select Toolbars and choose the toolbar that you want to appear -- or disappear.
Below you'll see the toolbar options, as well as a brief explanation of what each one does.
o Address. This toolbar will add an address window where you can type web addresses that you want to visit.
o Links. This gives you instant access to your favorite websites. When you click on it, you can access any site you have bookmarked in your Internet Explorer favorites menu.
o Tablet PC Input Panel. This is only for Tablet PC owners, but it translates pad writings into text.
o Desktop. This gives you access to the folders, files, and programs on your PC by letting you go through all the menus.
o New Toolbar. This allows you to add a folder to the taskbar. For example, the Documents folder.
Having Fun with Gadgets
As we stated earlier, gadgets in Windows 7 are kind of like magnets. They stick to your desktop and remain there until you remove them.
To access the gadgets, right click anywhere on your desktop.
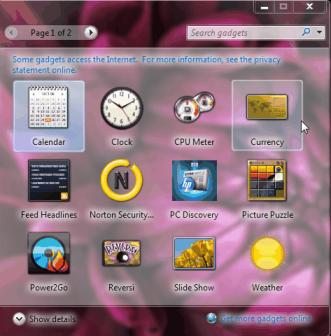
Select the gadget, then drop and drag it to your desktop. You can also click Get More Gadgets Online if you don't see one you like.