It almost goes without saying that Windows 7 is endlessly customizable. These days, a person's computer is as distinctive as their haircut or their style of clothes. In Windows 7, you use the Control Panel to customize your computing experience.
Using the Control Panel
So let's take a look at the Control Panel and explore some of the options available to us. To launch the Control Panel, select Control Panel from the Start Menu. It will look something like this:
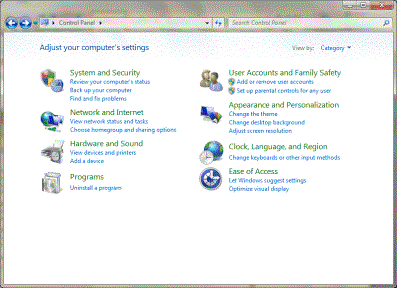
I know what you're thinking. You're thinking, "Hey, that doesn't look too intimidating." And you're right. The friendly folks at Microsoft have attempted to simplify the search for the right function by conveniently arranging them into categories. In fact, this is called the "Category View."
So let's say you wanted to turn off automatic updates or defragment your hard drive. You'd simply click "System and Security" and the functions associated with that category would appear. Easy, huh?
To make it even easier, a few of the most commonly used functions associated with each category appear in blue under each headline.
But what if you are not sure what category a function would fall under? That's easy too. See in the upper right hand corner where it says "View By: Category"? Click the word "Category" and you'll see two more viewing options. They are Small Icons and Large Icons. Selecting either of these options will switch to that view. Below is an example of Small Icons View.
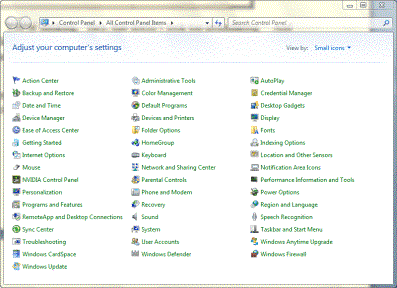
As you can see, it's slightly more cluttered, but may help you find exactly what you're looking for without clicking through a bunch of categories.
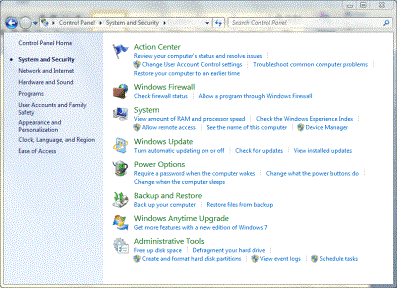
System and Security
This is where we will find all the options associated with system maintenance and security. For instance, if you wanted to check the status of your firewall, or turn on automatic updating, you'd come here. These are the nuts and bolts aspects of your computer that can keep it running smoothly and efficiently.
For now, I just want you to get familiar with the options available to you. That way when the times come when you do need to access one of these features, you'll know exactly where to find it.
Parental Controls
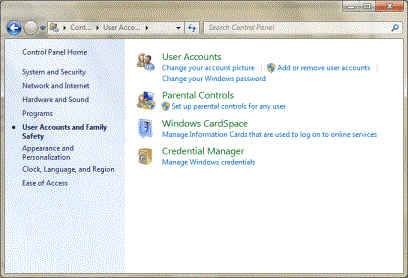
Now go back to the Control Panel and click User Accounts and Family Safety.
The Parental Controls allows you to set up restrictions on your child's account. For example, you can specify when they are allowed to log in, as well as what websites they can view, and what games they can play. This feature also allows you to prevent them from installing any potentially malicious or questionable software.
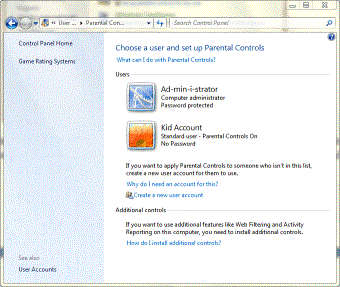
In order to apply parental controls, the first step is to create a new account for your child. As soon as the account is created, it will appear under the administrator (which is you, of course) in the Users column. Now click on the kid's account.
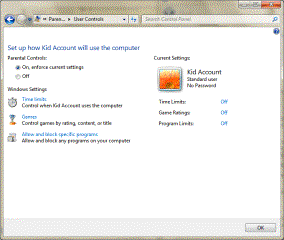
In this window, you are able to turn parental controls on or off, as well as set other restrictions. Let's take a closer look at those restrictions.
Time Limits
Time limits allows you to create a window when the child is allowed to log into their account. For instance, you may not want them to be able use the computer immediately after school in order to give them time to do their homework. Or perhaps you don't want them to use the computer before bed. To do this, click Time limits.
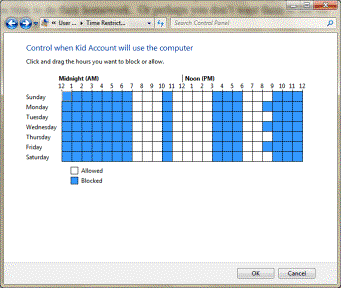
As you can see in the above example, each hour is broken down into 1-hour blocks, starting and ending at midnight. The blue squares represent times when the kid cannot use the computer, and the white ones represent the time when he or she is allowed. To select a square, simply click on it. To select several squares at once, simply click in one square and drag your mouse over the others.
If the child tries to sign in during a time that isn't allowed, Windows will tell him or her to try again some other time.
Games
If you have any games installed on your computer, you can use this feature to prevent your child from playing them. This may be especially important if you have children of different ages. For instance, you may feel it is appropriate for your teenage son to play Mature or Teen games, but completely inappropriate for your 6-year-old daughter to play them.
To set game restrictions, click "Games."
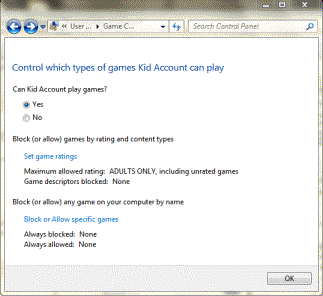
In this window, you can decide whether or not the user of this account can play games at all. If you select "No", "Set game ratings" and "Block or Allow specific games" will no longer be highlighted, meaning those options are no longer available.
Use "Set game ratings" to determine which type of games your child can play.
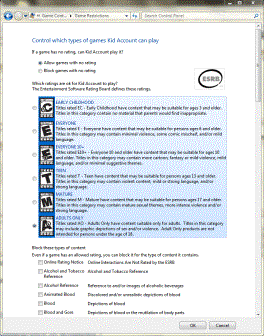
As you can see, you now have the option of blocking games by ESRB rating, or by content. For instance, if your child is not allowed to play games with animated depictions of blood, you can click that box to check it. A checked box excludes that content. Some games are not rated by ESRB and may contain questionable content that will not be blocked by checking any of these boxes. If you don't want to risk this, make sure you check "Block games with no rating" at the top of the window.
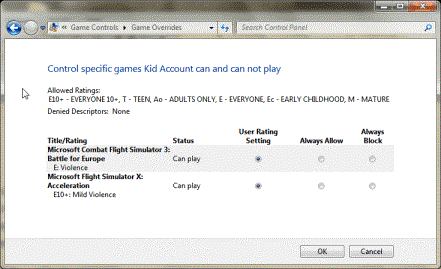
Allow and Block Specific Games
Use this feature to block any particular game that has been installed on your computer. Please note that you cannot block games that may be installed in the future. So if you bought "Zombie Deathmatch" for your teenage son for his birthday, and don't want your 8-year-old daughter to play it, you will have to launch this feature and block it on her account as soon as it's installed. This simply lists the games that are currently installed on your computer.
Changing the Appearance of Windows 7
Computers are almost like cars. Have you ever borrowed somebody else's car? You settle in behind the wheel, only to realize that the seat is too far back or too far forward, the mirror is in the wrong position, the radio is set to all the wrong stations and they have an old scented pine tree in there that smells like old socks or onions. You immediately begin to miss your own comfortable car.
The same is true of your computer. In this section, we're going to learn how to make Windows reflect our personality. So let's go back to the Control Panel and select "Appearance and Personalization." The resulting window looks like this:
As you can see, we're given a bunch of new categories. You see things like Personalization, Display, Desktop Gadgets, and you realize there's a lot of stuff in there. In fact, there's enough stuff here to keep you busy for a week! The best way to see all of what Windows 7 has to offer is to go through each item and experiment with the settings, see what you like.
You can select new themes and colors, sound effects and screen resolution.
Hardware and Sound
Use this button to manage the hardware that is connected to your computer. Most of the time, when you plug a piece of hardware in to your computer, Windows automatically detects it and installs the driver. If Windows cannot find a driver for the device, it will ask you to insert the disk that came with it.
Sometimes, however, you will have to install a device manually. If that is the case, click "Add a device." Windows will search your system for any device that has been connected, but does not yet have a driver associated with it. In the following example, Windows found a printer on the network.
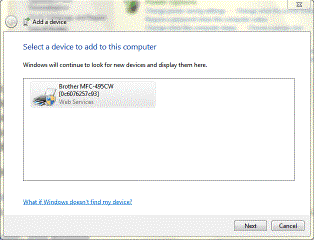
To install the driver, simply select the device and click Next. Then follow the prompts until the device has been successfully installed.

You can view a list of installed devices and change any device's properties by clicking "Devices and Printers."
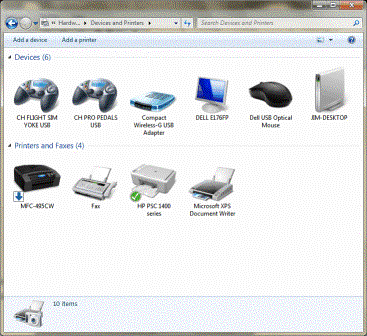
Double-click the device to see and adjust its properties. The options available are unique to each device.
Clock, Language, and Region
When you first run Windows 7, you will be asked to set the clock and select a language and region, and in most cases, you won't ever have to change them again. But if you do, you can change them by using this button.
Adding and/or Removing Programs
If you need to add or remove a program, go to the Control Panel and click Programs. That's easy enough, isn't it? Most of the time, when adding a program, the software manufacturer will include a Windows installer that will launch automatically, and place all of the necessary files in the appropriate places. If the installer doesn't begin automatically, you may have to click on the program's installer package. (These can be found on the software's disk, or, if you downloaded it from the internet, in the file that was downloaded.)
To uninstall a program, you'll have to click Programs and Features (or "Uninstall a program" right under it.) This will show you a list of the programs that are installed on your computer.
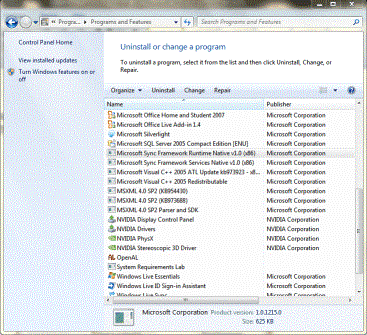
To launch the uninstaller for that program, click on a program to select it, then click "Uninstall." Then simply follow the prompts included in the uninstall package.
Add or Remove Parts of Windows 7
To add or remove parts of Windows 7, click "Turn Windows features on or off." This will show you a list of all of the available Windows 7 features that are available to you.
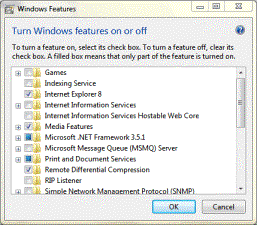
To add features, click a box to check an item. To remove a feature, clear the check. Windows will take care of the rest.
Modifying Windows 7 for Physically Challenged Users
From the Control Panel, choose "Ease of Access", then "Ease of Access Center." When you launch this section, by default, a voice will read all of the items on the page. This is to help people with vision problems set up their computer.
Take a moment to browse all of the options available on this screen. It gives you a lot of powerful tools to set up your computer in a way that can be easier for you to use.

Note the box close to the top that say, "Always read this section aloud." If you don't want the narrator to read the items on this screen aloud, uncheck this box.
o Start Magnifier-Use this to launch a program that will make it easier to magnify a certain section of the screen.
o Start Narrator-Use the narrator if you want Windows to read the contents of screens to you.
o Start On-Screen Keyboard-This will launch a clickable keyboard.
o Set up High Contrast-Use this to eliminate nearly all colors on the screen. This creates a black and white Windows environment that helps people with vision problems see it better.