
Just like other Microsoft Office software, PowerPoint 2019 has several features that let you print copies or have other recipients review your slides before you present them.
Previewing Slideshows
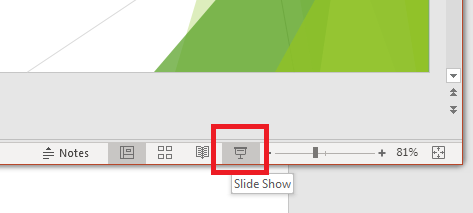
Before displaying a slideshow to a large audience, you should review the way slides look on a projector or on your computer screen. PowerPoint has several different views for viewing slides, but the software has a specific button for starting a presentation at the beginning and moving through each slide as you present your topics. The button can be found at the bottom-right section of the PowerPoint window.
(Start a slide show)
The bottom-right section of the PowerPoint 2019 interface has several buttons to change views with one click of the mouse instead of navigating to the "View" tab. These are shortcut buttons. The default view is the first button, and the last button is the "Slide Show" button. Clicking this button expands the PowerPoint interface to fit the entire screen.
When the presentation starts, you have buttons at the top that let you exit full-screen mode. Arrow buttons at the bottom of the window point to the left and the right. The left arrow button takes viewers to the previous slide. The arrow button that points to the right moves to the next slide. You can also use a keyboard's spacebar key to move to the next slide. This section also tells you the number of total slides in your presentation, and it tells the number of the currently viewing slide.
If you have dual monitors, one monitor displays slides in full-screen mode, and the second monitor displays information about the presentation such as the next slide to come up in the series and the ability to show the Windows taskbar and end the slideshow.
Printing Slides
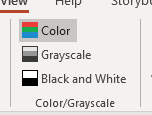
Before you print slides, you should decide if you want to print in full color or using grayscale. Click the "View" tab. The color options can be found in the "Color/Grayscale" section of the menu.
(Color/Grayscale menu print options)
If you have only a black and white printer, then choosing "Color" might give you a poor print copy from your printer. The default selection is "Color" since your slideshows during display will be in color, but if you only have a black-and-white printer then you should choose either "Grayscale" or "Black and White." Grayscale will transform colors into shades of gray. It's the preferred way to print black and white copies.
If you have an older printer that does not support grayscale or it only prints low quality, then the "Black and White" option will translate images and background colors into black. Only use this option if you have plain slides with text and SmartArt that don't require gray colors in a print job.
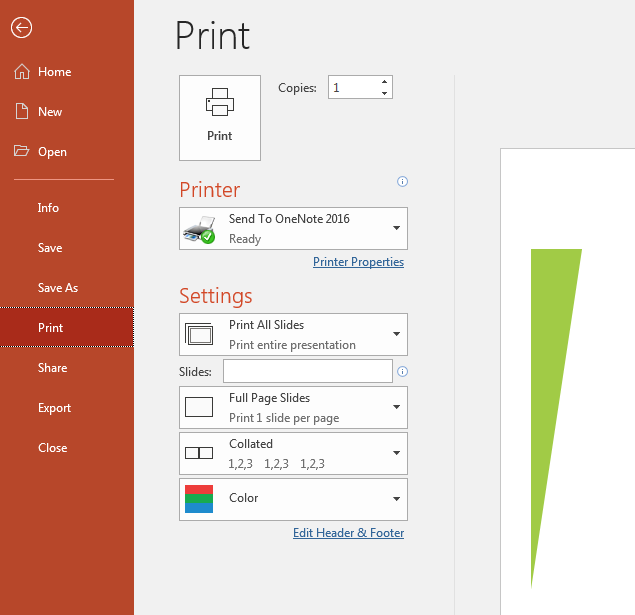
Print options are found in the "File" tab. After you click the tab, a left panel of options display. Click "Print" to review print options before you send the slideshow to a printer.
(Print options)
In the "Settings" section, you see that you can print in several different ways. The first option lets you set the slides that you want to print. You don't have to print all of them. Instead, you can print specific slides. This is useful when you have several slides in your presentation and only need to print a few pages.
The second option lets you determine the size of your slides. By default, PowerPoint prints one slide per page in full size. If you don't need a slide to take an entire page, you can print several slides per page. PowerPoint reduces the size of each slide to print them on one page. For instance, you can print 4 slides per page, which will print two slides per column and row reduced to fit the size limitation.
The color option is again useful if you don't have a color printer. If you only have a black-and-white printer, choosing "Color" will have poor print results. Instead, choose "Grayscale" unless you have an old printer and need to simply print in only black and white.
Exporting Presentations to a New File Format
It's common to publish PowerPoint 2019 presentations in other formats. Other formats make it easier for a user to view slideshows if they don't have PowerPoint installed on their computer. If you send a PowerPoint presentation to a third party but they don't have PowerPoint, then you must convert it to a different file format so that it can be read. You can do this by exporting a presentation to a different file format commonly supported by most operating systems. For instance, exporting to a PDF will ensure that the recipient can read your slides.
Click the "File" tab and a secondary menu displays in the left pane. Click "Export" and you'll see several options.
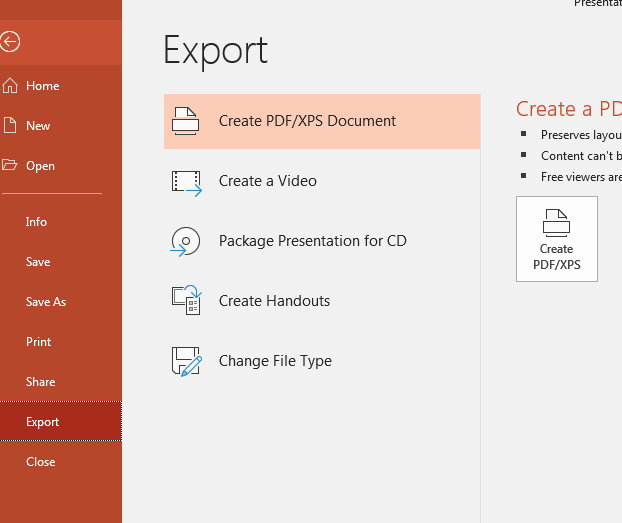
(Export options)
In the export options, you can export to several file formats including video. The first option is to export files to PDF, which is a globally support format for users that have Adobe Reader installed. Adobe Reader is free and included with some operating systems. If users do not have Adobe Reader, they can download it from the official Adobe site and install it for free.
If you prefer publishing your slides on public video platforms, you can choose the "Create a Video" option. This will turn your slideshow into a video where you can share it on any popular video site.
The "Change File Type" option will open a dialog window where you can specifically choose a file type. A panel displays with popular alternative file types. For instance, you can save a PowerPoint presentation as a JPEG image file. If you don't see the file type that you prefer, click the "Save As" button in the "Other File Types" section. A "Save As" dialog window opens where you can choose an alternative file format from the "Save As type" dropdown menu. Give your file a name and click "Save." The file is exported to the file type of your choice.
Sharing Presentations
Sharing presentations is useful if you work in the enterprise with a group of people that must be able to review your slides. Click the "File" tab. In the left control panel, click "Share" and a window opens where you can share slides with other recipients.
If you're an individual and just need to share slides with other people, a OneDrive window opens when you click the "Share" option.
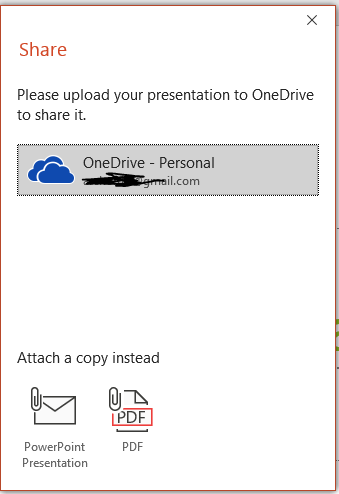
(Sharing a presentation)
You can save the presentation on a OneDrive cloud account, and then share it from this location. You can share with individual users or enterprise users located in a collaborative group. One benefit of sharing in the cloud is that you can share with anyone who has Internet access. OneCloud is Microsoft's cloud sharing service that's available with any Office application.
After you've shared a presentation, you can revoke privileges and remove access at any time. Just remember to share presentation files with only recipients that you trust using OneDrive's permission options.