Permission Messages
Although Windows 7 is a lot better than Vista, sometimes it still can't distinguish between you trying to do something on your computer and a virus. Just to make sure it's not a virus, Windows 7 will let you know when it notices anybody or anything trying to make a change. This will be in the form of a warning message. It will look similar to the message below:
At this time, you have to decide if you were doing something that would cause the message -- or if it's a virus. If you're trying to do something, simply click YES.
Be warned, though! If you're trying to make changes and you're not an administrator, you will have to track down the administrator and have them allow the changes under their administrator account.
The Action Center
You can check how safe your computer is in the Windows 7 Action Center. This Action Center can be accessed from the Control Panel. It will inform you of any problems that it finds with your computer's defenses and offer solutions that just take a click of the mouse. You'll see it appear as a white flag icon in the taskbar.
A picture of the Action Center is shown below.
Once in the Action Center, you'll be able to tell the severity of threats to your computer by the color of the band to the left. A red band means there are critical problems that you need to address immediately. A yellow band indicates problems that need attention soon.
Changing Firewall Settings
Firewalls exist to protect you from unknown invaders getting into your computers. Although this can mean hackers, it can also protect you from sites that want to send cookies and other means of tracking to your computer. Think of your firewall as the doorman for your computer, checking ID and making sure that only those who are friendly visitors are allowed in and blocking all the rest.
However, that doesn't mean that the firewall won't block a program or website that you want to allow in. This can happen with a multi-player game or a file sharing program.
To adjust your firewall's settings, go to the Control Panel and click Windows Firewall. If you don't see this option, click System and Security.
To allow a program to access your computer, click Allow a Program or Feature Through Windows Firewall.
Windows will then show you a list of programs that are currently allowed to access your computer. Click the Change Settings Button.
The Allow Another Program button is now activated. Click on it.
Find the program that you want to allow and click Add.
Changing Windows Update Settings
Windows Updates are simply security updates to your Windows 7. They can also include updates to Microsoft programs such as Internet Explorer. These are updates you'll want to make, and they are also updates that are made automatically if you have it enabled. You can make sure that Windows Update is turned on by visiting the Action Center.
If you don't want updates to be downloaded and made automatically, that's fine too. It's certainly not putting your computer at risk as long as you check for updates regularly, review them, then make the ones that are critical to your computer's safety.
To manually change the settings for Windows Update or to review the updates before they're made, go to Start>All Programs>Windows Update.
As you can see in the snapshot above, you can use this window to check for updates. You can also change the settings for updates by clicking the link on the left.
On our computer, the updates are installed automatically. We have the frequency and time of the updates scheduled. That way, it doesn't affect us when we're on the computer.
If you don't want to update automatically, you can also select from these choices by clicking the downward arrow:
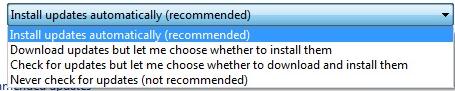
Make all the changes you feel necessary, then click OK.
How to Avoid Viruses
Although there's no way to prevent every virus from getting into your computer, you can drastically reduce your chance of infection by following the steps we've listed below.
o Scan everything you download using your anti-virus program. Also scan emails and instant messages.
o Don't open email attachments if you're not expecting them. Contact trusted senders through email or by phone and ask if they actually sent the attachment. If it's not a trusted sender, delete the email.
o Don't try to be extra safe and install two anti-virus programs. They'll argue and, while they argue, a virus can sneak in.
o An antivirus program is a good start, but it's not enough. Make sure your virus definitions are up-to-date as well so all the latest viruses will be detected by your checker program.
o Keep your firewall turned on, no matter how annoying it can be at times.
o Avoid adult sites and other sites that are famous for damaging computers.
Setting Parental Controls
Parental controls in Windows 7 allow you to set time limits for your children to be on the pc by specifying when they may log on. You can also restrict games and allow/block programs.
To set parental controls, go to Start>Control Panel>User Accounts, then click Parental Controls on the bottom left of the window (as pictured below).
Select the user account that you want to restrict.
Under Parental Controls, turn the enforcement on. Then use Windows Settings to limit activity.
Using Windows Defender
Windows Defender detects and destroys spyware and other parasites before they have a chance to attach themselves to your computer -- or those that have already attached. You may be familiar with Defender from Windows Vista.
To use Windows Defender to scan your PC for spyware and such, go to the Start menu and type Windows Defender in the search box. Open the program.
Prevent Windows Crashes
We've all heard the horror stories about the illusive "blue screen of death"-an event that's supposed to tell you that your computer has just shuffled off the electrical coil. (You can say it in hushed, ominous tones and add an "oooh weee ooooh," if you want.) You may have even seen one in the early days of personal computers. These days, however, they are quite uncommon. Windows, despite a competitor's claim to the contrary, is a very stable operating system.
In fact, when you think about how many different components make up a personal computer, each made by a different manufacturer, and each manufacturer having its own quality control standards and device drivers, it's actually quite an accomplishment for a single operating to make them work together seamlessly.
Having said that, though, computers sometimes do crash, the power sometimes goes out unexpectedly, and device drivers sometimes don't work as well as they're supposed to. And it's always better to be safe than sorry, isn't it?
In this lesson, we'll show you what steps you can take to prepare for the unexpected, as well as what steps you can take to recover your computer if the unexpected happens.
System Restore
Before we explain what System Restore is, we ought to tell you what it is not. For the record, it is not a means to recover lost documents, emails or photos. So if you're working on a Word document and the power goes out before you can save it, using System Restore is not going to bring that document back from the dead. What system restore will do is roll back changes made to your computer. So let's say you installed some new software, but it doesn't work exactly as advertised. In fact, it's made your computer work in unpleasant and unpredictable ways. You try uninstalling the software, but that doesn't really work. Your next option is to use System Restore to return your computer to the condition it was in before you installed the software.
So how does it work?
Windows uses these things called "Restore Points", which are created automatically every week, or whenever a change is made to your computer, such as the installation of new software or drivers. They're like little snapshots of your computer's configuration files. When you use system restore, Windows simply removes all of the configuration files that were created after that point, and replaces them with the saved files.
To use System Restore, launch the Control Panel and select System and Security, then Backup and Restore. From the Backup and Restore menu, select "Recover system settings or your computer." This will launch the Recovery menu, which looks like this:
As you can see, it reminds you that using System Restore will mean that your documents and personal files will remain unchanged, but that it may remove recently installed programs and drivers. Click "Open System Restore" then click Next. You will see a list of available restore points, as well as the date and time they were created.
To select a restore point, simply click on it, then click next. If you're worried about the programs that might be removed by a restore point, you can click on it, then select "Scan for affected programs." This will show you a list of the programs that will be deleted and a list of the programs that may be restored.
If you are satisfied with this restore point, click Close to return to the System Restore window. You can then click Next to continue on to the next step, which is to confirm the system restore point. Click "Finish" when you're ready to restore your system. As the window warns, your computer will need to restart to complete the process.
Back Up Your Computer
A backup is similar to a restore point, except that instead of just configuration files and system settings, your personal files and programs can also be saved. If you choose to create a system image (which we'll discuss in greater detail in just a moment), you can even use that system image as a restore point.
Unlike System Restore, Windows does not automatically create one. Before you can use the feature, you will have to set it up. To do so, launch the Control Panel and select System and Security, then Backup and Restore. As you can see in the example below, Backup has not been set up. Click the shield in the upper right hand corner of the window that says "Set up backup."
The next step will scan your computer and let you know where you can save the backup. You can save a backup to an internal or external drive, a network drive, or to CD or DVD drives. However, if you choose to back up your files to CDs or DVDs, Windows cannot be set up to automatically back up your files at intervals. If you choose "Save on network", you will be asked to specify a network directory and to enter a user name and password if one is required.
Select a destination drive, then click Next.

Here you can elect whether to use the Windows default settings, or select your own. If you'd only like to back up certain files, and exclude others, select "Let me choose." Then click Next.

Remember earlier when we told you we'd explain what a system image is a little bit later? Well, it's a little bit later. A system image is an exact copy of your hard drive. It includes all of your personal folders-all of your documents, pictures, videos, music, etc.-as well as the system files that are required for Windows to even run. So if you restore your computer using a system image, it will be returned to the exact state it was in when the system image was created.
It should be noted, however, that unlike an ordinary backup, when you restore using a system image, you cannot choose which files to recover. It simply copies this system image back onto the original drive. Anything you created or installed after the image was made will be lost, that includes personal documents, software, and settings.
Using the Built-in Maintenance tools
The folks at Microsoft naturally want you to have the best computing experience possible. In order for that to happen, your computer must run at peak efficiency. To help your computer maintain peak efficiency, they've built several maintenance tools right into the system. What's more, most of them are set to run automatically.
A few of the programs you'll use most frequently are:
o Windows Update-Sometimes manufacturers make changes (usually fixes for problems or improvements) to their software. Windows will automatically scan your computer for programs, then check the web to see if any of those programs have been updated. If so, Windows will automatically download and install them.
o Disk Defragmenter-This program rearranges files on your hard drive to make your computer run more efficiently. We'll discuss how to use it later in this lesson.
o Backup and Restore-This function we've already talked about.
Technical Information about Your Computer
Knowing where to find the technical information about your computer is like knowing where to find your automobile insurance. You don't tend to look at it on a day to day basis, but it's sure nice to be able to find it quickly when you need it.
To find information about your computer, launch the Control Panel, then click "System and Security" and "System." This will show you a screen that looks like this:
This screen gives you a whole bunch of information that comes in handy when you're talking to tech support. It tells you what operating system you're using, what type of processor your using and it's speed (2.70 GHz in this instance), and how much memory you have. It also tells you whether Windows has been activated or not and if the copy on your computer is Genuine.
Free Up Space On Your Hard Drive
Let's face it, today's computers can get very cluttered. After all, we practically live on them anymore. We "tweet", we maintain our relationships through Facebook, we read the news, watch videos, write documents, listen to music, and much more. What's more, every time we visit a web page, Windows automatically saves some information about it so that it'll load more quickly next time you visit it. Every time you install software, certain setup files might be left behind.
Now, in all honesty, this stuff really doesn't amount to much, considering that some computers have a storage capacity of one terabyte (which is one thousand gigabytes-which is a lot of disk space). In fact, if you go into the start menu and click "Computer", you'd see a representation of the drives installed on your computer and they'd probably look a lot like this:
The blue portion, of course, represents the amount of disk space that is being used. All that white space? Yep, you got it-available disk space. To put all that white space into perspective, you could still install 200 hours of movies or 40,000 songs on this drive before you maxed it out.
So the information from a few web pages and a few scattered setup files probably won't affect storage capacity too much. And on today's computers, with their lightning fast dual- and quad-core processors, it's probably not going to affect efficiency too much, either. To tell the truth, disk cleanup is really just a holdover from that time when disk space was limited and processor and memory speed was relatively slow. In those days, all of those saved, superfluous files could certainly affect the efficiency of your computer. It'd be like having to dig through a pile of papers to find a single note.
Of course, if you do think your computer is running a little sluggishly, you could try to delete these files. To do so, go to the start menu, click Control Panel, then System and Security. Now, look at the bottom of the window where it says "Administrator Tools."

Click "Free up disk space." This will launch a new window which will ask you which drive you'd like to clean up. Choose one and click next. Windows will then scan the drive and tell you how much disk space you'll be able to save. It will also give you the opportunity to include or exclude certain folders.
Simply select the folders you'd like to include, then click OK. Windows will perform the task.
Defragmenting Your Hard Drive
Another routine maintenance task you can do if your computer seems to be running sluggishly is called "Defragmenting." It's like spring cleaning for your computer. Before I show you how to use it, though, I should probably explain how your computer works.
Now, you probably know that all of your computer's files are stored on the hard drive. Well, when you launch a program, the computer sends only the files it will need up to a temporary location, which is RAM. (That's why the more RAM you have, the more programs you can run at the same time.)
Well, naturally it won't need all of the files for that program all the time, so while the program is running, Windows is constantly shuffling files to and from the hard drive to the RAM location. And these files don't always go back to where they started from. They can get scattered all over the hard drive. Which means it'll take Windows just a little bit longer to locate the files next time it needs them.
You can think of it like a disorganized wood worker not putting his tools back where they belong.pretty soon he's going to start scratching his head and turning in circles, wondering just where he set down his tape measure or his rasp. He may even start cursing.
So to keep Windows from cursing, you'd run the disk defragmenter. It's basically a program that comes in behind the disorganized wood worker and puts all the tools back in their assigned locations.
The defragmenter is located right next to "Free up disk space" under Administrative Tools on the Control Panel, and there is a reason for this. It's always best to run disk cleanup before defragmenting the drives. That way, Windows won't be shuffling around unnecessary files.
So let's take a look at the Disk Defragmenter screen. As you can see in the section titled "Schedule", Windows automatically runs disk defragmenter at 1:00 AM every Wednesday. You can easily change these settings by clicking "Configure schedule." Just remember that defragmenting a drive can use a lot of system resources, so you probably don't want to do it at a time when you're actively using your computer. And if you have big disks and a lot of files, it can take a long time to complete-sometimes several hours.
If you're not sure if a disk needs defragmented, select the drive and click "Analyze Disk." If you take another look at disk C in the example above, you'll see that it is 1% fragmented. The others are not fragmented at all. 1% really doesn't matter much, certainly not enough to significantly affect your computer's efficiency, but when it gets to 30%, 50%, or (yikes) 80%, it's a good idea to defragment the drive.
To do so, simply select a drive (or all of them) and click "Defragment disk."