If you've ever seen a spreadsheet, or used a program such as Excel, then you're probably pretty familiar with tables. That's all tables are, after all-simply a grid arranged into columns and rows. You can use them to organize and emphasize certain pieces of information. More than that, you can use tables to do complex page layout operations that almost rival expensive professional publishing programs like Adobe InDesign.
Inserting Tables
Before we identify the different parts of a table, let's go ahead and insert one into our document. To do this, position the cursor at the point in the document where you want to put the table. Don't worry if it's not exactly right-you can always move or manipulate it later.
The tool you're going to use to insert a table is almost directly under the Insert tab. It looks like this:
Here's an example of a 3 X 3 table using Insert Table:
We know that, without having to count each box, because Word tells us with the text right above the boxes. See where it says "3x3 Table"? Cool, huh? And convenient.
To insert this simple table, click the mouse.

We now have a basic table. So let's identify the parts.
Each box is called a "Cell." There are 9 cells in the example above.
The "Rows" go from top to bottom. In the example below, the rows are numbered from one to three and the 1st row is highlighted.

Columns go from left to right. In this example, the columns are numbered and the middle column (2.) is highlighted. In a program such as Excel, the rows are usually expressed in numbers while the columns are expressed in letters. For instance, in our example Row 1, Column 2 might be expressed as 1b.

So now that we've identified the parts of a table, let's take a look at the other ways in which we can add them.
Using the Insert Table Dialogue
Once again, we're going to move the cursor to the point in the document where we want the table to appear. Now go back to the Insert tab, click the Insert Table tool, and select "Insert Table" instead of dragging your mouse over the boxes (which really represent cells, as we learned a second ago.)
From here you can select the number of rows and columns. In this example, there are going to be 5 columns, and 2 rows. Select your preferences in the AutoFit behavior section and then click OK. A table is automatically entered into your document.
By default, the column width will adjust automatically to fit the text and objects you insert into a cell. If you don't want this to happen, you can select "Fixed column width" and set a fixed value.
Drawing a Table
If you know your table is not going to be uniform (regularly sized columns and rows), you can "draw" a table. This is particularly helpful when using tables to create complex page layouts.
To do this, click the Insert Table tool and select Draw Table. Your mouse pointer will transform into a pencil tool and you'll be able to draw individual cells anywhere in your document. You can even draw cells within cells as I've done in the following example.
Click and hold the left mouse button, drag the cell into the desired size and shape, and then release. It's that simple.
Selecting parts of tables
You can select and change the attributes of any row, column, or individual cell.
Selecting an individual cell
To select an individual cell, right click on the cell and then choose SELECT > CELL. A selected cell will be highlighted in blue as in the following example.

Selecting a Row or a Column
There are two ways to select rows and columns. You can right click on a cell and choose SELECT > ROW or SELECT > COLUMN. This will select whatever row or column that particular cell is a part of. For instance, if you want to select column three in the example above, you'd have to right click any of the cells in the last column.
You can also click and hold on a cell, then drag the mouse through the cells you want to select. For instance, to highlight cells in the following example, we clicked on the cell in the first row and column, and, holding the left mouse button, dragged our pointer through the cell in the 2nd row, 2nd column.

You can select an entire table using either of those methods.
Adding Text to a Table
Adding text to a table is as easy as clicking into a cell and then typing. You will be able to change any attributes of that text, too, and even apply a Quick Style.
Converting Text into a Table
You can convert text into a table. This is especially handy if you've already written information that you think would be more effectively conveyed in a table.
To do this, you'll have to carve up the text into columns and rows using commas and new paragraphs. That's how you tell Word to separate the text into individual cells. Simply place a comma between the text you want to put into a column and place a paragraph where you want to begin a new row. An example of the text might look like this:
Now select the text, click the Insert Table tool and select "Convert Text To Table."
In the dialogue, select how many rows and columns you want, and then tell Word to separate the text at commas (frankly, it's just easiest.) In this example, we've selected three rows and three columns. Click OK.
Look at the example below to see the final result.

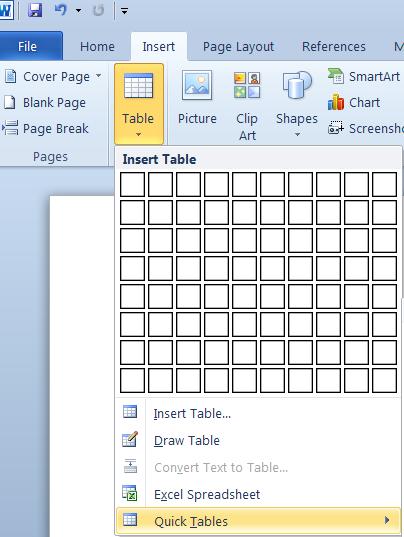
Quick Tables
Word 2010 comes with a group of table templates for you to use and quickly customize to fit your needs. You can access them by clicking the Insert Table tool and choosing Quick Tables. Scroll through the templates choose the one that best suits your needs. As with other kinds of tables, Word automatically inserts Quick Tables wherever the cursor is positioned in the document.
Once the Quick Table has been created, click the template text and start typing to replace it... You can also create your own Quick Tables by selecting a table that you've created and clicking the Save to Quick Table Gallery button at the bottom of the Quick Table menu.
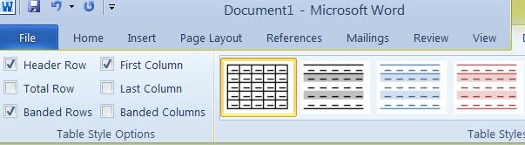
Formatting Tables with the Table Tools
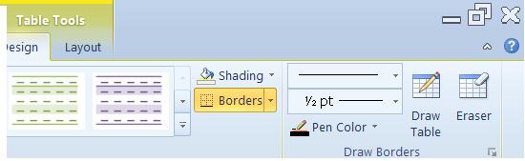
Whenever you create or select a table, the Table Tools will open automatically over the Design and Layout tabs in the tool bar. It allows you to easily apply table styles, borders, and shading attributes and more. Below is an example of the Design layout tools available for tables.

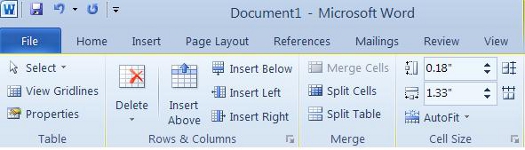
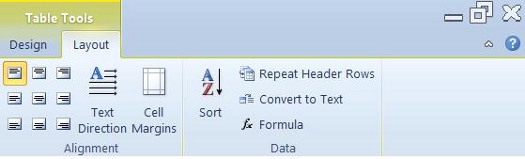
The Layout tab, when associated with the Table Tools, allows you to easily insert rows and columns, and format text and objects within cells. The Table Tools ribbon is below and the zoom of their left and right sections is below it.

Adjusting the Width of Individual Columns
There are several ways to adjust the width of individual columns:
o Position your mouse pointer over the edge of the column and then drag it to the desired width.
o Select the column, then go to the Table Tool/Layout tab and type a figure into the Width box as in the following example.
o Select a column, then click the arrow in the Cell Size group of the Layout ribbon and enter a value in the Column tab.
Adjusting Width of All Columns
To fix the width of all of the columns at once, select the entire table and use the Width box in the Table Tool/Layout tab to adjust the columns to the desired size.
You can also use the Distribute Columns button to make all of the columns the same size.
Adjust rows in the same way, except use the Height field.
Adding Rows and Columns
There are two ways to add a new row or column to a table.
1. Select a cell, row, or column and right click on it.
o Select Insert and one of the following
oInsert Columns to the Left
oInsert Columns to the Right
oInsert Rows Above
oInsert Rows Below
oInsert Cells
2. Select a cell, row, or column
o Navigate to the Table Tools/Layout tab
oChoose an option from the Rows & Columns section of the ribbon.
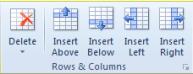
Deleting Cells, Rows or Columns
To delete a Cell, Row or Column, simply select it, navigate to the Table Tools/Layout tab, and click the Delete Button.
You will then have the option of deleting a cell, a row, a column, or the entire table.
You can also delete cells, rows and columns by right-clicking inside a cell. In the menu select Delete Cells. Click the appropriate command and click Ok.
Merging Cells and Splitting Cells
To merge cells, drag your mouse over the cells while holding the left mouse button to select them. In the Layout tab, select the Merge Cells button from the ribbon.  It is located in the Merge group on the ribbon. Alternatively, select the cells you'd like to merge and click the right mouse button. Select the Merge Cells from the menu.
To split a cell, select it by clicking on it, then click the Split Cell button on the ribbon.  This button is also found in the Merge group. Choose the number of rows and columns you'd like to split the cell into then click OK.
Split a table by clicking the Split Table button. 
Borders and Shading
The way information in a table is presented determines how easily it can be understood. Use the borders and shading features to control the look of a table.
The borders and shading tools can be found in the Table Styles group on the Design tab under Table Tools.
Microsoft Word 2010 provides some customizable templates. Roll your mouse over one of them, and you will see a preview in your selected table.
A drop cap is a simple embellishment that, if used correctly, can make your documents look more interesting and professional. Basically, it's a letter at the beginning of a section or paragraph that is larger than the text that follows it, but instead of extending upward (which is what it would do if you just tried to increase the font size for a single letter) it drops a few lines down:

Creating a drop cap in Word 2010 is incredibly easy. Just go to the Insert tab and click the Drop Cap button  in the Text section of the ribbon. The cursor should be positioned in the paragraph you'd like to add the drop cap to, but it doesn't necessarily have to be in front of the letter you want to add the effect to.
You can choose to place the drop cap within the paragraph or in the margins. To exercise a little more control over it, click Drop Cap Options. You'll then see a dialogue box that looks like this:
You can have the letter drop as many lines as you'd like, and even choose how much space to put between it and the text that follows.
Watermarks
You're probably familiar with watermarks. They can sometimes be seen stamped into expensive bond paper, and they are visible when you hold twenty-dollar-bills up to the light. You're probably thinking, though, "Cool, Word 2010 can do that?" The answer is, "Sort of."
A real watermark is stamped into a page with expensive equipment. All Word 2010 does, really, is allows you to place a light, printable image behind all the text and objects in a document. You can use it to add an effect to the document, mark it as a sample or draft, or even authenticate it.
Unlike most objects that can be inserted into a document, the watermark button isn't located on the Insert tab. Instead, to place one in your document, go to the Page Layout tab and look at the Page Background section of the ribbon. It is placed here because really, that's what a watermark is-a background. It cannot be manipulated or moved around like other objects.
Several watermarks were included with your copy of Word 2010. They are things like "Confidential", "Do Not Copy", "Draft" and "Urgent." If you are connected to the internet, you can easily browse watermarks that were created the Office 2010 community by clicking "More Watermarks from Office.com."
You can also create custom watermarks using pictures on your computer or text of your own. Just click "Custom Watermark." You'll see a screen that looks like this:
Choose your own language, font size and type, it's orientation to the page (called "Layout") and more. Type your text in the Text field (in the sample above the text chosen is "ASAP.") Click okay to apply it.
You can remove a watermark at any time by returning to the Page Layout tab, selecting watermark, and clicking "Remove Watermark."
Borders and Shading
Borders can be applied to an entire page, an entire document, or just certain sections of the document. They can also be applied to paragraphs.