
Basics of a Conditional Statement
Every programming language has conditional statements. The always have the same, basic structure. An IF statement requires two parameters with an optional third parameter:
- The condition to evaluate
- What to do when the condition evaluates to true
- What to do when the condition evaluates to false
In Excel, the second and third conditions are optional, but the first evaluation condition is required. You can have nested IF statements within each other, which can make Excel formulas very complex.
IF statements use logical operators to evaluate conditions. There are several logical operators that are standard across all programming languages. The following operators are used in Excel:
= (equal to): a value must match the condition exactly
> (greater than): a value must be a higher value than the comparison value
>= (greater than or equal to): the value must be higher or equal to a comparison value. The value only needs to meet one condition (greater than or equal to) for the condition to return "true."
< (less than): the value must be lower than the comparison value.
<= (less than or equal to): the value must be lower or equal to a comparison value. Only one condition must be met (greater than or equal to) for the condition to return a value of "true."
<> (not equal to): the value does not equal the comparison value.
Logical errors are common when creating IF formulas, because just a simple mistake of using the wrong inequality symbol can make the entire calculation incorrect. The most common mistake is using a greater to or equal to condition when you only want to return true if a value is greater than another value. A value must only meet one condition with these statements to return true, and this can lead to accidental bugs in your Excel formulas.
The IF statement in Excel 2019 has the following syntax:
IF (<condition to evaluate>, <what to display if true>, <what to display if false>)
The first parameter is required, because it's the condition that you want to evaluate against a cell's stored value. The second parameter only processes if the condition from the first parameter returns "true." You can display a value or text, or you can proceed to an additional calculation using this second parameter. The third parameter is also optional. You can display nothing if a condition returns "false," or you can perform another calculation or display an alternative value. The way you set up your IF statement depends on the purpose of the calculation and the results that you want to display.
Simple IF Formulas
IF statements can be complex and nested, or you can use them for simple conditions. Using the "Expenses" spreadsheet example, you may want to flag any Internet payments over a certain threshold. This will tell you if you've spent too much on Internet bills by overpaying for bandwidth. You can do this with an IF function to display results in adjacent cells.
(Simple IF function example)
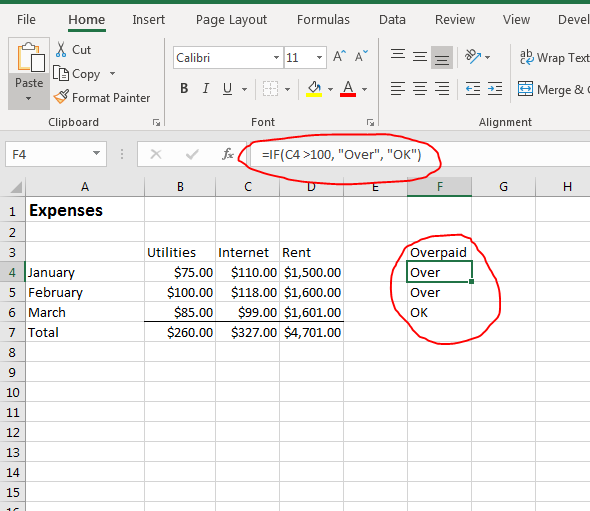
When you create complex IF statements, you don't need to retype the statement for every cell. You just need to type it once and copy and paste the original cell to each row that you want to evaluate. In the "Expenses" example spreadsheet, the goal is to display the text "Over" if an Internet payment is over $100.00. If a payment is not over $100.00, then the text "OK" will display instead.
The IF statement is typed in the F4 cell and instead of typing the IF statement again in the F5 row, the original C4 calculation was copied and pasted to F5 and F6. When you copy cells with formulas and functions, Excel automatically changes the referenced cell values to the new row number. This means that you only need to type a formula once, and then you can copy the same formula to several cells in the same column or row.
In this example, the condition is set to evaluate if a cell value is over 100. If the condition returns "true," then the text "Over" displays. If it is under 100, then the term "OK" is displayed.
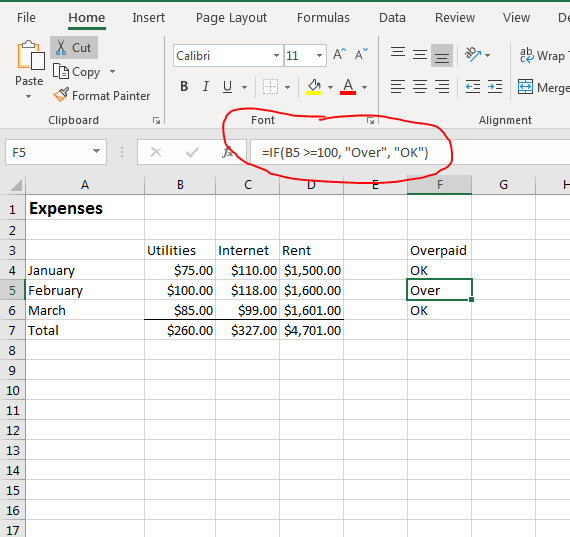
One issue with this example is that the condition uses the greater than logical expression, but it does not consider if the value is equal to 100. To fix this bug, you should use the "greater than or equal to" (>=) logical operator.
(Greater than or equal to example)
In the above example, the "Utilities" column is used instead of the "Internet" column because the utilities payments have a cell that equals $100. With the new column used in the IF function, you can see that the text "Over" displays in the selected cell. It displays "Over" because the value 100 meets one of the conditions (B5 is equal to 100).
Because the second or third parameter is optional, you don't need to display text in a cell for either a true or a false return condition result. You can optionally show nothing by leaving the parameter empty. For instance, instead of posting "OK" in a cell that does not meet the condition, you can leave the parameter empty and display nothing. However, when the parameter is not added, Excel displays "false" in the cell indicating that the return value is false for the evaluated condition.
To change this behavior, you can add a space character for the third parameter. This will emulate a blank cell without forcing Excel 2019 to display "false" in the selected cell.
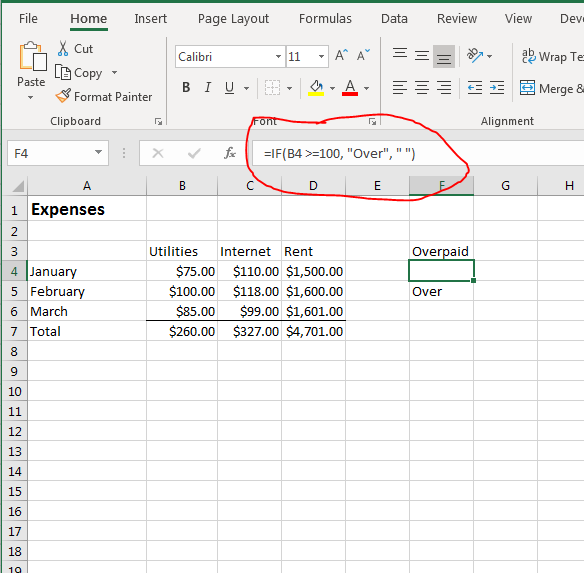
(IF function with blank parameter)
A space character displays as nothing in a cell, but to the Excel software it's a character that overwrites the standard "false" value that displays without it. You can switch the blank character to the second parameter, and Excel will display the space character when the condition evaluates to "true."
Nested IF Statements
Simple IF statements are great when you have only a cell or two to evaluate, but sometimes you need to evaluate two cells in relation to each other. You can next IF statements in a way that the inner IF statement is first evaluated, and then the outer IF statement is used to display results.
Multiple nested IF statements can be created to evaluate multiple conditions. For each parameter in the IF statement, you can add another IF statement to perform an additional evaluation. The more IF statements added to a formula, the more complex it becomes. Too many embedded IF statements can create very complex statements that can increase the chance of bugs. When you have several conditions that you want to evaluate, it's best to break out your IF statements and test them before you nest them within another. This will reduce the chance of errors in your calculations.
Nested IF statements have the following syntax:
IF(<condition>, <nested IF statement>, <nested IF statement>)
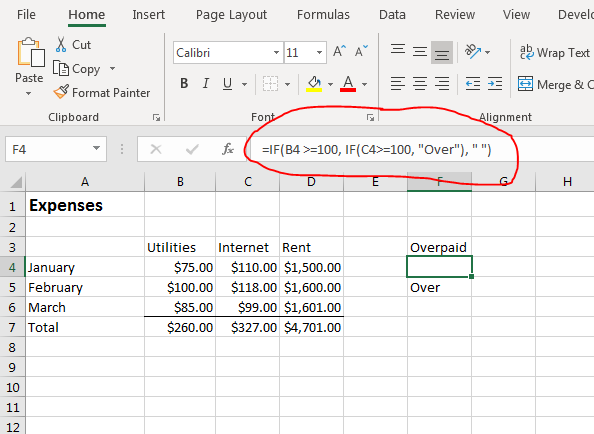
Because the second and third parameter are optional, you don't need to add either one to your nested functions. The main purpose of an IF statement is to control the value displayed should a certain condition result happen. For instance, you might want to display "Over" in an expense report when the value in the "Internet" column exceeds $100 and the value in the "Utilities" column exceeds $100 as well. You can perform this calculation by using a nested IF statement.
(Nested IF function example)
In this example, a nested IF function is placed in the outer IF statement's second parameter. By using this nested function, you can change the text displayed based on the second condition. With expenses, you might only want to show when utilities and Internet payments are over $100, and this statement will do just that.
The second parameter is evaluated first. It evaluates if the internet payments section has a value greater than or equal to 100. If the condition returns "true," then the returned result is "Over." Since this nested IF function is in the "true" parameter of the outer IF statement, this text value is returned if the outer IF function condition evaluates to "true."
When you work with nested IF statements, you add additional conditions that must be met before a specific result is displayed. In this example, the only way the "Over" text will display is if both the utilities payment and the internet payment are over $100. You can create even more complex nested IF statements by adding an additional one in the second nested IF function.
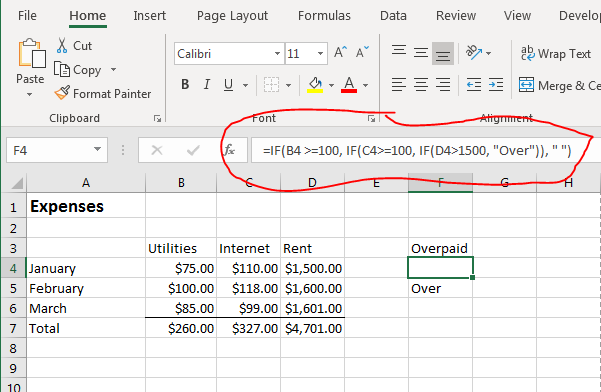
(Triple nested IF functions)
This example shows three nested IF statement within one formula. The result of these three nested IF statements is that you now evaluate and calculate all three rent, internet and utilities columns. These three statements combined will only display "Over" if all three column cells for each month are over $100. You can quickly see that only one month (February) has payments over $100 for each column.
With multiple, embedded IF statements you can perform multiple condition evaluations on a list of values before displaying any text in a cell. Nested IF statements can be complex, so you should test each individual statement before you use them in your calculations. With these nested IF statements, you can change the way values are displayed by changing conditions. By changing the condition's logical expression, you can change the information displayed in a spreadsheet.
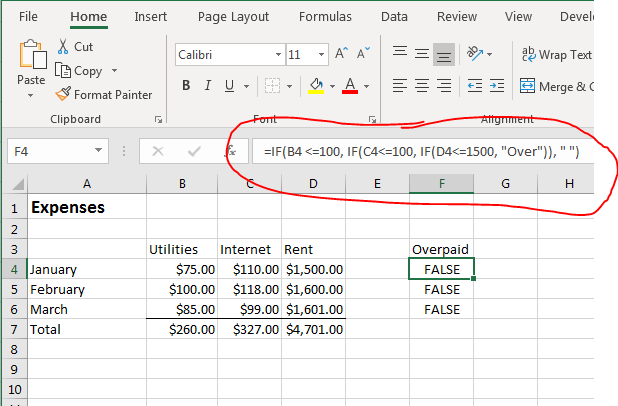
(Nested IF functions with opposite logical operators)
By changing the logical operators in each nested IF function, you completely change the displayed results. Because there is no alternative text in each IF statement, the only option for Excel 2019 to display text in a cell is to display a value of "false." Since none of the conditions return "true" in the inner IF functions, the result displayed is "false" since the most outer IF statement returns "true." The outer IF statement will then display what is returned from the inner functions, which is "false."
As you can see, nested IF functions can become very complex and lead to multiple logical errors. However, these nested functions can become very useful when you have several conditions that you want to evaluate before you display a value in a selected cell. Just remember that for each nested IF function, you add some complexity to your statement. Always test each individual statement in your nested functions before you use them for published spreadsheets.