Statements are reminders to your customers that they owe you money. They are usually sent out at the end of each month and give a summary of the user's account. While not entirely necessary, they are a good way to keep a customer engaged and aware of their account status.
They are also especially important when funds are overdue. Getting your payments in a quick and timely manner can mean the difference between your business staying afloat or sinking.
In this article, we'll look into the process of creating and sending out statements to your customers.
Statements
Statements should be sent out to customers who have past balances due. If you have already sent out an invoice for a current payment, it may not be necessary to send out a statement. Also, if the customer does not owe any money and has not made any new transactions, then statements can be unnecessary in that context, too.
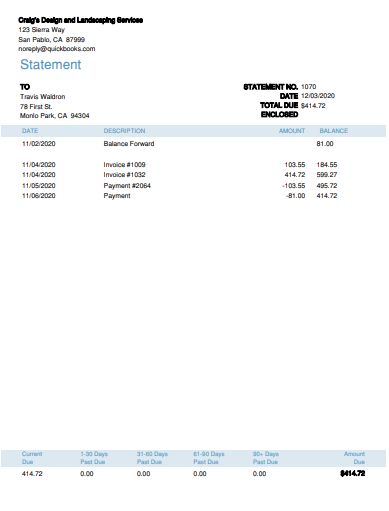
The information that appears in a statement includes transactions such as invoices, credit memos, sales receipts, and payments. An example of a statement looks as follows:
[Figure: An example receipt]
Statements should be sent out to relevant customers once a month. It's especially important to keep an eye on customers with late balances so that you remember to send out their statements. Before we start making statements, let's take a look at some ways that you can determine which customers need them sent.
Tracking Past Due Customers
One easy way to check if you have any past due customers is to simply glance at your dashboard. You will see a chart right there in the Invoices section that shows how much you are owed in overdue funds.
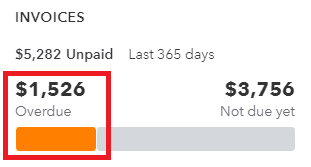
Clicking the graph will take you to the Invoices page under Sales in the left-side Navigation Pane. Here you can see the list of all invoices. Overdue invoices will have an orange exclamation mark next to them in the Status column. You can also see the amount and the date at which the invoice became overdue.
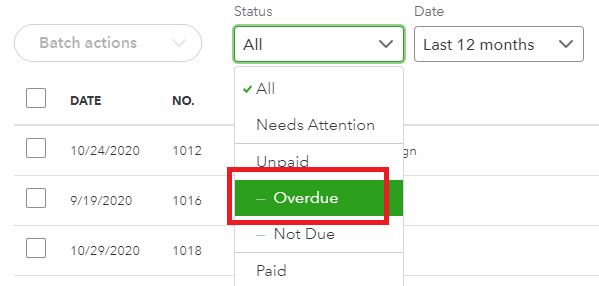
To see only the invoices that are overdue, you can filter by Status in the drop-down menu above the table.
[Figure: Filtering invoices by status]
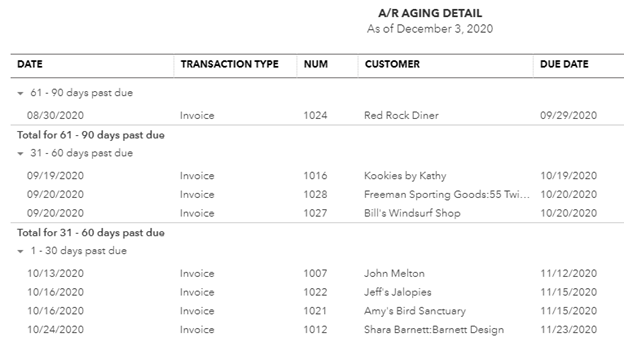
Another way to view overdue invoices is through Reports. Go to Reports from the left-side Navigation Pane and then scroll down to the section titled Who owes you. Here you will see reports titled Accounts receivable aging detail and Accounts receivable aging summary.
The first chart will show you unpaid invoices that are grouped by days past due. The oldest due will be shown at the top of the report, which looks like this:
[Figure: Accounts receivable aging detail report]
While the previous chart showed unpaid invoices, the second chart shows unpaid balances for each customer. They are also grouped by days past due, and the report looks like this:
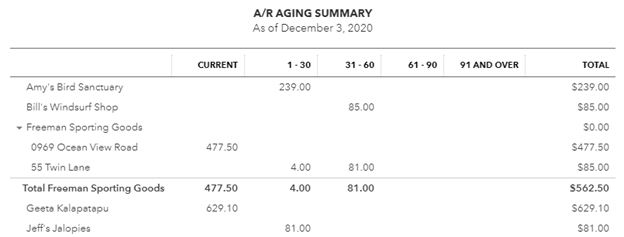
[Figure: Accounts receivable aging summary report]
Both of these reports will give you insight into your customers that are overdue on their payments and should therefore receive statements each month until they are paid off. Now that we've seen which customers need statements, let's take a look at how those statements can be generated.
Creating Statements for Multiple Customers
There are several different ways that statements can be generated. In general, they can be made for multiple customers at once, or else made one-by-one for customers that need it. We'll start this lesson by showing how to generate statements for multiple customers first.
We can start making statements by going to the left-side Navigation Pane and clicking the New button. You can find Statements in the Other column.

[Figure: Navigating to Statements]
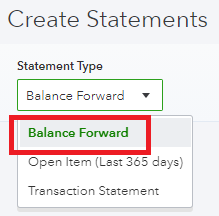
You will now be in the Create Statements window. The first thing you will need to do is pick a statement type. The types of statements are:
- Balance Forward. This type shows all of the invoices, payments, and credit notes within the specified time frame.
- Open Item (last 365 days). This type of statement shows invoices that have an open balance, which means an amount is still due on them.
- Transaction Statement. This type of statement has a list of transactions between the specified dates.
For these statements, we'll use Balance Forward.
[Figure: Selecting the statement type]
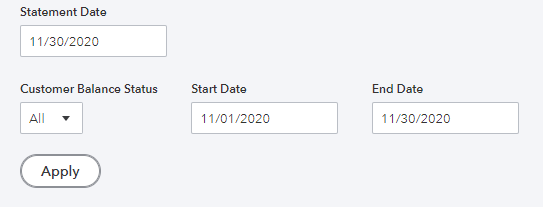
Next, we need to select a statement date. It's a good idea to choose the last day of the month.
You will also need to select the Start Date and End Date for the statement. The Start Date is typically the first day of the month, while the End Date is the last day of the month.
Additionally, decide on the Customer Balance Status, which can be All, Open, or Overdue. Choosing All will generate a statement to every customer while Open will generate statements for customers with an open balance and Overdue will just send to customers who owe money. We'll choose All for this example.
[Figure: Entering the Statement Date, Customer Balance Status, Start Date, and End Date]
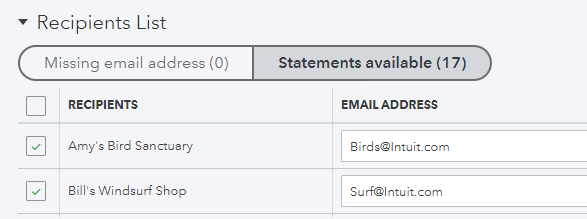
Once you are ready, click the Apply button. You will then see a list of recipients that can have statements generated.
Directly below the list's title are two buttons where you can see if any email addresses are missing and how many statements are available. Clicking on the Missing email addresses will filter out any customers with email address from the list.
The list has columns for the recipient name, email address, and balance. There's also a checkbox column on the left where you can deselect any customers that you don't want to send a statement to.
[Figure: List of statement recipients]
Before sending, you can preview the statements by clicking on the Print or Preview button at the bottom of the page.
You will then see a preview of all the statements loaded into your browser window. You are able to download a PDF file of all the statements from this screen, as well.
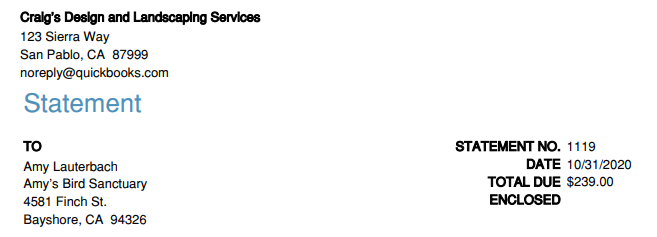
Looking at the statement, you can see how everything is organized. At the top-left is your company's information followed below by the customer's name and address. On the right side of the header is information about the statement number, date, and total due.
There is a blank space for an amount to be written in for how much the customer will enclose towards the total due if they reply by mail.
[Figure: Header information on a statement]
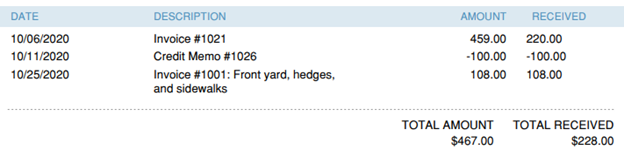
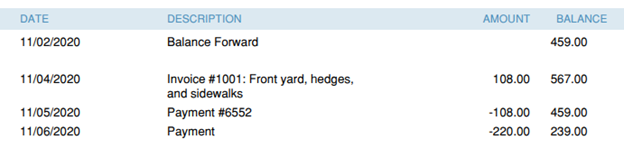
In the body of the statement, we can see a table of transactions relevant to the type of statement we created. The first line shows the balance brought over from the previous statement.
We can then see all the activity that happened in the account, including payments, invoices, and credit memos.
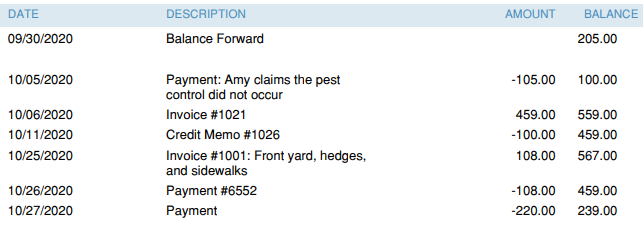
[Figure: Transactions in the balance forward statement]
Finally, at the bottom of the statement, we can see a summary of the amount due, including a breakdown of how past due each amount is.

[Figure: Bottom of the statement with past due notices]
While the statement above showed the result of a Balance Forward statement, we can also take a look at what the other types of statements will produce. Going back to the previous page, we can change the statement type to Open Item and click Apply.
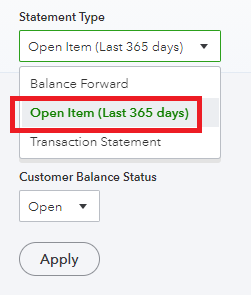
[Figure: Creating an Open Item statement]
Now, we can click Print or Preview at the bottom again to see what the statements look like. Looking at a statement for the same customer, we can see that it doesn't show all the transactions we previously saw.

[Figure: Transactions listed in the Open Item statement]
Now we can also take a look at a statement that uses the Transaction Statement Type. Go back to the previous screen and choose Transaction Statement. Click the Apply button to generate the statements.
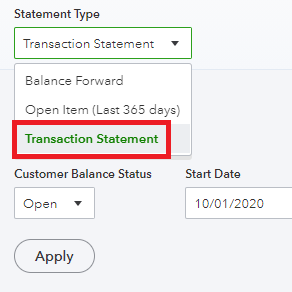
[Figure: Selecting the Transaction Statement type]
With the transaction statement, we see the transactions that were recorded during the specified time frame. It doesn't have as many details as the Balance Forward statement, though. It also doesn't show the overdue balances at the bottom.
[Figure: Table rows in a Transaction Statement type statement]
Now that we've seen each type of statement, let's look at printing, saving, and sending them.
You can print the statements directly from the Print or Preview screen. Right-click on the document and select Print from the options to do this.
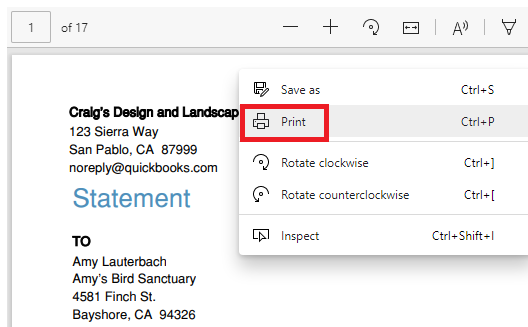
[Figure: Printing statements from the Print or Preview page]
To save and send the statements, close the Print or Preview with Close button at the bottom of the screen. Back at the Create Statements screen, you can save the statements with the Save button at the bottom.
You can also send the statements by clicking the Save and Send button, or just save and return to your previous screen by clicking Save and Close button from the button's drop-down menu.
Seeing Your Statements
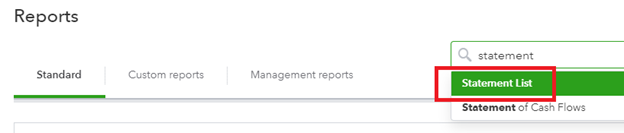
You can review statements that you have created in Reports. To get there, go to Reports in the left-side Navigation Pane.
At the Reports page, enter the word 'statement' in the search bar to quickly get to the Statement List.
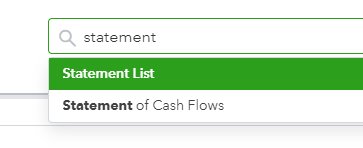
[Figure: Searching for statements on the Reports page]
When you click the Statement List in the search bar, you will be taken to a report where you will see the statements you just generated. A drop-down menu above the list lets you sort it in various ways.
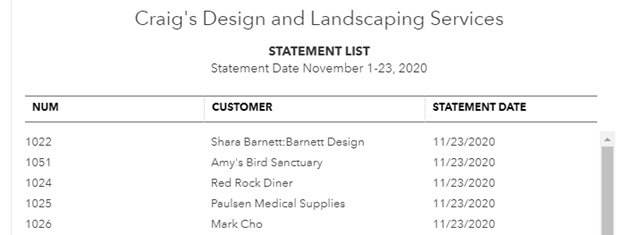
[Figure: The Statement List report]
Creating a Statement for a Single Customer
Since you don't always need to generate multiple statements, you can also create just a single statement for a customer
You start this by going to Sales in the left-side Navigation Pane and then click on Customers. You will then be at a list of all customers.
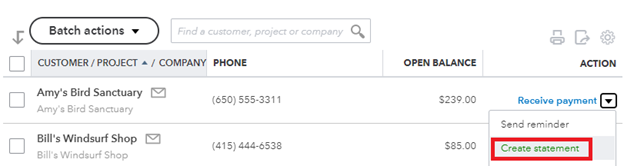
Find the customer that needs a statement and click on the drop-down arrow in the Action column. From the drop-down, select the Create Statement option.
[Figure: Creating a statement from the Customers list]
You will then be taken to the Create Statements window. This is the same form as before, however only the customer that you selected will be shown in the Recipient List.
As with the previous example, choose a Statement Type among the options of Balance Forward, Open Item, and Transaction Statement.
Next, choose the Start Date and Ed Date just as before. In the Recipients List, you will only see the customer that you chose.

[Figure: Recipients List for creating a single statement]
When you are ready, you can either print or preview the statement, save it without closing, save it and send it, or save and close the window. We will just save and close it to move on to the next part of the lesson.
Now that you have made some statements, let's look at how we can customize the amount of detail that appears on each line of the statement.
Setting up the Level of Detail and Aging Table in Statements
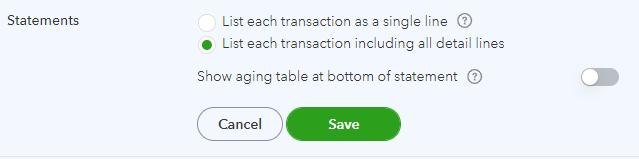
You can set up the level of detail that you want customers to see by going to the Settings menu represented by the gear icon in the top. From there, go to Account and Settings in the first column. In Account and Settings, go to the Sales tab and find the Statements category.

[Figure: Getting to the Statements settings in Account and Settings]
Here, you can first decide to show each transaction on a single line or with details. You can then decide to show an aging table at the bottom of the statement. An aging table shows the amounts due and by how many days they are overdue.
Let's select the single line transactions and to turn on the aging table. Click Save to save the settings.
Now, we'll generate a new statement to see how the settings take place. Click the New button in the left-side Navigation Pane and then choose Statement from the Other column.
When the Create Statements page loads, click Print or Preview at the very bottom. When the preview pops up, you will only see single lines for each transaction.
[Figure: Transactions shown as a single-line summary]
Additionally, at the bottom you will see that there is an aging table which shows how past due each amount is.

[Figure: Aging table]
Let's compare what it looks like when you change the settings to show detailed transactions and turn off the aging statement. Go back to the Statements settings in Account and Settings.
Change the first option to List each transaction including all detail lines. With the second option to Show aging table at bottom of statement, make sure that it is turned off.
[Figure: Listing each transaction in detail and turning off the aging statement]
Now, return to the Create Statements screen from the New button and click Print or Preview at the bottom. You will see more details in transactions. Also, the aging table at the bottom is now gone.
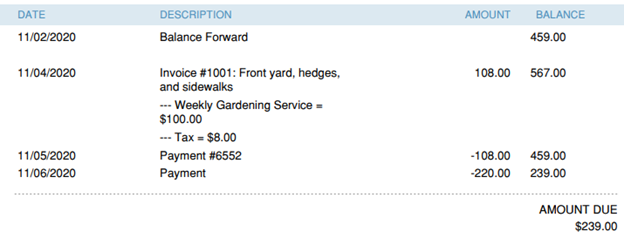
[Figure: Detailed transaction lines and without an aging table]
Now that you've seen two ways to make statements and how to customize what they show, let's now look at how you can delete them.
Deleting Statements
You may need to delete generated statements if you don't plan to mail or email them out anymore. You can delete customer statements by going to Report in the left-side Navigation Menu.
Use the search box to find the report called Statement List.
[Figure: Getting to the Statement List]
Once you're at the Statement List, click on one of the statement lines to open it up. When the statement details are shown, you will see a Delete button at the bottom next to the Print or Preview button.
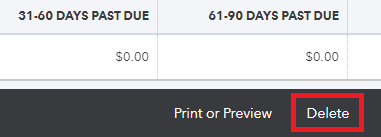
[Figure: Deleting a statement]
Clicking the Delete button will pop open a window confirming your action. Once confirmed you will be taken back to the Statement List. You can repeat these steps to delete as many statements as you need.
Conclusion
In this article, you have learned all about generating statements. You have learned the reasons to send statements and seen how to find customers with overdue balances that need them.
You have seen three different types of statements and how they differ. You have also seen how to view your statements in Reports, as well as how to delete them.