One of the most important things you need to manage are your bank accounts and credit cards. QuickBooks Online lets you create all sort of accounts that you can monitor within the app. With QuickBooks Online, you can create your accounts and then link to them to your financial institutions.
Linking your accounts can be a great time-saver and allow you to see all your up-to-date accounts in one place. However, we will cover linking your accounts to financial institutions in a later lesson. In this lesson, we'll take a look at how you can manage bank accounts and credit cards.
In this article, we will see how you can quickly view your accounts in the dashboard, how you can make and edit accounts, how you can enter starting balances through journal entries, how you can reconcile an account, and how you can delete, then later restore, an account.
Viewing Your Accounts
Let's start by seeing how you see an overview of your accounts.
You can quickly see your bank accounts right from the dashboard. They usually appear on the right-most column, although it depends on how wide your screen is.
From this window, you are able to directly do a few tasks.
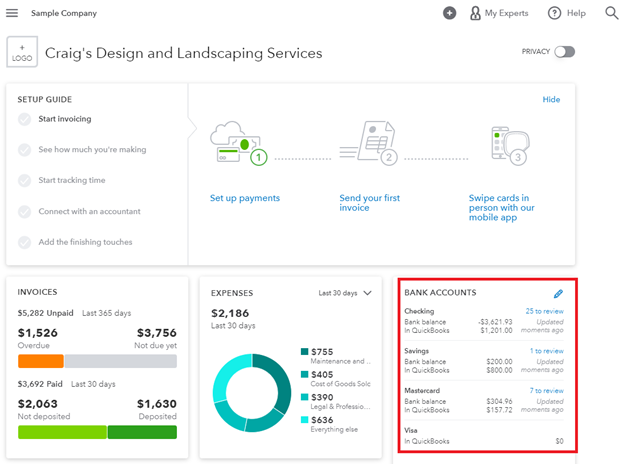
[Figure: Finding the Bank Accounts panel in the dashboard]
If you click on the pencil icon in this panel, you will be able to edit the order of each account by dragging and dropping them in any order that you like.
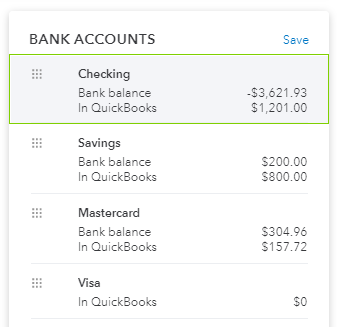
[Figure: Reordering bank accounts]
Click Save to save the order of the accounts. It not only saves here, but also saves the new order on the Banking page.
Now that you've seen where bank accounts show up on the dashboard, let's see how we can make a new account.
Creating a New Bank Account
To set up a new bank account, start by clicking the gear-shaped Settings icon in the Header and then choosing Chart of Accounts. Alternatively, you can get to the Chart of Accounts page from the Accounting section in the left-side Navigation Pane. At the Chart of Accounts page, click the New button.
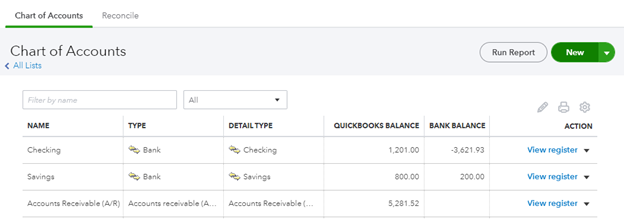
[Figure: Creating a new account from the Chart of Accounts page]
You will then see an Account panel pop up. The first option asks you what type of account to make. The options here include Accounts Receivable (A/R), Other Current Assests, Bank, Fixed Assets, Other Assets, Accounts Payable (A/P), Credit Card, Other Current Liabilities, Long Term Liabilities, Equity, Income, Other Income, Cost of Goods Sold, Expenses, and Other Expenses.
We are making a bank account, so you should select Bank from the dropdown menu.
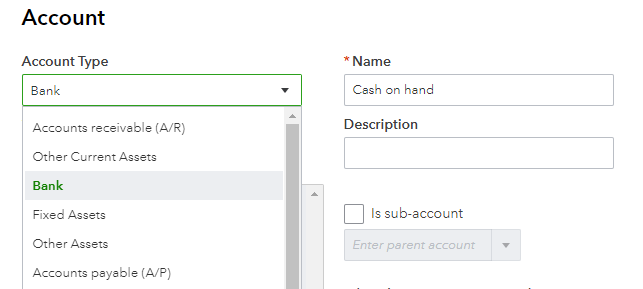
[Figure: Creating a new bank account]
Depending on your selection in the Account Type option, you will see different options in the Detail Type section. The options here include Cash on Hand, Checking, Money Market, Rents Held in Trust, Savings, and Trust Account.
Choose Checking for Detail Type and you will notice that the Name field is automatically changed to represent your choice.
You can change that name to be more specific. Optionally, you can also fill out the Description section.
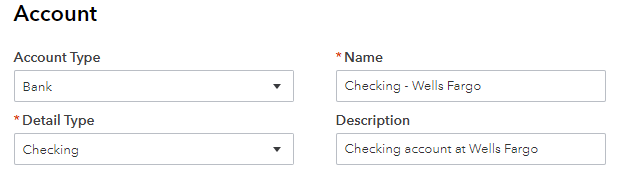
[Figure: Entering information for a new checking account]
You will then be asked if this account is a sub-account of another. You may want to do this in order to break down your expenses and income into more detail later, but we will skip that for now.
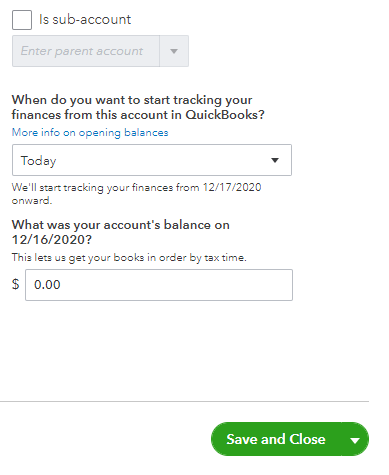
[Figure: Additional information while creating a new bank account]
Next you can enter the date that you want to start tracking your account from and the balance on that date. If you don't want to enter an opening balance, you can skip it and enter it later.
If you want to enter the balance now, then where QuickBooks Online asks When do you want to start tracking your finances from this account in QuickBooks, you can choose between Beginning of this Year, Beginning of this Month, Today, or Other.
Choosing Today will start tracking from today. You can then enter the account balance as it is today.
Choosing Beginning of this Year will automatically set the date to January 1st of the current year. You will then have to enter the account's balance as it was on December 31st of the previous year.
Choosing Beginning of the Month will automatically set it to the first day of the current month. You will then have to enter the account's balance as it was on the last day of the previous month.
Choosing Other will allow you to pick a specific date in either MM/DD/YYYY format or by selecting the date from their popup calendar. You will then have to enter the account balance from the date before you specified.

[Figure: Selecting the date from the calendar popup]
When you have finished choosing the date and balance, click the Save and Close button at the bottom. You will now see your new bank account appear in the Chart of Accounts.
Let's now take a look at how to add a new credit card account.
Adding a New Credit Card Account
Adding a new credit card account is similar to adding a new bank account. From the Chart of Accounts, click on the New button, just as you did in the previous section.
This will bring up the same Account panel that you filled out when making a bank account. This time, choose Credit Card for the Account Type.
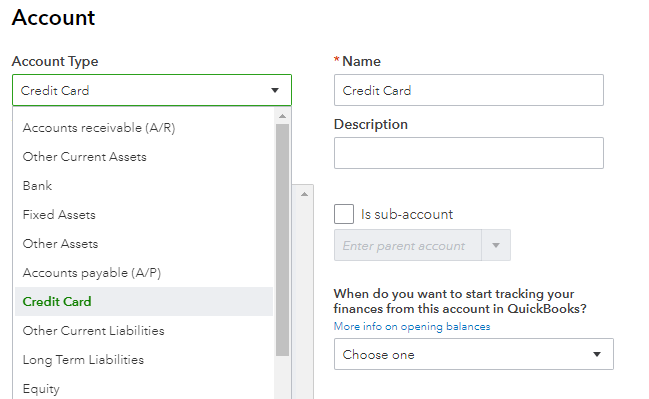
[Figure: Adding a new credit card account]
When you select the Account Type to be a credit card, then the Detail Type only has the option of being Credit Card. You can edit the Name and, optionally, the Description fields to better identify this account.
Furthermore, you may make it a sub-account of another account for better organization.
If you would like to enter the starting date and balance, enter that in the next section just as you would for a bank account.
Where QuickBooks Online asks When do you want to start tracking your finances from this account in QuickBooks, you can choose between Beginning of this Year, Beginning of this Month, Today, or Other.
Choosing Today will start tracking from today. You can then enter the account balance as it is today.
Choosing Beginning of this Year will automatically set the date to January 1st of the current year. You will then have to enter the account's balance as it was on December 31st of the previous year.
Choosing Beginning of the Month will automatically set it to the first day of the current month. You will then have to enter the account's balance as it was on the last day of the previous month.
Choosing Other will allow you to pick a specific date in either MM/DD/YYYY format or by selecting the date from their popup calendar. You will then have to enter the account balance from the date before you specified.
Entering a balance here will also update the Opening Balance Equity account.
Click the Save and Close button to finish creating the account.
Entering an Opening Balance
If you didn't set the opening balance from the beginning, you can come back and set it later. Make sure that this account hasn't been reconciled yet.
To do this, first confirm that your account doesn't have an opening balance. You can do this from the Chart of Accounts. Find the account in the Chart of Accounts and select View Register from the Action column.
In the register, check if there is an entry for an opening balance. This entry should have Opening Balance Equity in the Payee/Account tab and Opening Balance in the memo tab.
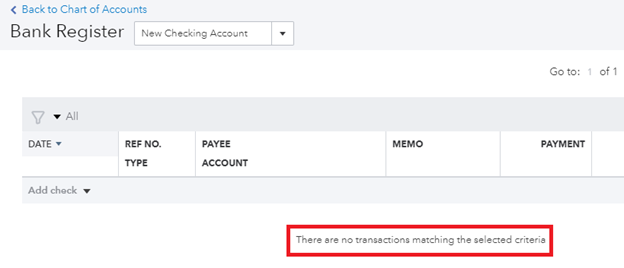
[Figure: An account with no opening balance]
If there is no opening balance, then you can create one by making a journal entry. We'll do that in the next step.
Making a Journal Entry
You can make a new journal entry by clicking the New button in the left-side Navigation Pane and choosing Journal Entry.
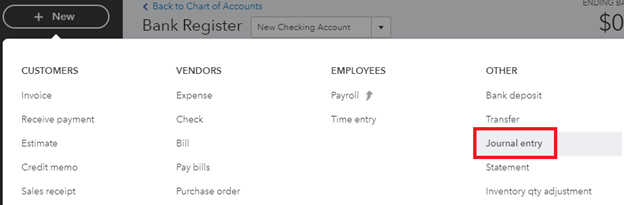 [Figure: Getting to the Journal Entry panel]
In the Journal Entry page, you first want to select the date. You need the date to be earlier than your oldest transaction for the account. That date will be your account opening date.
In the Account dropdown on the first line, select the account that you want to enter the opening balance for. We'll use a new checking account for this example.
In the Description field, write that you are adding the opening balance here.
On the second line of the journal entry, choose Opening Balance Equity.
You can then enter the opening balance based on the real balance of the account. Depending on the type of account, you will want to enter the amount in either the Credits or Debits columns.
Since this is a checking account, enter the opening balance in the Debits column on the first line, and in the Credits column on the second line.

[Figure: Setting up the journal entry to add the opening balance]
Depending on the type of account, you will enter the amounts into the Credits or Debits columns:
- For assets and expense accounts, enter the opening balance into the Debits column on the first line and in the Credits column on the second line. This includes savings and checking account.
- For liabilities, equity, and income accounts, enter the opening balance in the Credits column on the first line and in the Debits column on the second line.
- For accounts payable accounts, choose the vendor that you owe money to on the first line in the Name column. Then, enter the opening balance as a credit and enter the same amount in the credit column on the second line.
- For accounts receivable, choose the customers that owe you money in the Name column on the first line. Then, enter the opening balance as a debit and enter the same amount as a credit in the second line.
Once you have set up the opening balance in the Journal, select Save.
You Journal entry will now appear in the account's register.
Reconciling the Journal Entry
Now that you have a journal entry, you need to be sure that it is reconciled. Go back to the account in the Chart of Accounts and click on View Register from the Action column again.
In the register, find the journal entry and click on it to expand it. You will see a column that has a checkmark on it. In the journal entry, click that column until it says "R" for reconcile.

[Figure: Reconciling the journal entry for the opening balance]
Now, click on the Save button to reconcile the opening balance.
Since you can now make a bank or credit card account and add the opening balance, let's take a look at how you can edit the opening balance.
Editing the Opening Balance
If you need to add transactions from before the opening account date that you previously specified, then you can do so by going to the account register from the Chart of Accounts.
In the account's register, search for the opening balance entry. This entry should have the Opening Balance Equity as its account.

[Figure: Locating the opening balance entry]
You can now correct the opening account balance by clicking on it to expand it. In the Deposit column, edit it so that it correctly matches the real account data from your bank.

[Figure: Updating the opening balance]
Once you have fixed the opening balance, click the Save button.
So far, you have only reconciled the opening balance of accounts. Let's see how you can reconcile other transactions in the account.
Reconciling Accounts
Keeping your accounts in QuickBooks Online up-to-date with their real counterparts is called reconciling. If your accounts are not connected online to your financial, then you will need to manually reconcile your accounts. Keeping your accounts reconciled is an important part of bookkeeping.
To start reconciling, you will need to have a copy of your bank statement that lists all of your transactions. You will need to go through each transaction from your bank account and compare it to what you have in QuickBooks Online. This process should be done every month.
To start reconciling your accounts, go to the Settings menu at the top right in the Header and select Reconcile under the Tools category. Disregard attempts to connect your account to a financial institution because we will be doing this manually in this lesson.
You should arrive at a page where you will choose an account that you want to reconcile.
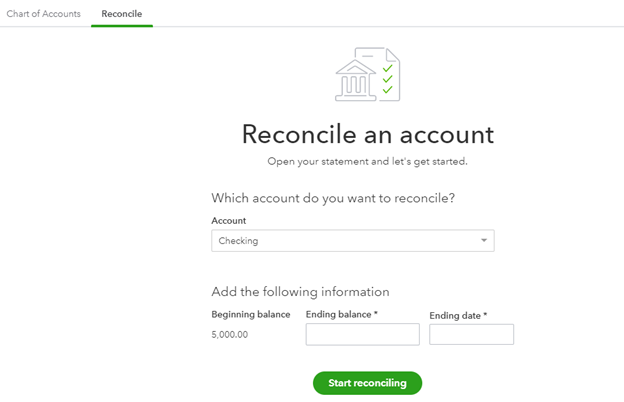
[Figure: Choosing an account to reconcile]
Review the Beginning balance to see that your bank statement matches QuickBooks Online, and then enter the ending balance and ending date from your bank statement.
If you have already reconciled, then you can also review the Last statement ending date. Your current statement should start the day after that.
Once you are ready, click Start Reconciling to begin the reconciliation. You will be taken to the reconciliation screen and will check every transaction until the difference between your QuickBooks Online account and bank statement is $0.

[Figure: Reconciling an account]
To manually reconcile your account, go through each transaction on the Reconciliation page. When you find a matching transaction on your bank statement, put a checkmark next to it in QuickBooks Online. Once that transaction has a checkmark, it is reconciled.

[Figure: Checking off transactions that have been reconciled]
Once you have reconciled all of your transactions, then the difference between your QuickBooks Online account and your bank statement will be $0. You can then click the Finish Now button.
If your difference is not $0, then instead of Finish Now, you can choose to Save for Later or Close Without Saving.
If the difference is not $0 at the end of reconciliation, then you will need to double-check your transactions to try and find the error. Some issues that might cause your books to not match up include:
- Mis-entering the opening and beginning balances. Check that these are accurate before doing any reconciliation.
- Mis-entering the ending balance or ending date. Check the bank statement to make sure you entered these values correctly.
- Multiple transactions combined into a single transaction. Banks will often combine multiple transactions into a single one. You should also combine your transactions to match. You can put the transactions into the Undeposited Funds account, and then combine them in a bank deposit.
- Check for transactions that were on a past reconciliation. You may have already reconciled the transaction in another reconciliation.
- Check for bank fees. You may have had fees from the bank and they won't show up in your QuickBooks account. Add those fees to QuickBooks by using a new bank deposit form.
- Bank error. Contact the bank if it seems they made an error, and if so, then make an adjustment transaction in the register.
You should now have a good idea of how to manage the creation, editing, and reconciliation of an account. Let's also now consider how you can remove an account that you no longer need.
Deleting a bank or credit card account
You can delete an account that you no longer need. Deleting an account in QuickBooks Online is the same as making it inactive. Deleting an account will not delete the transactions that it was involved with. Additionally, you can restore a deleted account if needed.
To delete an account, go to the Chart of Accounts by clicking on Accounting in the left-side Navigation Pane and then selecting Chart of Accounts.
Find the account that you want to delete and in the Action column, select Make Inactive.

[Figure: Deleting an account by making it inactive]
You will then have a confirmation box appear to check that you really want to inactivate it. Once inactive, it will not show up in the Chart of Accounts by default.
Restoring a Deleted Account
You can get your deleted account active again. To do this, go to the Chart of Accounts and click the gear icon above the list. Check the box that says Include Inactive. You can now see your deleted accounts.
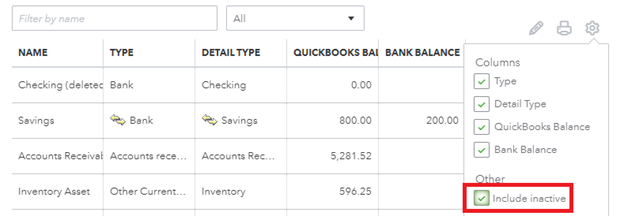
[Figure: Selecting to included inactive accounts in the Chart of Accounts]
Once the deleted account shows up in the list, you can select Make Active from the Action column.
Conclusion
In this article you learned all about managing bank and credit card accounts. You learned how to view, create, set opening balances, reconcile, and then delete them.