There are times when a business will need to borrow money in order to get funds to buy things essential for running their business. That can be for things like real estate, equipment, or research & development. This money comes in the form of a loan, and it is a liability that your company must pay off.
If your company gets a loan, it can be managed in QuickBooks Online. QuickBooks Online lets you easily keep track of how much you owe. You can monitor short-term and long-term loans, as well as keep track of the loan deposit amount and loan repayments.
Another situation that QuickBooks Online can handle is when you want to give a loan to a customer. They may need a loan to help pay off an invoices, or they may need a loan for any other reason.
In this article, we will look at making and managing loans with liability accounts. We'll also look at how to make loans to other businesses.
Defining Liabilities
Let's start by defining what a liability is. A liability is money that you currently owe to other people. Another word for liabilities is debts.
Liabilities come in many different forms. They can be rent, outstanding bills, credit card debt, owed taxes, and loans.
There are two classifications of loans in QuickBooks Online: current liabilities and long-term liabilities.
Current liabilities are short-term debts that are expected to be paid within a year. These include bills, deferred salaries, sales and payroll taxes, and short-term loans.
Long-term liabilities are debts that are not expected to be paid off in only a year. These include mortgages and big loans.
As an example, if you need to take out a loan for a car, you may have five years to pay it off. The loan is a long-term liability and the car becomes an asset.
Now that you have an idea about different liabilities, let's look at how you can set up a liability account in QuickBooks Online.
Setting Up a Liability Account
Let's now take a look at how to set up a liability account. A liability account is an account for things that you owe.
Start by going to your Chart of Accounts by clicking the gear-shaped Settings button in the Header at the top of the screen. The link to the Chart of Accounts is under the Your Company heading.
Once at the Chart of Accounts, click the New button to create a new account.
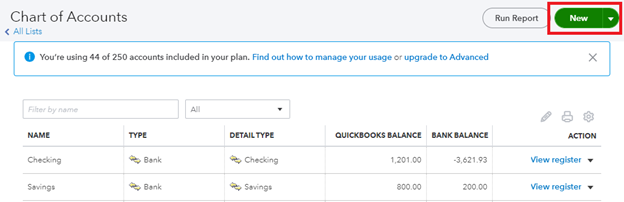
[Figure: Creating a new account]
Now, the Account panel will pop up and you can enter in details about the loan account. From the Account Type menu, you can select either Long Term Liabilities or Other Current Liabilities. Choose Other Current Liabilities if you intend to pay off the loan in the current fiscal year.
For this example, we'll choose Long Term Liabilities.
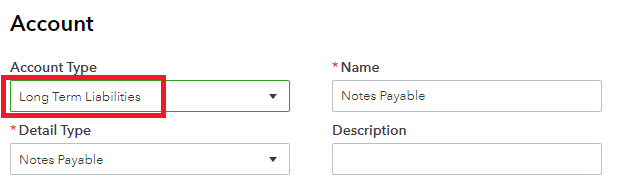
[Figure: Selecting the account type]
When you select Long Term Liabilities, the Detail Type and Name will change to Notes Payable automatically. You can change the name to something more relevant, like Car loan. You can also optionally enter a description in the Description field.
You will then have to determine if the loan is a sub-account. You may want to make it a sub-account to keep your accounts more organized.
Then, determine the date that you want to start tracking your account in the dropdown that says When do you want to start tracking your finances from this account in QuickBooks? The options available are Beginning of this year, Beginning of this month, Today, and Other. For this example, we'll choose Today.
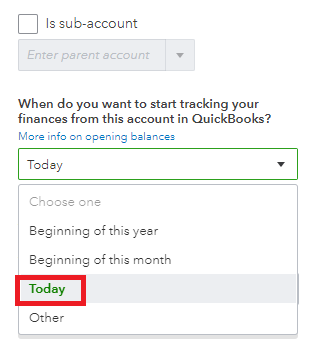
[Figure: Selecting the start date for tracking the loan]
Once you've selected the date, you will need to enter the balance on that date. This should be a negative amount. When you have finished setting up the liability account, click the Save and Close button.
Recording the Loan Money
Once you have received loan money, you may want to put it right into your bank account. We can do this by creating a new journal entry.
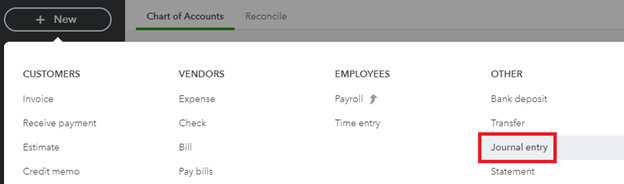
To make a new journal entry, click on the New button in the left-side Navigation Pane. From the New panel, select Journal Entry from the Other column.
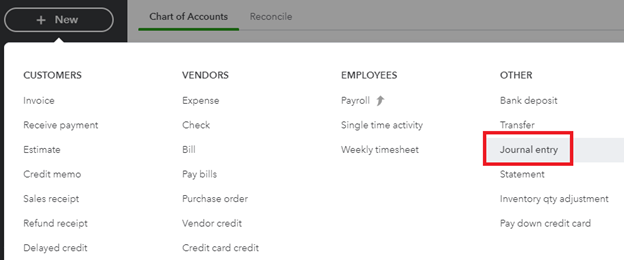
[Figure: Adding a journal entry]
On the first line of the journal entry, choose the liability account that you just created for the Account field and enter the amount of the loan in the Credits field.
On the second line of the journal entry, select the bank account for the Account field and enter the loan amount into the Debits column.
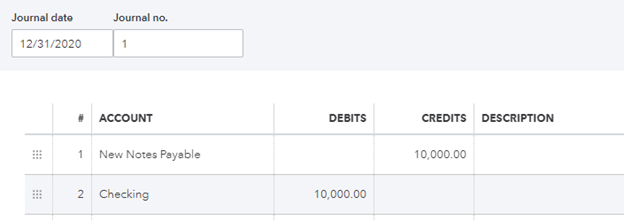
[Figure: Entering the loan amount into a journal entry]
Click the Save and Close button to finish adding this entry to the account.
Now that we've set up the loan in our books, we can look into how we record repayments to the loan.
Recording Loan Repayments
There are many different ways to record loan repayments depending on which method of payment you want to use. For example, two ways that you can pay back with are checks or ACH deposits.
Let's take a look at how to pay back with checks. Start by clicking on the New button in the left-side Navigation Pane. Then, select Check from the Vendors category.
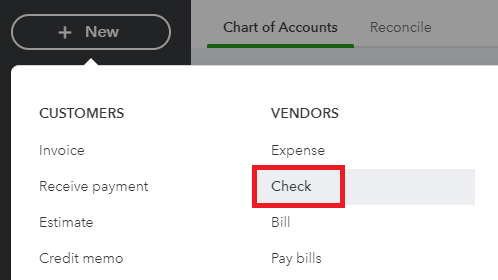
[Figure: Making a check for a loan repayment]
Enter a check number if you are sending a check, or enter Debit or ETF in the Check field if you are using direct withdrawal or an ETF.
In the Category Details for each check, select the liability account for the loan on the first line in the Category column. Enter the payment amount in the Amount category.

[Figure: Recording a loan payment]
On the second line, in the Category column, enter the expense account for interest. Put the interest amount paid in the Amount column.
If there are any additional fees, enter them on additional lines using the appropriate accounts and amounts.
After you're finished, click Save and Close.
Now that you've seen how to record a loan that you have received, let's look at how you can grant loans to others.
Granting a Loan to Another Company
You may want to grant a loan to other companies for several reasons. For example, you may give them a loan so that they can pay off an invoice. Additionally, you may want to give them a loan because you can earn interest and you trust that they will pay you back.
We'll start by considering the first scenario in which they need a loan to pay off invoices.
Granting a Loan to Close Open Invoices
If you're going to create a loan close open invoices, start by creating a new account in the Chart of Accounts. You can get to the Chart of Accounts by clicking on the Settings icon in header and then choosing Chart of Accounts from the Your Company category.
At the Chart of Accounts, click the New button to start making a new account. In the Account panel that pops up, first select either Other Current Assets or Current Assets from the Account Type dropdown.
Use Other Current Assets if the loan will be repaid within the current fiscal year. Use Current Assets if the loan will be repaid after the current fiscal year.
For this example, we'll use Other Current Assets. Other Current Assets has many different options that show up in the Detail Type dropdown, including: Allowance for Bad Debts, Development Costs, Employee Cash Advances, Inventory, Investment - Mortgage/Real Estate Loans, Investment - Tax-Exempt Securities, Investment - U.S. Government Obligations, Investments - Other, Loans to Officers, Loans to Others, Loans to Stockholders, Other Current Assets, Prepaid Expenses, Retainage, and Undeposited Funds.
For this loan to a customer, we'll select Loans to Others from the Detail Type dropdown.
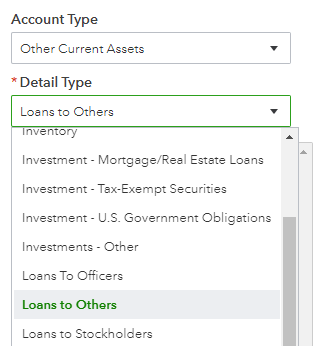
[Figure: Setting up a Loan to Others]
Enter a memorable name for the loan in the Name field. You can then click Save and Close to finish creating the loan, as we will enter the loan amount by using a journal entry.
Entering the Loan Amount with a Journal Entry
You can enter the loan amount and create a credit in Accounts Receivable for the customer. The credit will then be applied to open invoices.
To start making the Journal entry, Click the New button in the left-side navigation window. Then, select Journal Entry under the Other category.
 [Figure: Starting a Journal Entry]
You will need to enter information on two lines in the Journal Entry. On the first line, select the customer's loan account from the Account dropdown. Next, enter the amount in the debit field.
On the second line, select the Accounts Receivable account from the Accounts dropdown and enter the customer's name in the Name column.

[Figure: Filling in the Journal Entry for a customer loan]
To finish, click the Save and Close button.
Now that you've seen how to create a loan to give a customer credit for their invoices, let's see how you can create a loan which allows customers to do whatever they please with it.
Creating a General Loan for a Customer
To make a general loan for a customer, you will want to create a new account for it, just as you did in the previous exercise. So, go back to the Chart of Accounts. You can get to the Chart of Accounts from the Accounts tab in the left-side Navigation Pane.
At the Chart of Accounts, click the New button to start a creating a new account. In the Account panel that pops up, choose Other Current Assets for the Account Type. This type of loan should be paid back before the end of the fiscal year.
In the Account Details dropdown, choose Loans to Others. Next, add a name that accurately describes the loan. You can now click the Save and Close button at the bottom. You will have created a loan similar to the previous one.
Now, you can issue a check for the loan to give to the customer. Do this by clicking the New button in the left-side Navigation Pane. Then, choose Checks under the Vendors heading.
In the Check panel that pops up, choose the account that funds the loan in the Bank Account dropdown, such as your Checking of Savings account. Next, enter the account that you made to track the loan as the off setting account in the area below the check and also enter the amount.

[Figure: Writing the check to the customer]
Then, click the Save and Close button.
Now that you've set up the account and issued the loan, let's discuss how you can record customer payments.
Recording Customer Loan Payments
Your customer should soon start repaying the loan amount that you sent to them. This loan may also be including interest in additional to the principal amount. QuickBooks Online does not automatically count interest, so be sure that you do this separately.
To start recording customer payments, you will record a new bank deposit. Click on the New button in the left-side Navigation Pane and choose Bank Deposits from the Other category.
Select the Account where you want the payment to go to in the dropdown. At the bottom of the form in the area called Add Funds to This Deposit, enter the details about the loan repayment. For the Received From field, enter the customer's name. For Account, choose the loan account that you created. In Memo, enter a note to help later when you need to recognize this transaction. In Payment Method, select the way that the customer paid you. Ref # is for the check number and Class is used if you are using Class tracking. Lastly, enter the amount paid in the Amount section.

[Figure: Enter loan repayment information in the bank deposit]
On the second line, you can enter the interest payment from the customer, if any. On this line, choose your Interest Income account for the Account field and fill in only the interest amount in the Amount field.
When finished, click the Save and Close button at the bottom.
Now that you've seen how to record a customer's payment, let's look into creating recurring invoices so customers are reminded when to pay.
Sending Recurring Invoices
In previous lessons, we've learned how to both send invoices as well as add items in Products and Services. In this section, we will use both of those concepts. To start sending recurring invoices, you will first want to set up an item that uses the customer's loan receivable account.
Creating an Item for the Loan
First, navigate to the Products and Services List. This can be found by clicking the gear-shaped Settings icon in the Header and choosing Products and Services under the Lists heading.
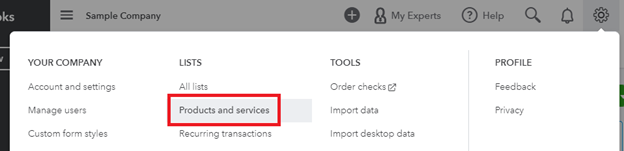
[Figure: Navigating to Products and Services]
At the Products and Services list, click the New button and then choose Service. In the panel that slides in, enter a descriptive name for the loan and in the Income Account dropdown, select the customer's loan receivable account.
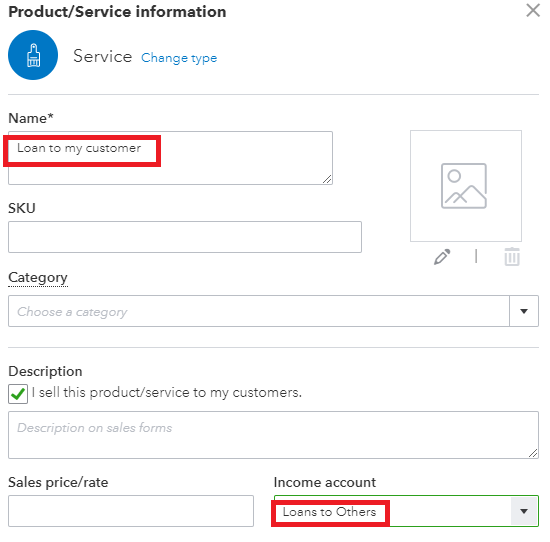
[Figure: Adding the service item]
Then, click the Save and Close button to finish this step.
Now that you have an item, it's time to create the recurring invoice.
Making a Recurring Invoice for Loan Repayments
To start making the recurring invoice, click on the gear-shaped Settings icon in the Header and choose Recurring Transaction under the Lists heading.
At the top of this list, click the New button and then select Invoice from the dropdown.
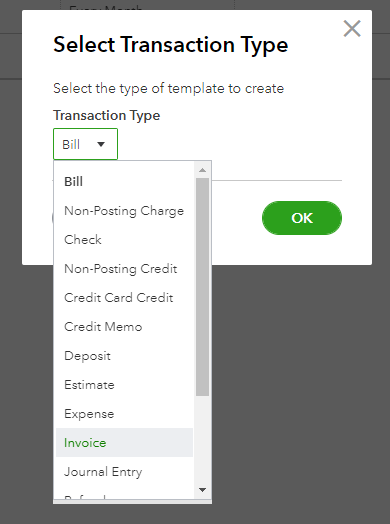
[Figure: Adding a recurring invoice]
At the Invoice form, select the customer's name from the Customer dropdown. Then, select the item that you previously made for the loan from the Product/Service dropdown.
In the Edit Schedule area, enter the schedule that you want the loan to be paid by. When done, click the Save Template button.
You will now be set up to send recurring invoices. In the next section, we'll take a look at what to do when we receive those payments.
Receiving the Payments
When the customer sends in a payment, you can use the Receive Payment tool to record it. This is similar to what we have already covered in a previous lesson on receiving customer payments.
To start this, click the New button in the left-side Navigation Pane and choose Receive Payment under the Customer heading.
In the Receive Payment form, enter the details about the payment. Make sure that you deposit the funds into the Undeposited Funds account.
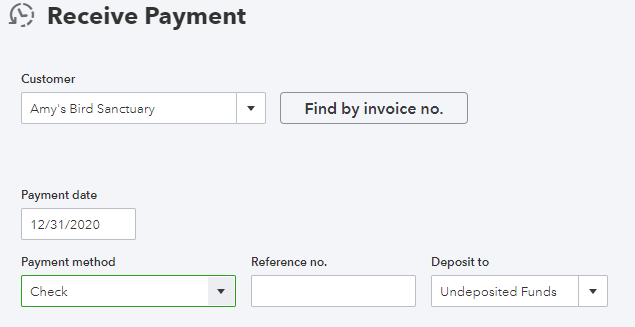
[Figure: Receiving a customer's loan payment]
Click the Save and Close button when you are done.
Now that you have received a payment, let's next look at adjusting the loan balance after receiving it.
Entering the Deposit and Adjusting Loan Balance
You can take the invoice and use it to adjust the loan balance while adding the interest back into the loan and posting the interest income.
First of all, start making a new bank deposit by clicking the New button in the left-side Navigation Pane and choosing Bank Deposit under the Other heading.
Select the payment you received and in the Add Funds to This Deposit section, select the loan account that you created for the customer from the dropdown. Then, enter the interest as a negative number. On the second line, choose the interest income account and enter the interest as a positive number in the amount.

[Figure: Adjusting the loan for interest]
Click the Save and Close button to finish the process.
You've now seen how to manage many facets of receiving and making loans.
Conclusion
In this article, you saw how you can manage loans that you have received and those that you have given out to others. You've seen that QuickBooks Online has many ways to manage these loans, such as sending out recurring invoices for loan repayments and calculating loan balances after deposits.