
There's no doubt that security is important to you when it comes to your computer and the things you keep on it. In this day in age where we store everything on our computers, from bank account information to sensitive emails, it's important to be able to protect that data from other users, as well as potential intruders that lurk on the Internet.
The Mac offers several ways to keep your information private from others who share your Mac, and it also gives you several ways to keep your Mac safe while online. We are going to take this article to discuss security and your Mac.
About Accounts
User accounts is one of the seemingly most basic features to your Mac. By creating a user account, you can keep your surfing habits, emails, applications, and other data safe from the eyes of others who might use your Mac. You can create multiple user accounts on the Mac, and each account will be protected by a username and password. Both will be needed to log in and access your data.
The following elements are protected from the curious eyes of others when you create a user account:
1. Documents, including files and folders.
2. Email accounts, including emails.
3. Programs and fonts that you've installed.
4. Programs that launch when you boot up the Mac.
5. The settings you establish for programs you use, including bookmarks and home pages in your browser, desktop pictures, screen savers, icons on the Desktop and in the Dock, etc.
Creating a User Account
When you installed OS X, you were asked for a name and password. This was creating your user account. You can also create user accounts for other people � or more for yourself if you want.
To create a new user account, go to System Preferences> Users & Groups.
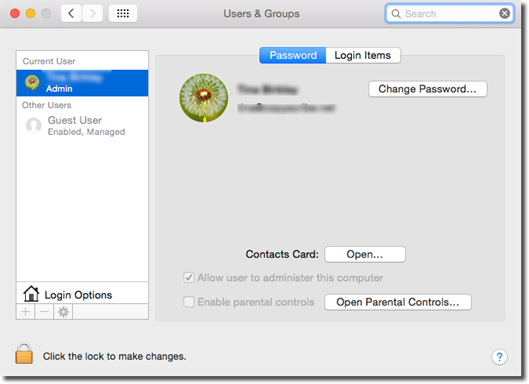
As you can see in left column of the snapshot above, we already have two accounts created. The admin account was created when we installed OS X. We also have a Guest User account for guests.
To create another account, click the padlock at the very bottom of the window, beneath the left column, if it's locked. You will then be asked to enter your password for your Apple ID. Only the administrator can create new accounts.
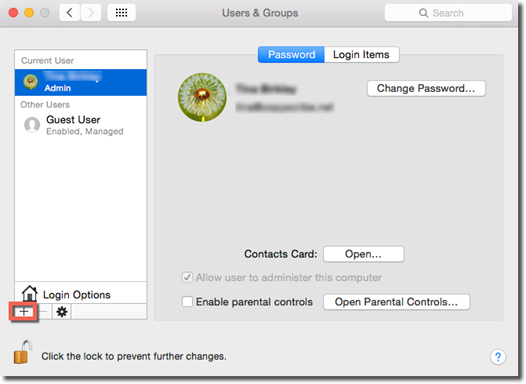
Next, click the plus sign (+).
You will then see this pop up window:
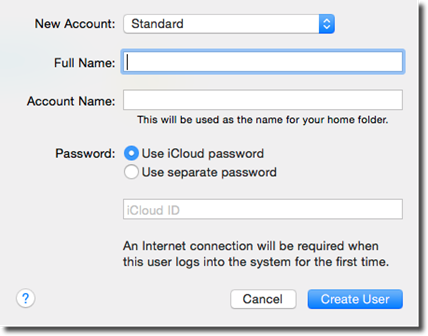
First, choose an account type in the New Account field.
We cover account types in the next section.
Next, enter the user's full name in the Full Name field.
Enter an account name. You can abbreviate your name for the account field if you want.
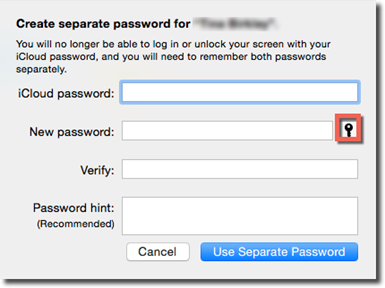
Next, enter a password. You can enter the user's iCloud password. You can also enter a separate password if the user doesn't have an iCloud account or doesn't want to use it to log in.
You'll also be asked to add a password hint in case the user forgets their password.
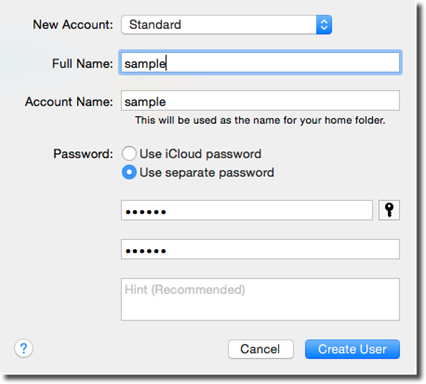
Once you're finished, click the Create User button.
You will be taken back to the User & Groups window where you'll be able to further specify:
1. If the user can reset their password by entering their Apple ID � if they have an Apple ID.
2. If you want to allow the user to be an administrator.
3. If you want to enable parental controls.
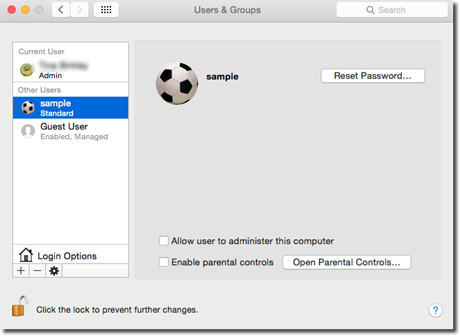
Each account that you create is given a picture. As you can see in the snapshot above, this account was given a soccer ball.
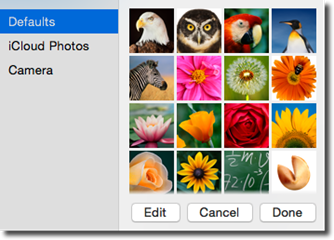
Click on the picture to see a pop up menu of other pictures that can be used.
Click Done when you are finished.
NOTE: Make sure to click the padlock in the Users & Groups window when you're finished.
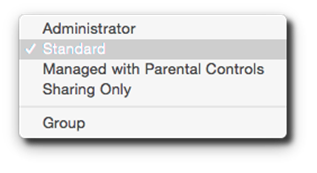
Account Types
Listed below are the different types of user accounts that you can create. With each type of user account is a brief description of the functions of the account.
-
Administrators have all the power. Only administrators can install new programs into the Applications folder, add fonts for everybody, create accounts, change anyone's files, make changes to all system preferences, etc.
-
Standard account holders an access their private Home folders and some areas of system preferences, but none that will make drastic changes to the Mac, such as Network, Date & Time, Energy Saver, and Startup Disk. They cannot create new folders on the hard drive, only in their Home folders.
-
Managed with Parental Controls accounts has limited access based on permissions given by the administrator. We will talk more about parental controls later in this article.
-
Shared Only Account is for sharing files over a network.
-
Group simply holds the name of account holders. For example, you might want to create a group that consists of your kids. Another group might be adults who have accounts on your Mac.
-
Guest accounts give your guests a way to use your Mac. With a guest account, any files created while the guest user is logged in, as well as emails, bookmarks, etc., are erased as soon as they log out.
Parental Controls
Parental controls allow you to control what users with standard or managed accounts can access on the Internet. It also gives you, the administrator, the power to set time limits for Internet access, restrict access to applications, and more.
To set parental controls, go to System Preferences> Users & Groups.
Click the padlock located in the lower left corner of the window if it appears locked. You must always "unlock" the padlock to make changes to accounts. Once you click the padlock, you will be asked to enter your Apple ID.
In the left column, elect the standard or managed account for which you want to apply parental controls.
Next, click the Open Parental Controls button.
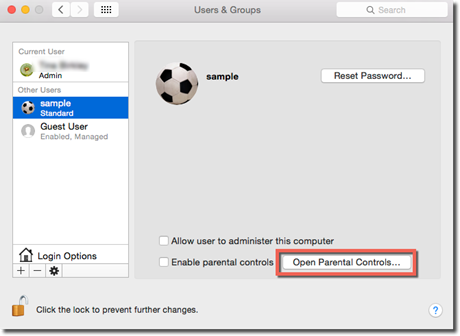
Once again, you will need to enter your Apple ID to continue.
After you enter your Apple ID, you will see this window:
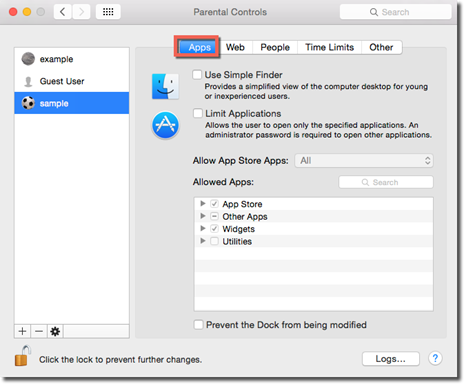
Under the Apps tab, as highlighted above, you can check the Simple Finder box to apply a simplified view of the desktop for kids.
You can also check the Limit Applications checkbox to limit the applications on your Mac that the user can access.
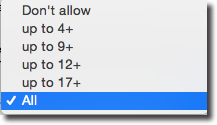
In the "Allow App Store Apps," you can specify the types of apps the user can download based on the recommended ages for the app. However, the Limit Applications checkbox must be checked to use this feature.
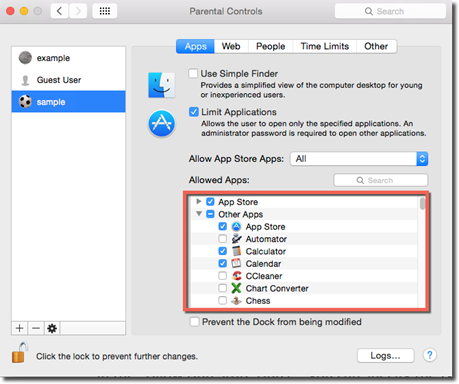
Next, you can put a checkmark beside apps on your computer that you want to allow the user to access.
Under the Web tab, as shown below, you can limit websites that the user can visit.
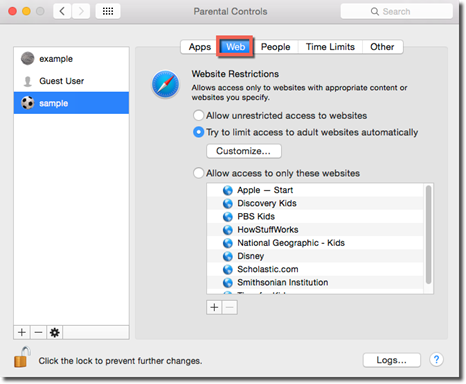
You can even specify that the user can only access certain websites by putting a checkmark beside "Allow access to only these websites," then clicking the plus (+) sign to add the URL of websites.
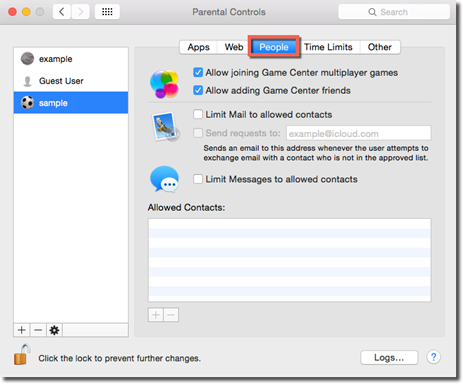
Under the People tab, you can restrict the user's access to other people in games, Messages, and Mail.
Under the Time Limits tab, you can set times to establish when the user can sign into their account and access the Internet.

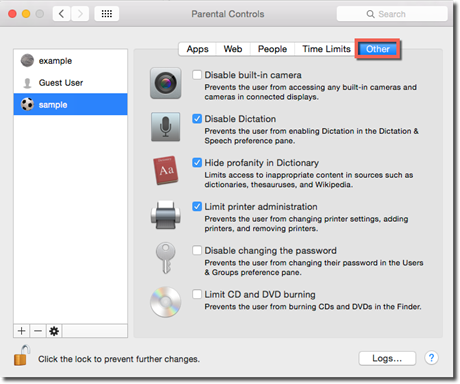
Under the Other tab, you can set additional options.
Remember to click the padlock when you're finished making changes to user accounts.
Editing Accounts
To edit any account, select the account in System Preferences> Users & Groups. Remember that you may need to unlock the padlock and enter your Apple ID first.
Next, click on the account in the left column and make any changes you need to make.
If you want to delete an account, select the account in the left column, then click the minus sign (-), as highlighted below.
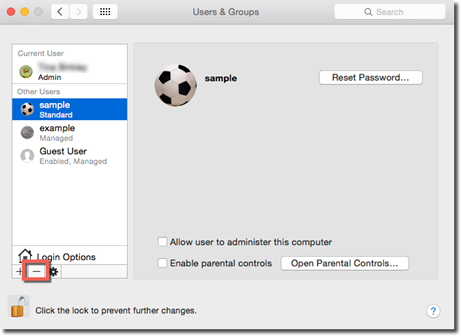
You will then see this window:

Select what you want to do with the user's Home folder, then click the Delete User button.
Login Options
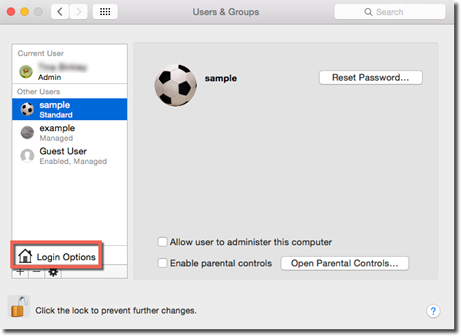
By clicking Login Options in the Users & Groups window in System Preferences, you can add more security at the login screen that you see when you first start up your Mac � or add less.
The Login Options button is highlighted below.
When you click on the Login Options button, this is what you will see:
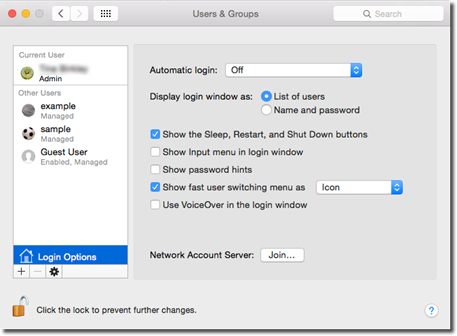
Let's discuss the various login options available to you in this window:
-
Automatic Login makes it so you do not have to sign in. This is perfect if you're the only user on your Mac � and live alone.
-
Display Login Window As. The login screen usually shows you all the users and their user pictures. However, you may not want that list to appear. Maybe there are too many users, or you don't want to give out usernames. Instead, you can make users enter their names and passwords.
-
Show the Sleep, Restart, and Shutdown Buttons. These appear at the bottom of the login screen unless you uncheck this box.
-
Show Input Menu in Login Window. This means that those who use non-U.S. keyboards and alphabets can login without having to figure out how to use the American keyboard.
-
Show Password Hints. The hint will not appear unless you turn it on.
-
Show Fast User Switching Menu As. By turning on this feature, you can switch to another account without having to logout of the one you're currently using.
-
Use VoiceOver in the Login Window. If you have a visually impaired user, it's helpful to make sure this feature is activated.
Sharing with Other Accounts
There may come a time when you want to share a file, folder, or document with other users on your Mac.
To do so, you can add files, folders, or documents to the Shared folder located within the Users folder. You can also add them to the Public folder inside your Home folder.
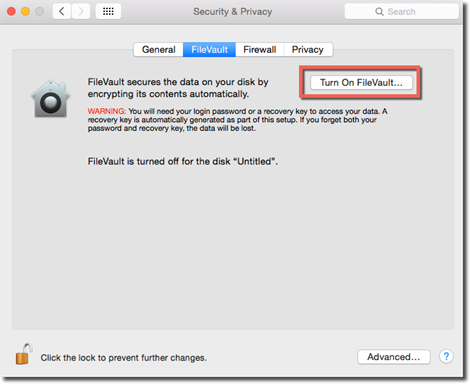
FileVault
FileVault is a way to keep others from going through your sensitive files. This means that other users will not be able to access your files no matter how many backdoors they try to open or how many loopholes they find.
When you enable FileVault, everything on your startup hard drive is encrypted � or scrambled. Nobody can unencrypt those files unless they know your password. That said, FileVault is only in action if you're logged out of your username. If you're logged in, all your files can be accessed. In addition, the administrator of your Mac, if it's not you, will be able to access all your files whether or not you've enabled FileVault.
To enable FileVault, go to System Preferences>Security & Privacy> File Vault.
Click the padlock, then enter your Apple ID.
Click the Turn on FileVault button.
You will then see this window:
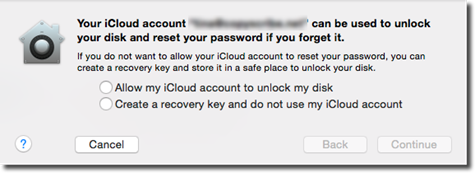
You can choose to allow your iCloud account to unlock your disk, or you can choose to create a recovery key. This will be a long string, so make sure you write it down and do not lose it.
Click Continue.
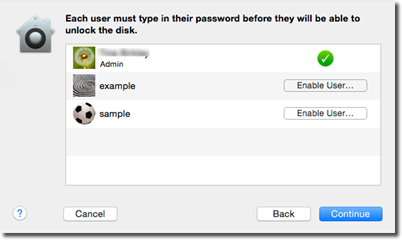
Next, specify the accounts that are allowed to unlock your disk by clicking Enable User to the right of their username.
Press Continue.
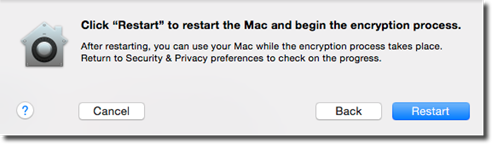
Click Restart to restart your Mac so your hard drive can be encrypted.
Password Assistant
Password Assistant helps you generate nearly-impossible-to-guess passwords.
To use Password Assistant, look for the key icon whenever you have a password dialogue box, and you're asked to create a password for an application.
You can see the key icon in the snapshot below. It appeared when we went to System Preferences> Users & Groups, then chose to change the password for our Administrator account.
When we click on the key icon, we see this pop up window:
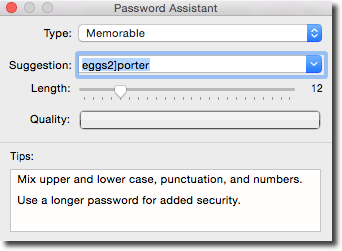
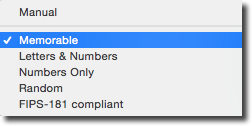
Start by choosing a password type from the Type field.
Next, Password Assistant provides password suggestions.
Use the Length slider to determine the length of the password.
The Quality bar will show you the strength of the password.
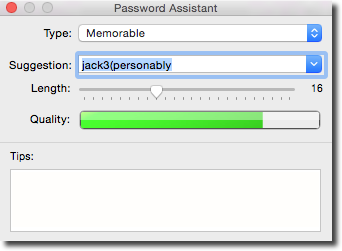
The Quality bar starts off in red when the password is weak.
As it gets stronger, the color changes to green. The darker the green, the stronger the password. If the Quality bar is completely filled with green, the password is as strong as it gets and is deemed nearly-impossible-to-crack.
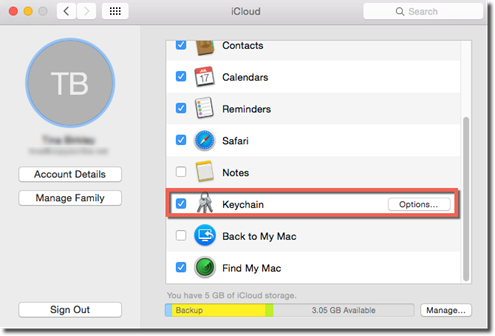
Keychain
Keychain keeps your website account names, passwords, credit card numbers, Wi-Fi network names/passwords, and account names/passwords up-to-date and safe on your Mac.
What's more, Keychain makes it so that you could even forget all your passwords (except for your login password), because Keychain will remember them for you.
Whenever you go to an application, website, and so forth that requires you enter information that you have stored in Keychain, Keychain will autofill in the required information for you.
To activate Keychain on your Mac, go to System Preferences> iCloud.
Put a checkmark beside Keychain, then click Options to set how any new Apple devices you get will be approved to share your Keychain.
Once you enable Keychain, whenever you use an application that requires a password or other information that can be stored in Keychain, you will see a message like this:
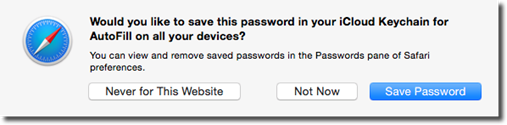
Click Save Password to save the information to Keychain.
Remember: Keychain can store account names, passwords, credit card numbers, credit card expiration dates, etc.
Keychain works automatically once you enable it. If you ever want to lock Keychain so that it doesn't autofill passwords and other information for you, open the Keychain Access program by going to Finder, then clicking Applications in the Sidebar. Go to Utilities> Keychain Access.
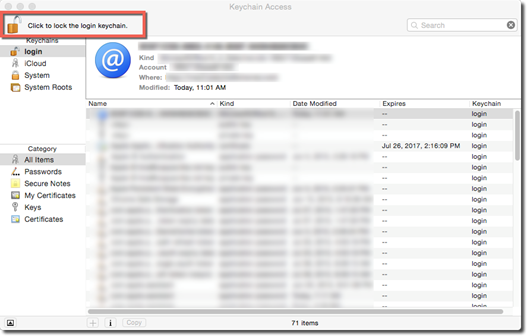
Click the padlock next to "Click to lock the login keychain," as highlighted above. You can also go to File>Lock Keychain "login."
Gatekeeper
Thus far in this article, we've talked about keeping your data safe from other users on the Mac. Now let's switch gears and talk about keeping the data on your Mac � as well as your Mac � safe from the dangers that lurk on the Internet.
Gatekeeper is an OS X feature that prevents you from downloading programs that could be harmful to your Mac.
To enable or disable Gatekeeper, go to System Preferences> Security & Privacy> General.
As shown below, the three options at the bottom of the screen are for Gatekeeper.
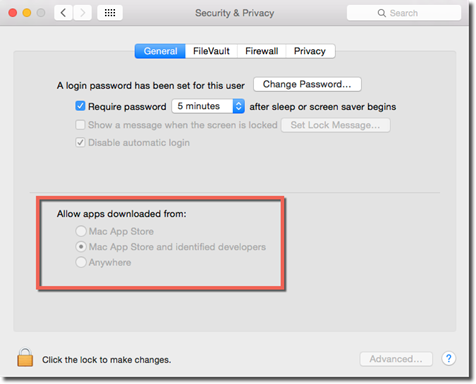
As you can see, right now apps that are downloaded from the Mac App Store and identified developers are allowed. We've already introduced you to the App Store. The term identified developers applies to software companies registered with Apple. When they register with Apple, they get a certificate � or encrypted code � embedded in their programs. It does not mean that Apple inspected the program and deemed it safe. It simply means that if a user reports the program is actually a virus, it will be removed as an identified developer.
To make changes to the apps that Gatekeeper allows, click the padlock to unlock it, then enter your Apple ID.
Choose the option you wish to apply.
That said, if you select "Anywhere," you should be aware of the dangers that are posed when you download programs that aren't in the Apple Store or from an identified developer.
Firewall
Firewall is designed to keep your Mac from being flooded with malicious data packets and letting hackers take control of your computer. If you use your Mac to get on the Internet, you should make sure you have Firewall enabled and fine-tuned for how you use the Internet.
By default, Firewall is turned off. To turn it on, go to System Preferences>Security & Privacy> Firewall.
Click the Turn On Firewall button.
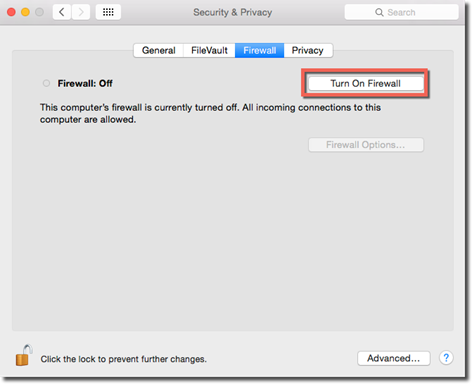
Clicking the button turns Firewall on.
Now click the Firewall Options button, as highlighted below.
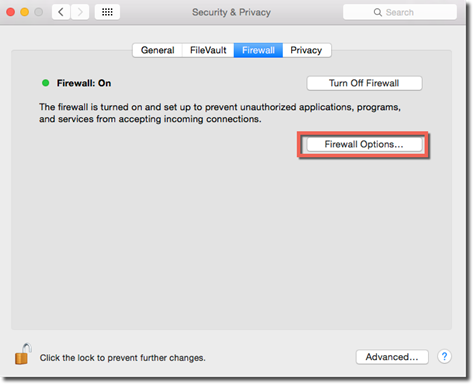
You can now customize Firewall.
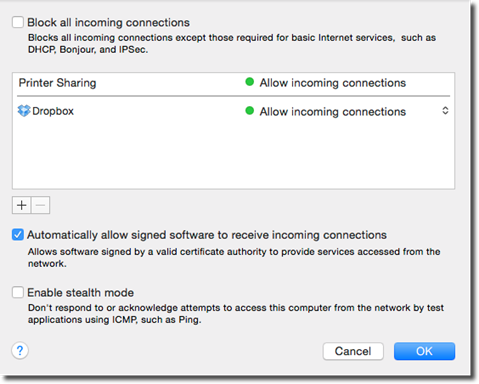
-
Put a checkmark beside "Block all incoming connections" if all you want to do on the Internet is email and a little web surfing. You won't be able to do much else.
-
You can also specify individual programs that are allowed to accept connections from your network. These are typically sharing programs. The ones listed above the horizontal line will be OS X features.
-
Put a checkmark beside "Automatically allow signed software to receive incoming connections." This has to do with application and programs. It means that programs that are designated legitimate by Apple are allowed. If you do not check this box, you will have to give your Mac permission to allow a program when you run that program for the first time.
-
If you put a checkmark beside "Enable stealth mode," your Mac will be hidden on the network. It will not respond to pings.
Click OK when you are finished.
Privacy Shields
Apple offers five different types of privacy shields that help "shield" your information from programs and apps that may want to access it.
These privacy shields are found in System Preferences> Security & Privacy> Privacy.
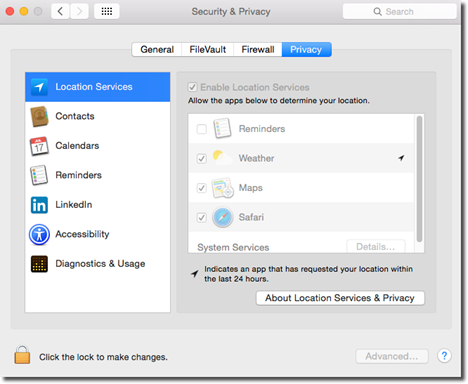
Location Services gives you the power to allow or not allow apps to determine your location.
Contacts, Calendars, Reminders allow you to grant (or not grant) programs access to your contacts, calendar, and reminders.
Twitter, Facebook, LinkedIn. You can also grant permission to programs that will want to access your social media accounts.
Accessibility allows you to allow apps to control your computer. These are not necessarily programs for the disabled. Instead, they are programs that need the Mac's accessibility features in order to function.
Diagnostics & Usage will allow your Mac to send information o Apple that lets Apple know your Mac's behavior, such as crashes, freezes, programs you use, hardware you use, etc.


