

After audio and video, animations are the next most common object in PowerPoint presentations. Animations in PowerPoint 2019 are the same cartoonish images you see on the web. They're small files that animate when you reach a slide in your presentation. They are just as easy to add to a slide as other objects, and you can use any animation located on your local drive.
Transitions are a bit different than animations. Transitions are effects that display as you move from one slide to another. These effects can be sounds, speed and a look and feel as you move from one slide to the next. When you select a transition effect, you can preview it before you finalize your presentation file.
Adding an Animated Image
Adding animation to a slide is similar to the features and functions to add a video. You can add an animation you found online or one located on your computer's drive. If you have a network with a drive mapped to a storage device, you can add an animation located on a network drive.
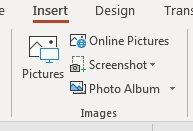
Animations are moving images, so you can add one by inserting a new image to the slide. Click the "Insert" tab. In the "Images" section, click the "Pictures" button and select a file on your local drive.
(Image features)
Should you decide to add an image from an online search, click "Online Pictures." Using Bing, you can search for an animated image and add it to your slide.
Another type of animation is available in PowerPoint. You can add animations to a static image on a slide using pre-defined animation effects available in PowerPoint 2019. You can find these effects in the "Animations" tab.

(Animations tab)
Before you can use these animations, you first need to select an image on one of your slides. If no image is selected, all animations shown in the "Animation" section will be grayed out. When an image is selected, effect icons turn green, so you know that they are available to use.
With the image selected, click one of the animation options. For instance, click the "Fly In" animation option. When you click an animation effect, a preview is automatically shown in the current slide. When you choose "Fly In," the image will move from the bottom of your slide to its designated location. If you no longer want any animations shown with your slide image, click "None" and any animation will be removed.
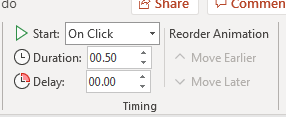
Animations only display when the slide becomes active, so it will display as you move through your presentation. However, you can control the timing for animations using features found in the "Timing" section of the "Animation" tab.
(Timing options for animations)
Animations can also play at specific times as you scroll through your slides. The default time to start an animation is "On Click," which is when you click on the slide as it moves to the current view. You can also choose to have the animation display right before the slide moves to current view using the "With Previous" option or display the animation as the slide moves to the next one by choosing the "After Previous" option. To review changes to animation timing, click the "Review" button to see it in action.
The "Duration" option sets the time for an animation to complete. The default is ".50" seconds, so the animation will complete from the time it's activated in .50 seconds. Increasing this time will slow down the animation. Reducing this time frame will speed up the animation. Again, you can click the "Preview" button to see the way an animation displays after you change timing features.
The "Reorder Animation" feature lets you change the way an animation displays should you have more than one in a slide. You can set the order in which each animation displays. Click the "Move Earlier" option to have the animation run prior to others on the slide. Click "Move Later" to have the animation run after others on the slide. These options are beneficial when you need animations to run in a certain order instead of all at once.
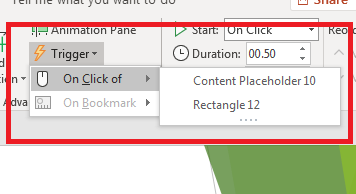
Another animation option is to have it trigger when you click another object in your slide. This object could be a button, text or even another animation. This option is found in the "Advanced Animation" section of the "Animation" tab.
(Trigger options)
Click the "Trigger" button and then the "On Click of" submenu option. The objects shown in the submenu are the names of objects in the current slide. The two objects in this example is a content placeholder and a rectangle shape drawn on the slide. Each object on a slide is given a default name. You can identify the name by the type of object on the slide. These names are incremented by 1 each time you add a new object to the slide.
Adding Transition Effects
Animation effects apply to only selected objects in a slide, but transition effects affect the entire slide including theme background, images and other objects. Transitions add effects when you move from slide to slide, so the move from one side to another is much more smoothly. They can also be used to bring attention to a particular slide as it moves into current view.
Transition effects can be found in the "Transitions" tab. Transition options are displayed in the main "Transition to This Slide" section and can be seen when you click one of the options.

(Slide transition options)
Since transitions apply to the entire slide, you just need to have the slide as the active one in the main PowerPoint 2019 interface to apply a new transition. Click one of the transition options in the menu, and a preview is shown on the slide. This preview shows you how the slide will display as it becomes active during your presentation. Notice how each object including background images become a part of a transition.
You can change transition effects from objects to words and characters on your slide. By default, transitions are applied to all objects on your slide, but click the "Effect Options" button and you can see two other ways to use transitions.
The second option lets you change transitions to affect words only. Choose this option and click an effect to see the changes. Transitions that affect words will only perform animations on text boxes located on your slide. Choosing the "Characters" option will only place transition effects on certain characters within the slide.
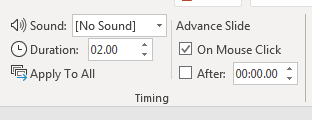
Just like animations, transition effects also have timing options. You find these options in the "Timing" section of the main menu.
(Timing options for transitions)
With transitions, you can set a sound from the "Sound" dropdown. Should you choose a sound, it will play when the current slide becomes active. The "Duration" option sets the amount of time from the start of a transition to the end. Increase the time, and the transition slows down. Lower the time, and the transition is faster. Click the "Apply to All" button to make these timing changes apply to all objects in a transition. Using the "After" option, you can set a delay for a transition so that it will run after a set period of seconds or minutes after the slide is active.


