
It's not uncommon for Excel 2019 users to convert files from other sources to spreadsheets stored on their local machines. You can convert data from a flat file in CSV (comma-separated values) format or pull data from a database. Excel can retrieve data from any external source as long as your local computer is able to make a connection. You can export data from a database such as Microsoft Access to a CSV file, and then you can import data from the file to Excel. Because several database applications support exports to a CSV file, Excel can be used with numerous database solutions. This article covers some ways that you can transfer data from Microsoft Access and import it to Excel. We also show how to connect to an Access database directly to query data from Excel.
Exporting Data from Microsoft Access to Excel
Since Microsoft is the developer for both Access and Excel, transferring data from Access to Excel is supported within the Access software. The quickest way of transferring to Excel is to convert Access tables to a CSV. CSV files are a universal file format that lets you transfer data between platforms. Databases that aren't compatible with each other using a direct connection can have data transferred by first exporting to a CSV file as an intermediary. Excel can read a CSV without any extra configurations or changes to the file.
When you open an Access database, one thing you can do without any of the export procedures is to copy all rows and columns in a table, copy them and then paste them directly to an Excel 2019 file. This is a quick way to copy small tables into an Excel spreadsheet, but it isn't convenient if you have thousands of records in your Access tables.
Open any Access database that you want to export. In the examples below, the Northwind database is used, which is a sample database provided by Microsoft with any Access install. With the database opened, open a table that you want to export. Data is stored in tables in Access instead of worksheets, but the layout looks similarly to an Excel spreadsheet including rows and columns.
Click the "External Data" tab to see a list of options for export.
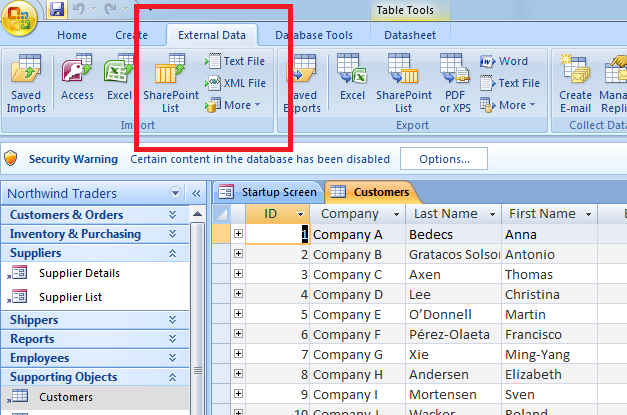
(External data export options in Access)
A CSV file is a formatted text file, but you can export in different formats if they are available in this tab. Notice that there is also an option to export directly to Excel. With this option, you can export into a file with the Excel extension, but then you would only be able to transfer data to a third-party database that supports importing Excel files. Microsoft databases support Excel imports, but most other external databases do not.
Click the "Text File" button in the "Export" category section in the External Data tab. A configuration window opens where you set up the export customizations.
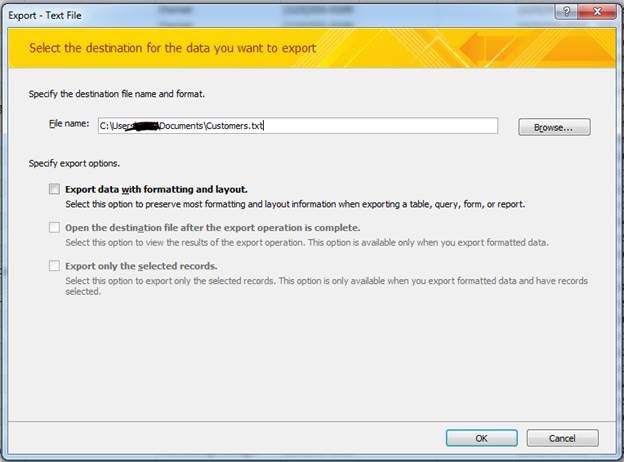
(Export text file configuration window)
A suggested file name and location are already filled out in the "File Name" input text box, but you can click the "Browse" button to choose a new directory path and file name. You can also type a new location into this input text box if you know the location that you want to store your file without the search function.
Check the box labeled "Export data with formatting and layout" if you have several tables that you want to export. In this example, only one table is being exported, so we'll leave the check box unchecked.
Click the "OK" button and Access displays a sample of the data and its format.
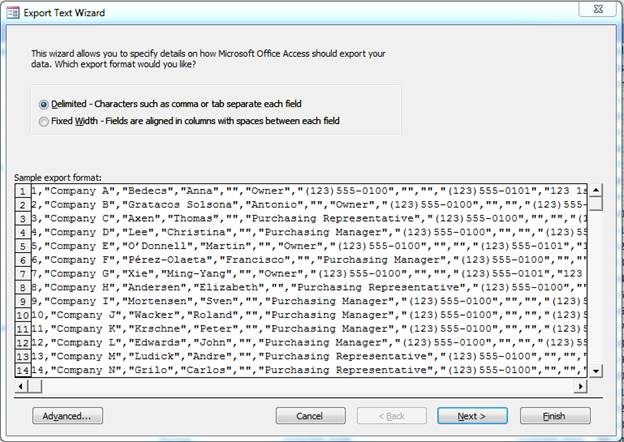
(Export data sample format)
The quotes around values ensure that any commas don't interfere with the CSV format. For instance, if you had a comma in an address, it would break the import process in Excel 2019. The quotation marks surrounding values ensure that commas are considered a part of the input rather than a delimiter.
Delimited format is the default for export of a text file, but you can also use "Fixed Width." Fixed width means that each value has a tab or a set number of spaces between them.
Click the "Next" button to see the next configuration window.
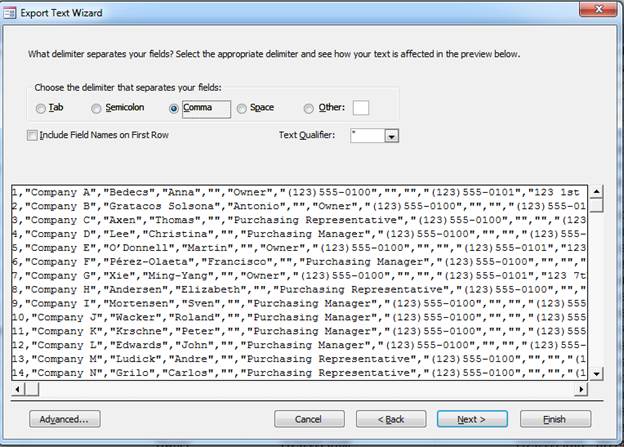
(Confirmation of quotation qualifier and comma delimiter)
The next window displays confirmation of what you saw in the previous window. Notice that you have other choices for delimiters, but a comma is a universal format between other databases. Use other options only if you know that you can configure the external source to import based on an alternative delimiter.
The default text qualifier is quotation marks, but just like the delimiter, you can enter an alternative. Just like the delimiter, you should only use an alternative if you are sure that the database where the import will happen supports another character.
Click "Finish" to export the data to a text file.
If you open the text file to see the data, it will look exactly like the image above. If you have too many rows, opening the file might slow down your computer and even crash the application, so opening a large CSV file should be done only if you know that you have the computer resources to view it.
With the file exported and stored on your computer, right-click the file and select "Open With." Choose "Default program." In the list of programs, choose Excel.
Alternatively, you can open the file directly in Excel. Click the "File" tab to see a list of options. One of those options is "Open" where a window opens for you to select a file. In the "File Type" dropdown at the bottom of the window, select either "All files" or choose the "*.csv" option. If you named the CSV with a ".txt" option, then change the file type to ".txt." When you choose a file type from the dropdown in the "Open File" window, you filter out all other file types. This makes it easier to find the file that you want when there are several files stored in a directory.
Double-click the file when you find it, and Excel 2019 opens the file in spreadsheet format. A file opened in Excel looks like a long list of data in the same format as it was stored in an Access table. Each field in an Access table is displayed as a cell in Excel.
Any changes you make to a text file can be saved to the original file, but you should take a copy of it and save it in an Excel .xls or .xlsx file format. CSV files require precise formatting, or you could have errors when you import it to a third-party database. You can save changes to Excel format using the "Save As" function.
Click the "File" tab in Excel and then click the "Save As" link.
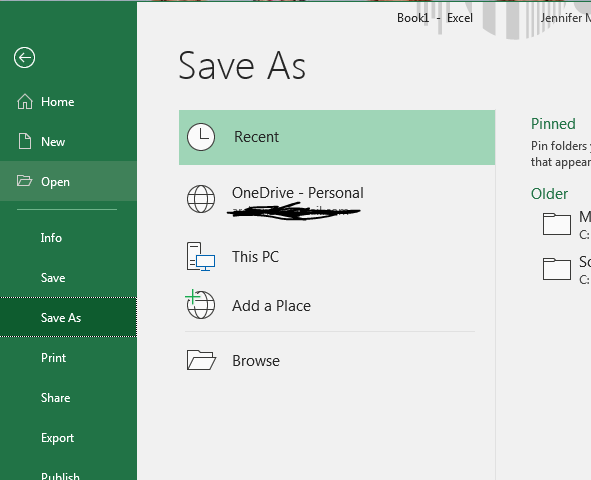
(Excel "Save As" window)
Excel keeps track of where you last saved your files, so you can use "Recent" if you want to save a file in the most recent directory where other files are stored. To use the familiar "Save As" window familiar with most users, click the "Browse" option. With Excel 2019, you also have the option to store the file in a OneDrive location, which is Microsoft's version of cloud hosting. This location is linked to your Microsoft account, so you must be logged in to store to a OneDrive location.
Query External Data
The previous section explained how to export data and import it into Excel. Any changes in the original Access database will not change the static data imported from the CSV file. Excel 2019 has an alternative option that queries data from an Access database directly, so any changes would be seen the next time you query the external source. This function can be triggered by clicking the "Get Data" button in the "Data" tab.
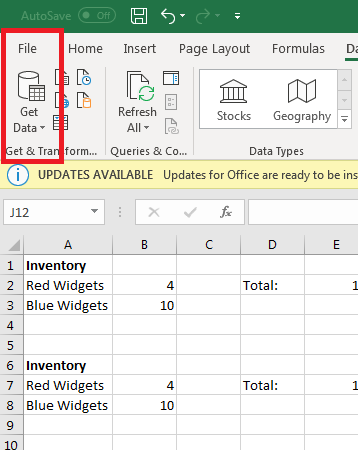
(Get Data button)
When you click the "Get Data" button, you have several options including a file, database or cloud location. When you choose a database location, you again have several database providers to choose from. Since we're using an Access database, choose this option but just know that Excel can query several other database resources.
A new window opens prompting you to point to the Access file. Navigate to the location of an Access database. In this example, the Northwind database is selected. If you don't have the Northwind database stored on your computer, you can open Access and choose the Northwind database template to download it and store a copy on your computer.
Excel 2019 will automatically make a connection to the Access database and show you the tables available in the file. Click a table and see a preview of the table data.
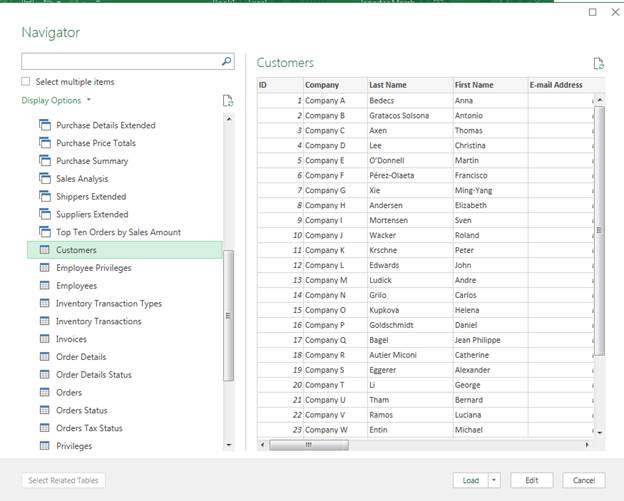
(Access Customer table preview)
This preview lets you review the information stored in a table. In this example, the Customers table is chosen, and a sample of data stored in this table is displayed in the right panel.
After you've selected the table that you want to load, click the "Load" button.
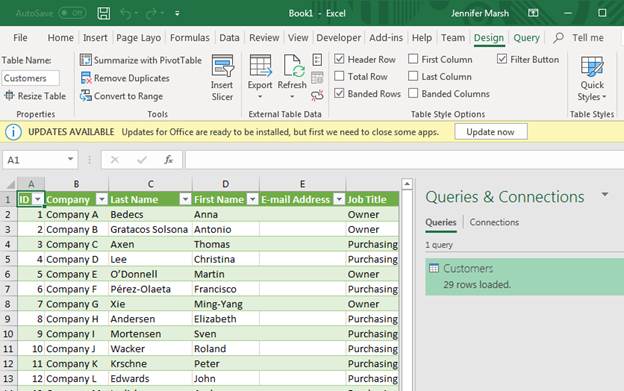
(Loaded data from Access)
In the image above, the linked Access table data displays in an Excel spreadsheet. Column headers are already added, and Excel 2019 even color codes rows to make each one easier to read. Should you change data in the Access table, the changes result in the Excel spreadsheet as well. In the right panel, the connected table name is displayed, so you know the data source and the table name that's displayed in the spreadsheet.
You can click the arrow next to each column header to change the order. By default, the order displayed from a linked table is the ID column. Most tables have an ID column, which is a unique number that differentiates each record. You can change this order by clicking the arrow number next to the column header and select the column that you want to use to set the order. For instance, you might want to order rows based on a customer's last name. You can choose the "Last Name" column to be the primary order for all records in the table.
Making changes such as ordering records does not change values in the source database. Using linked data in Excel makes it convenient when you have data stored in one place and want to review it in Excel 2019. You can also copy data from this view, so you can transfer it from this Excel spreadsheet to another as a static record archive of the current data.