
Introduction to Macros

One reason Microsoft Office is popular is because it provides development and automation tools for users. Every product in the Microsoft Office suite has development tools and macro automation. We'll cover development tools in the next lesson, but this lesson covers macros. Macros can be integrated with development tools, but you can also create macros that automate tedious tasks that must be done over and over.
For instance, you might have a document where you need to enter information into a form. You might need to enter the same information in several form input boxes. You could have a thousand documents to generate, and you would need to enter the same information over and over until you're finished. As you can imagine, entering the same information in a thousand documents in the same forms could be very time consuming. You don't have to spend hours entering the same data constantly. Instead, you can use a macro to automate data entry.
Macros are a way to save time either for someone who owns a business or an employee that must enter numerous data that could be automated based on the information being redundant. In addition to reducing overhead for redundant data entry, macros can lower the amount of time to enter information. If it takes you 15 hours to enter data into five hundred documents, using a macro will reduce this time to only a few minutes. By reducing the time it takes to fill out these forms, you reduce money paid to have these documents filled out. Not only do macros reduce time, they also save you money. For anyone who runs on a small budget or does not have time to perform redundant tasks, macros are a great solution.
Create a Small Macro
Macros can be long recordings with developer code embedded to customize the way that they work. However, not every macro must be complex with several steps and coding experience to create. You can create small macros that perform small tasks to save time. In this section, we'll create a simple macro to illustrate how to create, record and run a macro. Just know that these features in Word can be much more complex as you need more tasks fulfilled. When you know how to create a simple macro, you can then move on to more complex ones that require longer recordings and developer coding.
Macro recording and settings are found in the "View" ribbon tab. This tab contains several functions including views and zoom levels. On the right side of the panel, you will see the "Macros" category with one button. Click the "Macros" button to see the dropdown options.
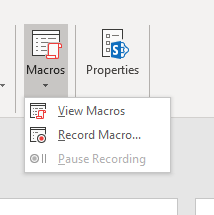
(Macros dropdown button options)
The first option in the dropdown lets you view current macros. If you click this option, a window opens that shows any current macros. If you've never created any macros, you won't see any macros showing in the list.
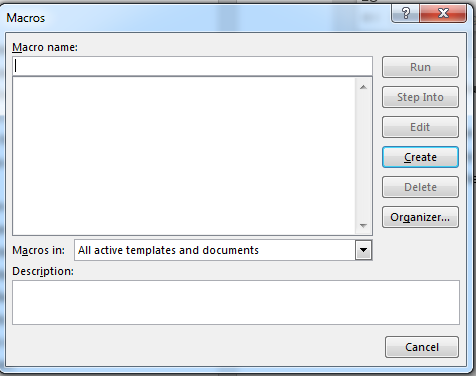
(Macro list)
In the image above, no macros have been created, so you see none in the list. You have the option to create a new macro by clicking the "Create" button. You should first select the local document from the "Macros in" dropdown, but you can also keep the macro global by leaving the dropdown selection at the default.
When you click the "Create" button, the developer interface opens. This is a macro that is integrated with developer applications. This will be covered in the next chapter. These macros can be complex and automate several activities on your computer. Just know that these macros are much more customizable than a simple macro recorded in a document.
Click the "Record Macro" from the "Macros" dropdown in the "View" ribbon tab. This opens a window where you can see a list of recorded macros.
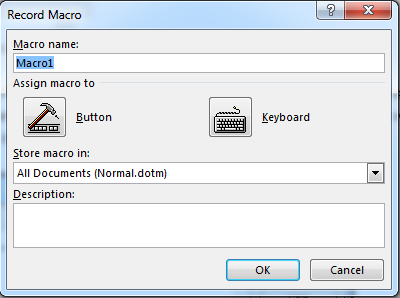
(Record macro)
A new macro name is automatically filled out in the "Macro name" input box, but you can type any name into this input box. Choose a name that can be used to recognize the macro.
The "Assign macro to" section lets you choose if you want to create a button to trigger the macro or a keyboard shortcut. With a keyboard shortcut, you just need to press a key combination to invoke the macro. This is the quickest and easiest method, but then you need to remember the key combination to invoke the macro.
The button option relinquishes the requirement of remembering a keyboard shortcut, but it also comes with its disadvantages. A button takes space on the quick access bar or wherever you choose to display it. When you choose the "Button" option, a new settings window opens where you choose the location to store your new macro button. This option requires you just to have space for the button, and it is probably the most popular option for convenience.
Click the "Button" option and a location settings button displays.
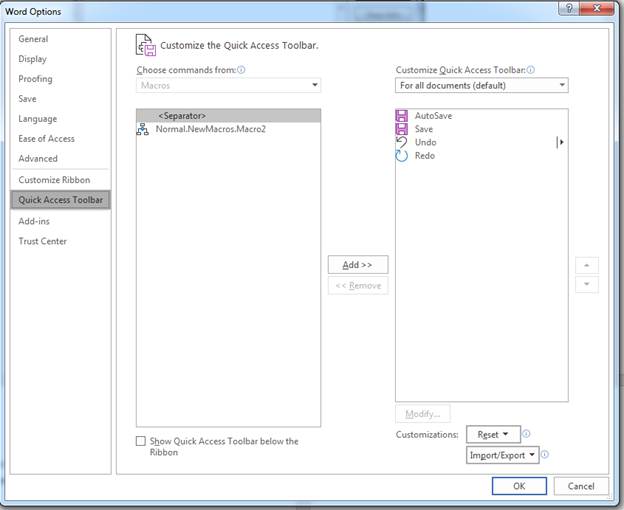
(Choosing a location for a macro button)
The Quick Access toolbar holds your macro buttons. The Quick Access toolbar is the very top of your Word window where you see the Save and Undo buttons, which you use frequently. Notice that these functions show in the right side of the two panels. What shows in the right panel will show in the Quick Access bar. Choose your new macro name in the left panel and click the "Add" button to move it to the actively shown panel. Afterward, click the "OK" button for your changes to take effect.
After you determine the button location for your macro, it's time to record it. Click "OK" and the recording mechanism starts. Anything you do at this point is recorded by the macro function. Click a menu button, type some text, delete content or paste some media to your Word document. All of these actions are recorded by your macro.
Once the macro recording starts, a new option in the "Macros" dropdown button is activated. You can now see the "Stop Recording" option in the dropdown. When you are finished recording activity, you can click this button to stop the macro.
You might want to redo the macro recording. This is common when you make a mistake with one of the steps. When you're recording, you can't just delete part of it. You're forced to redo the macro recording instead. You can delete the macro by clicking the "View Macro" option in the dropdown after clicking the "Macros" button. The window was shown previously where a list of macro names is displayed.
Click the macro that you want to redo and click the "Delete" button. Make sure that you don't delete the wrong macro, or you'll be forced to rewrite a second macro as well. With the macro deleted, you can then perform the same steps and re-record your macro.
After you are happy with your macro recording, you can then view it to test its outcome. Viewing your macro runs it for a test round, so you can identify if you want to distribute it with your document or delete it again and re-record it.
You can run a macro in the same window where you can view a list of available macros. You aren't limited to just the ones that you currently recorded. Any macros that you previously recorded and made available to all documents are shown in the list of macros. Click the one that you want to run and click the "Run" button. Notice that the macro takes the same exact actions as what you did as you were recording it.
Simple recorded macros are perfect for monotonous tasks that you must do with every document. Click a button and an hour-long activity takes only a few seconds. You can't rely always on simple recorded macros. You sometimes need to incorporate developer tools. In the next chapter, we discuss an introduction in creating more advanced macros.


