
The second focus in this article is macros. Macros are functions that automate activity for you. They are a set of instructions that carry out a function, so you just click a button and have this activity done for you without performing the same click of a button, press of a key or any other calculation that has shown to be too repetitive. Macros are perfect for repetitive tasks that you must do too often. They can save time especially when it's a large number of steps to finish one activity.
Using Templates in Excel
Microsoft offers several templates for all software in its productivity suite. Excel's templates focus on common activities that require calculations. If you want to learn how to work with certain Excel functions, some templates are meant to help you understand how to work with Excel. For instance, Excel has a template that's marked as a "Pivot Table tutorial," which is a spreadsheet used to help you learn Pivot Tables.
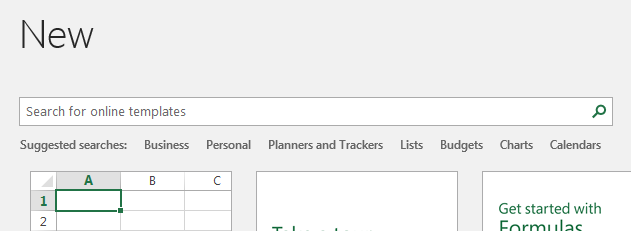
To find a template, start Excel 2019 if you don't already have the software open. If you already have a spreadsheet open, Click the "File" tab option and a new window displays. Click the "New" option in the left panel. This prompts you to create a new spreadsheet. A new "blank" spreadsheet is just a template that has no preconfigured settings, values, formulas or layout.
(New template choice categories)
Under the search text box, a list of categories is shown horizontally along the top of the template options. You can use these category links to filter and narrow down the number of template options. For instance, if you click the "Personal" link, several personal templates are showing including personal monthly budget, expense calculator, amortization schedule, and loan calculator.
When you open a template document, Excel 2019 takes the template and applies it to your new file. The template values for you to enter are left blank, but all formulas and functions are already stored in the appropriate cells. You can still customize the template if you choose to. The original template is stored in the cloud, so the changes that you make can be reversed by deleting them yourself or re-downloading the template from Microsoft's cloud server that hosts them.
If you don't find a template in the list, you can also type a search phrase into the text box and find a template. Templates offered by Microsoft are free, but other vendors might offer a template either customized or sold from a stock of templates for a fee.
Understanding Macros
Macros save you a huge amount of time on repetitive activity. It might seem trivial when you only have a few cells to work with, but if you do the same task over and over in a spreadsheet across hundreds or even thousands of rows, a macro can save you hours. The small bits of time that are no longer wasted on manual keystrokes and mouse clicks are done programmatically in your macro.
Before you can record a macro, you need access to the "Developer" tab. This tab is hidden by default, because it opens up a powerful dashboard of options that can be used to program applications that run in Excel. Macros don't require knowledge of Visual Basic, but you can create applications specifically for Microsoft Excel using Visual Basic code.
Note: Macros can be used to add malicious malware on another user's computer. This is why a warning message is displayed before a macro can run. By default, Microsoft Office blocks macros with a message confirming that the user wants to run them each time a user opens a file that contains a macro. When you send files in email or to other users in some way, some cyber security systems will block files with macros by default. For this reason, you should use macros sparingly, preferably only within your own files that you trust. It's generally better to block macros in files from any other users. Malicious macros can install ransomware, download third-party software, and install rootkits giving an attacker access to your computer.
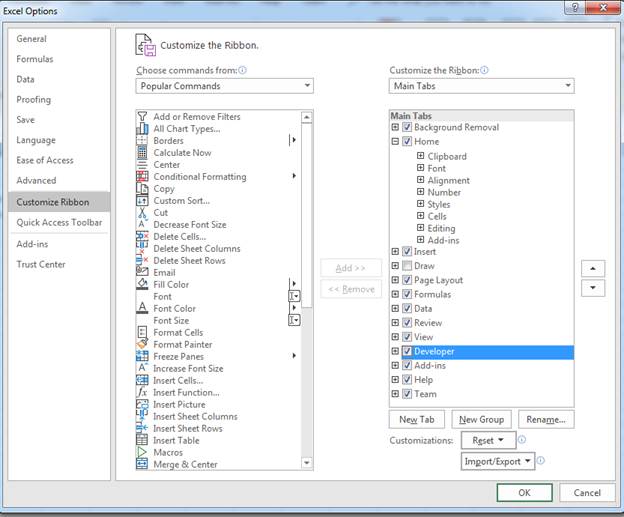
The "Developer" tab is located between the "View" and "Add-ins" tab if you already have it enabled. Take a look at the top of your spreadsheet window to identify if you have this tab enabled. If it's not enabled, you won't see the tab, so you need to enable it in Excel options.
Click the "File" tab at the top of your window, and then click "Options." The "Options" link is located on the bottom-left corner of the window that displays when you click the "File" tab. A window opens with a list of options.
(Excel options window)
Click the "Customize Ribbon" option in the left panel, and you'll notice several ribbon options in the right list with the "Developer" box unchecked. Check the "Developer" check box to enable the tab and then click "OK" to close the window. The window closes and now you can see the "Developer" tab in the list of ribbons at the top of the spreadsheet.
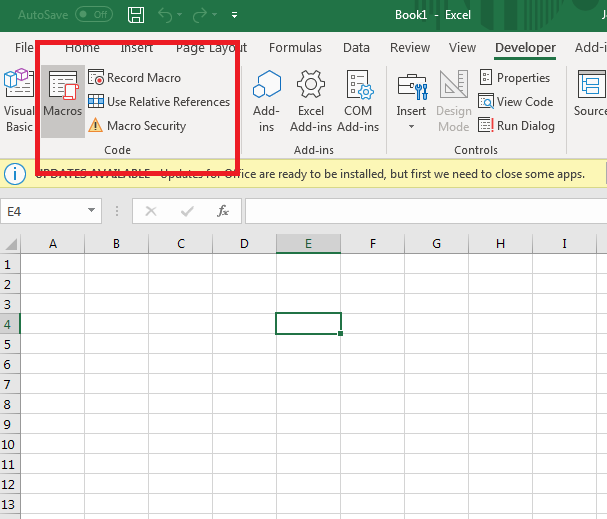
Click the "Developer" tab and take a look at the options in the tab. We're concerned with the macro options.
(Macro section of the Developer tab)
The left button displays the Visual Basic option where you can create applications that run in Excel 2019. These applications require programming knowledge of Visual Basic, so we'll cover basic macros recorded using the "Record Macro" option.
For the following examples, small steps will be used to illustrate a macro, but you can have many more steps in your macro recording. You can record as many as you need to complete the steps for automation.
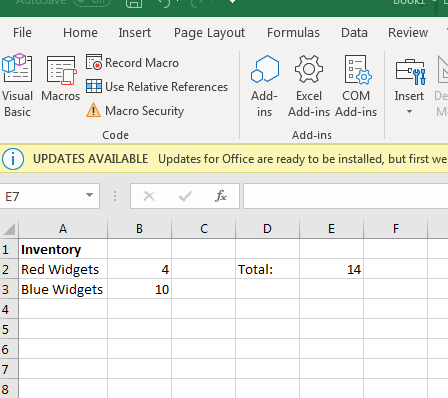
First, some test data is set up.
(Test data set up for a macro)
In the image above, a small inventory list is created to keep track of the number of red widgets and blue widgets. A formula is stored in cell E2 that adds up the values in the inventory cells B2 and B3.
Suppose we want to create a separate set of data for each month. The above month could represent January, so we need to then copy another set of data from these cells to cells below this section. We will need to copy these cells each month, so we can create a macro to copy these cells for us and save us time. Again, although this seems trivial and only saves a few seconds of time, imagine if you had to perform this copy and paste action dozens of times in one spreadsheet each time you created it. What is only a few seconds could take several minutes, and a macro will perform the action for us.
The first step is to click the "Record Macro" button at the top in the "Code" section of the "Developer" tab.
(Record macro settings window)
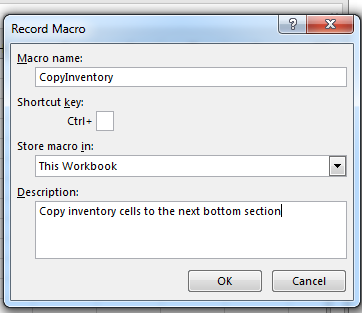
A window opens (pictured above) where you can configure a few minor settings. First, macros are stored with a name, so you can reference them again should you want to delete it or reconfigure a macro's recording.
Give your macro a name, and then a shortcut key which is optional. A shortcut key lets you use a keystroke to start a macro. Notice that you must use the keystroke while holding the Ctrl button, which is why the Ctrl text displays in front of the input text box.
You can store the macro in the current workbook or store it in a separate file. Unless you have several macros that you want to use across several workbooks, it's better to store the macro in your current workbook. It's easier to retrieve, and it won't conflict with any macros that you have for other workbooks. The description is a basic short explanation of the functionality of the macro, so you can look up its information before running it again in the future.
Click "OK" and the recording begins. Highlight all cells that contain the data that you want to copy, and then paste a second copy below the first one. Notice that the "Record Macro" button changes to show "Stop Recording." When you're done with copying and pasting cells to the next section, click the "Stop Recording" button and the macro is finished.
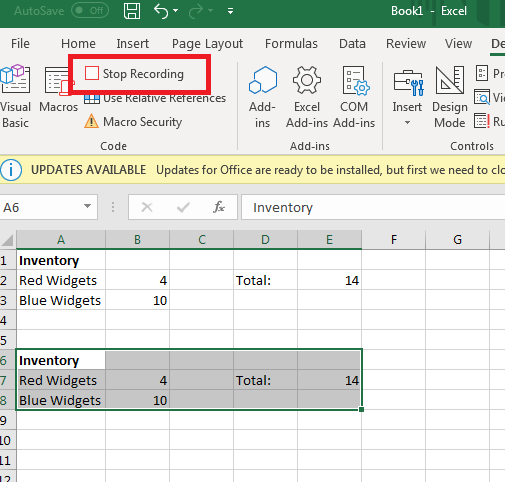
(Stop recording after you copy a second section)
In the image above, a second copy of the inventory section is copied again. When you copy a group of cells that contain a formula, the formula is copied and cells shift to reflect the new location. If you look at the new E7 formula that calculates red and blue widget inventory. If you change the values in the new section (cells B7 and B8), these new values are recalculated in E7 and displays the added result. This macro activity makes it much easier to repeat steps such as these without formatting or re-adding formulas.
You can add multiple macros to your workbook, but the names of each of your macros must be unique. Should you create a new macro and attempt to name it the same as an existing one, Excel 2019 will ask if you want to overwrite an existing macro or rename the new one to something different.
Both templates and macros are convenient added extras for anyone who uses Excel 2019 frequently. Templates save you time by having all the formulas, formatting and functions already set up for you. Microsoft offers numerous different templates online that you can download and save yourself time. Macros are small recorded actions that save you time as well, but these recordings save you time when setting up your templates or just performing repetitive tasks. Using bot templates and macros, you can save hours of work when using Microsoft Excel 2019.