Once you start using the Adobe Photoshop Lightroom program, it is possible that you will have hundreds, maybe even thousands of images that you want to import. This is especially true if you are a professional photographer or an avid hobbyist who constantly takes pictures of family and nature. That said, being able to organize your images will be critical to being able to find those images when you need them.
In this article, we are going to talk more about organizing your images and talk about the several methods that Lightroom provides.
We will learn how to:
-
Organize folders and create subfolders
-
Delete photos from folders and the catalog
-
Sync folders
-
Create collections
-
Stack images
-
Add keywords, flags, labels, and ratings
-
Organize images by location
-
Use the Painter Tool
Organizing Folders and Creating Subfolders
As you already know, whenever you import an image into Lightroom, Lightroom creates a catalog entry for that image which includes the location of the image. The location of an image is typically the folder where it is stored.
All folders that contain imported images are listed in the Folders panel in the left panel group. While in the Folders panel, you can move around files and folders without worrying about messing up your catalog. Typically, if you move a file or folder on your computer after importing the images into your catalog, Lightroom will not be able to find the image because the location will have changed. However, in the Folders panel, you do not have to worry about this.
Take a look at our folder listed in the Folder panel below.
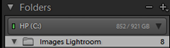
As you can see, the folder name is Images Lightroom. We can also see that there are eight images in that folder.
When we click on that folder, we can see the images in Grid view.
Now, let's say we want to organize the images that are inside the folder. We are going to do so by creating a subfolder within the folder.
To get started doing that, select the images in Grid view that you want to add to a subfolder. Click CTRL+Click to select more than one image.
Next, click the Create New Folder button in the Folders panel. It looks like this: 
Select Add Subfolder from the context menu.
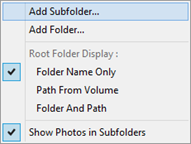
NOTE: There should be a checkmark beside Show Photos in Subfolders (pictured above).
You will then see the Create Folder dialogue box.

Type in a name for the new folder. We are going to name ours Birds.
Make sure there is a checkmark beside Include Selected Photos.
Click the Create button.
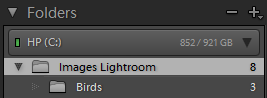
As you can see in the snapshot below, the subfolder named Birds is now shown below are folder.
Deleting Photos from Folders
If you make any changes to folders or images in the Folders panel, those changes are made on your hard disk as well. On the flip side, if you make changes to folders, images, or folder/image locations on your hard drive, the Folders panel needs to be updated as well. If you delete an image on your computer, Lightroom will have an alert badge that appears in Grid view in place of the image. If you select the image, the missing photo alert appears below the Histogram as well.
For the example below, we have deleted an image by going to the folder on our hard disk and deleting the photo.
Take notice of the image we have selected below. This is the image we deleted. You can see the alert badge in the upper right hand corner. When we clicked on the alert badge, the Confirm dialogue box appeared.
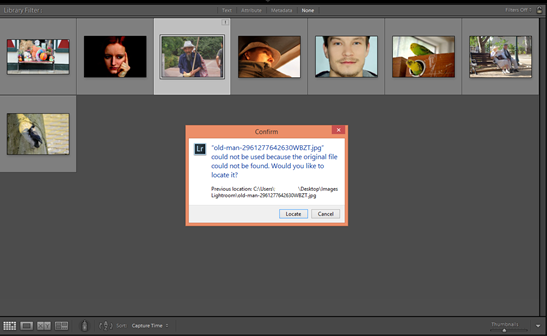
If you want to locate the missing file, click the Locate button.
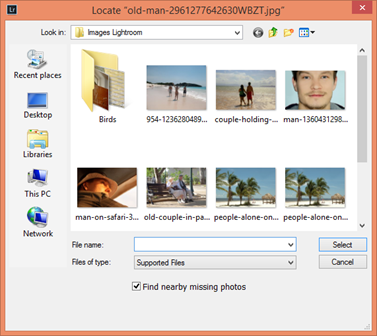
We can now find the missing photo.
That said, if you deleted the image on purpose and do not want to restore it, you also need to delete it from the catalog. To do this, select the image in Grid view, then click ALT+Backspace on your keyboard. You can also go to Photo>Remove Photo from Catalog.
Synching Folders
When you sync folders in Lightroom, you synchronize the folders in your catalog with those on your hard disk. This is the perfect time to remove deleted photos from your catalog, as well as import new images that have been added to your folders since the last import.
To sync folders, select the folder you want to sync in the Folders panel, then go to Library>Synchronize folder.

Select if you want to:
-
Import new photos that have been added to the folder on your hard disk, then also if you want to see the import dialogue box before importing.
-
Remove any photos that have been removed from the folder on your hard disk from the catalog as well.
-
Scan for any updated metadata.
Click Synchronize when you are finished.
Creating a Standard Collection
In Lightroom, a collection is like a folder that groups your images in the way you want them grouped so that you can easily find them whenever you need them. You can add any images that you want to the collection that you create. For example, you can create collections based on subject matter, creation date, etc.
There are three types of collections in Lightroom: Collections, Smart Collections, and Quick Collections.
We are going to teach you to create all three.
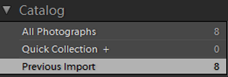
To create a standard collection, select the images you want to choose from in the Catalog panel (left panel group). As you can see below, you can select All Photographs or the Previous Import.
Your images should be displayed in Grid view.
Select the images you want to add to the collection by clicking on them in Grid view. Remember to click CTRL+Click to select multiple images.
Next, go to Library>New Collection.
You will then see the Create Collection dialogue box.
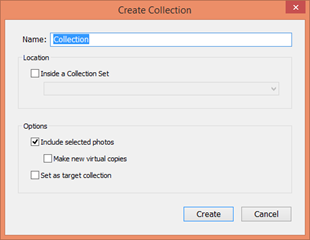
Enter a name for the new collection.
We are going to name ours Example.
Make sure Include Selected Photos is checked, then click the Create button.
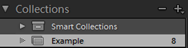
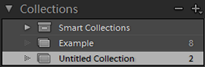
You can go to the Collections panel (left panel group) to see your new collection listed.
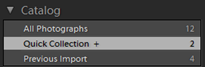
Creating a Quick Collection
A Quick Collection is a temporary collection that you use to store images as you gather them from different folders. The Quick Collection can be accessed in the Catalog panel, as shown below.
When you are finished adding images from different folders, you can convert the Quick Collection into a permanent collection.
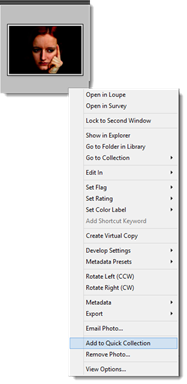
To add an image to a Quick Collection, click to select the image, then right click.
Select Add to Quick Collection from the context menu.
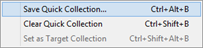
To convert a Quick Collection to a permanent collection, go to the Catalog panel and click on the Quick Collection to select it.
Right click, then select Save Quick Selection.
You will then see the Save Quick Collection dialogue box.
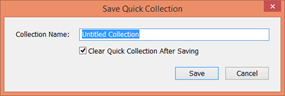
Enter a name for the collection, then click the Save button.
The collection is now permanent and appears in the Collections panel.
Our new collection is selected in the snapshot below.
Creating a Smart Collection
Smart collections are collections of images that are grouped together based on metadata.
To create a Smart Collection, go to Library>New Smart Collection.
You will then see the Create Smart Collection dialogue box.
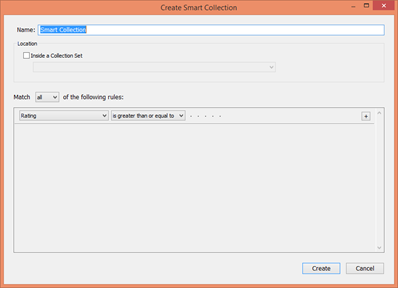
In this dialogue box, tell Lightroom what search criteria you want to use to create your Smart Collection.
For example, you can create a collection based on images that have at least a certain rating.
When you are finished, click the Create button.
Stacking Images
Stacking images simply refers to the process of stacking images on top of each other within a folder or collection. Only the top image in the stack is displayed in the folder or collection. Typically, you would stack related images.
By stacking images, it is easier to browse through folders or collections to find the images that you need.
To stack images, select two or more images in Grid view, the go to Photo>Stacking>Group Into Stack.
To specify the top image in the stack, go to Photo>Stacking Menu.
To expand or collapse a stack, click the stack icon that appears on the top image in the stack.
Adding Keywords
You can also add keywords to individual photos.
To add keywords to an image, select the image in Grid view, then go to the Keywording panel (right panel group).
Enter keywords where it says Click Here to Add Keywords. Separate different keywords with commas.
Press Enter when you are finished.
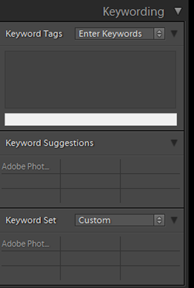
You can also add keyword sets in the Keywording panel. Keyword sets are groups of keywords put together for a reason. For example, you may create a keyword set for a certain project.
Adding Flags
You can flag images to mark the ones you want to keep � or to mark the ones you want to reject. For example, if you are a professional photographer and have taken pictures of a client's wedding, you and the client may want to go through the photos together to decide which ones to print. You can flag the ones your client does not like and might want to reject. Later, you can go back through the flagged photos by searching for them using the Filter bar located above the work area. Your client can then make a final decision about those flagged images.
You can flag an image as a pick, reject, or leave it unflagged.
Go to the Toolbar. Click the triangle on the far right side.
Make sure Flagging is checked.

You will then see the Pick and Set as Rejected buttons in the Toolbar:

The Pick flag is white. The Set as Rejected flag has an X on it.
Now select a photo. Click a flag in the Toolbar.
If you look at the Filmstrip, you will see the flag in the upper left corner of the image.
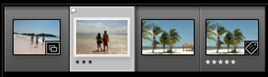
Adding a Rating
You can rate images on a five star scale. This is a great way to sort images by quality.
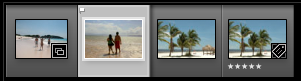
To assign a star rating to an image, select an image in Grid view.
Press a number from 1 to 5 to rate the image. 1 equals one star, etc.
We added a three star rating to the selected image below.
Adding Color Labels
You can add color labels to your images as a way to further organize and sort your images. For example, perhaps you will want to add a green color label to all images with a landscape orientation or with pictures of children. You can group them however you want.
To add a color label, select an image in Grid view, then right click on it.
Choose Set Color Label, then choose the color (as shown below).
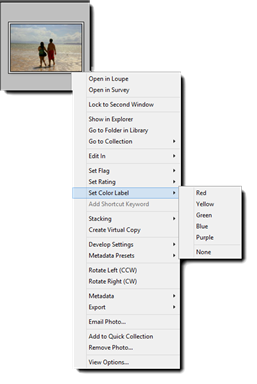
The color you choose then frames in the image.
Organizing Images by Location
You can also geotag your images in order to be able to organize and sort them by location. Your camera may do this for you, but if not you can do it easily enough on your own in Lightroom.
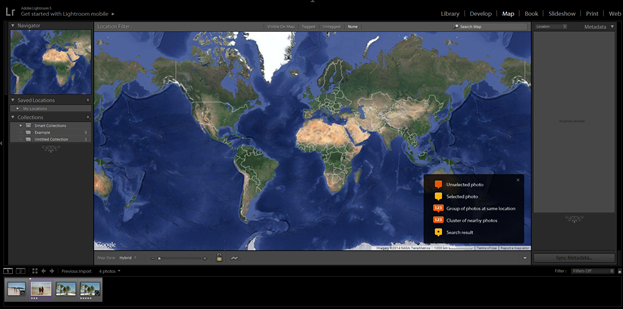
To geotag an image, select it in Grid view, then click Map in the module picker. The module picker is shown below to remind you what it is.

The Map module is pictured below.
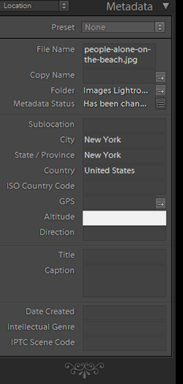
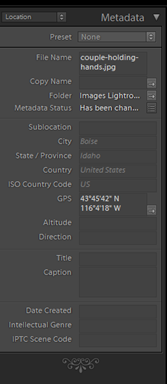
Go to the Metadata panel (right panel group) and add the information.
Adding Locations Using Tracklogs
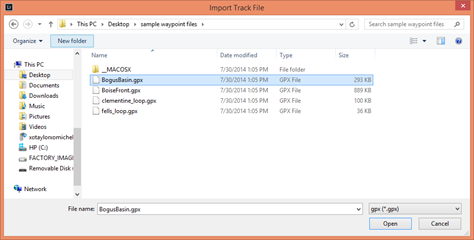
Your camera may or may not record GPS data. However, you might be able to export your locations over a given period of time from your phone and import it into Lightroom. Lightroom can then match the times and dates of your locations with the times and dates of your photos. The file you export from your phone will be a .gpx file.
Here is how to use Tracklogs in Lightroom:
Click the GPS Tracklogs button in the Toolbar. It looks like this: 
Select Load Tracklog.
You will then see the Import Track File dialogue box.
Find the .gpx file, then click Open.
Your map will be updated.
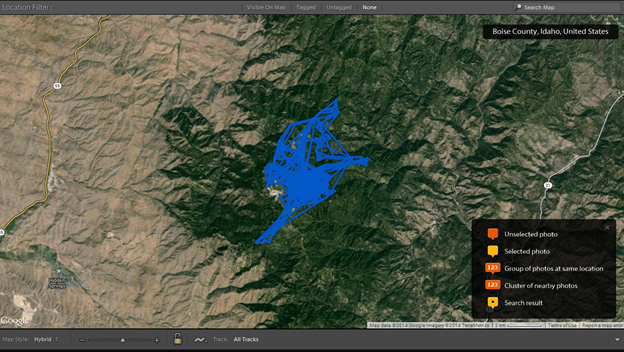
You can zoom in if you need to in order to be able to better see exact locations.
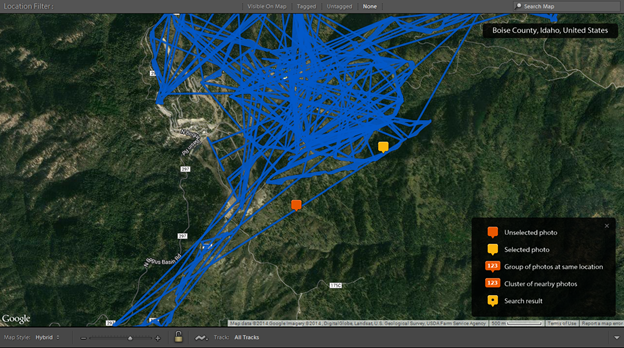
Drag photos from the Filmstrip to locations on the map.
If you look at the Metadata panel, you will see the GPS coordinates are added.
Now when you go to the Map module, you will see your images on the map:
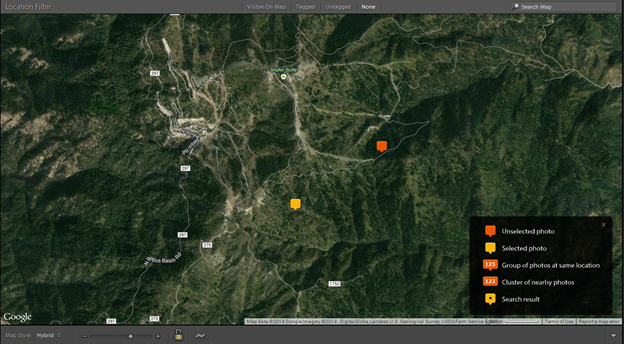
You can use the Filter bar to search for them.
The Painter Tool
The Painter Tool makes adding metadata, keywords, labels, ratings, and color labels as easy as dragging the tool across an image.
For this section of the article, let's return to the Library module.
The Painter Tool is located in the Toolbar. It looks like this: 
To use the Painter Tool, click on it, then select what attributes you want to "paint" on your images.

NOTE : Keywords is chosen by default. Click the double arrows to see all menu options.
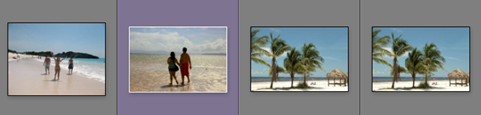
We are going to choose Label, then click on the green box for a green label.

Now we can move our mouse over any of the images in Grid view, and we'll see a green spray paint can appear. Simply click on a thumbnail to apply the green label.

If you move your mouse back over one of the thumbnails that you labeled, then press the Alt key, the cursor will change to an eraser. Click on the thumbnail to remove the label.