Lightroom gives you several ways to publish your images to the Internet and share them with others. You can even showcase your images with online galleries. In this article, we will cover the methods you can use to publish your images to the web.
We will discuss:
-
Publishing in the Library module
-
Publishing to Flickr, Facebook, and hard disk
-
Using the Web module to create online photo galleries
-
Selecting templates
-
Adding and replacing text in a template
-
Changing the color scheme in a template
-
Modifying a template's layout
-
Establishing output settings for your gallery
-
Saving a custom template
-
Saving your gallery
-
Exporting a gallery
Publishing in the Library Module
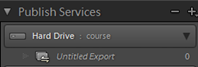
The Publish Services panel in the Library mode lets you publish directly from the Library module. It provide connections to Behance, Flickr, Facebook, and to Lightroom Exchange. With Lightroom Exchange, you can download third-party plug-ins to give you access to other websites where you can share your images.
The Publish Services panel is pictured below.
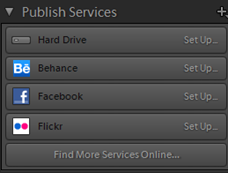
Getting Set Up with Flickr
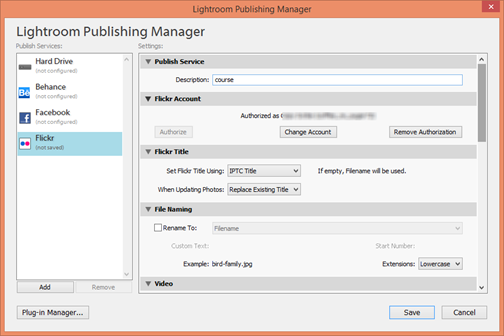
To publish images to Flickr, go to the Publish Services panel, then click on Set Up to the right of Flickr.
You will then see the Lightroom Publishing Manager dialogue box.
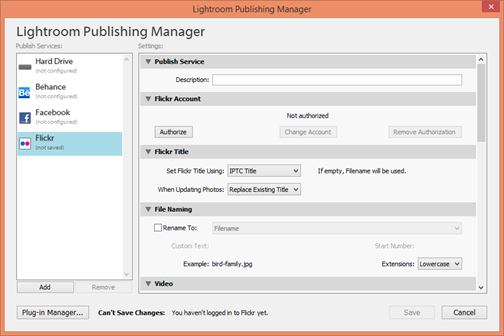
In the Description box under Publish Service, type in a description for your images. You can simply enter your name if you want.
Next, click the Authorize button in the Flickr Account section.
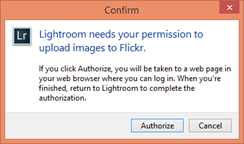
Click the Authorize button.
When you click the Authorize button, your web browser will open. You will be asked to sign into your Yahoo. Once you sign in, you will be taken to the Flickr sign in page.
You will then see this message in your browser window:
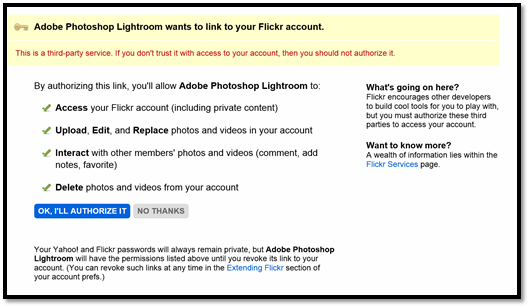
Click OK, I'll authorize It.
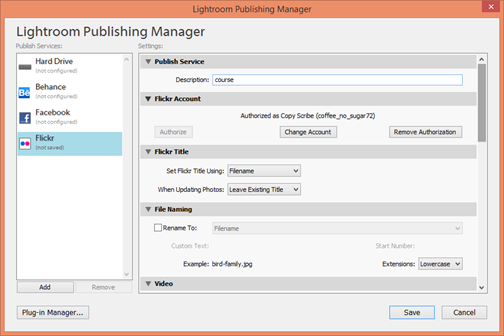
As you can see in the Flickr Account section, the account is now authorized.
Set the rest of your options in the dialogue box, then click the Save button.
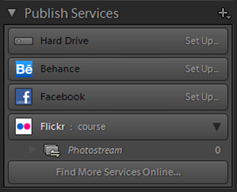
If you look at the Publish Services panel, your Flickr shows the name you added in the description field of the dialogue box.
Publishing to Flickr
To add images to your Flickr Photostream, go to the Folders panel.
We are going to click on our sub-folder entitled Birds.
Click CTRL+A to select all images in the folder.
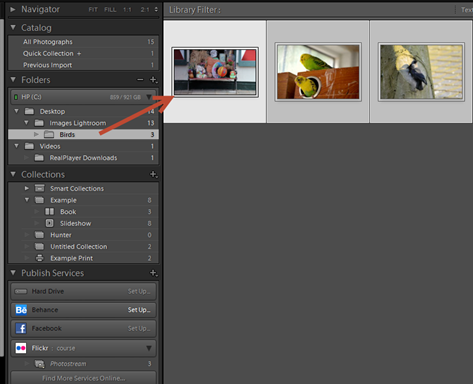
Next, click and drag the images to your Photostream.
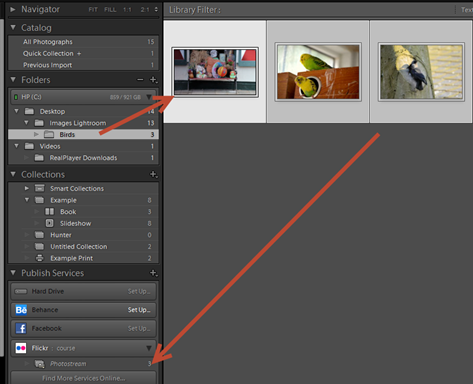
Click the Publish button that is located at the bottom of the left panel group.
When all of your images are listed as published, right click on our new Photostream in the Publish Services panel. Select Show in Flickr from the context menu.
Publishing to Facebook
To publish images to Facebook, go to the Publish Services panel.
Click on Set Up. This appears to the right of the Facebook icon in the panel.
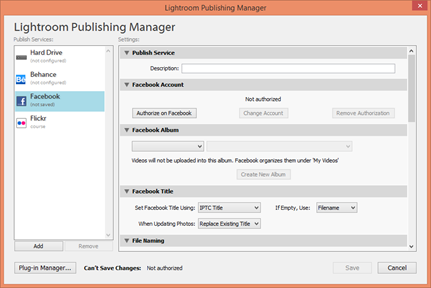
Enter a description just as you did for Flickr, then click the Authorize on Facebook button.
Facebook will then open in your web browser. Once you sign in, you will see this message:
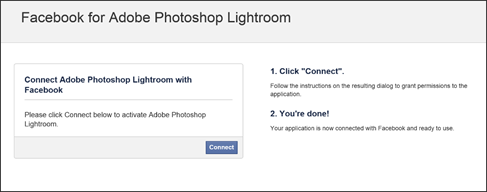
Click Connect.
When you return to Lightroom, finish establishing your settings in the Lightroom Publishing Manager dialogue box, then click Save.
You will see the description you entered in the dialogue box listed beside Facebook in the Publish Services panel. Below it, you will see Timeline Photos.
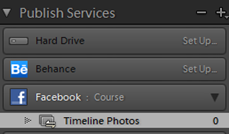
To add image to Timeline photos, select a folder in the Folders panel as we did in the last section. Click CTRL+A to select all images (or CTRL+Click to select multiple), then drag the image to Timeline Photos in the Publish Services panel.
Publishing to Hard Disk
You can also publish collections on your hard disk. To do this, go to the Publish Services panel. Click Set Up. It appears to the right of Hard Drive.
You will then see the Lightroom Publishing Manger. This should look familiar to you by now.
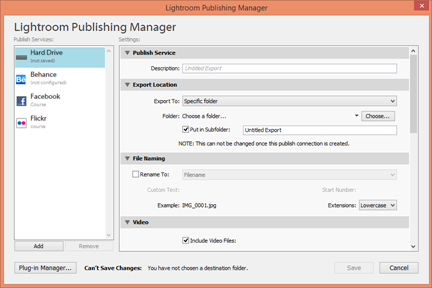
Enter a description, then choose a location where the exported file will be stored by choosing a folder and an optional sub-folder.
After you have set your options in the dialogue box, click the Save button.
It then appears in the Publish Services panel.
You can add image to it following the same steps you used for Flickr and Facebook.
The Web Module
So far in this article, we have used the Library module to publish our images. Let's switch to the Web module now.
The Web module is pictured below.
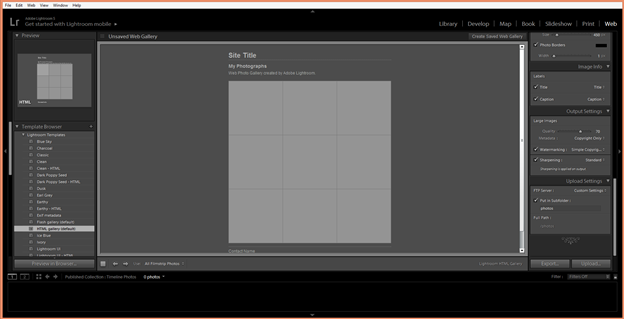
Using the Web module, we are going to create an online photo gallery. The easiest way to do this will be by creating a collection that contains the images we want to include in the gallery.
If you are following along in Lightroom, make sure that you have a collection created --- or create one � to use to create an online photo gallery.
Selecting a Template
We can use a template to create an online photo gallery in much the same way as we used templates to print images and create photobooks.
To select a template, first click on the collection you want to use in the Collections panel.
Next, go to the Layout Style panel in the right panel group.
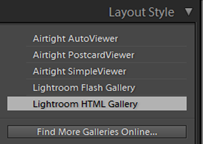
Choose a layout style. We are going to choose Lightroom HTML Gallery.
When you do this, you can see the default HTML gallery template activated in the Template Browser in the left panel group.
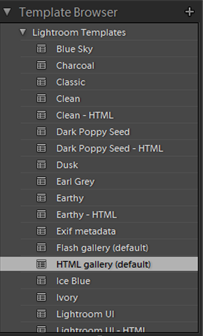
If you want, you can choose another layout style from the Layout Style panel, or you can select another template from the Template Browser Panel. We are going to select Earthy-HTML from the Template Browser panel.
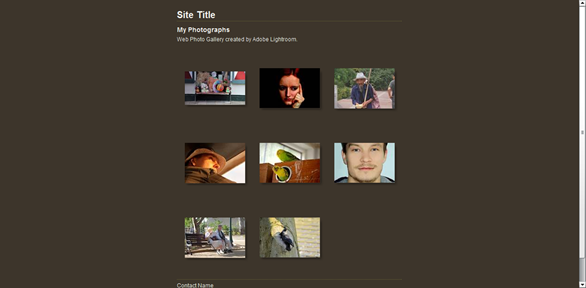
Look at your work area. You will see how your images will look in your selected layout.
NOTE: Make sure that All Filmstrip Photos is selected from the Use menu in the toolbar, as pictured below.

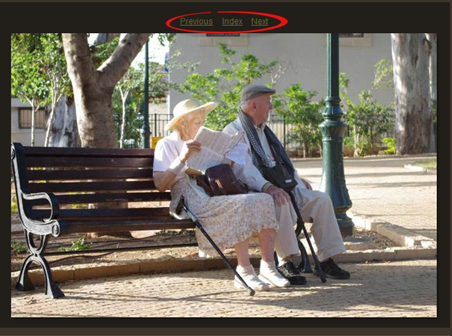
Now we can click on one of the images and view our gallery. Note the Previous, Index, and Next above our image.
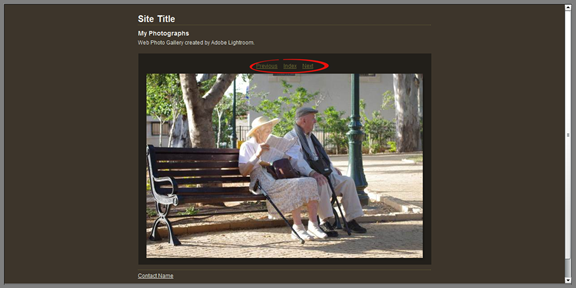
If this were a Flash gallery, we would have playback controls.
Adding and Replacing Text
Using the Site Info panel, you can add a website title, collection description, contact information, as well as email links. Any information you add in this panel will appear on your website. You can also customize the Identity Plate.
The Site Info panel is shown below.

Filling in the information in the Site Info panel is optional. Fill in whatever information you want to appear.
Changing the Color Scheme
By going to the Color Palette panel, you can change the color scheme for the website.
The Color Palette panel is pictured below.
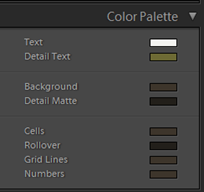
As you can see, you can change the color of the text or the detail text. We can see detail text above our image in the snapshot below.
To change the color, click on the color tile next to the element whose color you want to change.
Select a color from the Color Picker.
You can take your time selecting a color. Experiment and choose the colors that look the best.
Modifying the Layout
You can modify the layout of your photo gallery by going to the Appearance panel.
The Appearance panel is pictured below.
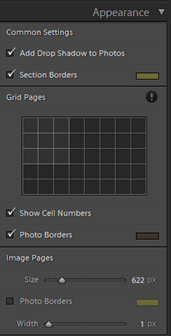
You can add drop shadows to images or section borders.
In addition, you can change the way your images are arranged in the grid � or index. You can also specify the size for image pages and add photo borders. Note that you can add photo borders to image pages (pictured below) and the thumbnails in the grid/index.

The modifications you make to your layout should be based on personal preference, as well as the best way to display your photos based on the people who will view them and the subject matter.
Establishing Output Settings
The Output Settings panel allows you to control image quality as well as the sharpness of JPEG images.
The Output Settings panel is pictured below.
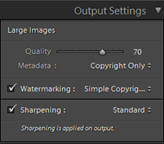
You can also add metadata and a watermark in the Output Settings panel.
Saving a Custom Template
If you make changes to the template you choose, such as color scheme, text, watermarks, etc., you can save it as a custom template to use again with future galleries that you create.
Here is how to do it.
With your gallery open, go to the Template Browser panel. Click the + sign in the header. This is the Create New Preset button.
You will then see the New Template dialogue box.
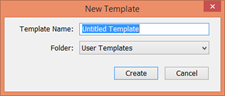
Enter a name for the template, then click the Create button.
Your template is saved under User Templates in the Template Browser panel.
Saving Your Gallery
To save your gallery, click the Create Saved Web Gallery on the right side of the top panel.
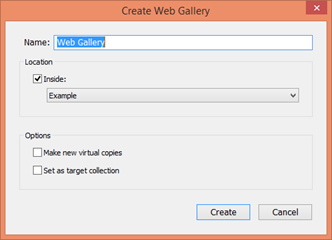
Enter a name for the gallery, then click Create.
The saved gallery appears in your collections. It has an icon beside it that looks like this: 
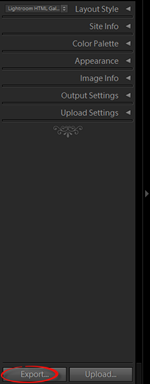
Exporting a Gallery
Once you are finished with your gallery, and you have saved it, it is time to export it to hard disk.
To do this, click the Export button below the right panel group.
You will then see the Save Web Gallery dialogue box.
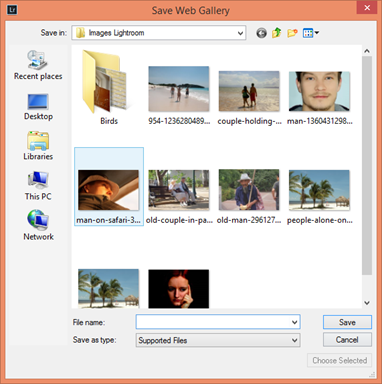
Type in a file name in the File Name field, then click the Save button.
Uploading a Gallery to a Server
In order to upload your gallery to a web server, you will need a hosting account and FTP information from your hosting provider.
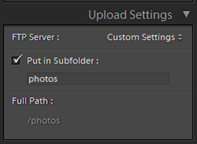
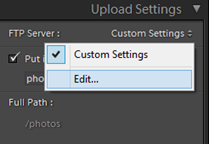
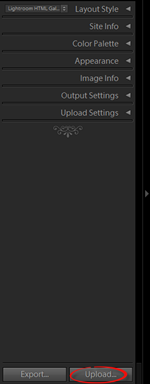
After you have that, go to the Web module and to the Upload Settings panel in the right panel group.
The Upload Settings panel is pictured below.
Click the Custom Settings menu.
Select Edit.
You will then see the Configure FTP File Transfer dialogue box.
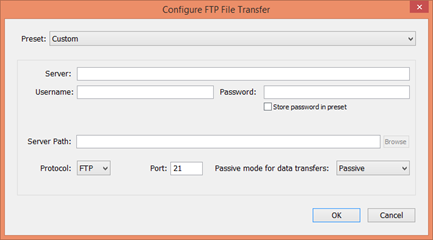
You will need to enter the server address, the username and password provided to you by your hosting provider, and the server path. If you are unsure about any of this information, you should verify it with your hosting provider. You must enter the correct information, or you will not be able to upload your gallery.
In the Preset field, click Save Current Settings as New Preset.
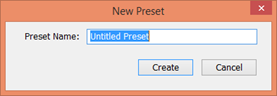
Enter a name for the new preset, then click the Create button.
You can now click the OK button to close out the Configure FTP File Transfer dialogue box.
Now, let's go back to the Upload Settings dialogue box.
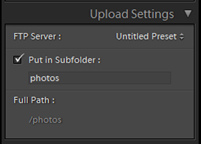
As you can see, FTP server is now set to the preset we created.
Next, choose where you want to put your gallery on your server. Most websites have subfolders, such as images, java, etc. If you have a subfolder where you want to store the gallery, type in the name of the subfolder.
Finally, type in the full path for the gallery, such as www.abc.com/photos.
When you are finished, click the Upload button at the bottom of the right panel group. We have circled it in red below.
Keeping Your Images and Data Safe
In this article, we are going to talk about ways you can protect all your images and hard work in Lightroom from things such as computer crashes and even theft. We will discuss:
-
Backing up files
-
Exporting metadata
-
Exporting images
-
Using and Creating Export Presets
Backing up Files
Can you even imagine losing your Lightroom catalog? Even if you managed to save all your images on an external storage device, losing the catalog would be devastating. Remember, the catalog not only lists your images, it also lists all the adjustments and changes you made to them. It also contains all your metadata for each image. Backing up your catalog helps to ensure that all your hard work will be safe in the event of data loss. You can schedule backups so Lightroom does it for you � automatically � and you do not have to worry about it.
To back up your catalog, go to Edit>Catalog Settings.
You will then see the Catalog Settings dialogue box.

Under the General tab, go to the Backup section (pictured above) and set the frequency for your automatic backups.
When you are finished, click OK.
Now, exit out of Lightroom. You will then see the Back Up Catalog dialogue box.
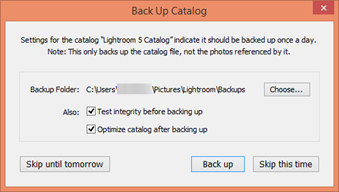
Choose a location where the backup will be stored by clicking on the Choose button.
Put a checkmark beside Test Integrity Before Backing Up and Optimize Catalog After Backing Up.
When you are finished, click the Back Up Button.
Exporting Metadata
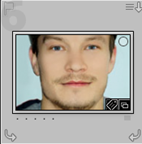
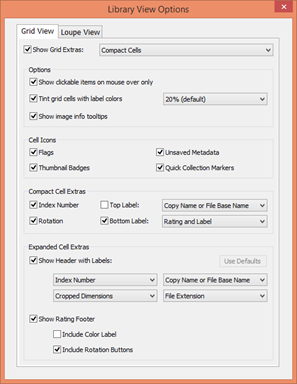
It is important to export the catalog files content so that you minimize the damage done if your catalog file is lost or damaged. When you make a change to the metadata of an image or a group of images, you will see an icon in the upper right hand corner of the image in Grid view that has a white downward arrow in it. It is pictured below.
If you do not see the icon, go to View>View Options in the Library module.
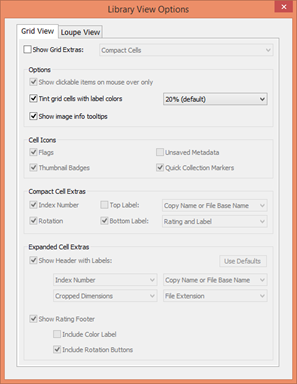
Go to the Grid View tab, then put a checkmark beside Unsaved Metadata in the Cell Icons section.
Close the dialogue box.
Now, select an image in the grid that has unsaved metadata. Right click, then go to Metadata>Save Metadata to File.

Click the Continue button.
The icon will disappear from the image.
Exporting Images
In the last section, you backed up your catalog file without the images. However, when you choose to export images as a catalog, Lightroom allows you to make copies of master files and previews. In addition, you can export all images or just some of them.
To export images, go to the Catalog panel in the Library module. Select All Photographs, then go to File>Export as Catalog.
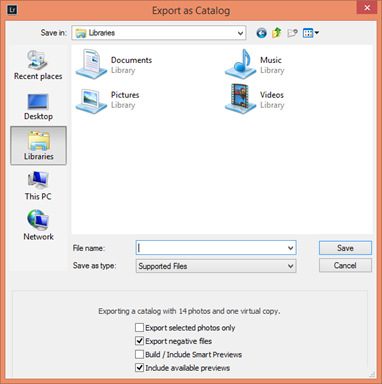
Choose a location to store the files. Next, enter a file name.
At the bottom of the dialogue box shown above, you can choose what to export. Put a checkmark next to what you want to export.
Click the Save button when you are finished.
You will be able to open this catalog in Lightroom.
Exporting Photos for Non-Lightroom Users
In the last section, we talked about exporting images that can later be opened in Lightroom. But what about if you want to export files so that people who do not have Lightroom installed can open them? That is what we are going to talk about next.
Exporting JPEG Images
Let's export an image so that it is in JPEG format and can be opened for viewing on any computer. We will do this while keeping the settings you have applied to it in Lightroom.
First, go to the Folders panel and select a folder.
Select the images in the folder that you want to export, then go to File>Export.
You will then see the Export dialogue box.
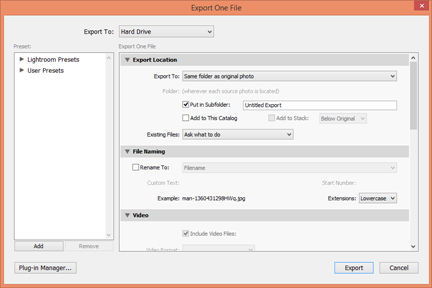
Choose a folder where you want to store the exported file in the Export Location section. You can also choose a subfolder.
Do not put a checkmark beside Add This to Catalog.
Next, put a checkmark beside Rename To in the File Naming section. Enter a filename.
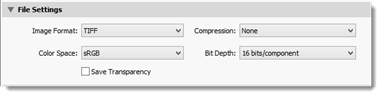
Go to the File Settings section, then the Image Format menu. Select JPEG. The Quality value should be set to around 80%.
Set the rest of your options in the dialogue box, then click the Export button.
The JPEG image will be found in the location you chose. You can open it using any image viewing program.
Exporting as PSD or TIFF
Perhaps you have made color adjustments or tonal changes to an image. You need to work with layers to be able to finish your changes, but to do that, you need to be able to open in the editable version of the image in Photoshop. If you want to be able to continue to edit the images in another program such as Photoshop, you can export images as a PSD or TIFF file.
To do this, select the image(s) you want to export.
Go to File>Export.

Follow the same steps we covered for JPEG. The only difference is that when you select a file format, you will choose TIFF or PSD.
If you choose TIFF, you can apply ZIP data compression. This will reduce the file size.
Set the rest of your options. When you get to the Post-Processing section, decide what will happen after you export the image(s). You can open the image in another location and continue to edit if you want.

When you are finished, click on the Export button.
Exporting as DNG or Original
To archive your image(s), go to File>Export. Leave everything in the Export Location the same from the last sections, but disable the file renaming option.
Next, go to the File Settings section. Select Original from the menu, as shown below.
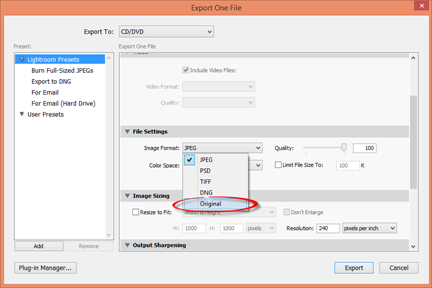
Go to the Post Processing section. Select Show in Explorer. You will find this in the After Export menu.

Click the Export button.
An XMP sidecar file will be saved with the copy of the original image. This stores the edits made to the image, as well as the metadata for the image.
Export Presets
You can create presets for your exporting tasks to save time and make it easier on you. This is an especially helpful thing to do if you find that you are always exporting JPEG images, but constantly having to adjust the options in the Export dialogue box to meet your specifications. By creating a preset, all you have to do is select the preset. Your options will be saved with the preset. In addition to creating your own presets, you can also use presets that Lightroom created for you.
To see these presets, go to File>Export.
You can see the presets listed on the left side of the dialogue box. For example, you can use the preset for email. This preset has a quality setting of 60% . The reason is a smaller file size is preferable for email.
To add your own preset, set your options, then click the Add button below the list of presets.
You will then see the New Preset dialogue box.
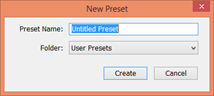
Enter a name for your new preset, then click the Create button.
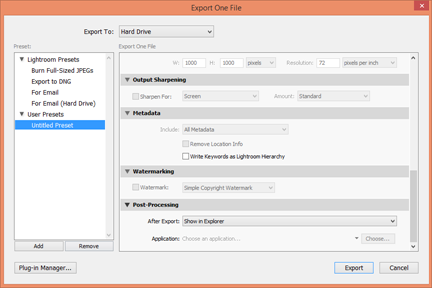
It will then appear under User Presets in the Export dialogue box.