In order to create or edit a video in Final Cut Pro X, you must first create a project. A project contains all the media you use and all the edits that you make.
To create a new project, go to File>New>Project. You can also go to the Project Library, and click the New Project button.
In the pop up window that appears, type a name for the project.

In the In Event field, select a default event for the project.
You can also further specify settings for the project by clicking the Use Custom Settings button.
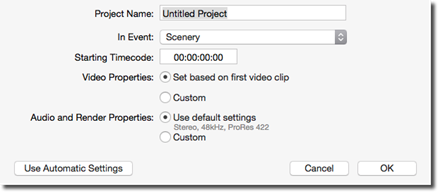
If you want the timecode to start at a different time other than 00:00:00:00, enter it in the Starting Timecode field.
You can also adjust the video and audio properties if you want by selecting the Custom option.
Click OK when you are finished.
You can now look at the Timeline, and see that is ready for you to start working on the project.
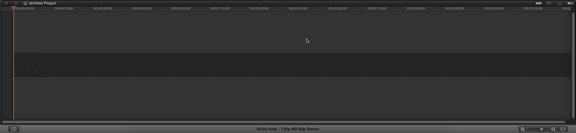
The Timeline is where you will work on your project by adding and editing clips.
Introducing the Primary Storyline
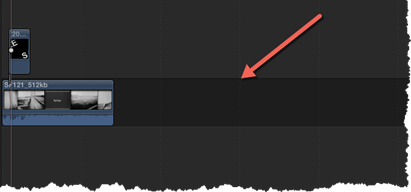
Any project that you work on in Final Cut Pro X will revolve around the primary storyline. The primary storyline is found in the Timeline. It is the black strip that goes across it, as pointed out in the snapshot below.
The primary storyline can contain any content that you want to add to it for your video. For example, if you were creating a documentary, it may contain a voiceover, sound bites, and video footage.
About Secondary Storylines and the Trackless Timeline
Final Cut Pro X has a trackless timeline, meaning that there are not fixed audio and video tracks like in previous versions of Final Cut � or with other similar programs such as Premiere Pro.
Instead, Final Cut Pro X uses storylines. We introduced you to the primary storyline in the last section.
You can also create secondary storylines that appear either above or below the primary storyline. These secondary storylines are complementary clips that are connected to the primary storyline. You can use secondary storylines for cutaway shots, audio, or titles.
Adding Clips to the Timeline
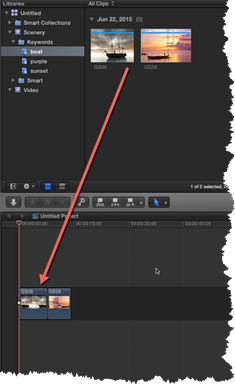
An easy way to add clips to the Timeline is to drag them from the Event Browser.
To do this, select the event in the Event Library that contains the clips you want to use in your project.
Drag the clips or a range of clips from the Event Browser to the Timeline. Since Final Cut Pro X has the Magnetic Timeline, the clips will "snap" into place.
NOTE: If you add pictures or still images to your Timeline, they will have a default duration of four seconds.
Selecting Clips in the Timeline
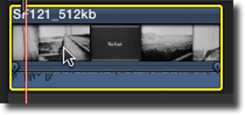
To select a clip that it is in the Timeline, click on it once. When a clip is selected, you will see a yellow border around it, as shown below.
To select a connected clip, which we will learn about later in this article, move your mouse pointer over the connected clip, then press C on your keyboard.
To select multiple clips, press Command+Click on the clips that you want to select.
To select a range of clips, drag across the clips in the filmstrip just as you did in the Event Browser.
Adding a Clip to the End of a Project
An "append edit" is when you add a clip or clips to the end of your project.
To append clips to the Timeline, select the clip(s) in the Event Browser.
Next, go to Edit>Append to Storyline. (Some versions of Final Cut Pro may say Append to End).
Inserting Clips into a Project
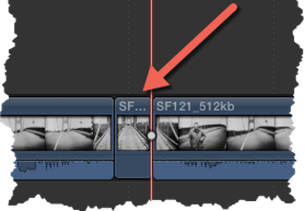
An "insert edit" is when you insert clips in between clips already placed in the Timeline. All clips after the insertion point for the clip are moved forward � or rippled � to make room for the clip that you are inserting.
To insert clips from the Event Browser into the Timeline, move the playhead in the Timeline to the insertion point � or where you want to insert the clip.
The playhead is circled below.
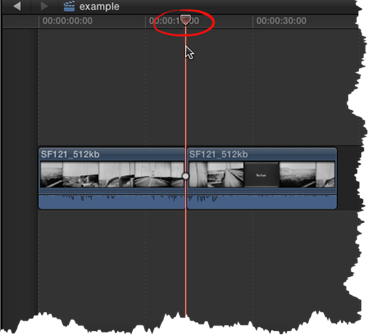
To move it, simply click and drag.
Next, you can either go to Edit>Insert, or you can click the Insert button on the toolbar.

Connecting Clips
In Final Cut Pro X, you can attach clips to other clips. You can use this feature for cutaway shots or to superimpose titles or add sound effects or background music to a specific clip. You can connect a clip to another clip to create an overlay, as we are going to do as an example for this section of the article.
When you connect a video clip to a clip in the Timeline, the clip appears above the storyline. When you connect an audio clip to a clip in the Timeline, it appears below the storyline.
We are going to connect an image clip to a clip in our video.
This is our image clip, as it appears in the Event Browser. It has a transparent background.

To do this, we are going to select the image clip � or the clip we want to connect � in the Event Browser. We are also going to go to the Timeline, and move the playhead over the clip to which we want to connect the image clip.
Now, we are going to click the Connect button in the toolbar, as circled below.

As you can see, the connected clip (the image clip) appears above the storyline in the Timeline.

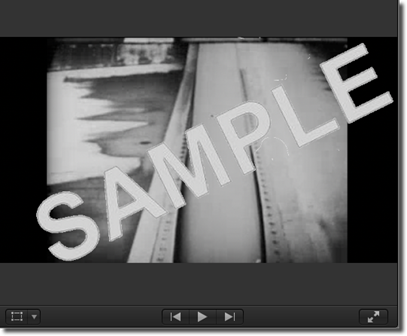
Let's see how it looks in our video.
If we would move in the clip in our storyline, the connected clip would move with it.
NOTE: You can also connect clips by dragging them. If you do this, you can put video clips below the storyline and audio clips above the storyline if you so choose.
About Overwrite Edits
Clips found in your project can be replaced with clips in the Event Browser or other Final Cut Pro media browsers. This is called an overwrite edit.
To do this, select a clip or range of clips in the Event Browser. These should be the clips that you want to use to replace clips in your project.
Next, drag those clips over the clips in the Timeline that you want to replace. You will see a white outline appear as you hover over the clip in the Timeline.
When you release the mouse button, you will see this pop up menu:

Choose if you want to:
-
Replace. The clip in the Timeline is replaced with the source clips you dragged from the Event Browser.
-
Replace from Start. The clip in the Timeline is replaced with the new clip. It starts from the beginning of the clip that you dragged from the Event Browser. The duration of the clip will be determined by the duration of the clip in the Timeline.
-
Replace from End. The clip in the Timeline is replaced with the clip, but starting from the end of the new clip.
-
Replace and Retime to Fit. Retimes the duration of the clip you have dragged into the Timeline so that it fits the duration of the clip it is replacing.
-
Replace and Add to Audition. This makes the clip you dragged from the Timeline the pick and the clip you are replacing the alternate clip. The duration will be determined by the clip dragged from the Event Browser.
-
Add to Audition. The clip in the timeline is the pick, and the clip you dragged from the Event Browser is the alternate.
Working with Still Images
Still images can be dragged to the Timeline the same as any other clip. You can also use the Insert, Connect, or Append buttons on the toolbar to add still images to a storyline.
You can also add layered graphic files to the Timeline, such as Photoshop (.PSD) files. To add a layered graphic file, first import the file into an event.
Next, push Control+Click on the layered image in the Event Browser, then select Open in Timeline from the menu that appears.
The layers appear as connected clips. You can edit them the same way as you would other clips.
NOTE: The duration of a still image can be as long or as little as you need it to be. To set the duration of a still image, go to Modify>Change Duration with the clip selected.
Creating Freeze Frames
A freeze frame clip holds a frame in place; therefore, it temporarily stops any action happening on the screen.
To create a freeze frame clip in the Timeline, move the playhead to the frame that you want to freeze.
Next, go to Edit>Add Freeze Frame.
A freeze frame clip is then inserted in the Timeline at the location of the playhead, as shown below.
Freeze frame clips are four seconds in duration just as still image clips. If you want to change the default duration, go to Final Cut Pro>Preferences, then click the Editing button that you will find at the top of the window.
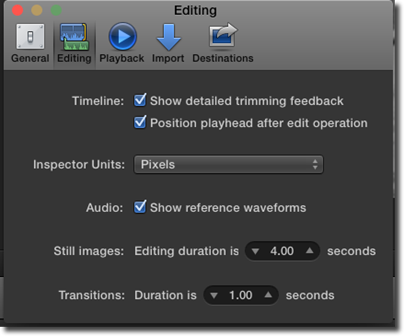
Go to Still Images and adjust the duration.
Adding Just Audio or Video from an Event
When you move a clip from an event to the Timeline, both the audio and video components of that clip will be added to the storyline. However, you may not want to use both the audio and video in your project. You may just want to use one or the other. For example, if you are creating a documentary, you may want the video footage, but you may wish to use a voice-over for the audio instead of the audio that is part of the footage.
To add just the audio or just the video to your timeline, select the clip in the Event Browser.
Go to the toolbar. In the Edit pop-up menu, select Video Only or Audio Only.
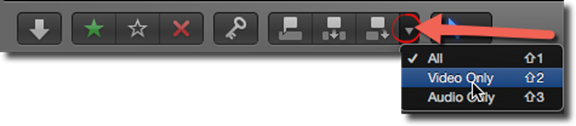
When you make your selection, the edit buttons in the toolbar will change to match the selection.
Here is the toolbar is you choose Audio Only:

And Video Only:

Removing a Clip
If you want to delete a clip from the Timeline, select the clip or range of clips that you want to delete.
Next, either press Delete on your keyboard or go to Edit>Delete.
Any clips that are located to the right of the deleted clip will ripple to close the gap.
That said, deleting a clip in this manner will affect duration and timing.
If you want to delete a clip without affecting the duration or timing, select the clip you want to remove, then go to Edit>Replace with Gap.
There will be a gap clip placed where the deleted clip was before you removed it.

Any connected clips will remain attached to the gap clip.
Solo Clips
When you solo a clip, you only play the audio in that clip. The audio for all other unselected clips is disabled. If you have a series of clips selected and solo those clips, you will be able to compare how it plays without the interference of the other clips in your project.
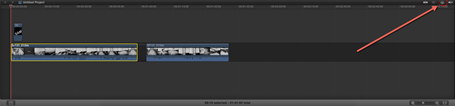
To solo a clip, select the clip(s) in the Timeline. You can then either got to Clip>Solo or click the Solo button on the Timeline, as circled below. Simply click the Solo button again to turn it off.
Disable Clips
Instead of deleting clips from your storyline, you can also disable them to see how your project looks without them during playback.
To disable a clip, select the clip(s), then go to Clip>Disable.
To re-enable a clip, go to Clip>Disable again.
Finding the Source Clip
If you have several events in the Event Browser and hundreds of clips, it may prove difficult to be able to find the source clip for a clip in the Timeline.
For example, let's say there is a clip in your Timeline that you want to duplicate. You would have to find the source clip in the Event Library or Event Browser. But as said, if you have hundreds of clips that can be a near impossible feat if you are going to search through events manually.
If you need to find the source clip for a clip in the Timeline, select the clip in the Timeline.
Press Control+Click, then select Reveal in Browser from the pop up menu.

Moving Clips
Moving clips around the Timeline is easy. You can drag them across the Timeline by selecting clips then dragging and dropping them.
You can also move clips by entering the amount of time you want to move the clips.
To do this, select the clips, then press the + key to move the clip forward or the hyphen key to move them back, then enter a timecode duration for the move.
In the snapshot of the timecode below, we have moved the clips ahead in the Timeline by pressing the + key. You can see the plus sign on the left.
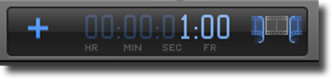
We also typed in 1:00 to move the slide forward one second. You do not need to click on the timecode. As soon as you press the + sign, you can begin typing.
Compound Clips
A compound clip is essentially two more clips that are grouped together. If you have ever used a program like Adobe Photoshop, then you know that when you group elements together, they become on element. The same basic principle applies to compound clips.
You can create compound clips from video and audio clips, as well as other compound clip. Each compound clip that you create becomes a sub-project in your project, because it will have project properties. With compound clips, you can add effects and transitions, edit them, and add them to your project.
You can create compound clips in either the Timeline or the Event Browser. No matter where you create the compound clip, a "parent" compound clip will be in the Event Browser even after you add it to the Timeline. If you edit or make changes to the compound clip in the Timeline, those changes will be applied to the parent compound clip in the Event Browser. In addition, if you delete something from a parent clip in the Event Browser, it will also be deleted from the compound clip in the Timeline.
To create a compound clip, select the clips you want to combine into a compound clip. You can select them from either the Event Browser or the Timeline. The clips can be contiguous or noncontiguous. They can be other compound clips, clips from your storyline, or even connected clips. Remember, they can also be either audio or video clips.
Next, go to File>New Compound Clip.

Enter a name for the clip, then choose an event to store it in.
Click OK.
The parent compound clip appears in the Event Browser with a compound clip icon in the upper left corner.