An online form is a place where you can collect information about your visitors, take polls, orders, or allow visitors to your website to contact you. It's probably safe to say that in your time online, you've seen online forms and even filled out your fair share.
The good news is that even the forms that look the most complex aren't necessarily difficult to create. In this article, you're going to learn how to create these forms in Dreamweaver so that you can easily add them to any website that you build.
Form Basics
Before we delve into how to create a form, it's important that you know the aspects of any form that you can create.
Below are aspects of forms. You'll need to know these, so take the time to study them.
- Text Field. A text field is there to collect text, but only a single line of text. These are mainly used to gather names, phone number, email addresses, etc.
- Text Area. This is like a text field, but paragraphs of text can be entered.
- Checkbox. These are used for YES and NO questions.
Every field that you create in a form has a field name. The field name will tell you what information is being collected, such as email address, phone, or street address. The field labels are sent to you along with the information when you receive a completed form from a visitor.
Let's say that you sell t-shirts and you create an order form. One of the questions you ask might be the size of the shirt the customer wears. "Shirt Size" would be the field name. "Large" might be the size the customer gives.
In addition to a field name, every field will also have a label. A label is text that tells the visitors what type of information that you want them to enter. Using the example above, you might have the label "Enter Your Shirt Size" for the field that collects shirt sizes. This way, the visitor knows to enter their shirt size in that field.
Creating a Basic HTML Form
Creating a basic HTML form is not difficult at all using Dreamweaver. Start out by opening a new HTML document. We're going to teach you how to create a form in this section of the article.
Save the HTML document as "form" in your "Course_Sites" folder.
The best way to learn is by doing, so let's get started.
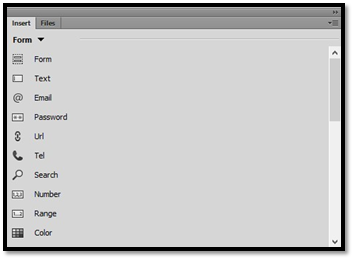
Go to the Insert panel and select Forms from the boldfaced dropdown menu at the top. "Common" shows by default, so just click on the drop down arrow and select Form.
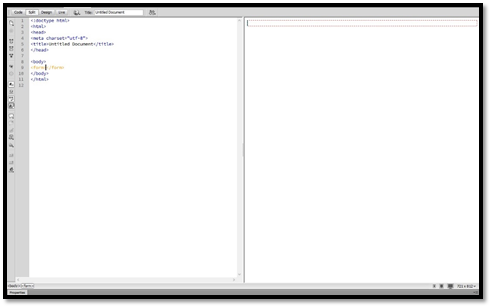
Click on your document in the place where you want to form to start.
Click on Form on the Insert panel.
You'll see a red rectangle in your document, as pictured below. From now on, everything you add to the form will appear inside that red rectangle. Do not click outside that rectangle when adding elements to your form.
In Split View, you can now see where the form is inserted. You see the opening tag and the closing tag.
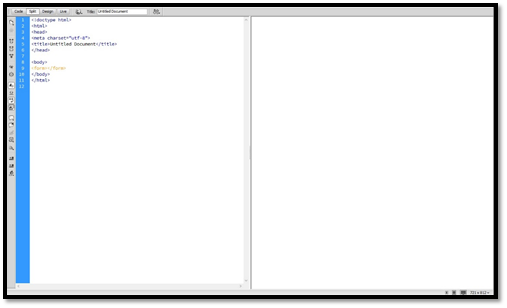
Click within the opening and closing tags. You'll then see a rectangular area outlined in red in the design area. This is your form area.
Add a Text Field
Let's start out by adding a text field to collect someone's name.
To do this, go to the Insert panel. Click Text.
As you can see, it was inserted for us.
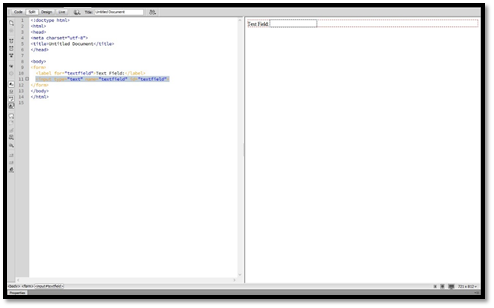
We can change the name that's displayed in Design View by selecting "Text Field" and replacing it with something else.

Now, we're going to go to the Property Inspector and make some more changes to customize the text field for our form.
In the TextField box, type a name. You must create different names for text fields so that it can be distinguished from others. We might name this text field "name."
In the CharWidth box, enter the number of characters you want visible in the text field. Since this is a name field, give people plenty of room to type their names.
In the Max Chars box, specify the amount of characters someone will be allowed to enter. This field is only visible if you choose Single Line radio button.
By Type, select if you want a single line text box, a multi-line, or a password if you want users to enter data they don't want displayed on the screen. Instead, it will appear as asterisks.
In the Class dropdown list, apply any class of CSS styles you have defined in the site.
In the Init Val text box, type text you want displayed when the form loads. For example, "add your name" might be displayed in the text field so they know what to type.
|
Adding Other Form Elements
All the form elements that you can add are visible in the Insert panel. To add a new form element, push Enter to put the element on a new line, then choose the element from the Insert panel that you want to insert.
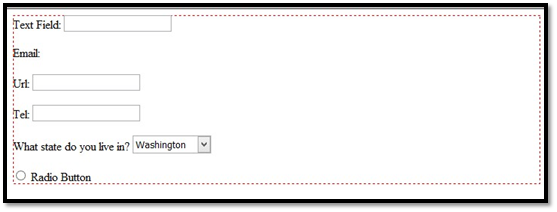
Below, we've added email, URL, and telephone.
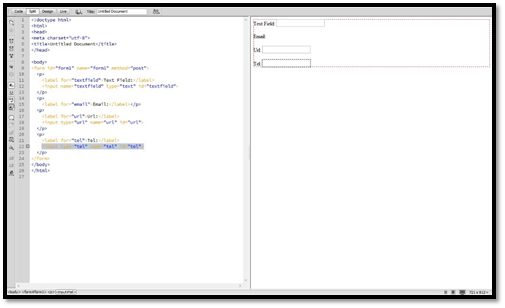
Use the Property Inspector to customize these fields.
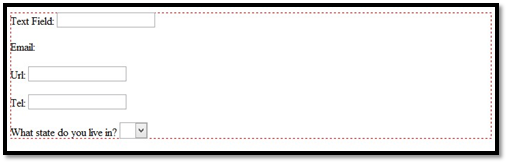
Add a Dropdown List
Let's say you want a user who is filling out your form to be able to choose from multiple selections as their answer. It's kind of like when you fill out a form and select the state you live in from a dropdown menu.
To do this, choose Select on the Insert panel.
You'll see a dropdown menu appear in Design View.

Now, click to put your cursor next to the field and type a question, such as, "What state do you live in?"
Next, select the field that represents the list on your page. You'll then see the List/Menu Property Inspector.
Go ahead and specify the properties as you did with the text field by giving it a name, type, etc. Then click the List Values button shown in the Property Inspector.
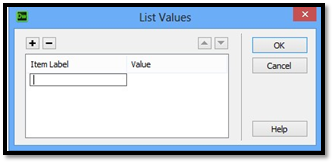
Enter the choices you want your visitors to be able to choose from when they view the dropdown menu.
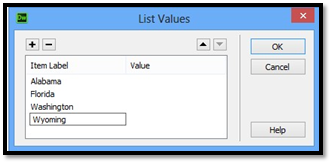
Use the + sign to add new values. Use the � sign to delete values.
Click OK when you're finished.
Adding Radio Buttons
A radio button gives visitors choices that they can make by clicking on the radio button to select their choice.
You can use radio buttons for yes/no questions or for multiple choice.
To add radio buttons, click Radio Button in the Insert panel.
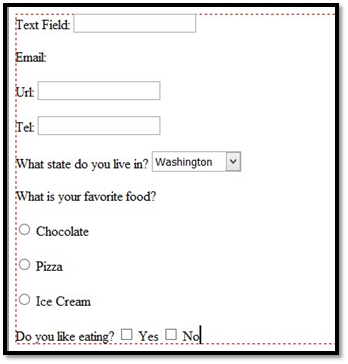
To the left of the radio button, type a question. An example might be "What is your favorite food?"
Then hit Enter if you want the choice to appear on the next line.
Select the text "Radio Button" and type in a choice. We typed chocolate.

Click Radio Button in the Insert panel to add more choices.
If you want to use radio buttons for multiple choice, a quicker way to do that is to select Radio Button Group from the Insert panel.
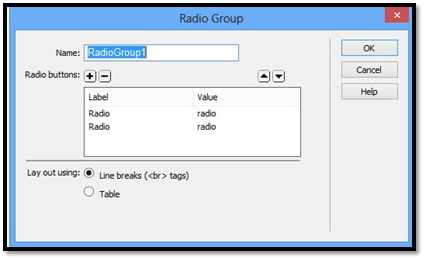
Just as you did with the dropdown list, enter values for each radio button, then click OK.
Adding Checkboxes
A checkbox is most commonly used for YES/NO and multiple choice answers.
To add a checkbox, select Checkbox from the Insert panel. You'll follow the same steps you did with a radio button.
To add multiple check boxes, choose Check Box Group from the Insert panel, just as you did with radio buttons.
Creating a Submit Button
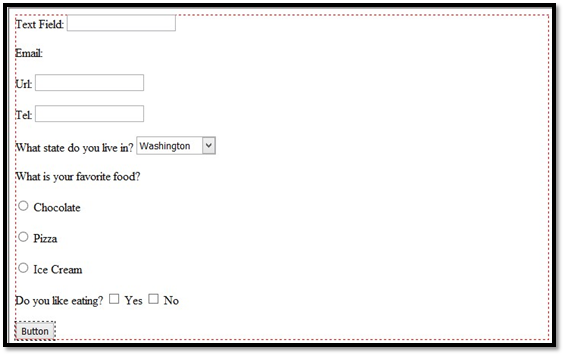
Of course, whenever you create a form, you'll want to include a submit button so that your visitors can send the information to you.
To create a submit button, click in the bottom of your form (but still inside the red rectangle).
Go to the Insert panel and insert a button.
Select your button by clicking on it, then go to the Property Inspector.
Next to Action, click the Submit Form or Reset Form option.
In the Value box, type the text you want to appear on the button. We're going to type Submit.
Once you've done that, it's time to configure your form so it is sent to you whenever someone figures it out. To do this, we're going to use a CGI script.
CGI stands for Common Gateway Interface. These scripts are written Perl, PHP, ASP, Java, or C++. They work with your web server to process the data sent by the user who filled out the form.
Some web hosting service providers offer mail scripts that you can use with your forms. If they don't, you can download and configure a script online if you have the right access on your server and know how it's configured. However, it's recommended that you just find a service provider that offers CGI scripts for you to use.
If you have a CGI script, let's learn how to make it work with your form.
Click inside the red border of your form. You want to make sure the Form Property Inspector is displayed. If you see the Property Inspector for one of your form elements, go to Split View and click after the opening form tag (<form>).
The Property Inspector for Dreamweaver CC is shown below. Remember, CS6 typically just offers more options in the Property Inspector.

Where it says action, click the folder to the right of it and locate your CGI script.
Go to the Method field. Choose either Get, Post, or Default. Which you choose will depend on your script.
Now, click Target and tell the browser what it is to do when someone pushes the Submit button. Choosing _blank means the results open in a new browser window.
In the Enctype field, determine how the data is to be formatted when it's returned.
Insert Hidden Fields
There are a lot of scripts that will require that you use hidden fields. Hidden fields contain data that the user doesn't see. This may include the email address that the form is sent to when the Submit button is clicked.
To add a hidden field, go to the Insert panel and choose Hidden Field.
Go to the Property Inspector and add a name for the field. If you're using the script formmail.pl, you would enter the recipient as the name, then the email address of the recipient as the value.
Next, click to put your cursor inside the form tag, then click on the Hidden Field icon in the Forms Insert bar and add another hidden field. In the Property Inspector, enter the name as subject. In the value field, enter a subject line for the field.
Whenever someone submits the form, it will be sent to you as an email.