Knowing how to create objects and shapes is only half the battle with InDesign. Knowing how to manage those objects will be key to using InDesign successfully. In InDesign, your objects might contain text or graphics. Being able to manage them to make them look like you want and position them where you want will make using InDesign a lot easier, and it will make creating the pages you want a snap.
Align and Distribute Objects
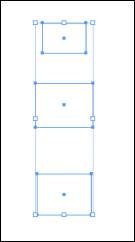
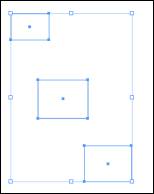
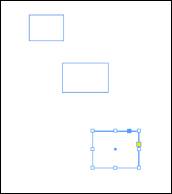
The Align panel helps you align or distribute objects evenly. In other words, it helps you evenly space out objects. Look at the snapshot below. We've drawn three rectangles.
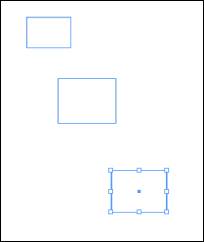
We want to align these on the page so one is on top of the other, and they are evenly spaced out. To do this, we're going to use the Gap tool. To use it, go to Window>Object & Layout>Align.
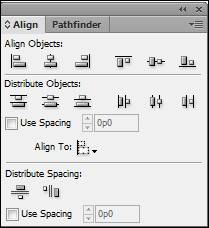
In this, we have our alignment options for objects.
The top row aligns objects by the objects.
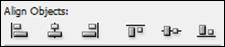
From left to right:
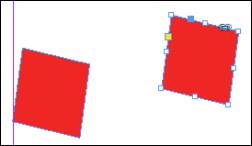
The first button aligns objects by their left sides. Simply select all the objects you want to align by using the Selection tool and pressing the Shift key, then click Align Left Edges.

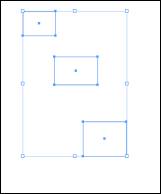
The second button is Align Horizontal Centers. It will align the objects by their centers, horizontally. Take a look:
The third button is Align Right Edges. Remember, you can mouse over any button, and InDesign will tell you what the button does. Align Right Edges aligns the objects by their right edges, the opposite of the Align Left Edges.
The next button over is Align Top Edges.
Then, we have Align Vertical Centers.
Finally, we have Align Bottom Edges.

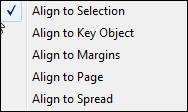
Going back to the Align Panel, the middle section is to distribute objects:
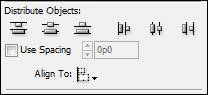
When you distribute objects, you distribute them evenly over an area. First, go to Align To and select what point you want to align the objects to.
Then, you can choose a distribution option.
You can choose from:
- Distribute Top Edges
- Distribute Vertical Centers
- Distribute Bottom Edges
- Distribute Left Edges

- Distribute Horizontal Centers
- Distribute Right Edges
You can also enter the spacing between objects in the Use Spacing box.
In the Distribute Spacing section, can choose to Distribute Vertical Space or Distribute Horizontal Space, then set the spacing.
Aligning Objects Using the Gap Tool
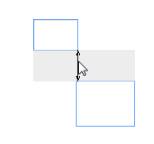
The Gap tool makes it quick to adjust the size of a gap between objects. This tool will also let you resize objects that have commonly aligned edges, and you can resize them all at once while keeping the gaps between them. It's an easy way to make adjustments to your layout by manipulating space between objects. Just be sure to make note that the Gap tool will not work with locked objects or master page items.
To use the Gap tool, select it in the Tools panel. It looks like this:  .
.
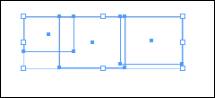
Now, move the pointer between two objects and do one the these things:
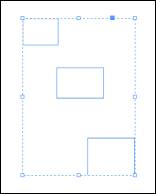
- You can drag to move the gap and resize the objects aligned along the gap. In the snapshot below, we can drag up and down to move the gap. The objects resize as we do.
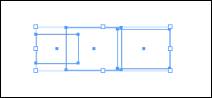
- Click Shift+drag to move the gap between only the two nearest objects.
- Click Ctrl+drag to resize the gap and not move it.
- Alt+drag to move the gap and objects in the same direction.
- Ctrl+Alt+drag to resize the gap AND move the objects.
Stacking Objects
Stacking is quite simply the placing of objects, one on top of another. The first object that you draw is the bottom object. If you draw another object, it appears on top of the first object, and so on and so forth. The first object you draw will always be the bottom object in the stacking order unless you change it. To change the stacking order, you use these commands: Bring to Front, Send to Back, Bring Forward, and Send Backward.
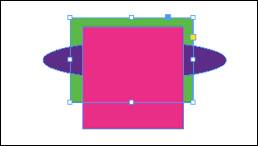
Look at our drawing below:
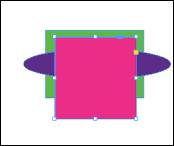
We have drawn a rectangle, an ellipse, and a square. The rectangle is on the bottom, then the ellipse, and finally the square.
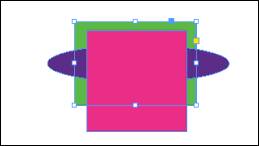
Now, let's change the stacking order so the rectangle is no longer on the bottom.
We're going to move the rectangle to the front.
First, let's select the rectangle since it's the object we want to arrange in the stack.
To do this, we're going to go to Object>Arrange>Bring to Front.
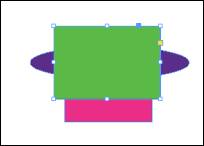
Now, let's move the rectangle back to the back of the stack (or the bottom of the stack, if you will).
Make sure the rectangle is selected, then go to Object>Arrange>Send to Back.
We can also move objects forward or back in the stack. We can move the rectangle forward so it's on top of the ellipse, but behind the square by going to Object>Arrange>Bring Forward. This brings an object forward - in front of the object that's currently on top of it.
Or we can move the ellipse behind the rectangle instead by going to Object>Arrange>Send Backward. This sends an object behind the object that's currently below it.
Creating and Controlling Layers
In the last section, we learned how to stack objects. Layers are simply transparent sheets that are stacked on top of each other, much like objects.
Whenever you open a new document, there's already a default layer - or the first layer - of your page. Everything you put on the page will be placed on the default layer unless you create a new one.
Keep in mind that you do not have to create layers at all when designing pages. You can work with everything on one layer if you want. However, layers give a designer more options than he/she would have if layers weren't used. With layers, you can manipulate a photo without actually making changes to the photo. You can also adjust blending and opacity - and even create different effects - on your page by simply using layers. It can also be a lot easier to make changes to a design if you're working with layers.
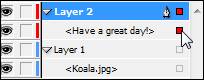
In the snapshot below, we have a photograph of a Koala bear. We're going to create a new layer to add some text on top of the picture. However, we're using a new layer because we don't want to edit our photograph.

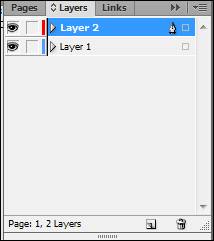
The first thing we do is go to the layers panel (Window>Layers).

We can see our first layer (named Layer 1 by default). Look at the little eye on the left hand side. This will come in handy when you have several layers. You can click this eye to make the layer invisible. Click the box to make it visible again. It's called Toggle Visibility.
Now, to add a new layer, click the Options menu, then select New Layer.
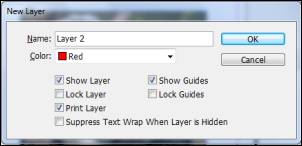
Name the layer. Specify the options that you want, then click OK.
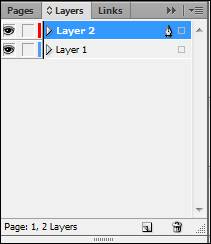
Now, if we look at the layers panel, we can see which layer we're working with by the layer that's selected (highlighted in blue), or we can look for the layer with the pen
 . Right now, that's layer two. This means that anything we add to the page will be added to layer two.
Let's add a text frame and some text.

Now, if we click the eye on the Layers panel, we can make the second layer go invisible. We are doing this to show you exactly how layers work.

Just click the Toggle Visibility box to bring it back again.
Instead of creating a new layer, you can also duplicate a layer to add special effects or for whatever reason. To duplicate a layer, to go the Options menu and select Duplicate Layer. You'll be able to duplicate the live layer, or the one selected in the panel.
Layer Options
We saw these options when we created a new layer in the last section:
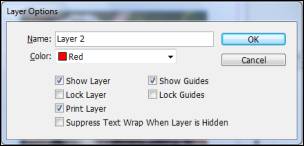
These are your layer options. You can set them when you create a new layer, or you can go to the Options menu, then select "Layer Options for." It will allow you to set layer options for the active layer.
Let's explore what these options mean.
- Enter a name for the layer in the Name field.
- Choose a color that will represent the layer in the panel and in your document. This color will be used to highlight frames and paths. If you look at our second layer above, you'll notice the color for our second layer was red. By the same token, the text frame in our second layer was highlighted with red.
- Click the Show Layer box to make the layer visible.
- Select Lock Layer to lock the layer in place.
- Select Print Layer to print the layer with the document or deselect it to prevent it from printing.
- Suppress Text Wrap When Layer is Hidden should be selected if you want to prevent text wrapping on hidden layers.
- Show Guides will show the guides on the layer.
- Lock Guides will lock the guides on the layer.
Click OK when you've set your options.
Managing Objects in the Layers Panel
Let's look at the Layers panel again so we can show you how to manage the layers and the objects in the layers by using the panel.
We already showed you the Toggle Visibility button.
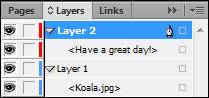
Click the arrow beside a layer name to see the objects on a layer:
You can use the Layers panel to hide/view certain layers, but you can also use it to keep track of objects and what layer each object appears on.
You can also select an object from the layers panel by clicking the box to the right of the object. Our mouse pointer is pointing to the box in the snapshot below.
As you can see, the text frame in our document is now selected:

Grouping Objects
You can group objects together and work with them as if they were the same object. For example, if you create three graphic frames and place three different pictures in there, but you want to keep those three graphic frames together - no matter where you move them - you can group them together so if you move one frame, you move them all. This is especially helpful if you've aligned and distributed objects and want to keep the arrangement, but just want to move them to a different spot on the page.
To group objects, first select the objects you want to group using the Selection tool. Remember, you can simply drag a marquee around the objects to select them. This is the easiest way.
Look at our objects below. Right now, we have to select and move them one at a time. You can tell this because only one is selected.
Let's select all of them.
Now, let's go to Object>Group.
The dotted line around them tells us that they are grouped together.
We can now move them as if they were one object.
To ungroup objects, go to Object>Ungroup.
Locking Objects
You can move any object around on the page. However, if you want to make it so an object on the page cannot be moved, you can lock the object.
First, select the object using the Selection tool, then go to Object>Lock.
It is now fixed on the page and cannot be moved unless you go to Object>Unlock.
Using Anchored Objects
Anchored objects are items such as images and text boxes that are attached (or anchored) to text. The object that's anchored goes with the text as the text reflows. You should use anchored objects for objects that you want associated with a line or block of texts. An example is an icon associated with a specific word. If you move the block of text the word is in, you want the icon to move too.
That said, when you create an anchored object, you can set it so it is in any of the following positions:
- Inline anchors the object with the baseline of the insertion point. This is the default type of anchored object.
- Above Line places it above the line with these alignment choices: left, center, right, towards spine, away from spine, and text alignment. Text alignment means the alignment is applied to the paragraph that has the anchor marker.
- Custom means you place the object in a position that you define in the Anchored Object Options dialogue box.
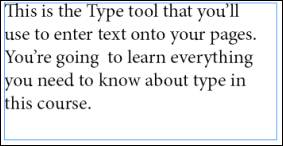
Let's learn to set an anchored object. This is our text:
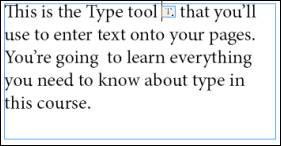
We want to use the Type tool button for an icon and insert it after the word "Type tool." We want to make this icon an anchored object.
To do this, first, we're going to use the Type tool to put an insertion point after the word "tool." We do this by clicking after the word so the cursor appears.
If the icon was already on our page, we could use Edit>Cut or Edit>Copy to cut or copy the object, then Edit>Paste to put it into position. Since it's not, we're going to use Place.
Select the object that will become an anchored object using the Selection tool.
Now, we go to Object>Anchored Object>Options.
Choose the position and click OK.
As you can see in the snapshot below, an anchor now appears over the selected object:
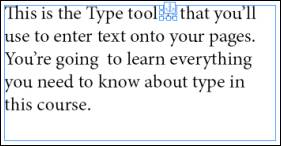
If we move the text frame (by clicking and dragging on the border of the text frame), the icon goes with it. It is now an anchored object.
Duplicating Objects
Duplicating objects (or creating a an exact replica of an object) is easy.
To duplicate an object, select the object you want to duplicate using the Selection tool. Then, you have a few ways to duplicate the object.
1. Go to Edit>Copy.
Now, click the area where you want the duplicate to appear. Then, go to Edit>Paste or Edit>Paste in Place.
2. Go to Edit>Duplicate. InDesign puts a duplicate copy over your original.

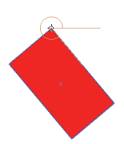
Rotating Objects
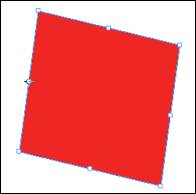
You can change an object's appearance or effect simply by rotating it. You can rotate a square to make it look like a diamond, for example.
To rotate an object, select it using the Selection tool.
Now, go to the Rotate tool in the Tools panel. It's grouped with the Shear tool which looks like this:
 and the Free Transform tool
  . Click and hold on the Shear tool, then select the Rotate tool. The Rotate tool button looks like this:
  .
.Position your mouse just outside of one of the corner handles. Click and hold the mouse button to freely rotate the object. InDesign shows you the arc of the rotation and the degrees (not pictured below):
Shearing Objects
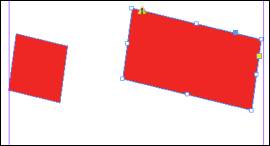
When you shear an object, you transform it and create a slanted version of it. To show you exactly what the Shear tool can do, let's show you how to use it.
First of all, select the object you want to shear using the Selection tool.
Next, click the Shear tool
 in the Tools panel. You learned where it was located in the last section.
Just like you did with the Rotate tool, click outside one of the corner handles. Hold your mouse button down to transform the object.
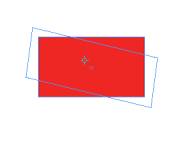
The finished object looks like this:
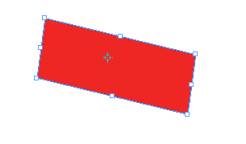
Scaling Objects
After you draw an object, you can scale it to change its size. You use the Scale tool to do this. It's located in the Tools panel and is grouped with the Free Transform and Shear tools. It looks like this:
 .
.Select the object you want to scale using the Selection tool.
Now, click outside of one of the corner handles and drag out to enlarge or inward to shrink the object's size.
We've resized our object.

Transforming Objects
To transform the shapes of objects, you use the Transform tool
 in the Tools panel.
Let's show you how to transform an object.
Select the Free Transform tool.
Next, select an object to transform.
- To scale an object, drag a corner handle to scale along to axes. Drag a side handle if you want to scale along one axis.
- To rotate an object, point outside a corner handle, then drag in a circle motion.
- To shear an object, drag a side handle, then hold down Ctrl as while you drag.
Collecting, Conveying, and Placing Content
The Content Collector is a new feature to InDesign CS6, and it may be the most beneficial feature that's been added with the new version. If you copy and paste a lot of content, this is something you're going to love. Content can be defined as frames, objects, or graphics and images.
As you know, InDesign already gives you the ability to copy content from one area of a document or from another document and then paste it somewhere else. The only problem with this feature is that it does not give you room to make changes to one instance of the content and transfer it to all other instances. For example, let's say you are creating company materials. These materials include a brochure, a catalog, and a flyer. All of these three things contain some of the same content. Before, in InDesign, you would simply copy and paste the content from the first piece of material and paste it into the others. If there was an update to the content, you would follow those steps again.
However, with the Content Collector, if you make changes in one (whether it's a page or a different document), changes are also automatically made in the other instances of the content. This is done through linked content, much like linked graphics.
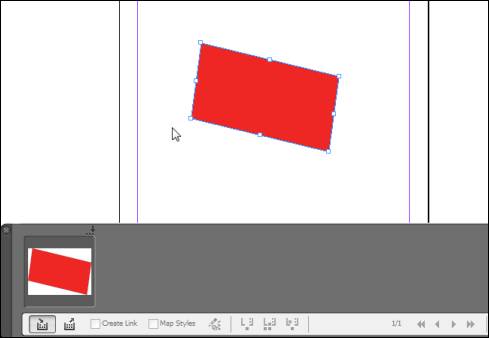
The Content Collector tools are located in the Tools panel. The Contact Collector button looks like this:
 . Grouped with the Content Collector, you have the Contact Placer tool
  .
.When you click on the Content Collector tool, it shows on the bottom of your document window:

Now, you can simply click on content on your page to add them to the Content Collector (as shown below).
You can simply drop content into the Content Collector by clicking on it, or you can also use the Conveyor. It's located at the far right side of the Content Collector and looks like this:
 .
.Click on the Content Conveyor:
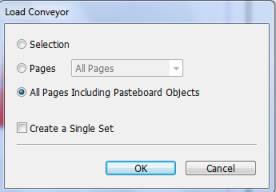
Here you can select if you want to collect the selection. Keep in mind that you select more than one object at once to load into the Collector. Those items will be placed by the Content Placer as a set as well.
You can load the Collector by selection, by pages, or by all pages. You can also create a single set.
Click OK when you're finished.
Now, you can use the Content Placer tool to place the content. All you do is drop it where you want it.
Just keep in mind that this is the same as copy and paste.
In order to make the most of the Content Collection tool, as we described at the beginning of this section, you have to create links. This is much like when you link a graphic to the source file. This way, when you make changes in one instance of the content, it's automatically changed in every other instance. To link the content back to the original content, click the Make Link box at the bottom of the Content Placer.

Now, you can place your content, as we've done below:
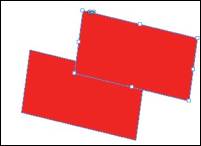
You can see that the content we've placed has a link symbol on it.
Now, let's say we make changes to the original content. We're going to use the Scale tool to make changes.
Now, there is an exclamation point on the content that we just placed.
Mouse over the exclamation point with the Selection tool:

Now, click on the exclamation point to update with the changes.