If you don't have a new document open already, open a new HTML file in your Dreamweaver window. Although CSS has become the most popular layout for standard web pages, we're going to use basic HTML right now to get you familiar with the very basics before moving onto anything more complex.
Adding text to a Dreamweaver document is actually very easy. You can type your text directly onto the Dreamweaver document or you can cut and paste text from other documents or sources.
Adding Text on a Page
To type text into your document:
Click on the Design button in the Document Toolbar. You can type in Code view, but unless you are familiar with HTML, this can be confusing. Let's make it easy.
Now, simply click on the area in the document where you want to apply the text.
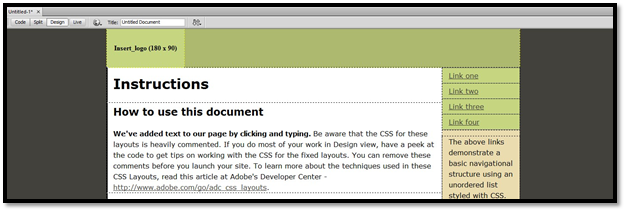
In the snapshot below, we've entered the text into the Design view. We boldfaced it using the Property Inspector so you can easily see the text we added by simply clicking on the page where we wanted to add the text, then typing.
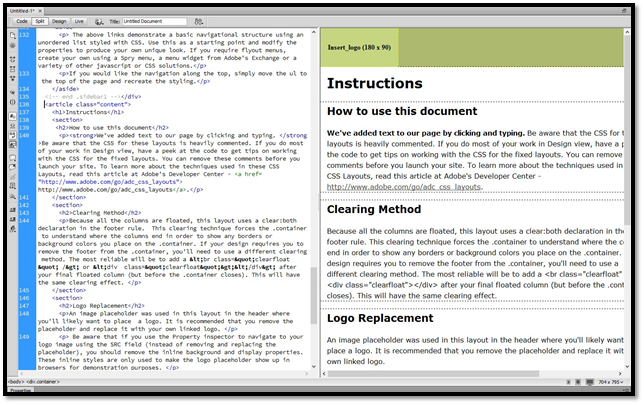
Now if we click the Code button in the Document Toolbar, we can see Dreamweaver placed our text within the code for us.

If we go to Split View, we can see both our code and design:
Pasting Text into a Document
If you want to paste text into your document, you have two choices. You can paste by going to Edit> Paste or by going to Edit> Paste Special.
Let's distinguish between the two. Since you're most likely already familiar with Paste, let's explain Paste Special.
If you select Edit> Paste Special, Dreamweaver will allow you to specify the format of the pasted text. For an example, let's say you copied text from a MS Word document. When you use Paste Special in Dreamweaver, you'll be able to choose if you want to strip the formatting that was used in MS Word. This allows you to paste text only, if that's what you want to do.
Formatting Text
If you've ever used Microsoft Word before, you know what it means to format text, and you also know how important it is to format text. Formatting text includes the font you use, the font color, paragraphs, lists, and so on.
Let's discuss how to format text in Dreamweaver using Design view.
Paragraphs
To create a new paragraph, all you have to do is press Enter and a white space will be placed beneath the text. If you want to add another row of white space, hit Enter again. Dreamweaver will automatically add the code that marks the end of one paragraph and the beginning of another.
Line Breaks
As we learned in the last section, whenever you press Enter, a <p> is inserted in the code and a new paragraph is started. But what if you want to create a line break without starting a new paragraph and without the extra white space that a new paragraph gives?
This is called a forced line break. To insert one into your document, move the cursor to the place where you want to insert a line break, hold down the Shift key while pushing Enter. The code for a line break is <br>.
You can also use line breaks to add more space between paragraphs.
Fonts
It's easy to set and control the font, or the typeset, in your document using a font tag. The font tag is a method of setting fonts and font attributes for a block of text. If you've ever looked at HTML code, you may have seen <font>. This is the font tag. Using this in HTML, it's easy to change the font from one block of text to another.
You can change the font type or font color for the entire page by going to Page Properties.
Formatting Paragraphs
In addition to formatting the text in your document, you can also format the paragraphs. There are three basic paragraph styles in Dreamweaver: paragraph, heading, and preformatted. You apply these by using the Format drop-down list in the Property Inspector, as shown below.

Let's discuss the three paragraph styles.
-
Paragraph. Most text on your page is formatted as the default format. It ignores white space. Sequential spaces within your paragraphs will appear as only one space when your viewers see it in a browser.
-
Headings. Headings are used to separate different contents on a page. We use headings in this article whenever we start a new subject matter, such as when we talked about Fonts, then moved to Formatting Paragraphs. Headings in Dreamweaver start at the largest and boldest, or <h1>, to the smallest (<h6).
-
Preformatted allows you to space the text exactly as you want it, including using white space and line breaks. However, it doesn't automatically word wrap. You must press Enter to end a line.
Creating Lists
You can create lists on your web pages to list items using bullet points. However, you can also create a navigational menu by using an unordered list using the Insert panel, clicking the downward arrow, and selecting Structure, then creating hyperlinks that link to the other pages in your website.
You can also use the Property Inspector to create lists. To do so:
- Place the cursor in your document where you want the list to begin.
- Go to the Property Inspector and click
 to create an unordered list (or simple bullet points). Click
  to create an ordered (or numbered) list. <li> is the tag for the beginning of a list.
 - Type in the text for your list
- Hit the list button again. </li> ends a list.
If you already have text that you want to put into list format, select the text and press the appropriate list button.
Increase and Reduce Indentions
To add or increase an indention in a line of text, place the cursor in the appropriate spot in your document, then click the  button in the Properties Inspector.
If you want to decrease an indention, click  .
.
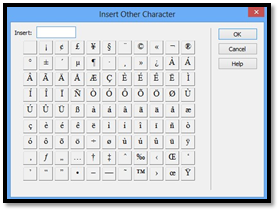
Insert Special Characters
You can insert special characters such as trademark, copyright, and other symbols quickly and easily in Dreamweaver. You can use the Characters menu on the Insert panel under Common, as shown below.
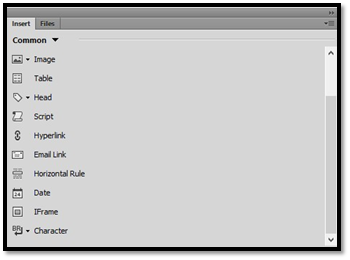
Click Character.
Some common characters are shown in the dropdown menu.

If you don't see the special character you need, select Other Characters. This character menu will appear:
Creating Links
A text link is a word or group of words that, when you click on them, take you to another page on your website or another website.
To create a text link:
Select the text that you want to turn into a link. We're using the sentence below.
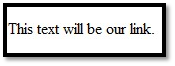
Select the text you want to become a link.
In the Properties Inspector panel, click the HTML button on the left hand side. You should now see a Link field. (Make sure you're in Design View.)

Enter the URL or web address. If the link points to a website other than your own, make sure you use the full address: http://www.notyourwebsite.com. If it points to a page within your website, you can simply type the name of the page and the extension. For example: page.html.
Hit the Enter key when you're finished. Your text will now appear as a link.

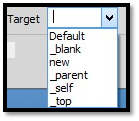
To create a link that opens in a new browser window, select the text that you want to make a link, type in the address for the link, then go to Target in Properties and select _blank.
Make an Image a Clickable Link
Making an image, such as a logo, into a clickable link is just as easy.
Select the image on your page that you want to turn into a link.
Go to the Properties panel for images and enter the URL into the Link box.
Make sure your image border is set to 0. Otherwise, your image may appear with a blue border to show that it is a clickable image.
Make a Clickable Image that Enlarges When Clicked
It's probable that you've seen this before. There is a small image on a web page and, when you click on it, it opens into a larger image. Believe it or not, this is very easy to do by creating a link. Instead of the link taking you to a different page or website, it takes you to a larger version of the image.
To do this, first, you'll need to create two copies of the image. One will need to be smaller than the other. For example: a thumbnail and a regular size copy of the image. Both copies of the image need to be in your image folder within your root folder.
Insert the smaller version of the image into your document.
Click the picture, then go to Link in Properties just as you did when you made a clickable image in the last section.
Now, click the browse button  beside the Link box.
Locate the larger image in your images folder. Select it, then click OK. Dreamweaver will insert the link for you.
Create an Email Link
An email link is a link that, when it's clicked on, creates an email using the viewer's default email program. You just specify what address the email will be sent to.
To create an email link, highlight the text that you wish to turn into an email link.
Go to Insert>Email Link.
This dialogue box will appear:
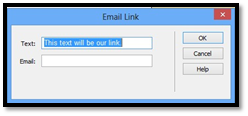
Enter in the email address in the E-Mail box, then click OK.
Create Anchors and Jump Links
You've seen anchors and jump links on web pages before. There are especially popular on FAQ pages where there is a list of questions. You can click on any one of those questions and be taken down further on the page to where the answer is located. This is done using an anchor and a jump link. When someone clicks on a jump link, they will jump to a different place on the page.
|
NOTE TO CC USERS: It's important to note that the anchor and jump link feature is only available in Dreamweaver CS6 and not Dreamweaver CC. Named anchors have been deprecated. You'll have to use Div IDs in your markup. |
If you're using Dreamweaver CS6, Creating a jump link is easy. As you can see below, we've created a series of questions followed by a one paragraph answer (in Design View). We're going to link the first question to this answer.
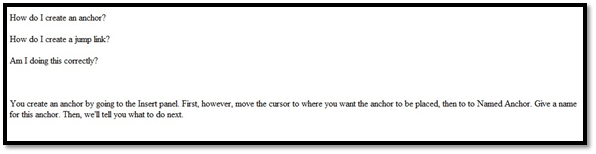
We want it so that when someone clicks on the first question, they will be taken to our answer. To do this, we're going to insert an anchor before the answer. We'll do that by clicking and moving the cursor to our answer (before the word "You."), then going to the Insert>Named Anchor.
Name the anchor. We're going to name our answer "question1."
Click OK.
The anchor now appears in our document.
Next, we're going to select the first question. This is the question that we want to link to our answer.
Now, go to the Insert panel and click Hyperlink under Common.
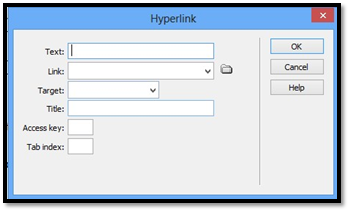
In the Link box, we're going to click the down arrow and select "question1."
Click OK.
Test your jump link by going to the Document Toolbar and previewing your page in a browser window. Click on the link to make sure it takes you to the appropriate area on the page.
Adding Meta Tags
If you've ever heard of a Meta tag before, you probably relate it to SEO, or Search Engine Optimization. Meta tags can be used for several things, but the most common use is for putting special text (in code) at the top of your pages. This text won't be viewable to visitors who come to your site, but it will be read by search engines as they crawl and index your website.
Dreamweaver offers features to add Meta tags, but first you should understand what each tag means.
-
A Meta keyword tag is used to list keywords you want to search engines to use if someone searches for your site in a search engine. For example, if you have a site about bass fishing, bass may be a keyword you want to use on your page in a Meta keyword tag.
-
A Meta description tag is a short paragraph that describes your website. This is usually the description that will appear with your website URL in search engine results. It should be written as an advertisement to compel people to click and visit your site.
To add a Meta description tag in CS6, go to Insert>HTML>Head Tags>Description.
If you're using CC, go to Insert>Head>Description.
You'll then see the Description dialogue box.
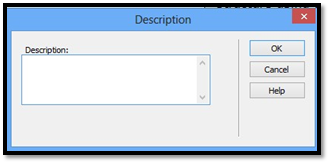
Type in your description. Do not add any HTML.
Click OK when you're finished.
To add Meta keyword tags, go to Insert>HTML>Head Tags>Keywords in CS6. In CC, go to Insert>Head>Keywords.