Learning how to navigate Dreamweaver will make learning to use it a lot easier. It's the same as knowing where all the ingredients are when you want to bake your favorite cake or knowing where your tools are before you start a home improvement project.
In this article, we're going to show you around the Dreamweaver workspace. You'll learn where to find all the panels, tools, and commands you'll need to successfully use Dreamweaver.
Workspace Layouts
Dreamweaver CS6 lets you choose from 11 preset workspace layouts. You can pick the layout you want to use based on the complexity or type of website you want to develop. For example, you can choose the App Developer Plus, Fluid Layout, and Mobile Applications views.
Each layout features toolbars, panels, and features in configurations that Dreamweaver has determined to be the most efficient and effective. If you want to change the layout, you can do so by going to Window in the menu bar, then selecting Workspace Layout.
The different workspace layouts are shown below:
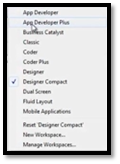
Take time to explore the different layouts. You'll use the one that you feel most comfortable using � and the one that lays out the workspace in the most efficient way for you as you work.
|
NOTE TO CC USERS: The 11 preset workspace layouts are only available with Dreamweaver CS6. If you're using Dreamweaver CC, you will not see the 11 preset workspace layouts as menu options. Instead, you can create your own workspace layout. |
When you select New Workspace, you'll see this dialogue box:
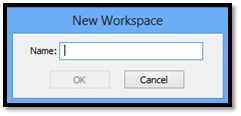
Type in a unique name for your workspace. We're going to type in Example. Then click OK.
Your new workspace is then added to the menu.
If you want to move a panel or inspector, then want to move it back to its original location, go to Workspace Layout under Window on the menu bar, then Reset followed by the name of the workspace to restore.
The Menu Bar
Dreamweaver CS6 is organized so that you can easily view the toolbars and areas that you need and not have to look at the ones that that you don't. This makes finding what you need as easy as can be when you're using Dreamweaver and eliminates the clutter that can be found in other similar programs.
Let's tour the Dreamweaver interface so you become familiar with its layout.
At the very top of the Dreamweaver screen is the menu bar. You'll see it pictured below.

Here you'll find all your menu options: File, Edit, View, Insert, Modify, Format, Commands, Site, Window, and Help.
On the right side of the menu bar, you can see the workspace layout you're using. You can also switch to a different layout.
To the right of the layout, you'll see a search box to search CS6.

|
NOTE TO CC USERS: In Dreamweaver CC, you'll see this button ( 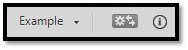 |
 ) that allows you to sync you settings to the cloud. You'll also see a circle with an "I" in it that you can click on to get help using Dreamweaver, as pictured below.
The Document Toolbar
The Document Toolbar is located beneath the tab that contains your document's name. It contains features that allow you to control the view and other options related to the document.

Below we've listed all the features you'll find in the Document Toolbar.
 Show Code View. Clicking on this will display only code (HTML, for example) in the Document window.
 Show Code and Design Views shows both the code and the design (or actual document).
 Show Design View shows only the design.
 Live shows you a non-editable version of your document as it will appear in a browser window. It will be fully functional.
 Preview/ Debug in Browser will allow you to preview or debug the document in a browser window. Select the browser you want to use from the menu.
 Document Title. This allows you to enter a title for the document. This title will be displayed in the browser title bar. If you have already named your document, the title will appear here.
 File Management shows the File Management pop-up menu.
 Refresh Design View refreshes the design after you make changes in Code view.
 View Options will allow you to choose options for Code and Design view, including if you want the Design view to appear above or below the Code view.
 Visual Aids allows you to use visual aids when designing your pages.
 W3C Validation allows you to validate the document or a tag that's selected to make sure the code is correct.
 Check Browser Compatibility. Use this to check if the CSS is compatible with different browsers.
 Inspect lets you highlight styles to help identify and troubleshoot CSS.
|
NOTE TO CC USERS: Below is the Document Toolbar for Dreamweaver CC.
The Document Toolbar in CC does not contain all the features/buttons found in CS6. |

The Document Window
The document window is the biggest area in Dreamweaver. It's the area where you'll see your website as it's designed � or the code � depending on the view you're in. The Document Window is located directly beneath the Document Toolbar.
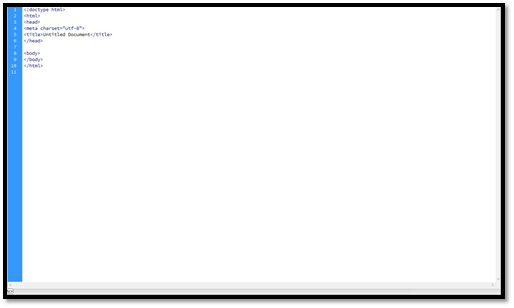
Below is our Document Window in Code view.
Docking Panels
Panels are located to the right of your design area. Some of Adobe's default panels are shown in the snapshot below.
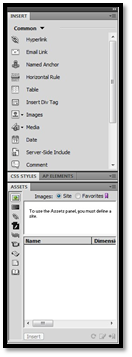
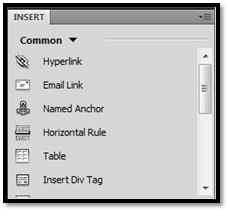
In the Insert panel, you can insert things into your page such as hyperlinks and media. The Insert panel is organized into different categories. The category that is shown by default is Common. Click the downward arrow beside Common to see the other categories.
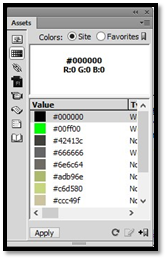
In the Assets panel, you can store library items for use in your documents.
To access different panels, go to Window in the menu bar and select the panel you want to view. If a panel is visible, it will have a checkmark next to it.
Moving Panels
You can move panels around by clicking in the tabbed area of the panel, then dragging and dropping with your mouse. Panels are docked by default, or set in place on the screen. However, can create floating panels by dropping them in the middle of the document window or in some other location. This allows you to have a panel that you're using frequently to be a quick click away.
If you want to close a panel or view its other options, right click on the  in the upper right hand corner of the appropriate panel.
The Status Bar
The Status Bar appears at the bottom of the document window and provides information about the document that you are creating.

Tag Selector, which is located on the far left of the Status Bar. This shows the hierarchy of tags that surround the current selection. You can click a tag in the hierarchy to select a tag as well as its contents. Clicking <body> will select the entire body of the document. Just so you know, a tag is anything that appears within < > in HTML. If you want to set the class or ID attributes, right click the tag, then select a class or ID.
Select Tool. Click the Select Tool to enable or disable the Hand tool.
Hand Tool. Use the hand tool to click a document and drag it to the Document window.
Zoom and Set Magnification. Set the magnification for a document. You can zoom in to make it appear bigger or zoom out to shrink it. This does not enlarge or decrease the file size.
Fluid Grid Layouts. These look like little monitors. They allow you to set the size for your web page for different devices. Included are mobile, tablet, and desktop.
Document Size and Download Time. This shows you the estimated document size and how long it will take to download. This includes images and other dependent files.
Encoding Indicator. The Encoding Indicator shows the encoding for your document.
The Property Inspector
The Property Inspector is located beneath the Status Bar. It displays the properties and options for an element that you have selected on the page. What you see in the Property Inspector will change based on the element you have selected. For example, it will look different when you have text selected than it will if you have an image selected. You'll also notice that the Property Inspector has two sections for some elements: HTML and CSS. You can switch from one to the other by clicking the appropriate button on the left side of the Property Inspector.
Coding Toolbar
The Coding toolbar appears to the left of where you see code.

It only appears when you have Code view set. You can use the Coding toolbar to perform several coding operations such as highlighting invalid code, adding or removing comments, indenting code, and inserting code snippets.
Setting Preferences
You can customize Dreamweaver's features to match how you use it by changing preference settings. To reach the Preferences dialogue box, go to Edit>Preferences.
Opening Files in Dreamweaver
When you first open the Dreamweaver CS6 software, you'll immediately see the opening window as shown below. From this window, you can get started using Dreamweaver by either creating a new file or opening a file that's already in existence.

If you're using Dreamweaver CC, you'll see a window that looks much like the one above, except it's customized for the CC version. It is pictured below.

If you're starting from scratch, select what type of document you want to create by going to the Create New column, then selecting the type.
Creating Websites in Dreamweaver
The Parts of a Dreamweaver Site
It goes without saying that you're going to use Dreamweaver to create websites. However, creating websites using Dreamweaver takes a little preparation. If, in the past, you've only used site builders that some hosting companies offer to build your websites, then you haven't had to worry so much about preparation. Don't worry. Preparing to set up a new or existing site with Dreamweaver isn't hard. In fact, it will actually make designing your site a lot easier.
The first thing that you need to know is that any typical Dreamweaver site has three parts.
- Local folder is where the files are stored on your computer. You must create a folder for any new website that you create using Dreamweaver and store files for that website in the folder. You can also use your local folder to store root folders. Your local folder will house all websites that you create with Dreamweaver. Your root folder will house individual sites.
Take a minute to create a local folder on your computer right now. Name the local folder "Course_Sites."
- Remote folder. This is typically the location on the web where you store your files for testing, collaboration, or publication. You upload files to a remote folder using an FTP client.
- Folder for dynamic pages or the Testing Server Folder. This is a folder where Dreamweaver processes dynamic pages. Usually it is the same as the remote folder. There's no need for you to worry about this unless you are developing a web application.
Set Up a Dreamweaver Site
In this article, you're going to learn to set up a new site both by reading how to do it and by actually doing it. You're going to want to set up a root folder for all files that will be included in this new website.
Set up your root folder within the "Course_Sites" folder by just creating a new folder. You're going to name this root file "New_Site." In this root folder, you'll want to place any images or other files that you will use in your website. (Don't worry about adding any files yet. We will do that later in this article.)
Next, you have to define the folder that contains your website information, documents, images, and other files in Dreamweaver. If you do not define the folder, there will be features that won't work properly. For example, images may not load onto the page.
To define the folder, go to Dreamweaver and go to Site> Manage Sites.
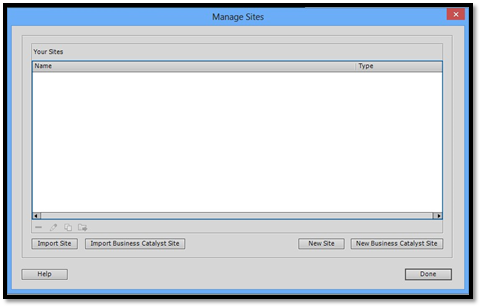
Click New Site. This button is located toward the bottom right of the window.
Select Site from the left hand side of the window pictured below. Click the file button (circled in red) to locate your site.
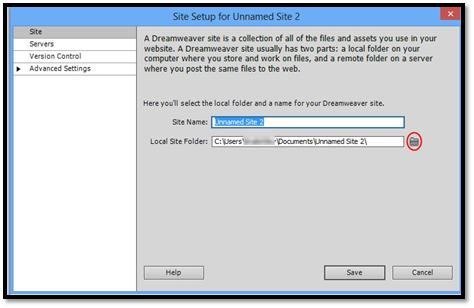
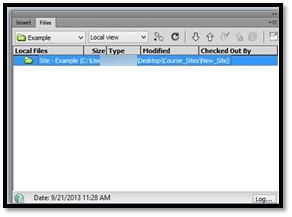
Find your New_Site folder on your computer. Remember, you'll have to first double click on the Course_Sites folder, then click to select the New_Site folder.
Once you've selected your site folder, you are taken back to the window below:
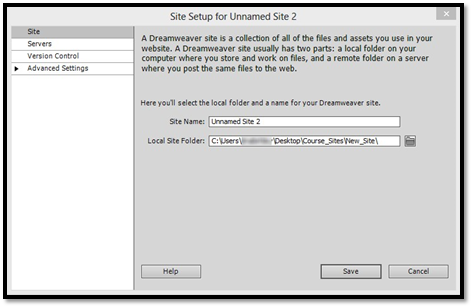
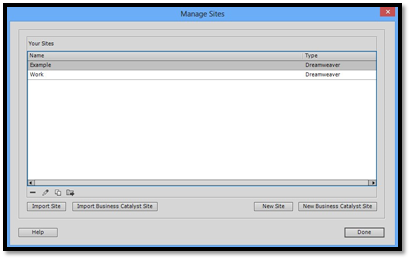
You can now name your site in the Site Name field, then click the Save button. We're going to name this site Example.
It now appears in your Manage Sites window:
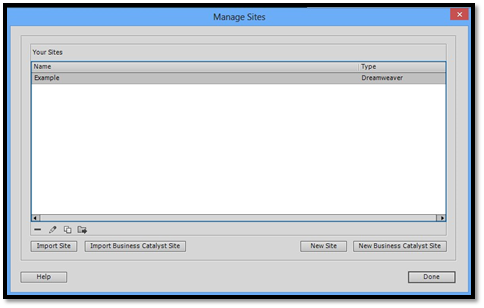
Click Done.
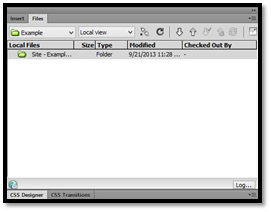
Your site will also appear in the Files panel:
Switching Between Different Sites
You can set up as many websites as you want in Dreamweaver. As you learned above, they will all appear in your Files panel.
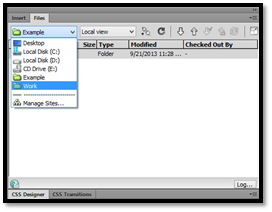
If you're working on one website and want to switch to another website, all you have to do is go to the Files panel, select the name of the site, then click the dropdown arrow beside the site name. If you look at the snapshot below, you'll see our site name in the upper left hand corner of the Files panel.
Find the site name you want and click on it.
It's that easy!
Managing the Set Up of Sites
Once you've set up a site as we already learned to do in this article, you can make changes and additions to the way you've set up the site. To do this, go to Site on the Menu bar, then click Manage Sites (Site>Manage Sites).
Right above the Import Site button, you'll see four icons. These are pictured below:
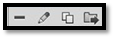
From left to right, these icons are:
-
Minus sign. This deletes a site from the Manage Sites window. When you select the site in this window, then push the minus sign icon, you don't delete folders associated with the site. Instead, you remove the site setup from the Dreamweaver program.
-
Edit icon. It looks like a pencil. When you click on this, the Site Setup dialog box opens. You can change the name of the site or change the local folder.
-
The Duplicated icon. This makes a copy of the site setup. However, it doesn't create a new copy of your site.
-
The Export icon. This exports the site definition. It doesn't create copies of the files. It simply exports the .ste file so that you can share site setup information on different computers.
Located below the icons is the Import button. You use this button to import .ste files if you want to add site setup information to the Dreamweaver program on your current computer.
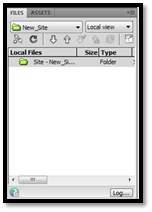
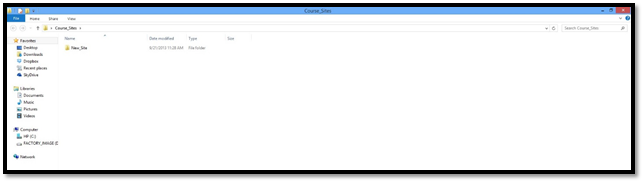
You should now be able to see your folder listed in the files panel. All files stored in the root folder will be displayed in the Files panel. You can go to the Files panel as you work on your website and open, delete, move, copy, and paste files just as you would if they were on your desktop.
Now that your site is listed in the Files panel, it's now set up and ready to design. Throughout the rest of this article, we'll learn how to add text and images to your web page.
Creating a Blank HTML File
Once you have your site set up, it's time to start creating pages (or files) for the site. To add a new, blank HTML page, go to File>New.
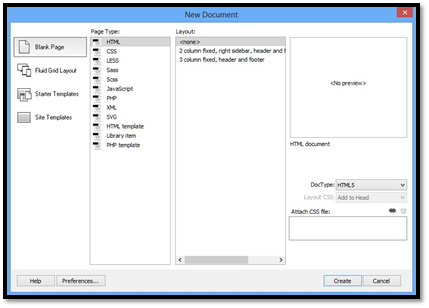
On the left side of this window, you'll see the types of files or pages you can create. We're going to choose Blank Page.
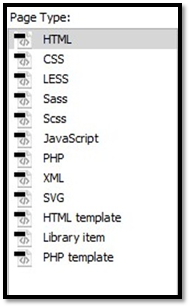
Next, you'll choose your page type. We're going to choose HTML.
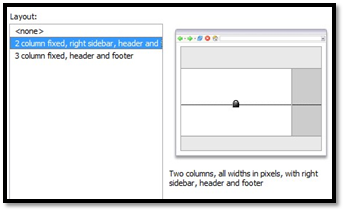
Now choose a layout for your blank page.
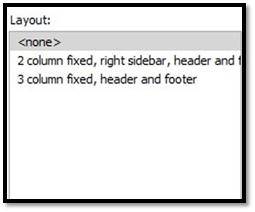
If you won't want to choose a layout, select <none>. You can click on 2 column fixed or 3 column fixed, then see what it will look like in the Preview window.
Below, we've chosen the 2 column fixed.
Choose a document type next to DocType.
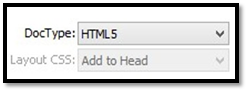
Dreamweaver CS6 creates pages using XHTML 1.0 Transitional doctype by default. This is the best option for most pages today. However, if the page you're working on requires strict HTML pages or you're using HTML5, change this setting.
Click Create to create your page.
As you can see, our page is now created. We can customize the text and other features to customize the page.
For now, take note that, by default, our page name is Untitled-1. Let's give it a custom name so we know what it is. To do this, go to File>Save.
Remember what we learned earlier in this article when we talked about the structure of a website and pages. If this page is going to be the first page of your site, you must name it index.html. If your domain is www.abc.com (for example), and this page is the page they will see when they type in www.abc.com, this page should be named index.html.
Aside from the index page, always try to name your pages to represent the subject of the page or the content that will be on the page.
Fluid Grid Layouts
Fluid Grid Layouts are new to Dreamweaver CS6 and CC. Fluid grid layouts allow you to design different sized pages for websites that will be viewed on different sized devices.
Using a fluid grid layout, you can design a website for viewing on a mobile device, tablet, or desktop.
To create a website using a fluid grid layout, go to File>New.
Select Fluid Grid Layout from the column on the left, then select HTML
Finally, select a layout, then click the Create button.
Viewing Your Website in Dreamweaver
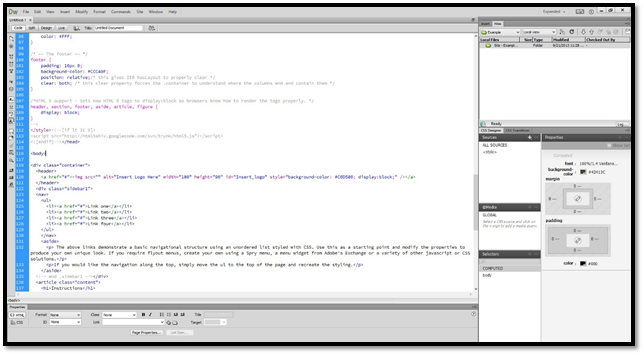
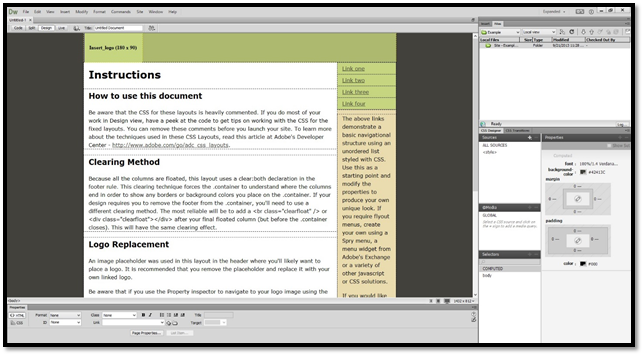
In the snapshot above, we see the code for the website. However, to get a better idea of what the website looks like, we can change the view.
To do this, go to the Document Toolbar. Click the Design button.
Using the Page Properties Dialog Box
Individual aspects of a page can be changed by using the Property Inspector located at the bottom of the Dreamweaver window.

Using the Property Inspector, you can change selections of text from boldface to italics, and so on. For example, we've selected a snippet of text below.
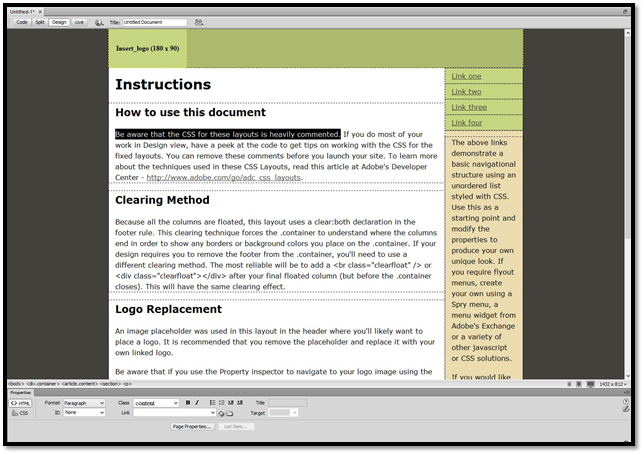
You can see the text that is selected above. Now we can go to the Property Inspector and click the B button for boldface to make the selected text boldfaced.
However, if we want to changes that affect the entire page, not just parts of it, we use the Page Properties dialogue box.
The Page Properties button is located in the Property Inspector.
Let's click on the Page Properties button now. You can also go to Modify>Page Properties.
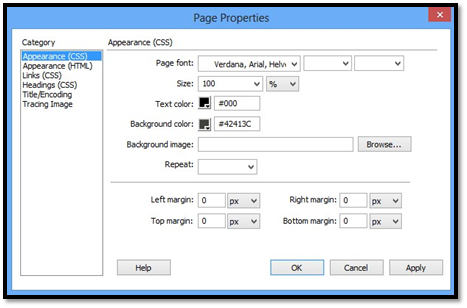
To change the background color or text color for your site, go to the Appearance section of the window above. To change the text color, click the dropdown menu beside Text Color and choose the color you want.
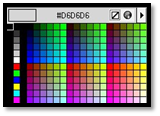
Do the same for Background Color.
You can also change the background image and adjust the margins.
If you look at the column on the left site of the window, you'll see Links (CSS). Here you can change the link styles. When you change the style, you make it look different. Perhaps you want your links not to be underlined (as they currently are) or you want the text color of links to be a different color. You can click on Links (CSS) to change these things.