
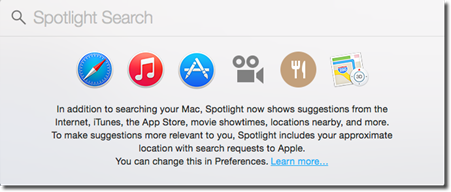
The OS X Spotlight feature has been around since OS X Tiger in 2005. The feature itself is nothing new. It has always been a way to perform system-wide searches, and it still can. However, in OS X Yosemite, Spotlight is a lot better with a new look and location, plus new data sources apart from your Mac. These data sources include the web, the Apple App Store, iTunes, Maps, etc. In addition, it's also a calculator that can convert measurements too. In other words, the new Spotlight is quite simply a powerhouse.
Introducing the New Spotlight Menu
There are two ways to open the Spotlight search box in OS Yosemite. The first way is by clicking the magnifying class icon in the Menu Bar.

The second way is to hit Command+Spacebar on your keyboard.
Next start typing your search term by the magnifying glass in the Spotlight menu window. Spotlight searches from the beginning of words, so as you type you will start to see results.
The search results will be based on three different categories:
1. Data found on your computer. This includes email messages, contacts, appointments, bookmarks, to-do items, chat transcripts, dictionary definitions, and websites in your history list. It also includes photos based on who is in the photos using the Faces feature in iPhoto. In addition, it also includes your buddy list in Messages.
2. Files found on your computer. This is everything with an icon.
3. Online. Results will also include matches from the Internet, including matches from the App Store, iTunes, Maps, etc.
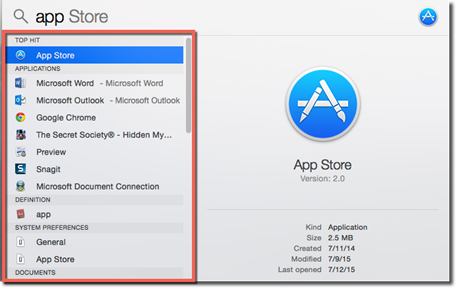
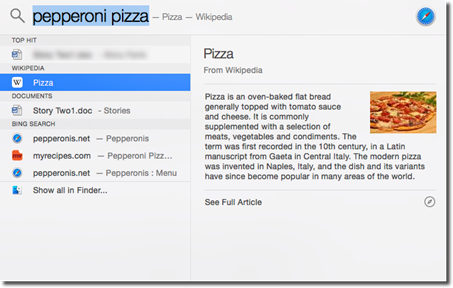
Let's take a look at the Spotlight search window below.
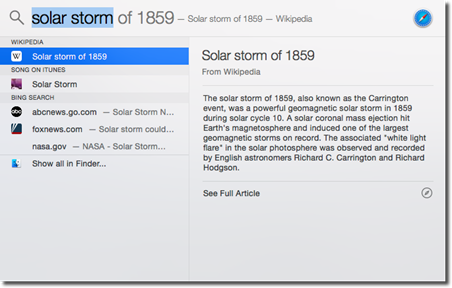
In the pane on the left side of the window, we see our search results. We can see that Spotlight pulled results from Wikipedia, iTunes, and Bing Search. If there would have been any matching files or folders on our Mac, those would have been displayed as well.
The right pane is the Preview Pane. It shows a preview of the selected result. We have highlighted Wikipedia in the left pane. A preview is shown in the right pane.
To open a search result from the left pane, double click on it.
Using Spotlight as a Calculator or Conversion Tool
As we mentioned earlier in this article, Spotlight can also be used as a calculator or conversion tool.
To use it as a calculator, type the equation into Spotlight search.
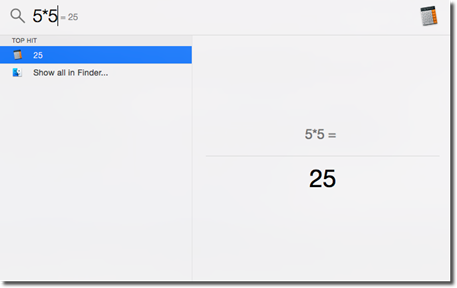
As you can see above, we've multiplied five times five. Use an asterisk for multiplication and a slash for division.
To use Spotlight as a conversion tool, simply type in a measurement.
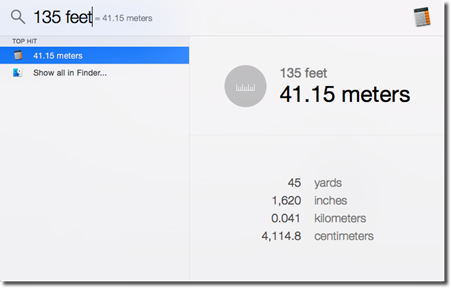
We entered 135 feet. Spotlight converted it to yards, inches, kilometers, and centimeters.
You can also use Spotlight to convert:
-
Area, such as acres, hectares, square yards, square meters, etc.
-
Force, such as joules, calories, foot pounds, newton meters, etc.
-
Power, such as watts, kilowatts, and BTU's per minute.
-
Temperature, such as Fahrenheit, Celsius, and Kelvin.
-
Volume, such as teaspoons, gallons, cubic feet, fluid ounces, etc.
-
Weight and mass, such as pounds, short tons, metric tonnes, etc.
Other Ways to Use Spotlight
Spotlight can be used for a lot more than searching your Mac or the Internet � or for use as a calculator or conversion tool. There are also several other ways that you can use Spotlight to save time finding the information you need.
You can also use Spotlight as a dictionary. Spotlight is connected to the OS X English dictionary. This means you can type in any word, and you will see the dictionary search results. Just highlight (or select) the "Definition" search result in the left pane.
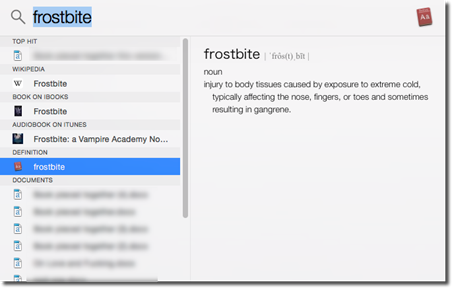
As you can see above, the dictionary definition appears in the right pane.
You can also use Spotlight to find movies through Fandango.com.
Simply type in the name of a movie, and you will see the release year, genre, rating, run time, plot summary, credits, and even buttons to open up a browser to play the movie's trailer.
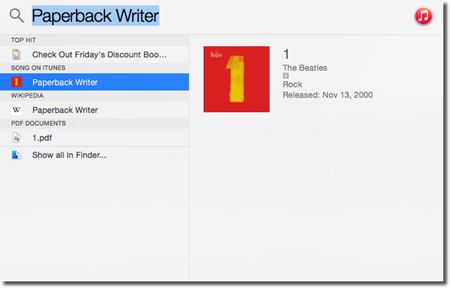
You can also find music in your iTunes music collection. Simply type in the name of the artist or album.
You can also find landmarks and places of interest using Spotlight's connection to Maps. Type in a landmark, type of landmark, business, or type of business.
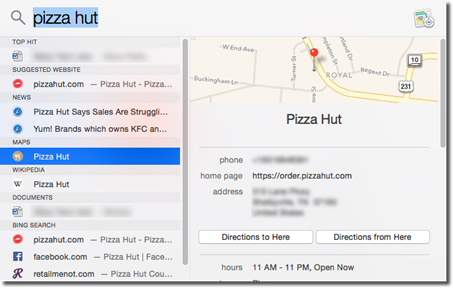
You will see a map, phone number, website, and location, plus buttons for directions.
Tips for Successful Searches Using Spotlight
Searching using Spotlight can be very similar to doing web searches using Google. There are certain things you can type into the search area that will help Spotlight deliver more accurate results to you.
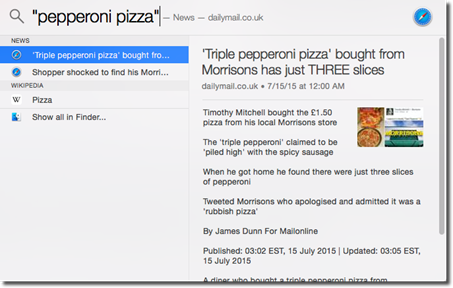
Using quotation marks (" ") around your search terms will deliver results that are an exact match for the words you entered. For example, if you're searching for pepperoni pizza, and you just type pepperoni pizza in the search box, your search results will include results for pizza, not just pepperoni pizza.
However, by entering in "pepperoni pizza" into the search box, Spotlight will keep the words pepperoni and pizza together to return exact results.
You can also search for certain kinds of things, such as images, applications, etc. To do this, you use the word kind followed by a colon, then the kind of thing you want to find. For example, find:image.
Below is a list of kinds you can use.
|
Kind |
When you want to find: |
|
kind:event or kind:events |
Calendar appointment |
|
kind:image or kind:images |
An image or graphic |
|
kind:music |
Music |
|
kind:movie or kind:movies |
Movies |
|
kind:pdf or kind:pdfs |
A PDF file |
|
kind:audio |
An audio file |
|
kind:bookmark or kind:bookmarks |
Safari bookmarks |
|
kind:font or kind:fonts |
A font |
|
kind:to do or kind:to dos |
A Calendar task |
|
kind:presentation or kind:presentations |
A PowerPoint or iWork presentation |
|
kind:app or kind:applications or kind:application |
A program |
|
kind:contact or kind:contacts |
A contact in your address book |
|
kind:folder or kind:folders |
A folder or disk |
|
kind:email or kind:emails |
An email message in Mail |
You can also restrict results by date by using date followed by a colon, then a keyword. For example, date:yesterday. You can use this year, next year, this month, next month, this week, next week, yesterday, today, and tomorrow.
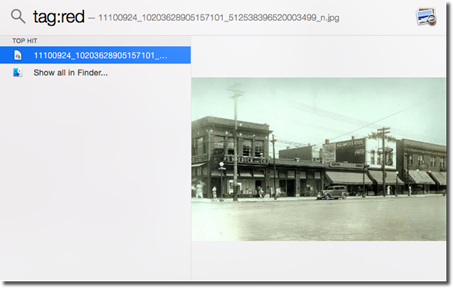
In addition, you can search by Finder tags. For example, tag:red or tag:Cincinnati.
Viewing Search Results in a Finder Window
Take a look at our Spotlight search window below.
When we scroll to the bottom of the results pane, we see "Show All in Finder." This is because Spotlight shows us the the most likely matches for our search terms in the Spotlight search window. If there are additional results, you will see the "Show All In Finder" at the bottom.
By double clicking "Show All In Finder," a Finder window opens with more results.
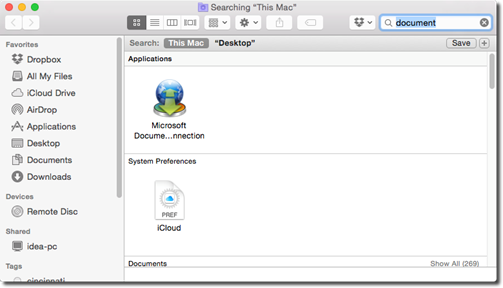
You can also initiate searches from the Finder window using the search box that we've highlighted in red below.
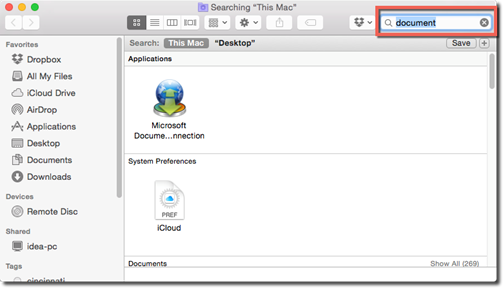
Start typing your search terms into the search box.
In the Finder window above, we searched for games in the location "This Mac."
We've highlighted the "This Mac" button below.

By selecting This Mac, we searched our entire computer. We could have also searched Desktop � or our desktop.
If we were networked with other computers, we would also see a "Shared" button to search all computers in the network.
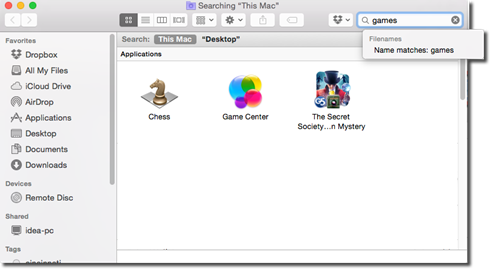
Searching with Tokens in the Finder Window
Tokens allow you to combine search criteria when using the Finder window to search. In Apple lingo, a token is a "visual representation of search criteria." For example, you can search for image files that were sent to you by Jim.
Let's see how tokens work.
In the Finder window search box, type image.
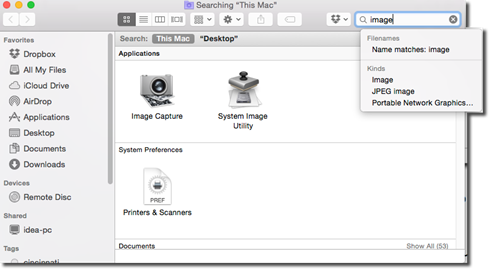
We can see all files on our Mac that contains the word image or is an actual image.
In the search results, we see a pop-up menu that allows us to specify what we want to find. Do we want to find something that contains the word image � or an actual kind of image?
We want to find an image, so we will select Image under Kinds.
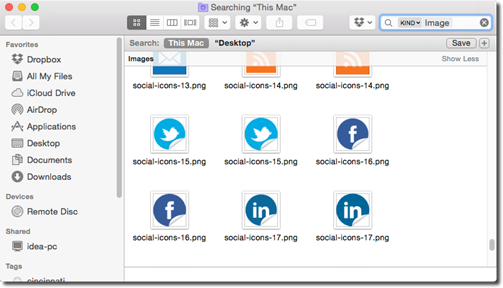
In the search box, we see a token has been created. It says "Kind:Image."
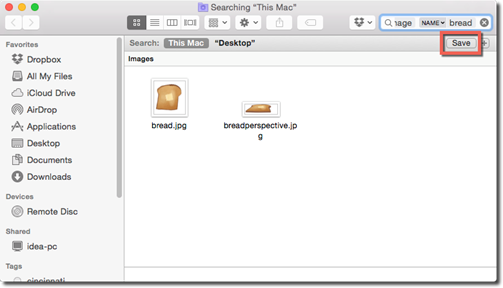
Now, we're going to type in the search box again, and type bread.
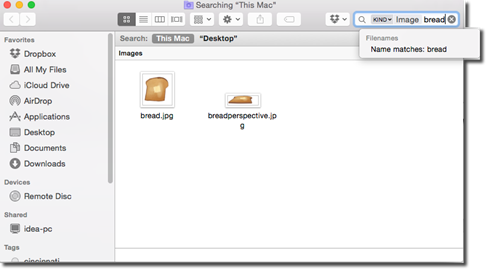
We now see all results that are images and contain bread.
Click the file name.
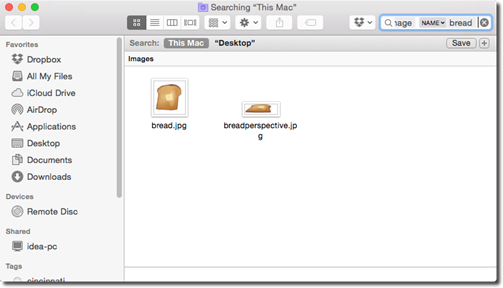
Next, type in more criteria if you want. You can keep entering criteria until you find the results you want.
Customizing Spotlight
Spotlight can be customized to help you work better, as well as for security reasons. To customize Spotlight, go to  >System Preferences.
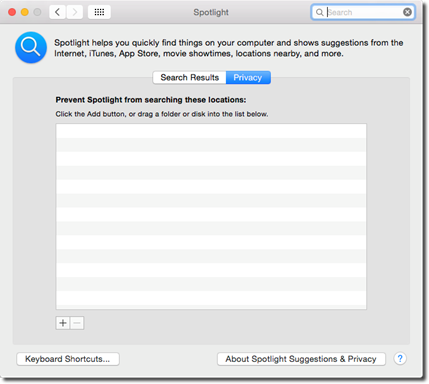
Click Spotlight.
You will then see this dialogue box:
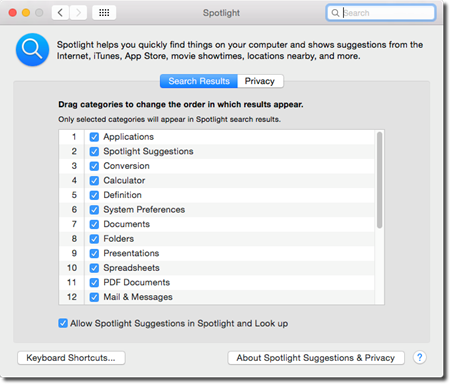
Now you can:
-
Turn off categories by unchecking the category in the list. This category will no longer appear in search results.
-
Prioritize categories by dragging them up or down the list. This will change the order that categories appear in search results.
-
Click the Privacy button and hide certain folders from Spotlight searches.
About Smart Folders
A Smart Folder is not an actual folder. It's more of a saved search. When you look at it, it will look like a folder of saved files, but the things you see that look like files are actual links to the actual search files. If you access the search files, the search results will be updated using the saved search criteria.
To create a Smart Folder, go to the Finder window from a Spotlight search, or perform a search in a Finder window.
Click the Save button.
You will then see this pop up window:

Enter a name for the search, then where you want to save the Smart Folder. Also, put a checkmark beside Add to Sidebar if you want the Smart Folder to appear in the Sidebar.
Click Save.
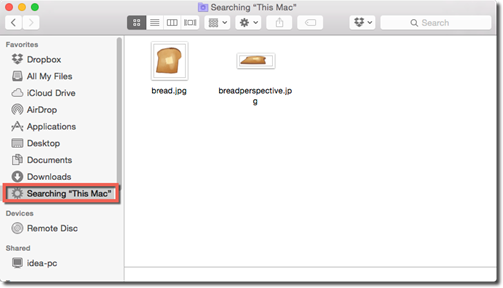
Our Smart Folder now appears in the Sidebar of the Finder window.
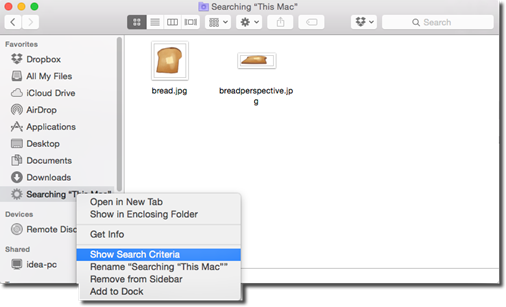
We can right click on the Smart Folder to show the search criteria or to rename the Smart Folder.
The OS X Yosemite Elements
If you are updating your Mac to OS X Yosemite, then chances are the new look will be something you either love or hate. The new look is more flat and simplified, and the icons look different. However, whether or not the look is better or worse is left up to debate, but learning how to use the features of OS X Yosemite will help you feel more at home with it.
Taking Another Look at the Dock
The Dock contains programs that are either a.) currently open on your Mac, or b.) ones that you want to be able to access quickly without going to the Launchpad.
A program that's currently open will have a dot beneath it in the Dock. Take a look at the Finder, MS Word, and SnagIt icons below, and you will see a dot beneath each of them.

To open a program from the Dock, just click on it.
If you want to add a program or file to the dock, all you have to do is drag it to it. For example, you can drag a program from Launchpad into the Dock.
You can rearrange the order of the icons on the dock by dragging them horizontally. If you want to remove an icon from the dock, simply drag it away from the Dock, then release your mouse.
To open a program in the Dock, click it once.
To see the name of a program in the Dock, hover your mouse over the icon for the program.

About Pop-Up Dock Folders
The Dock has two sides. Programs and applications are on the left. On the right side are files, documents, folders, disks, and windows you've minimized.
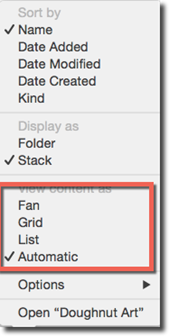
Click on a folder or disk icon on the right side of the Dock. The contents of that folder will sprout up from the icon.
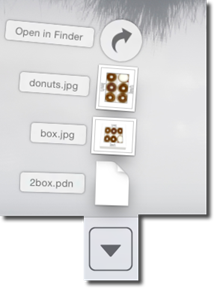
As you can see above, the content in the folder is displayed in a curved column. This is called Fan view.
You can also choose:
Grid view where the icons appear in a rectangular window.
List view where the items in the folder appear in a list.
Automatic where OS X will choose either Fan or Grid view depending on the number of icons in your folder.
To change the view, right click on the folder in the Dock. Choose the view you want from the pop up menu.
Moving or Hiding the Dock
If you do not like the Dock and do not want it to appear on your screen, you can go to System Preferences.
The icon for System Preferences looks like this:

You can find it in the Dock or by clicking on Launchpad.
Once you open System Preferences, click on Dock.

To hide the dock, put a checkmark beside "Automatically Hide and Show the Dock."
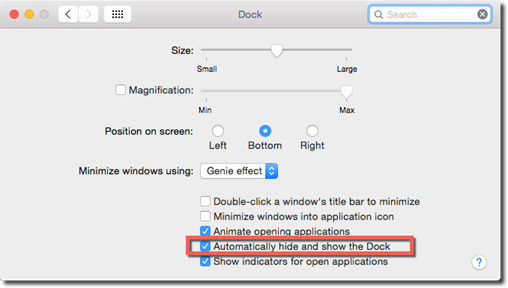
The dock is now hidden. To see it, move the cursor to the Dock's edge of the screen. Our Dock appears at the bottom of the screen, so we would move our cursor to the bottom of the screen to make it appear.
To move the dock from the bottom of the screen to a side of the screen, press the Shift key and drag on the Dock's divider line to move the Dock to either the right or left side of the screen.

Resizing the Dock
If you want to resize the Dock, hover your mouse over the divider line that divides the dock into a right and left side. The line will turn into a white double headed arrow.
Drag up to enlarge the Dock. Drag down to shrink the Dock.
Working with Applications Using the Dock
Let's say you have a text document in Documents. With Documents open in the Finder window, you can drag a specific document to a word processing program, such as Pages or MS Word, in the Dock. Just drag it and drop it on the program. OS X will use that program to open the document.
You can also hide all open windows of the program you're using. Simply go to the Dock and Option+Click on the program's icon. You can also hide all program windows except the program you're using by pressing Option+Command+Click on the icon of the program you're currently using.
Pinning an App to the Dock
If you want to add a program or app to the Dock so that it always appears on the Dock, first open the program or app. Whenever you open a program or app, its icon appears on the Dock.
Next, click and hold on the icon until a pop up menu appears.
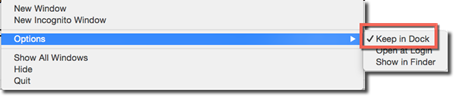
Go to Options> Keep in Dock, as shown above.
The Finder Toolbar
The Finder toolbar is located at the top of the Finder window.

The back arrow and forward arrow buttons on the far left side of the toolbar will move you back to the folder you were just looking at or forward to the window you backed out of. The forward button only appears after you've used the back button.
The View buttons allow you to switch between views. We've already discussed views, but we've highlighted the buttons below as a reminder.

The Arrange pop up menu allows you to group files by date, name, and other criteria.

The Action menu is marked by the gear-like icon.

The Share button allows you to share the selected icon.

If we click on the Share button, we see this pop up menu:
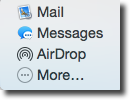
The menu gives us a few ways we can share the icon we selected: Mail, Messages, or AirDrop.
If you want other options to appear in the Share Menu, click More in the pop up menu.
To the right of the Share button in the Finder toolbar is the Finder Tags button.

Click the Finder tags button to assign a tag to the selected icon.
Hiding or Resizing the Toolbar
You can hide the Finder toolbar by going to View>Hide Toolbar. In addition, you can also press Option+Command+T.
If you don't want to hide the toolbar, but just want to make it smaller, you can do so by hiding the icons. To do this, right click in the Title Bar, next to the application icon, then choose Icon and Text, Icon Only, or Text Only.

Pictured below is Text Only.
Customizing Toolbar Icons
When you right click on the Title Bar in the Finder window, you can shrink the size of the toolbar, or you can customize the icons in the toolbar. To do this, select Customize toolbar.

You will then see this pop over window that appears over your Finder window.
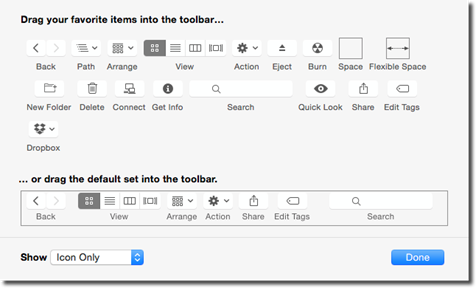
Using this window, you can add anything you want to the toolbar, as well as customize the look and feel by rearranging the toolbar � or even removing buttons you don't use.
Below we've listed buttons that you can add to the toolbar that appear in the window above.
-
Path adds a button that opens a pop up menu. It reveals the hierarchy of the folders you open.
-
Eject ejects the disk or disk image that's selected.
-
Burn lets you burn a CD or DVD using the folders you drag onto it.
-
Space. If you drag this onto the toolbar, it will add space between it and the icon to its left.
-
Flexible Space adds a gap too, but the gap expands as you widen the window.
-
New Folder creates a new folder in the window you're viewing.
-
Delete lets you delete the selected icon or folder in the Finder window.
-
Connect opens the Connect to Server dialogue box if you're on a network.
-
Get Info opens the Get Info window for the selected icon or file.
If you want to restore your toolbar to its original look, go to "drag the default set into the toolbar" and drag the rectangular strip to the toolbar.
If you want to add your own things to the toolbar (such as files, folders, programs, disks) etc., and turn them into buttons, simply select them in the Finder window, then Command+Option+Drag them them to the toolbar. Release your mouse button when you see a white plus sign in a green circle.
Customizing the Look of the Desktop
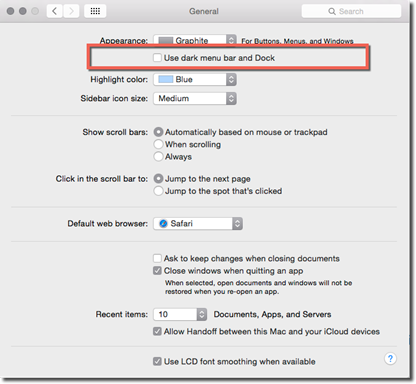
Apple gives you several ways to change the look and feel of OS X Yosemite's Desktop. To customize your desktop go to  > System Preferences. Click on General.
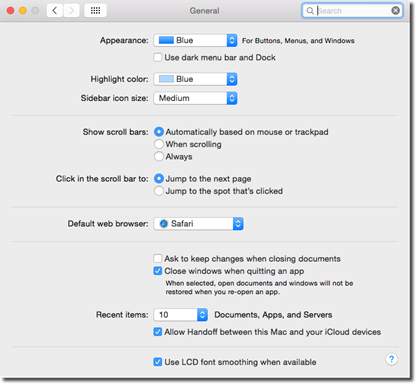
The default color for buttons, menus, and windows is blue. You can change this to Graphite in the Appearance section.

If you put a checkmark beside "Use Dark menu bar and Dock," the Menu bar, menus, and the Dock become dark gray.
About Desktop Sounds
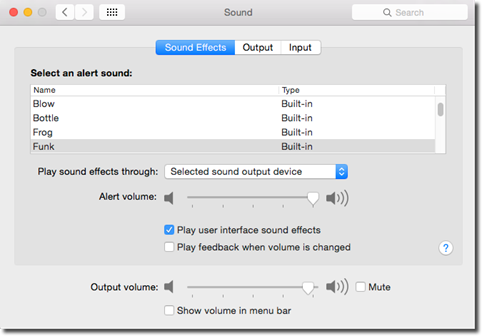
You may have noticed desktop sounds coming from your Mac. For example, you can hear a crunching sound when you drop something in the trash. You might even hear a slight thud when you drag something into a folder.
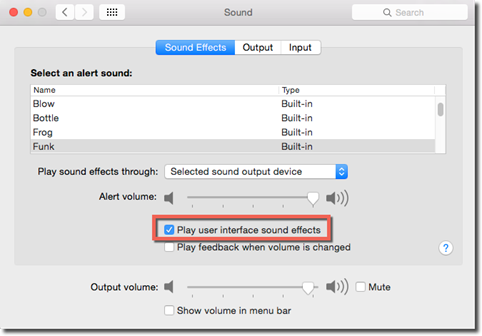
If you don't like these sound effects, you can turn them off by going to System Preferences, the clicking Sound.
Uncheck the box beside "Play User Interface Sound Effects."
Menulets
Menulets are the icons that you see on the far right side of the Menu Bar. The official name given to them by Apple is Menu Extras; however, the Mac user-given term has become much more popular.
You can see the menulets that appear on our Menu Bar below.

Below are a list of menulets that you can add, along with instructions on how to add them.
-
Battery. Battery shows you how much battery life your laptop battery has. To add a menulet for the battery life, go to System Preferences>Energy Saver, then put a check in the Show in Menu Bar box.
-
Bluetooth. Bluetooth can pair your Mac with your cell phone or send/receive files wirelessly. To show Bluetooth in the Menu Bar, go to System>Preferences>Bluetooth. Check the "Show Bluetooth in Menu Bar" box.
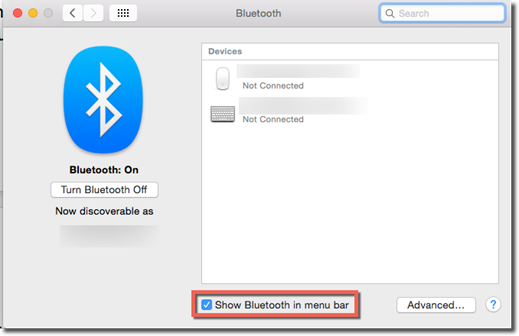
You can see the Bluetooth menulet below.

-
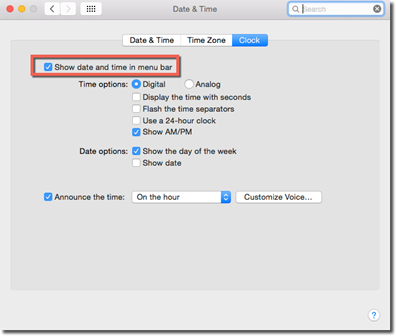
Clock shows you the date and time. To find the Show box for Clock as you have found the Show box for Bluetooth and Battery, go to System Preferences>Date &Time. Click the Clock tab, then put a checkmark beside "Show date and time in menu bar."
-
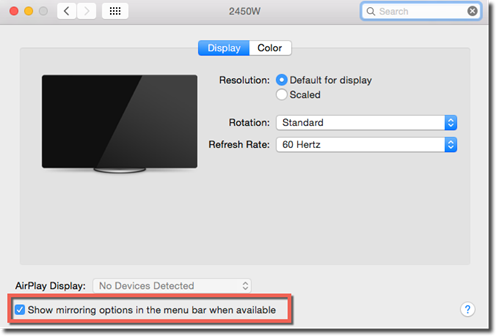
Displays adjusts the screen resolution. With Mac, it lets you turn screen mirroring on or off when you have a second monitor or projector. To locate the Show checkbox for this menulet, go to System Preferences>Displays, then click on the Display tab.
-
AirPort lets you turn Wi-Fi on or off as well as connect to wireless networks. To find the show checkbox for this menulet, go to System Preferences>Network. Click Wi-Fi.

-
Messages. This menulet works with the Message app. Set it so that your buddies know you're away from the computer or available to chat. You can also use the menulet to open the application. To turn on the menulet, go to the Messages app, then go to Messages>Preferences>General.
-
Remote Desktop is a program that you have to buy if you want other people in your network to be able to access your Mac. To turn on the menulet, go to System Preferences>Sharing, then click on Remote Management.
-
Script Menu has ready-to-run AppleScript programs. For the menulet, open the AppleScript Editor program, then go to AppleScript Editor>Preferences>General.
-
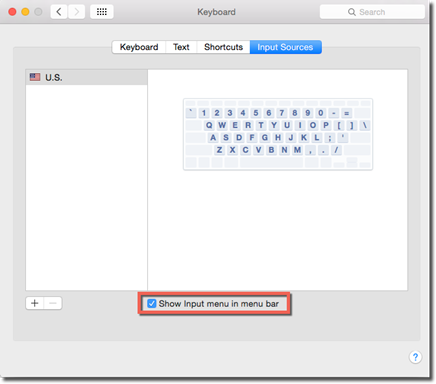
Text Input lets you switch between different text input modes. For the menulet, go to System Preferences>Keyboard>Input Sources.
-
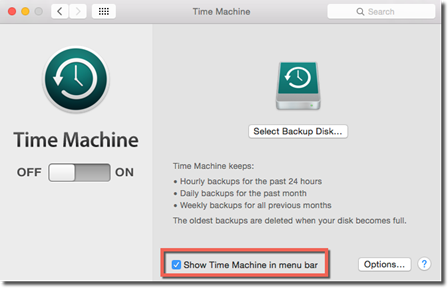
Time Machine. This menulet lets you start and stop Time Machine backups. Go to System Preferences>Time Machine.
-
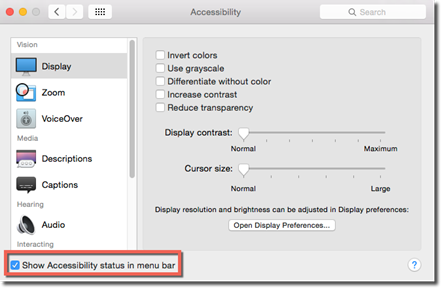
Accessibility. This menulet gives you ON/OFF controls for features that help those with visual, hearing, and muscle impairments. Go to System Preferences>Accessibility. (This may be found under System Preferences>Universal Access on your Mac.)
-
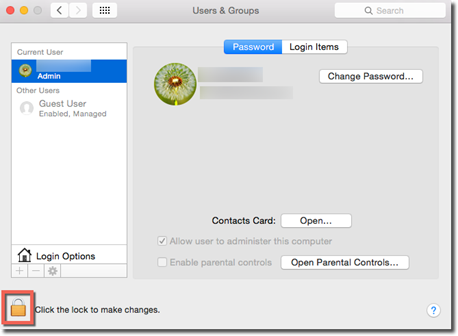
User shows whose account is logged into the Mac. To turn this on, go to System Preferences>Users & Groups. If you need to unlock the panel, click the padlock, as highlighted below.
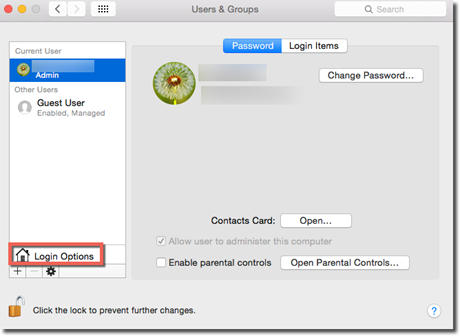
Next, click Login Options.
Put a checkmark beside "Show faster user switching menu as"
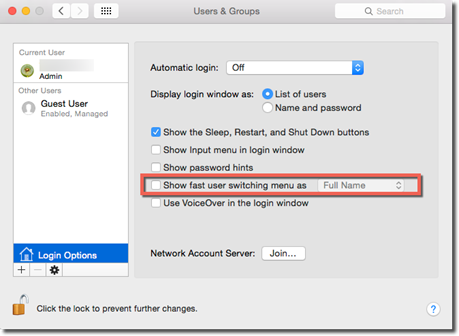
Choose Full Name, Account Name, or Icon from the pop up menu.
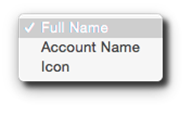
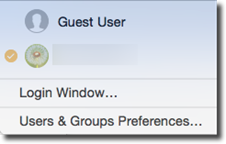
We chose Icon. As you can see, the menulet now appears in the Menu Bar.

If we click on the menulet, we can quickly switch between users.
-
Volume adjusts the speaker or headset volume. Go to System Preferences>Sound.


