Before we continue to talk about themes, let's take a break to talk about an aspect that is arguably the most important part of any website you create. That aspect is content. You see, the theme you select will make your website attractive to visitors. It will make them want to say for longer than a millisecond before moving onto another website.
However, it's the content that you add to your site that will get your visitors' attention, make them want to read (or watch), and compel them to visit all of your pages. If the theme you choose keeps them interested for a minute, the content you put on your website can keep them there for life (not literally, but you get our drift).
In this article, we're going to learn how to:
-
Create new posts
-
Publish posts
-
Create tags
-
Create and edit categories
-
Create a sticky post
-
Edit posts
-
Delete posts
-
Archive content
-
Customize permalinks
Creating New Posts for Your Site
You should already be signed into your WordPress site; however, if you're not, please do so that this time.
Go to your dashboard.
Click Posts.
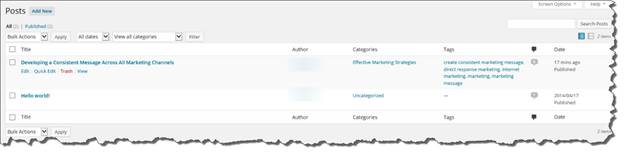
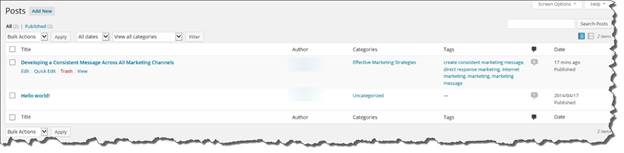
As you can see in the snapshot below, all of our posts are listed. They are listed by title, but also show the post author, the category, any tags, and the date it was published.

By default, all WordPress themes have one post.
To add a new post, click Add New in the dashboard.
This is what you will see:

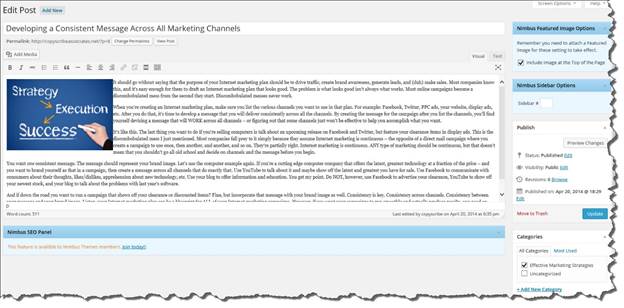
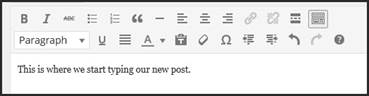
To add a new post, type in a title for the post.

If you want to add media, such as an image or video, click the Add Media button.

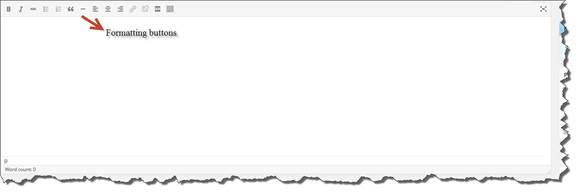
Type (or copy and paste) your post into the text area. You can use the formatting buttons to format your text. Just hover your mouse over a button to see what it does.
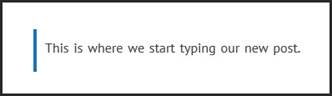
To add text, click in the text area. You will then see the cursor.
Start typing.

Formatting Text
The formatting tools for text in WordPress are similar to what you'll find in a word processing program. You should already be familiar with them.
 Adds a block quote. A block quote will appear indented on your screen when published, as shown below.
 Inserts a horizontal line.
 Inserts or removes a link.
 Inserts a Read More tag. This will truncate blog entries so that only a portion of the post is shown on the home and archive pages. There will be a link that directs the reader to the full post. To use this tag, type in your post. When you want to cut off the post, click the Read More tag button. Type in the rest of your post.
 Toggles the toolbar. The rest of the toolbar is shown below.

These tools give you more formatting options.
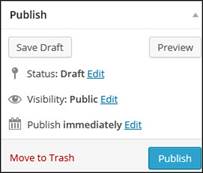
Publishing and Saving Posts
When you're finished creating your new post, it's time to get it ready for publication. To do this, go to the sidebar on the right, as pictured below.
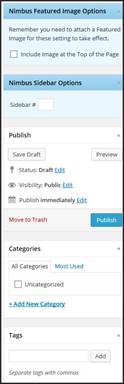
We are using a Nimbus theme, so we can include a photo to the top of our post, as well as choose a sidebar #. If we wanted to add an image, we'd do so there.
Next, we can choose what to do with our post:
-
We can click the Save Draft button to save the post as a draft. This means our post is saved, but it won't appear to visitors who come to our website.
-
We can click the Preview button to see how our post will look on your site.
-
We can click the blue to publish it to our site now.
We can also click one of the three blue Edit links.
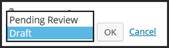
If we click the Edit link to the right of Status, we can choose if we want the status to remain as Draft or Pending Review (for posts that are moderated).
If we click the Edit link to the right of Visibility, we can set the visibility of our post. Right now, it's Public. When we publish the post, everyone who visits the site will be able to see it.
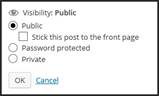
However, we can also choose to stick the post to the front page.
We can also password protect the post. Only those with the password will be able to view it.
We can mark the post as private so only we will be able to see it.
Click OK when you're finished.
When we're ready to publish the post, we can choose when we want it published by clicking Edit to the right of Publish.
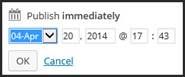
As you can see, we can publish it immediately, or we can choose a date or time. The date and time can be in the future � or in the past.
Click OK when you're finished.
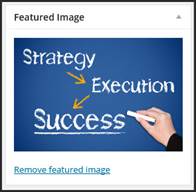
You can also add a featured image to your post:
However, before you publish your post, you'll want to add tags and categories.
Creating Tags
Tags are keywords or phrases that will be picked up by search engines to determine what your content is about. You'll want to add tags for each post that you create.
The tags that you create will be listed with your posts. They can also be listed in a tag cloud using a widget in the sidebar.
Before you publish a post, you'll want to create tags for that post. Use keywords that relate to the information presented in the post.
We've added tags below.

When you type in tags, separate each tag with a comma. When you're finished, click the Add button.
The Purpose of Categories
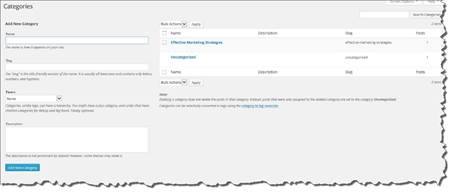
A category is the main topic or topics of your blog post. You can use categories to organize all your posts by subject. This makes it easier for your readers to find what they want to read. In WordPress, you assign categories to each blog post that you create. The categories for each post will be listed in the body of the post (after the title) and in the sidebar of your theme. In addition to categories, you can create subcategories (or category children). To do this, go to Posts>Categories on the dashboard.
Go ahead and create a category for your new post, as in the snapshot below.

Type in the name of the category, then decide if it's a parent or child category that falls under an existing parent category.
Click the Add New Category button.
(When you're finished, you can publish your post if you want.)
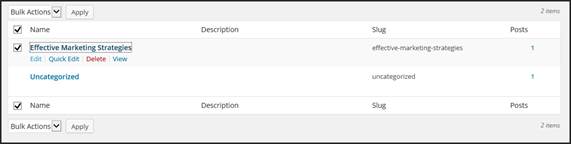
Changing Category Names
There may be a time when you want to change the name of a category. If you already have hundreds of posts filed under that category, changing them one at a time can prove too impossible of a task.
Here's an easy way to do it.
Go to Posts>Categories on your dashboard.
NOTE: You can also create new categories here as well.
Click on the title of the category that you want to edit on the right. If you hover your mouse, you'll see the Edit link.
Click Edit.
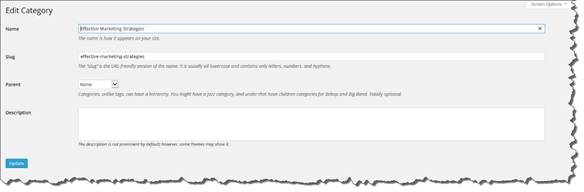
Type in the new name for the category, then type the new slug in the text box. A slug refers to the web address for the category. For example, if your category is "books," the slug would be www.yourdomain/books.
Click the blue Update button.
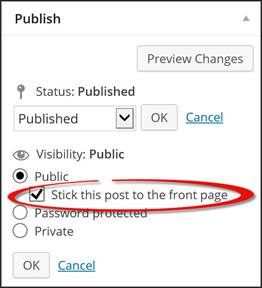
Creating a Sticky Post
Posts on WordPress are displayed in reverse chronological order, with the latest post on top. There isn't a way to undo this feature; however, you can mark a post as sticky so it appears at the top � above other posts.
To mark a post as sticky, put a check by the option that says Stick This Post to the FrontPage in the Publish section of your post.
Editing Posts
To edit a post, go to Posts>All Posts on the dashboard.
Hover your mouse over the post you want to edit.
Click the Edit link.
You will then see the same window you used to create the post. Make your changes, then click the Update button on the right in the Publish section.
Deleting Posts
To delete a post, hover your mouse over the post that you want to delete.
Click Trash.
Archiving Content
WordPress archives all your content for you whenever you publish a post or create a category for a post. This is because every post you make is sorted by the date. That said, your content is archived by:
-
The month it was published in
-
The category you placed it in
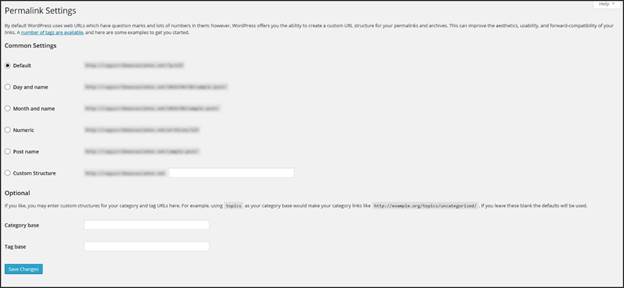
Customizing Permalinks
A permalink is a link to your blog or page post. By default, the permalink is made up of the title of your blog or page.
To customize a permalink, click to Edit the post or page.
Click the Change Permalinks button as shown below.

Enter in the new, custom permalink you want to use.
Making a Blog Look Like a Website
We'll discover how to:
-
Create traditional website pages
-
Remove comments from a page
-
Remove the sidebar
-
Use the Media Library
-
Add images to pages and posts
-
Add video to pages and posts
-
Embed videos in pages and posts
Creating Static Website Pages
Perhaps you don't want to create a site that looks like it's just a blog. Maybe you want a site for your business, or you just want a standard website instead of just a blogging site. To create a website like this, you create static pages and add static content to them.
Static content is content that doesn't change that often, such as an About page or a Contact page. A static page is a page that holds that type of content.
You can use the Pages feature on your WordPress site to create that type of content.
Let's learn how to create a static page.
Click Pages on the dashboard.
You will see two submenu links under Pages:
-
Edit lets you search, view, delete, or edit pages.
-
Add New lets you create a new page.
Remember that pages are different than posts. Pages are not blog pages. They don't appear in blog listings. They aren't categorized. They also aren't archived, nor do they appear in recent post listings.
When creating static pages, WordPress allows you to create parent pages and child pages.
-
A parent page is a top level page, such as About Me.
-
A child page is a second level page, such as My Bio. This page would come underneath the About Me page since it is related to About Me. Another child page might be My Mission.
Notice that all the child pages are basically subtopics of the parent page.
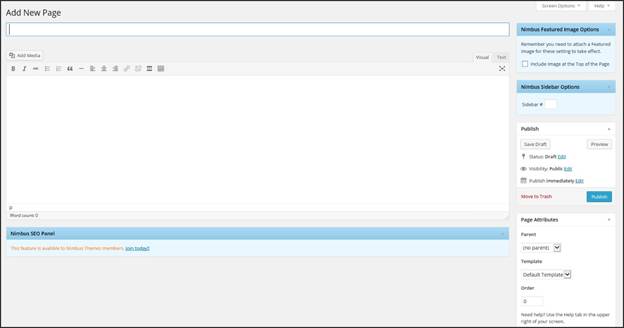
Click Pages>Add New to add a new page.
You'll enter the content for this page just as you did with posts. When you're finished, you can set your page attributes on the right, including specifying if it's a parent page (set to no parent if the new page is a parent page).
Just remember that the title of your page will be what you enter in the text field below "Add New Page."
Remove Comments from a Page
If you don't want your static page to look like a blog page, the one thing you want to get rid of are comments.
To do this, go to Pages>All Pages.
Hover your mouse over a static page for which you want to remove comments.
Click Quick Edit.
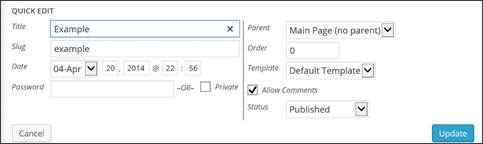
Uncheck the Allow Comments box.
Click the blue Update button.
This should remove the comments from your page. However, some templates may still show text on the page that lets the viewer know that comments are disabled.
If this happens to you, you can search for the text that tells viewers comments aren't allowed on page.php. When you find it, remove the text.
Removing the Sidebar
There are several different ways to remove the sidebar from a page; however, a lot of those ways are theme based and requires PHP. It is not a task you want to undertake if you're not a PHP programmer or only have minimal PHP skills.
That said, take the time to search for themes that do not have a sidebar. There are plenty of free WordPress themes that have the appearance of a traditional website on the home page. The Opulus theme that we chose is just one of those.
Remember, WordPress themes make it easier to design a website. Let them make it easier for you whenever possible.
Using the Media Library
To reach the Media Library, go to the dashboard, then go to Media>Library.
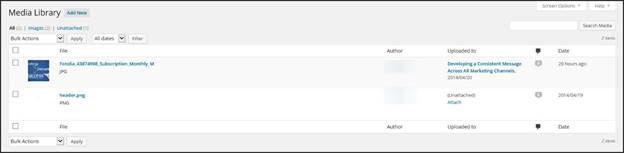
The Media Library is shown above.
You can see the images that we already have stored in our Media Library. If we add an image to a page and upload it directly from the page, it will still appear in the Media Library.
To add a new image or video, click the Add New button.

You will now see this WordPress window:
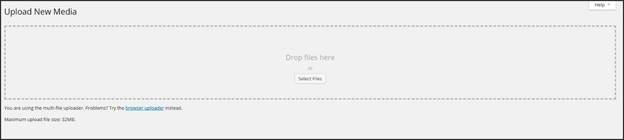
You can either drag and drop the files or click the Select Files button to locate the media files that you want to upload the Media Library. Remember, you can upload graphics, images, and video.
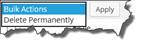
To delete an image or video, select the media by putting a checkmark in the box to the left of it. To Bulk Actions, shown below, and select Delete permanently. Click the Apply button.
Attached and Unattached Media
Let's take a look at the Media Library again.

The Media Library shows us our media files, the author of those media files, the comments left on our files, and the date it was uploaded. However, it also shows us where the file was uploaded to. This is in the Uploaded To column, shown below.
If you look at the snapshot above, you will see the Uploaded To column to the right of our images.
Now, look at header.jpg. You can see that header.jpg is unattached (in the Uploaded to column). This means that the image header.jpg is not attached to any page or post.
To attach it to a page or post, click Attach.
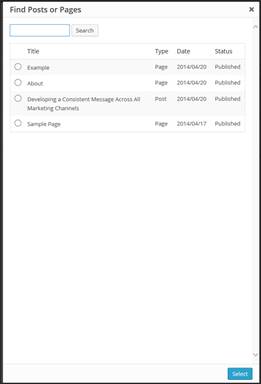
Select the page you want to attach it to.
Click the blue Select button.
Inserting Images or Videos Directly Into Posts or Pages
You do not have to upload videos or images to the Media Library before placing them on a page. Instead, you can upload an image or video to your post or page as you create it.
Here is how you do it.
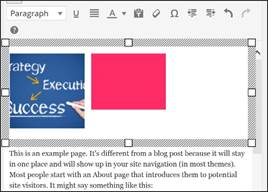
First, place the cursor in the location where you want the video or image to appear, as shown below.
Even though you can't see our cursor, we placed it before the beginning of our sentence.
Now, click the Add Media button.
You can Insert Media, Create Gallery, set a featured image, or insert media from a URL.
Click Insert Media or click the Upload File tab.
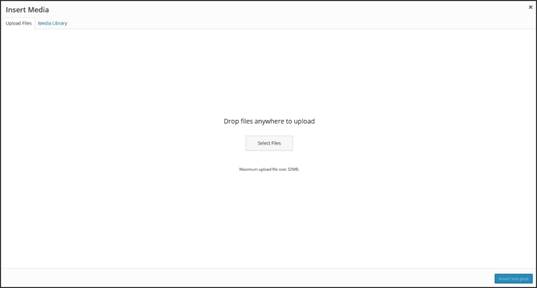
Either drag and drop your file, or click Select Files to locate the files you want to upload.
Click the blue Insert Into Post button when you're finished.
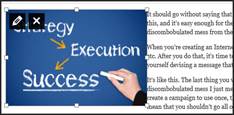
The image now appears in your post. You can use the handles on the sides and corners of the image to resize it.
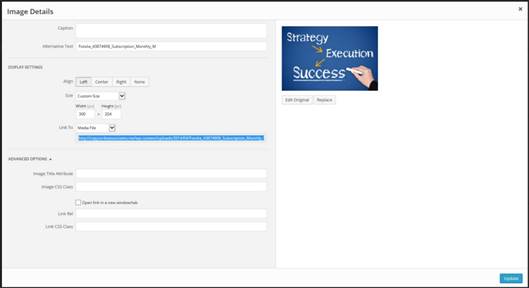
Click the Edit button (it looks like a pencil in the upper left corner of the image) to edit the image details, as shown below.
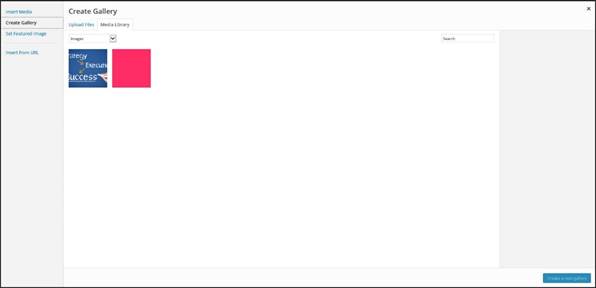
Create a Gallery
To create and insert a gallery onto a page or post, follow the steps to insert an image onto a page or post.
When you see this window, click Create Gallery.
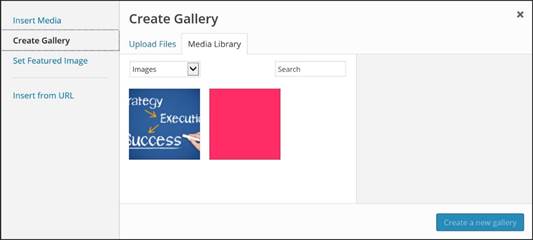
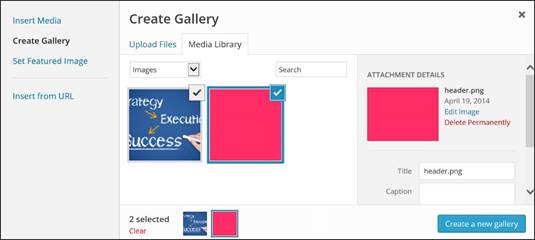
You can choose multiple images from your Media Library, upload images, or a combination.
Select your images, then click the blue Create a New Gallery button.
Next, you can drag to the center column (under Edit Gallery) and add captions to your images, as well as drag and drop to rearrange them.
In the column on the far right, you can choose your settings. You can turn the image into links so they go to another page on your site or an image file (a blank page with nothing but the image).
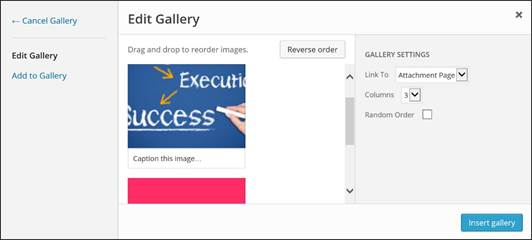
Click Insert Gallery when you're finished.
The gallery appears on your page with a bounding box around it so you can move or resize the gallery.
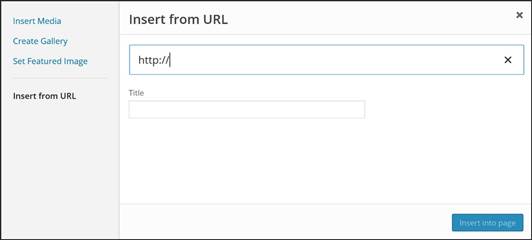
Insert an Image URL
When you insert an image from a URL, you are inserting a link to an image.
To do so, click the Insert from URL link on the left of the window below.
Enter in the URL of the image.