The Dissection of a Window A window is what pops up whenever you open a program, file, or folder. Everything you see that appears over the top of your desktop is a window. Internet Explorer opens in a window. When you click on your Documents library, it opens in a window. Hey, they don't call this Windows for nothing!
And just as a window opens for everything you do on your computer, it's also true that all windows have certain components. Some of these components are the same whether you're in your Document library or searching your Media library.
Let's analyze the components of a window using the Documents Window as an example. Pay attention to the tour, especially if you're one that likes to know what every button does.
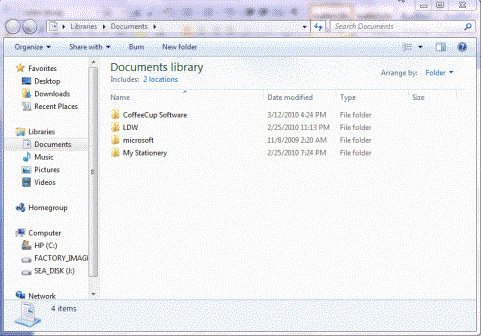
Let's start at the top of the window pictured above.
The two arrows you see are the Forward and Backward arrows. These will take you to previous libraries or folders that you had open.
Beside the arrows, you'll see the address bar. This tells you where you are in your computer.
Below, you'll see a snapshot of the arrows and the address bar just so we're all looking at the same area.

To the right of the address bar is the search box. You can use this to search just as you would the search box in the Start menu.
Above the search box, you have three boxes, as pictured below.

The first button (or the minus sign) will minimize a window to the taskbar.
The square, or the middle button, will maximize a window so that it covers your entire desktop.
The "X" will close out a window completely.

If you look to the far right on the Menu Bar, you'll see three icons. Let's cover what these do.
o The first icon (from the left) is Change Icon View. If you click on this, it will allow you to change the size of the icons, as well as specify how they're listed in the window. You can choose list, details, tiles, or content. Feel free to play around with these different options. You won't hurt anything on your computer. List is shown by default, and you can always return to it.
o The next icon is Toggle Preview Pane. This simply turns the Preview Pane on and off.
o The last icon is Help. Click on this to access Windows Help and Support.
On the right of the Menu Bar and going down the right side of the window, you have the scroll bar that allows you to navigate up and down inside the window.
To the left of the scroll bar, you'll see the Preview Pane. In the Documents library, this allows you to preview a document.
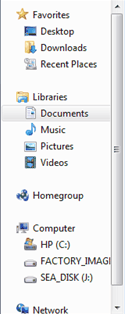
The Navigation Pane is on the left side of the window, as pictured below. Using the Navigation Pane, you can easily jump to other locations, libraries, etc. on your computer.
At the bottom of the window is the Details Pane. This tells you the details of the file you've selected. In this instance, it's from the Documents library.

As you can see in the snapshot above, the Details Pane tells you the name of the file, folder, or program. It tells you the state. Ours is shared and everyone can access it. It also tells you that it is a file folder, not a program or file. It also tells us the last date it was modified by either a user or by the computer.
In Need of a Shortcut?
If you look at the desk that your computer sits on, most likely you'll see items that you use frequently sitting on your desk. Maybe you have a coffee cup, a stapler, paper clips, or maybe even a candy dish. The good news is that Windows 7 allows you to put your favorite things inside the windows that you use. These favorite things are placed in the Navigation Pane. What appears there is determined by what you use the most -- or your favorites.
Let's look at the Navigation Pane again.

The Navigation Pane has five sections: Favorites, Libraries, Homegroup, Computer, and Network. If you click any of these sections, you'll see the contents appear to the right side of the Navigation Pane.
However, just so you understand the Navigation Pane, let's discuss the different sections.
1. Favorites. This isn't your Internet Explorer favorites. It's very important that you understand that. Instead, they are clickable shortcuts to the locations you've accessed most frequently in Windows. These shortcuts include your desktop, the files you've downloaded, and recent places.
2. Libraries are where you store folders and files. You store documents in your Documents Library, music in your Music Library, and so on.
3. Homegroup is new in Windows 7. It refers to two or more computers that share information in a simple network. You can click Homegroup in the Navigation Pane to see the folders shared by other computers in your Homegroup. Don't worry if you're still not sure what a homegroup is.
4. Computer. You can use this to browse through your computer, folders, and files.
5. Network. This is for the regular, run of the mill networks, but also includes your homegroup.
You can add files and folders to your Navigation Pane by dragging them and dropping them over the word Favorites.
Talking about Dialogue Boxes
There's no doubt that you've experienced dialogue boxes before. Dialogue boxes are the pesky windows that appear and ask you to fill in or specify more information. They usually appear when you execute a command. For example, earlier when we talked about customizing the Start menu, you were told to click the Customize button. A new window appeared. This was a dialogue box. (We've shown it below to refresh your memory.)
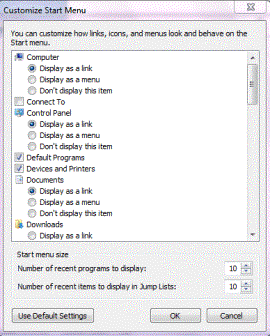
Think of it this way. A dialogue box is your computer's way of talking to you, or holding a dialogue. Using the previous example, you told your computer you wanted to customize the Start menu. You told it this when you right clicked on the Start menu icon, then clicked Properties. Next, you clicked the Customize button. Your computer then needed to ask you what aspects you wanted to customize so it could then do exactly as you wanted.
Moving Windows
Unlike the windows in your house, you can move and arrange the windows that open on your desktop. To move a window around your desktop, you can click in the title bar (or the horizontal bar at the very top of the window and above the address bar) and drag it to where you want it on the desktop.
Files, Folders, Flash Drives, Libraries, and CDs
Drives
It makes it so much easier to understand Windows 7 and organize your files and folders if you understand the organization system Windows has created for you. The first part is the file cabinet -- or your disk drives where you can store information. Although it's not really a filing cabinet, it's so much easier to understand if you can think of it that way -- virtually.
If you have files, you have to have somewhere to file them, right? Windows 7 gives you a filing cabinet to organize your files. To go to the file cabinet, to go the Start menu and click computer.
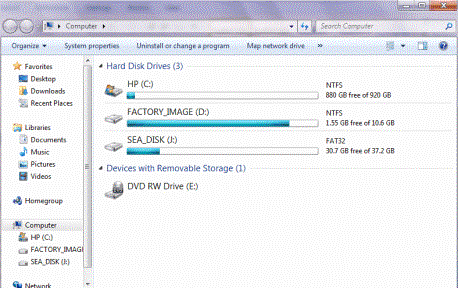
From here, you will see all the drawers -- or disk drives -- that your computer has. They are all places where you can store information. If you look at the snapshot above, you'll see the Navigation Pane on the left. In the big window on the right, you'll see your storage areas.
You have your hard drives. On most computers, C is the drive you'll use to save information. In this snapshot, we also have a drive J, which is an external hard drive.
In the next category, we have our removable storage drives. This includes CD, DVD, flash, and jump drives. It can also include memory card readers, MP3 players, and cameras.
Libraries and Folders
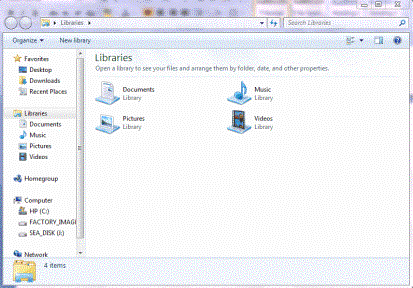
A library is nothing more than a super folder. It's a huge folder that contains other folders. In Windows 7, all libraries (or super folders) contain similar content. For example, the Documents library contains documents. The Music library contains music, and so on.
Windows 7 has created four libraries for you. They are the Documents, Pictures, Music, and Videos libraries. They can be accessed by clicking the  on the taskbar, and are shown below.
Seeing Files on a Disk Drive
We've told you how to find the drives on your computer, but not how to see what's on them. To see the files on any drive, simply double click the icon of the drive.
As you can see in the snapshot below, we clicked on disk drive C and it showed us the folders on the drive. Folders are represented by an icon that looks like a folder. Imagine that!
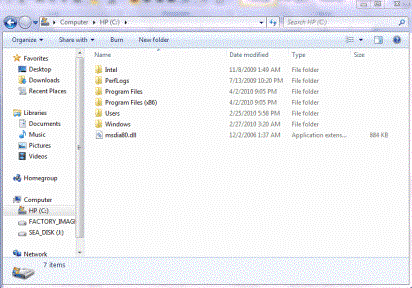
Now, you can double click on any of those folders and see the files inside those folders. The same is true for libraries. You can double click a library and see the folders in the library. Double click a folder and you'll see the files.
Is this hierarchy starting to make sense?
Whenever you double click a file, Windows 7 will use the default program assigned to that type of file to open it. For example, let's say you open a word processing file. Windows might use MS Office as the default program to open that file.
Managing the Folders in a Library
If the new library system in Windows 7 has you baffled, don't worry. It's actually simpler than Vista. Once you get used to it, you'll love it. For now, just treat the libraries each like folders.
You can view the folders inside any library, as we said, by double clicking on the library icon.
You can also place folders into a library from another location on your computer.
To do so, click the name of the library in the library window.
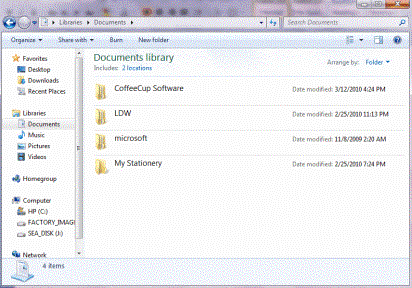
In the library pane (above the file list), next to Includes, click Locations.
When you click locations, this window will appear:
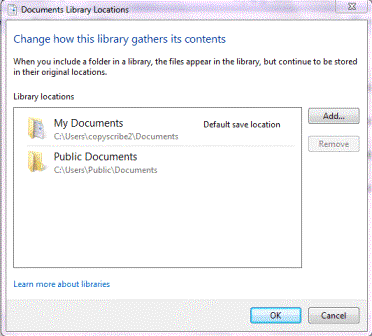
Click the Add button.
Find the folder that you want to add and click Include Folder.
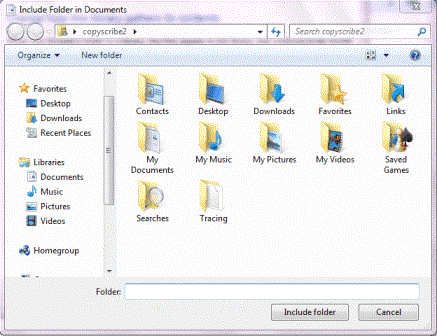
That folder will now appear in your document library, but it will also remain in its original location on your drive.
Create a New Folder
To create a new folder, right click on a blank space in a library or on your desktop and choose New> Folder.
Rename a Folder
To rename a folder, right click on the folder that you want to rename. Select Rename, then type the new name in the box below the folder.
Select Files or Folders
To select a file or folder (for cut/copy and paste), click on it once.
To select multiple files or folders at once (these files and folders must be neighbors), highlight them just as you would select text by placing your mouse in a blank area before the file or folder, holding down the mouse button, and dragging it over. This will highlight the folder. Then you can cut/copy and paste the file or folder.
Delete a File or Folder
Select the file or folder you want to delete by clicking on it once, then right click and choose Delete. The file or folder is now moved to your Recycle Bin.
Write to CD or DVD
To write (or burn) files to a CD or DVD, you must first have CDs or DVDs that you can write to. When you buy these, they both come in R and RW formats. The difference between these two formats is this: with an R format disc, you can burn your data, music, or files to it until the disk is full. But you cannot erase or burn over files. What you create originally is what you're stuck with. RW format disks allow you to rewrite files. This means you can get rid of things you don't want and replace them with things you do.
o To burn music to a CD, you'll need to use Windows 7 Media Player to burn the CD.


