Understanding Microsoft Publisher 2013
Microsoft Publisher 2013 is Microsoft's entry-level desktop publishing program. Not to be confused with Microsoft Word, Publisher is used primarily for page layouts and designs, instead of text documents and proofreading. The software program was created with small businesses in mind, more than the home user. It's perfect for those companies that don't want to yet purchase a more expensive desktop publishing program, or only have limited experience with desktop publishing.
That said, Microsoft Publisher 2013 is not available with all Microsoft Office product suites. Instead, it's only available with Office 365 or Office Professional 2013.
The Purpose of Publisher 2013
Publisher allows small businesses to quickly create publications for printing or sharing online. You can easily create professional-looking publications by either creating them yourself from scratch, or using one of the many pre-designed templates that Publisher offers.These templates can easily be customized for the look you want.
You can use Publisher to create:
-
Brochures
-
Labels
-
Greeting Cards
-
Certificates
-
Flyers
-
Invitations
-
Photo Albums
-
And more
You can create advertisements for your business, event announcements, awards, and the list goes on. You can even create bookmarks and stickers using Publisher. The primary difference between Publisher and other desktop publishing software programs is that Publisher makes the tasks easier for you to complete.That means you don't have to be a graphics design professional to be successful using this program. All that's required is knowledge of the program and a little creativity, and you're on your way to creating stunning publications.
Introduction to Layout and Design
Since MS Publisher is a desktop publishing software program, it's just as important to learn more about layout and design as well as to learn about Publisher. That said, before we delve into the technical aspects of Publisher itself and teach you how to use it, let's learn some basic principles of good design. You'll find that this information will help you use Publisher to create more professional and beautiful publications and designs.
Here are the aspects of good design and layout:
-
Alignment. Alignment refers to the placement of text and graphics so they line up on a page. It helps create attractive pages. You can use alignment to group items, create order, or organize the page elements. Alignment can be horizontal, vertical, or you can line up text and objects along their top, bottom, left, or right edges.
-
Balance. Balance is achieved by making sure elements are evenly distributed on a page. You don't want to have one section with dozens of pictures, the next with none – or everything lined up on side of the page and nothing on the other.
-
White Space. White space is the space in your layout and design that has nothing in it. It's just blank space – or white space. It's important to have enough white space so the page is easy to look at and to read. You don't want to cram in pictures and text. It looks like a traffic jam for the eyes.
-
Proximity. When you place objects close together on a page, you group them together and suggest a relationship. If you place objects far apart, it suggests lack of a relationship. This is important to remember in design. Group objects that are related close together. For example, you can group pictures and text together. Put the picture near related text, not in some other section where it's out of place.
-
Contrast. If you put all square shapes in your design, not one part of your design would stand out, would it? Use big and small elements, different shapes, and even different colors of text to achieve contrast. It makes for a more attractive design.
-
Unity. All the different objects and pieces in your design should tie together and become a whole.
-
Consistency and Repetition. Repeating design styles, font types, and design elements helps someone to more easily navigate your design and find what they need. This is especially important if you are designing monthly newsletters or brochures.
These are all things that you must keep in mind whenever you design a layout in Publisher or any other desktop publishing software. The great thing about Publisher 2013 is that you can use templates to make your work quicker and easier. However, if you need or want to design your own pieces, these terms are what you need to apply to your work to create stunning presentations.
Downloading Publisher 2013
With the launch of Office 2013, Microsoft made changes in how they sell their most popular software package. Of course, you can download a free trial by simply going to the Microsoft Office page, picking out what version you want to try, then downloading the software. You don't need a credit card to try the software.
If you want to purchase the software, Microsoft now gives you two choices. As always, you can buy the software either online or from most office supply or computer stores. The prices to buy the software vary depending on what version you wish to purchase. There are three versions: Home and Student, Home and Business, and Professional. As with other versions of Office, it's a one-time charge and the software is yours to use as long as you wish. However, you must remember that Publisher is only available with the Professional version, so this is the version you must buy if you wish to have access to Publisher.
However, Office 2013 also comes with Office 365, which is another method you can use to buy the Office suite of software – and Publisher. With Office 365, you subscribe to the software instead of just purchasing it , as you've done in the past. You can pay for your subscription by the month, or yearly on the Microsoft Office website. The price of your subscription will be determined by the version that you want: Home, Small Business, or Midsize Business.
Once you purchase a subscription, you'll be able to download Office 2013 on your computer, just as you would if you had bought the software in a store. As part of Office 365, you'll also be given multiple licenses, which will give you the ability to install the software on other computers, as well. This is a perk that doesn't come with buying the software in a store. For the Home version, you get up to five licenses (five devices). The Small Business version comes with licenses for up to 25 users. The Midsize Business provides for up to 300 users. There's also an Enterprise version for larger companies that offers unlimited users.
Once you subscribe to Office 365, you'll never have to worry about purchasing a new version of Office ever again. When a new version comes out, your software will be updated for you.
What's New in Publisher 2013
Microsoft 2013 is arguably the best version of Publisher yet. It contains the same great features you loved in past versions that have been fine-tuned and improved for better usability. In addition, it contains some great new features that make Publisher even more useful and functional than ever before.
Here are the improvements and changes you can look forward to seeing :
-
Insert pictures from a variety of places including Facebook and Flickr.
-
Insert several pictures at one time. These pictures appear in the scratch area. You can then drag and drop them into and out of your publication.
-
Swap pictures by selecting a picture and drag it to the other picture.
-
Use a picture as the background for your publication.
-
Add special effects to your pictures
-
Add special effects to your text, such as shadow and reflection.
-
Save your publications for printing. Each page of a publication can be saved as a JPEG so you can upload it to a photo center for easy printing.
Creating a New Publication
You open Microsoft Publisher by clicking on the icon on your desktop (if you have one there) or in the program bar. The icon for Microsoft Publisher 2013 looks like this:

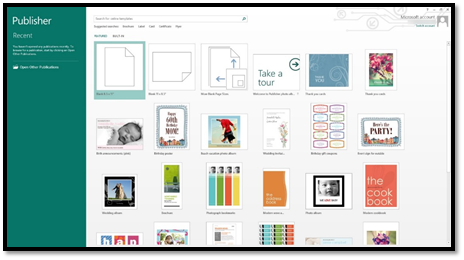
When you click on the icon, Publisher 2013 will open, and you'll see the Start Screen. This is new to 2013.
The Start Screen looks like this:
In Microsoft Word, each file you create is called a document. In Excel, each file you create is called a workbook. However, in Publisher, every file you create is called a publication.
On the left, you'll see the dark green that contains your recently opened publications. You can click on any of these to open them. To the right, you'll see templates you can use to start a new Publisher publication. You can also choose to just open a blank publication, as we've selected above.
Let's create a blank publication.
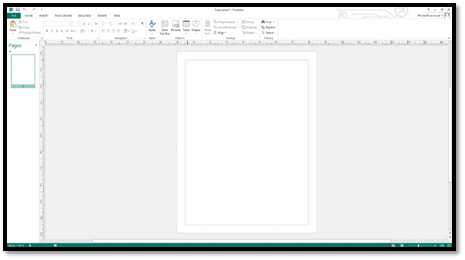
This is a new publication for which the default name is Publication1. You can see the name in the Title bar.

Navigating the Publisher 2013 Interface
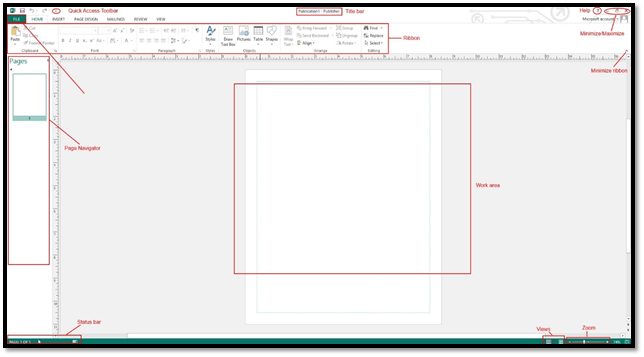
When you open a publication, you see the Publisher 2013 interface. Learning how to navigate the interface will make using Publisher a lot easier.
In the snapshot below, we've labeled the major parts of the interface.
About The Ribbon
The ribbon consists of tabs, groups, and tools. The tabs are located at the top of the ribbon and divides the groups and tools up to make what you need easier to find.
The tabs in Publisher 2013 are Home, Insert, Page Design, Mailings, Review, and View.
Under each tab, you'll find groups (and tools within the groups) that allow you to complete tasks related to the tab.
For example, under the Insert tab, you'll find groups and tools for inserting items into a publication. The Insert tab on the ribbon is pictured below.

The Insert tab contains the following groups: Pages, Tables, Illustrations, Building Blocks, Text, Links, and Header & Footer.
Below is the Illustrations group:
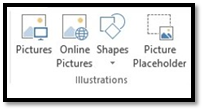
As you can see, the tools located within the Illustrations group all allow you to insert illustrations (such as pictures) into a publication.
The Backstage View
The Backstage View is located under the File tab on the ribbon. When you click on the file tab, this is what you see:
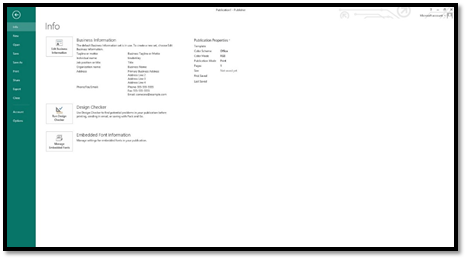
Using the Backstage view, you can get information on your publication, check it for design errors, save publications, print publications, share publications, and set your preferences for using Publisher 2013.
The Page Navigator
Page Navigation is shown by default on the left side of the MS Publisher 2013 screen whenever you open a publication.
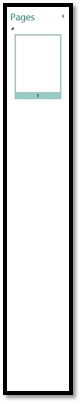
Page Navigation shows you thumbnails of all pages in your file. For example, if you had a multi-page newsletter, Page Navigation would show you thumbnails of each page. You can use this to easily navigate from page to page. You can click on a thumbnail to open it in the work space area.
You can also right-click on a page to do a variety of tasks quickly and easily.
When you right-click on a page, the following menu appears:
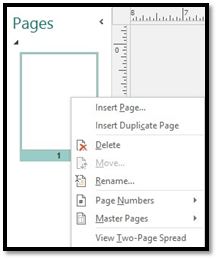
You can insert a new page, insert a duplicate page, delete the page, move the page up or down (make page 1, page 3), rename the page, work with the page numbers, or master pages (we'll discuss what this is later.) You can also view two pages at a time.
For now, click on Insert Page.
You'll see this dialog box:
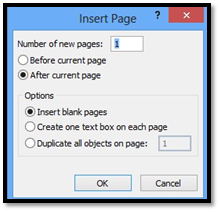
Type in the number of new pages you want to create. Then, decide if you want them to come before the current page, or after.
You can also choose to insert blank pages, pages with one text box on each, or duplicate all objects on a certain page number. Make sure you type in the page number.
When you're finished, click OK.
The Status Bar
The status bar is located in the bottom left corner of the MS Publisher 2013 screen and is pictured below. By default, it shows you what page you are viewing and how many total pages exist in your file.
Right click on the Status Bar to set options.
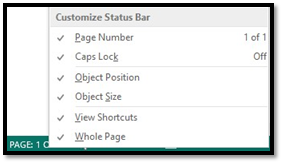
To the right of the page number in the status bar, you'll see these buttons:

These tell you the object location (position) in the publication and the size of the object you have selected.
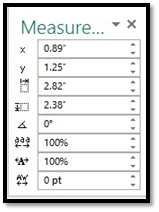
When you click these buttons, you can alter image sizes and locations. You can play with these different options to get a better feel for what they do.
X and Y are the coordinates on the screen where the image or text box appears. Adjusting these will move the image. In addition:
 Adjusts the image width.
 Adjusts the height.
 Adjusts the rotation.
 Adjusts the spacing across a word, line, or column of text. The higher the percentage, the more spacing. This is called tracking.
 Allows you to shrink or stretch the width of the text characters.
 Allows you to adjust the kerning, or the space between two letters.
Working with Publisher 2013 on a Tablet
If you're using Word on a tablet, you can adjust the spacing between buttons on the ribbon to make it easier to use. You do this by activating Touch mode.
To do this, click or touch the Quick Access Toolbar button: 
Select Touch/Mouse Mode.
You can now see the button in the Quick Access Toolbar, as shown below:
Now, touch or click the button and choose Touch.