During the process of importing media into Final Cut Pro X, you have the ability to organize the clips into events. An event is nothing more than a folder that can store hundreds of images, video, and audio clips. Each event in Final Cut Pro X represents a folder on your computer that contains the original source media, any render files, as well as a database file that helps Final Cut Pro X keep track of everything.
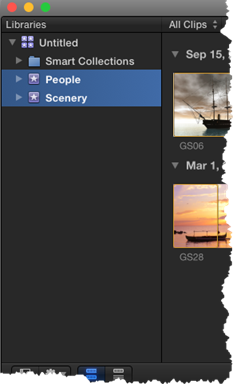
All your events are listed in the Event Library in the main window of Final Cut Pro X. If you click in an event in the Event Library, the clips in that event are displayed in the Event Browser, as shown below.
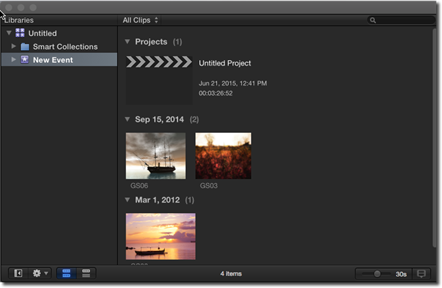
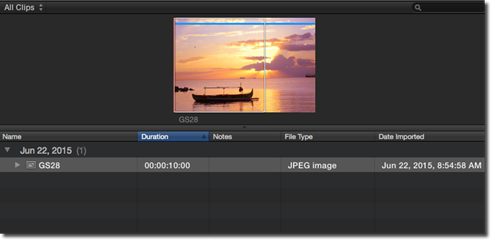
You can select a clip in the Event Browser to work on that clip. Clips that are displayed in the Event Browser can be sorted by creation date, reel, scene, clip duration, file type, and date imported. As you can see above, our clips are sorted by creation date.
Right now, the event that holds our clip has the generic name "New Event." However, in the interest of organizing your clips, you want to give your events names that represent the clips within the events.
Creating Events
During the import process, you can create events to store your media. However, you can also create events in the main Final Cut Pro X window if you need to in order to further organize your media.
To create a new event, go to File>New>Event.
You will then see this pop-up window:
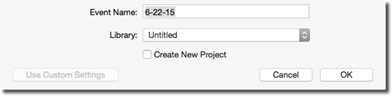
Enter a name for the new event, then press OK.
You can then move clips from other events into the new event or import media into the new event.
To move a clip from one event to another event, click on the clip in the Event Browser. Drag it to the event in the Event Library.
Renaming Events
To change the name of an event, go to the Event Library, then click on the event whose name you want to change. Press Return on your keyboard, then type in the new name for the event.
Remember, when you change the name of an event in Final Cut Pro X, you also change the name of the folder on your computer where the media is stored.
Merging Events
You can also combine two or more events into one event in Final Cut Pro X. To do this, drag over the events in the Event Library that you want to combine. Remember, to drag, left click your mouse and hold it down while mousing over the events that you want to select.
In the snapshot below, we have two events selected.
Now go to File>Merge Events.
NOTE: In some versions of Final Cut Pro X, you may see a dialogue box that asks you to name the new event and choose where you want to store the source files.
Sorting Events
If you have a lot of events in the Event Library, you may need to sort them to make the events you need easier to find.
You can sort events in several ways. The way you choose to sort them will be based on your needs and preferences.
To sort events, right click on an event, then choose Sort Events By, then choose either Date or Name, as well as if you want to sort in ascending or descending order.
Deleting Clips or Events
If you need to, you can delete clips from events � or even delete entire events.
To delete a clip from an event, select the clip you want to delete. Go to File>Move to Trash.
To delete an event, select the event, then go to File>Move Event to Trash.
Viewing Clips
Clips can be displayed in the event browser in either filmstrip view or list view. Filmstrip view essentially shows you thumbnails of your clips. List view shows you the names of the clips, as well as other file information such as creation date, duration, etc.
If you are looking for a specific image or range of clips, filmstrip view will help you find the clip you need. However, if you are looking for a clip by name or by other file information, list view will work best.
You can switch between list and filmstrip view at the bottom of the Event Browser. We have circled the two buttons below.
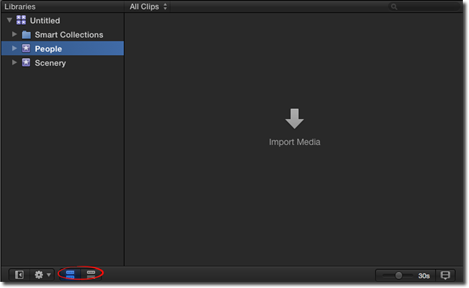
The button on the left is for filmstrip view. The button on the right is for list view.
Viewing More or Less Detail in Filmstrips
While in filmstrip view, you can adjust the time represented by the thumbnails in the filmstrip (for video).
Using the Duration Slider (circled below), you can expand or contract the detail shown in a clip's filmstrip.
To see what we mean, take a look at the clips in our Event Browser below.
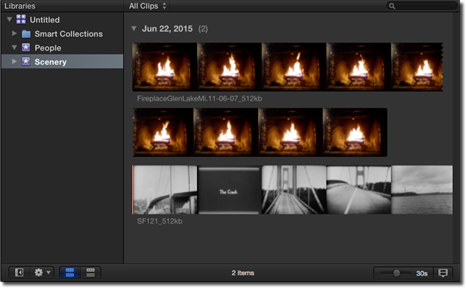
As you can see, we have two clips displayed in the Event Browser. Each clip is displaying several thumbnails.
The Duration Slider is located in the lower right hand corner. It is set to 30s. We have circled it below.

Let's contract the time by sliding it to the left.
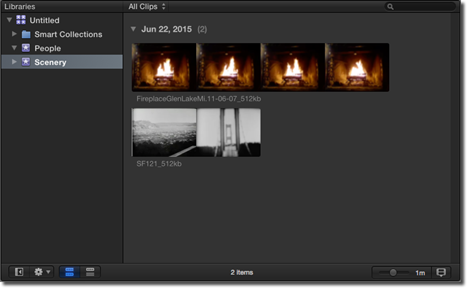
As you can see, fewer thumbnails from each clip are displayed. If we had more than two clips in this event, we would make room for more clips to be displayed by contracting the time in the Duration Slider.
If you want to control the height of a filmstrip, go the right of the Duration Slider, and click the Clip Appearance button (circled below).

Drag the Clip Height Slider in the pop up box to adjust the height.
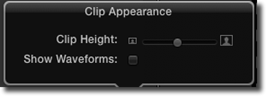
You can also adjust the height of still image thumbnails using this method.
Customizing List View
You can customize list view to choose what type of information is shown in the columns, to rearrange the order of the columns, to sort clips by a category, or to view the ratings and keywords for a clip in list view.
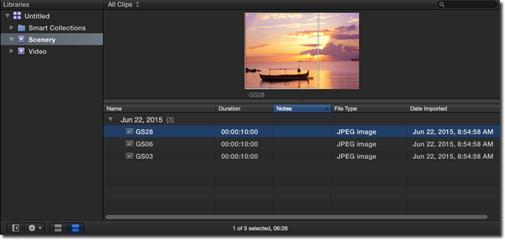
In the snapshot below, we have our clips shown in list view.

As you can see, the thumbnail that is displayed corresponds to the clip we have selected in the list.
In our list view, we have the file name. Our file name is GS03. We can also see the start and end times, as well as the duration. The column headings are Name, Start, End, and Duration.
If we want to change the information that is displayed in list view for each clip, we need to press Control+Click on a column heading, then choose categories that you want displayed.
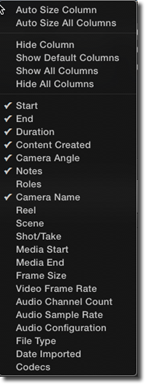
As you can see above, the categories with checkmarks are already displayed in list view.
If we uncheck Start and End, they will no longer appear in list view.
Instead, we may put a checkmark beside File Type and Date Imported.
To rearrange the order of the columns in list view, click on a column heading. Drag and drop it to where you want it to appear.
To sort the clips by a column heading, click the column heading that you want to use to sort.
To be able to see a clip's rating and keywords, click the triangle to the left of the clip's name. We will learn how to add keywords and ratings in this article.
Sorting and Grouping Clips in the Event Browser
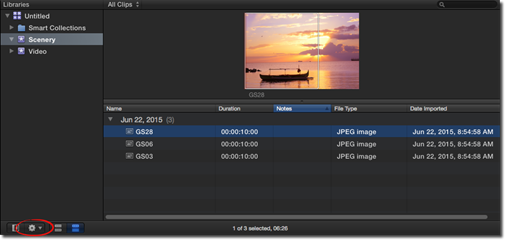
To sort and group clips in the Event Browser, click the gear shift button below the Event Library (circled below).
To group clips, choose Group Clips By in the pop up menu. You can then group them by when they were created, the date they were imported, the reel, the scene, the duration, the file type, the roles, the camera name, or the camera angle. You can also choose to sort them in either ascending or descending order.
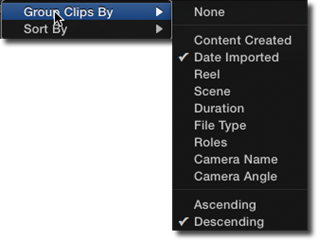
To sort clips, click the gear shift button, then choose Sort By. You can sort by the clip name, take, duration, or the date of creation. Once again, you can sort in either ascending or descending order.
Rating Clips
When you rate a clip, you rate it as either "favorite" or "rejected." For example, if you have a clip that is blurry or that contains a scene you do not need, you can mark it as Rejected. On the other hand, if you have a clip that you really like and want to make sure you use in your project, you can mark it as Favorite. When you start work on your project, you can only display the clips marked as Favorite.
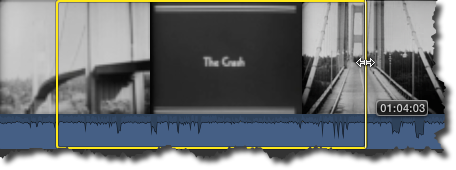
To rate a clip, select a clip, a range, or multiple clips.
Remember, to select a range, drag inside the filmstrip. You will see a rectangle appear, as shown below.
To mark a clip as Favorite, press the F key on your keyboard � or click the Favorite button located in the toolbar.

When you mark a clip as Favorite, a green line will appear at the top of the frame.

To mark a clip as Rejected, press the Delete key on the keyboard � or the Rejected button in the toolbar.

You will see a red line appear at the top of the frame for rejected clips.
To remove the rating from a clip, select the clip, then press U on the keyboard � or the Clear Rating button in the toolbar.

Adding Keywords to Clips
By adding keywords to clips, you can make it easier to find the clips you need as you start to work on your project. When you add a keyword to a clip or a range, a blue line appears on the clip in the Event Browser. In addition, you will also see a Keyword collection in the Event Library. The Keyboard Collection will point to all clips that contain a specified keyword. You will see what we mean in just a second.
Let's add keywords to a clip.
To do this, we are going to use the Keyword Editor.
Start by selecting a clip or clips for which you want to add keywords.
Click the Keywords button in the toolbar.

In the Keyword Editor, type the keyword or keyword phrase that you want to apply to the clip. Hit Return on your keyboard.
Repeat this step to add all keywords that you want to apply to the clip.
To assign keywords using keyboard shortcuts, click the triangle to the left of Keyword Shortcuts in the Keyword Editor.
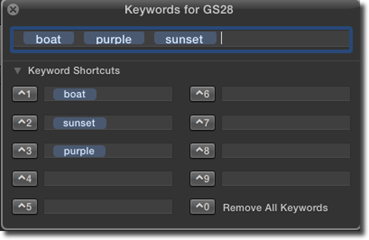
You can then type keywords or keyword phrases in the shortcut fields. Now, to add a keyword to a clip, multiple clips, or a range of clips, all you have to do is select the clips in the Event Browser, then apply the keyboard shortcut. They keyword will be applied to the clips.
To view the keywords that have been applied to clips, select an event in the Event Library. Clips with keywords will have a blue line at the top in the Event Browser.
If you want to view all keywords that have been applied to a clip, select the clip, then go to View>Show Skimmer Info.
You can also go to the Keyword Collection in the Event Library to see all the clips assigned to a keyword.
Adding and Editing Clip Notes
You can add notes to clips to help you remember certain things about the clip.
To add a note, go to list view in the Event Browser.
Select the clip for which you want to add a note.
Click the Note field for that clip.
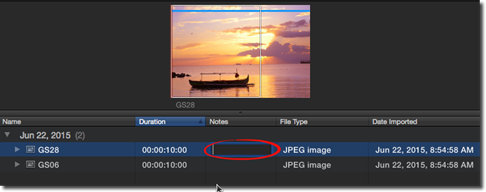
You can then add or edit a note.
Organizing Clips by Roles
Roles are simply metadata assigned to clips. Whenever you import clips into Final Cut Pro X, the program automatically assigns roles to video and audio aspects of the clips. There are five roles: Video, Titles, Dialogue, Music, and Effects. In addition to these roles, you can also create and assign roles to clips in the Event Browser.
To view the roles for a clip, go to the Event Browser and to list view. Select a column heading, then press Control+Click.
Put a checkmark beside Roles.
Now, go to the Roles column. Click a role for a clip to see the available roles.
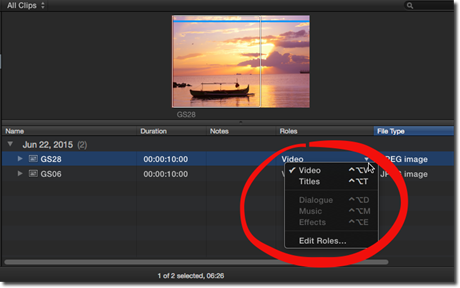
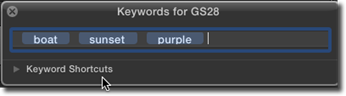
You can see that the role Video has been assigned to the clip named GS28.
If you wanted to apply the role Titles, you could click on it to add a checkmark before it. This would change the role from Video to Titles.
You can also click on Edit Roles to add your own role to the clip.
When you click on Edit Roles, you see this pop up window:
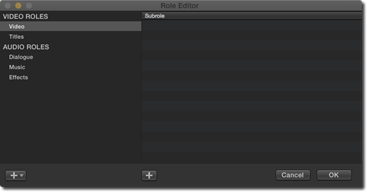
Click the plus sign in the bottom left corner.
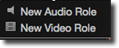
Choose if you want to add a new audio role or a new video role.
We are going to choose video role.

Enter a name for the new role, then click OK.
You can then assign the new role to a clip.
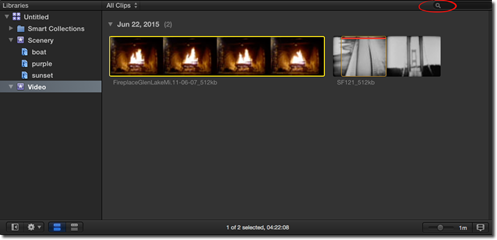
Searching for and Finding Clips
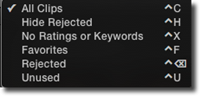
You can search for clips in the Event Browser by using the Filter pop up menu. It is circled in red in the screenshot below.
You can then find clips based on rating or by the clips that do not have ratings or keywords.
By clicking the magnifying glass at the top of the Event Browser, you can do an even more in-depth search.
Select the event you want to search.
In the Filter window, click the plus sign to add search criteria.
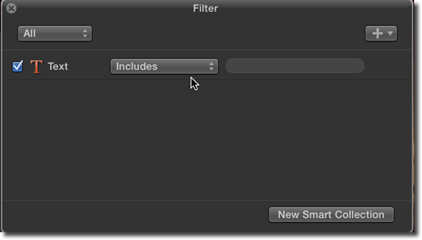
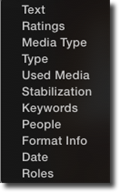
You can find clips by text that includes their name or notes, ratings, media type, keywords, and stabilization (or those with excessive shake).
You can see the various search criteria in the snapshot below.
You can search by one or more of the search criteria.
Creating a Smart Collection
When you use the filter box to search for and find clips, you can save the results as a Smart Collection.
In our filter box, we entered our search criteria for the Scenery event.
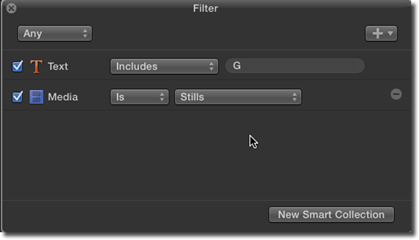
We want to save the results as a Smart Collection, so we are going to click on the New Smart Collection button.
Enter a new name for the Smart Collection in the Event Library.
We can now click on that Smart Collection to view the search results. If we need reminded of the search criteria, we can double click on the Smart Collection in the Event Library, which will pull up the Filter window.
Organizing Keywords and Smart Collections
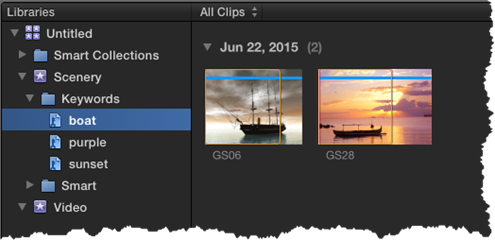
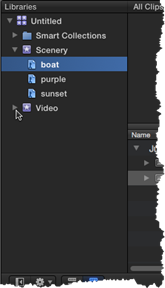
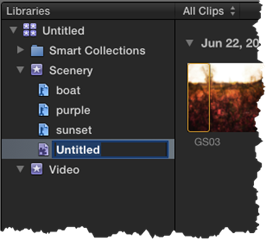
Take a look at our event entitled Scenery in the snapshot below.

As you can see, we have three Keyword Collections and one Smart Collection for this event.
We can now organize the collections with folders.
To create a new folder, select the event, then go to File>New> Folder.
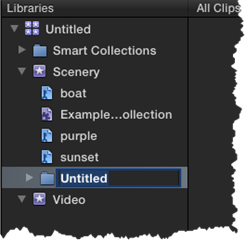
Type in a name for the folder.
Drag the Keyword Collections and Smart Collections you want to add to the folder.
As you can see below, we created a Keywords and Smart folder.
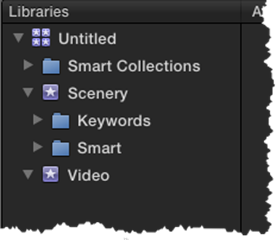
We added our Keyword Collections to the Keywords folder. We added our Smart Collection to the Smart folder.
If we click the triangle to the left of either folder, we can see the collections inside the folder.