You can import WAV and MP3 files onto your objects and slides in Adobe Captivate. Even though you can choose to import either type of file, the type you import will depend on your viewers and the size of the project. WAV files are high quality audio files, but they're also large files. Importing WAV files into your project will mean the download time will be greater for your viewers. For a viewer with a slow Internet connection, it may be impossible. MP3 files are usually 90% smaller than WAV files because they are compressed. Using MP3 files in a larger project can make the project downloadable for all viewers.
In this article, we're going to learn to insert audio onto objects and slides. We're also going to learn to import background audio that plays for the length of your entire project.
Importing Audio onto an Object
To import a sound effect onto an object, start by selecting the object on the slide.
Next, go to Audio>Import to>Object.
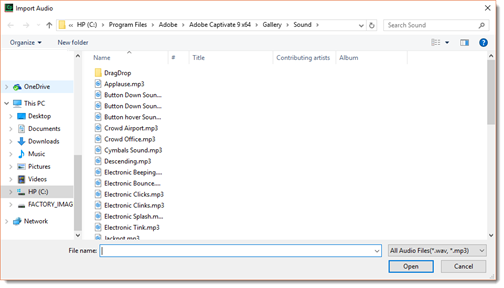
You will then see the Import Audio dialogue box, as shown below.
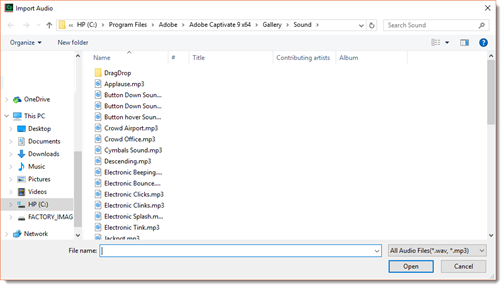
Select the sound effect, then click the Open button.
You will then see the Object Audio window. The Object Audio window allows you to preview the sound.
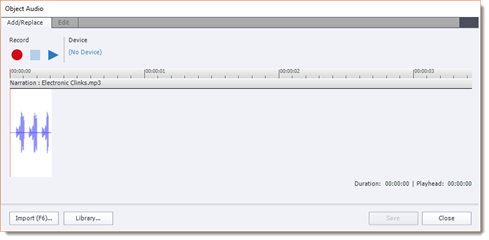
Click the Close button in the Object Audio window.
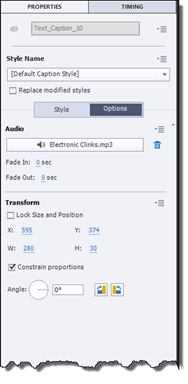
If you go to the Properties Inspector for the object, then click the Options tab, you can see the audio file you selected for the object in the Audio section.
Importing Background Audio
Background audio plays for the entire length of your project. Background audio can be music, but it can also be a narrative that you recorded.
To insert background audio, go to the Menu Bar. Select Audio>Import To>Background.
You will then see the Import Audio dialogue box, just as we did in the last section of this article.
Select the audio file that you want to import. You can import an audio file from anywhere on your computer. It does not have to be from the Adobe Captivate Sound folder.
When you locate the audio file, click on it to select it, then click the Open button.
You will then see the Background Audio window.
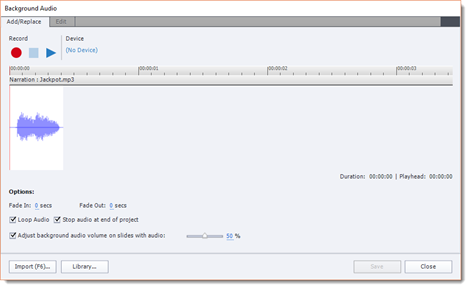
The Background Audio window opens to the Add/Replace tab.
Go to the Options section under the Add/Replace tab.
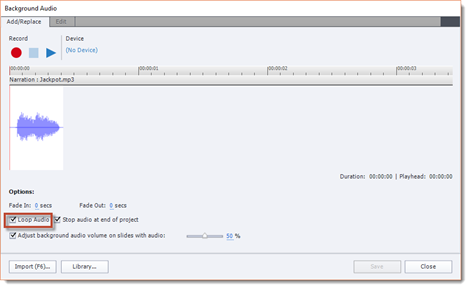
Make sure that Loop Audio has a checkmark next to it. This means that when your audio clip finishes playing, it will start to play again.
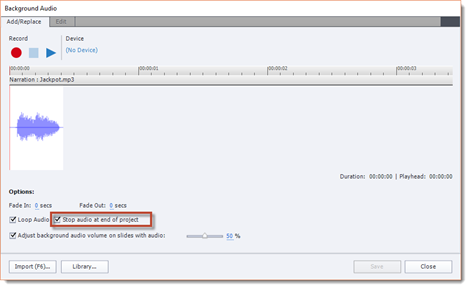
Next, make sure there is a checkmark beside Stop Audio at End of Project. This means that the audio file stops playing when a viewer closes the project.
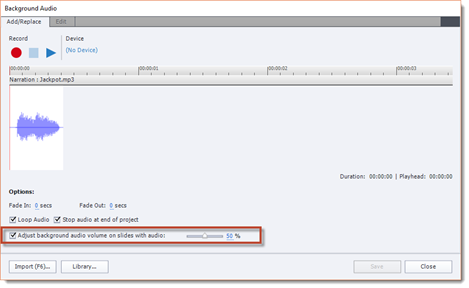
Also make sure that there is a checkmark beside Adjust Background Audio Volume on Slides with Audio.
This makes it so that the volume of the background audio is lowered when there is other audio on the slide being displayed on the viewer's screen.
Use the slider to the right to specify the percentage amount you want the volume lowered.
Click the Save button, then the Close button.
Importing Audio onto a Slide
To import audio onto a slide, go to the Menu Bar, then Audio>Import to>Slide.
You will then see the Import Audio dialogue box.
Find the audio clip on your computer that you want to import onto the slide, then click the OK button.
If the length of your audio clip is longer than the slide duration, you will see this dialogue box:
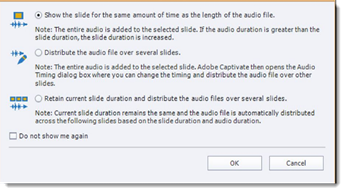
Select the first option, then click OK.
You will then see the Slide Audio dialogue box.
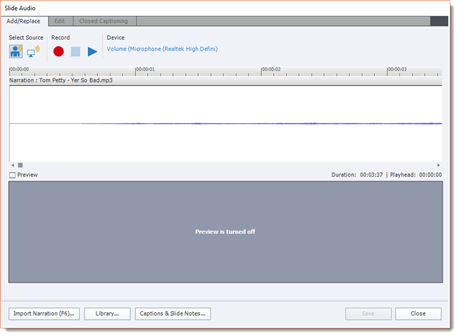
Click the Close button.
In the Filmstrip, you will see a speaker icon below the thumbnail of the slide.
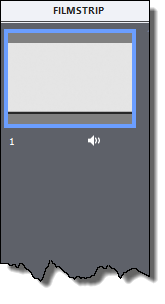
You can click on the speaker icon to play the audio clip, edit it, or remove it.
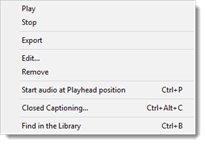
Editing Audio
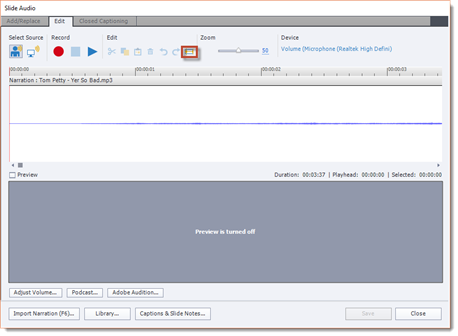
You can edit the audio files that you import onto a slide by going to Audio>Edit>Slide on the Menu Bar.
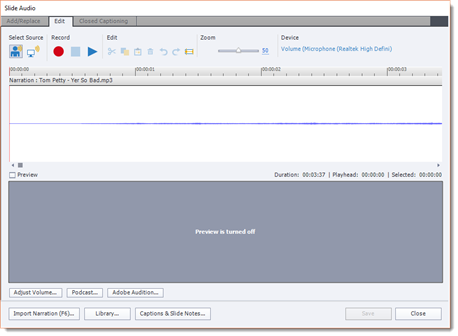
The Slide Audio dialogue box is pictured above.
Notice that there are three tabs in the dialogue box: Add/Replace, Edit, and Closed Captioning.
Click on the Edit tab if it isn't already selected.
Editing audio in Adobe Captivate involves deleting parts of the waveform that you don't want.
Drag the Zoom slider to zoom in on the waveform.
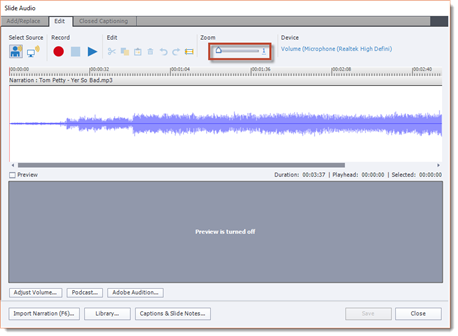
Now drag over the waveform to select the part you want to delete.
Next, click the Delete button.
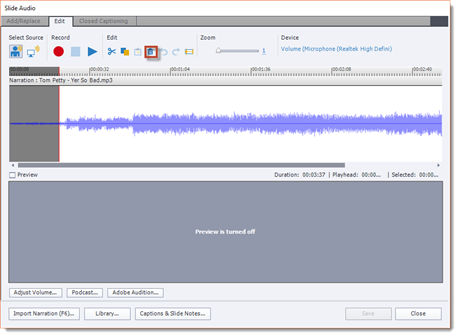
Click the Save button, then the OK button when you're finished.
Creating Slide Notes
Slide notes are notes that are added to slides that aren't visible to viewers when they watch your project. Slide notes can be used as Microsoft Word handouts that are given to viewers. They can also be used to display your narration script as you record voiceovers for your project.
Slide notes appear in a panel at the bottom of the Adobe Captivate window. Slide notes are grouped with the Timeline, as pictured below.

To add slide notes, go to the Menu Bar, then Window>Slide Notes.
You will see the Slide Notes panel open at the bottom of the Adobe Captivate window.
From this panel, you can add Closed Captions and Text to Speech � in addition to slide notes.
Go to the far right side of the panel. Select Notes from the dropdown menu.

To add a slide note, click the plus (+) button.

Click in the space below the triangle, and start typing.

Click outside the text entry field when you're finished.
Recording Audio in Adobe Captivate
You don't have to import audio into Adobe Captivate. You can record audio for your projects within Captivate if you choose to do so. Recording audio in Captivate is easy to do. However, the first thing you'll want to do is calibrate the microphone you'll use for recording.
We're going to record audio to a slide to show you how to do this.
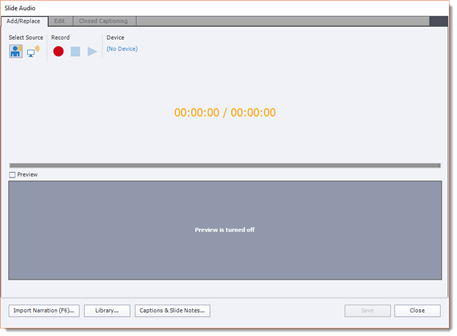
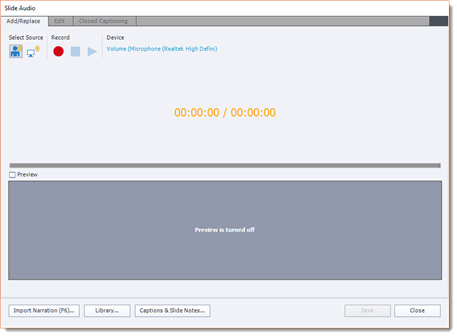
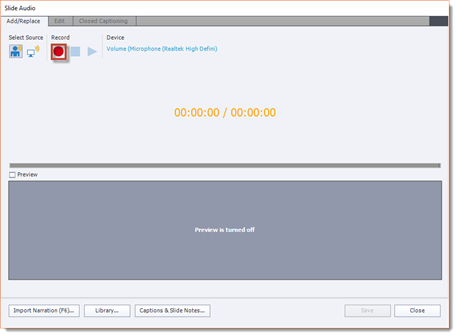
Go to Audio>Record To>Slide on the Menu Bar.
You will then see the Slide Audio dialogue box, as pictured below.
Click the link below Device.
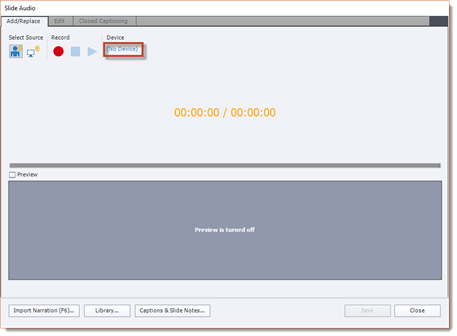
You will then see the Audio Settings dialogue box.
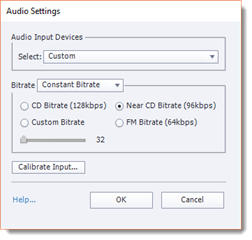
In the Audio Input Devices section, select the microphone you will be using from the dropdown menu.
In the Bitrate section, select Constant Bitrate. This creates audio files that sound good and are smaller in size.
The encoding bitrate should be set to FM Bitrate (64kbps). A larger bitrate slides leads to a larger project size.
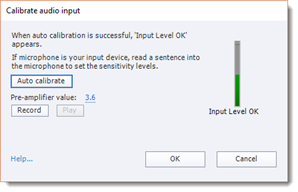
Next, click the Calibrate Input button.
You will then see the Calibrate Audio Input dialogue box.
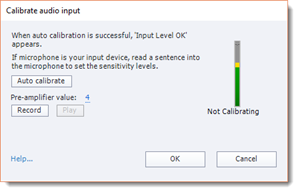
Click the Audio Calibrate button.
Talk into your microphone until you see "Input Level OK" appear below the meter on the right side of the dialogue box.
Click the OK button to close the dialogue box.
Click the OK button again to close the Audio Settings dialogue box.
You can now see your microphone shown below Device in the Slide Audio dialogue box.
To record a narration, click the Narration button under Select Source.
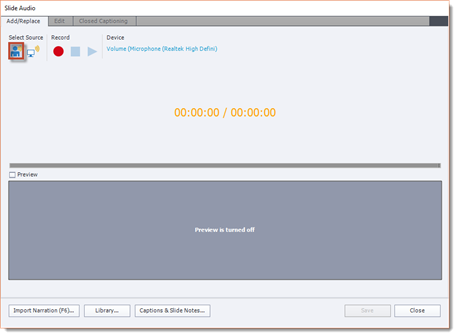
The other button is System Audio. This records the sound of your computer.
Next, click the Record button.
When you're finished recording, click the Stop button that's directly to the right of the Record button.
The audio you record will appear as a waveform in the dialogue box.
Click the Play button to listen to the audio you recorded.
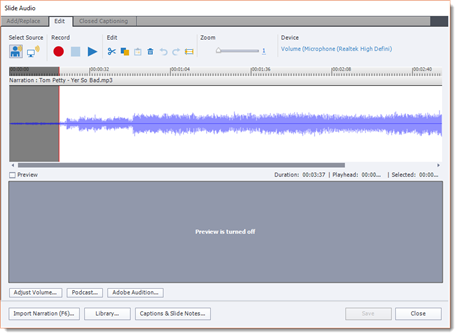
Inserting Silence
Earlier in this article, we talked about editing audio files by deleting part of the waveform. However, if you delete part of the waveform, it alters the length of the audio file. If you have your audio files timed with your slides, this may be a problem. That said, instead of deleting part of a waveform, you can insert silence instead.
To insert silence, go to Audio>Edit>Slide on the Menu Bar.

Select the part of the waveform you want to remove, as we learned to do earlier in this article.
Next, click Insert Silence.
You can then close the Slide Audio dialogue box by clicking the Save button, then the Close button.
Converting Text-to-Speech
If you don't have a good microphone or don't like recording your own voice, you can have Adobe Captivate read text aloud for you by using a feature called text-to-speech.
To use this feature, go to Audio>Speech Management on the Menu Bar.
![]()
Click the plus (+) sign to add text-to-speech.
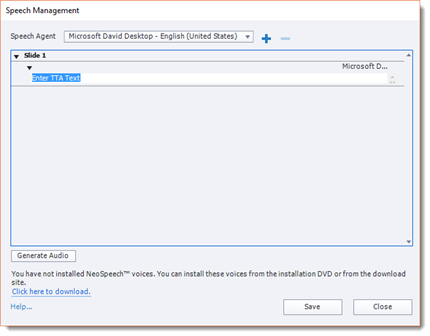
Type the words you want Adobe Captivate to read aloud in the field highlighted above.
Next, go to the Speech Agent dropdown menu.
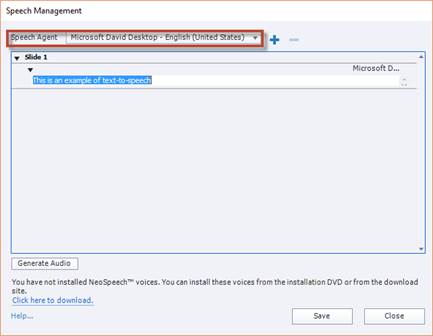
Choose an agent to read the text.
NOTE: If you haven't installed NeoSpeech voices, you should do so before selecting an agent. Click the "Click here to download" link toward the bottom of the dialogue box to get started. When the download is complete, extract the contents from the zip folder. You can then choose one of the agents.
Click the Generate Audio button.
Click Save, then Close to close the dialogue box.
About Videos
Just as you can insert audio, you can also insert video into your Adobe Captivate projects, including AVI, MOV, FLV, of F4V formats. You can import video files from your computer or web server, or you can import from Flash Video Streaming Service or Flash Media Server. In this article, we will learn to import media into your Adobe Captivate projects.
Inserting a Video
To insert a video onto a slide in your project, go to Media>Video on the Toolbar.
You will then see the Insert Video dialogue box, as pictured below.
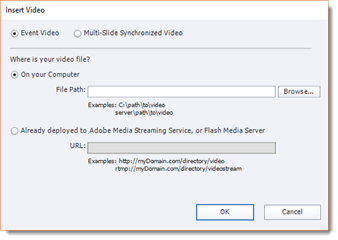
At the top of the dialogue window, select either Event Video or Multi-Slide Synchronized Video. An Event Video plays on one slide only. A Multi-Slide Synchronized Video plays across more than one slide.
For this article, we are going to select Event Video.
Next, tell Captivate where your video file is located.
Ours is located on our computer, so we are going to select "On Your Computer", then click the Browse button to locate the file.
Click the OK button.
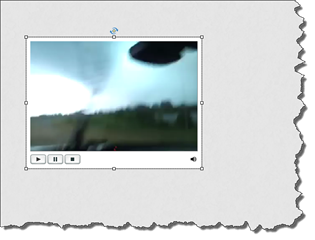
The video is then placed on your slide.
Setting Video Properties
Setting the properties for a video you insert onto a slide is just like setting the properties for objects. There are just a few different options that you can choose.
Let's go over the properties for videos that you insert onto slides to introduce you to those options.
To set the properties for a video you insert onto a slide, go to the Properties Inspector.
Under the Options tab of the Property Inspector, resize and reposition your video using the Transform area.
Under the Style tab of the Property Inspector, you can change the skin and determine whether or not the video starts to play on its own (auto play).
To change the skin, choose a skin from the Skin dropdown menu.
![]()
If you want the video to play on its own, meaning the viewer doesn't have to press the Play button, put a checkmark before Auto Play in the Property Inspector.
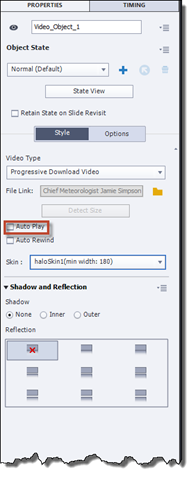
You can change the timing of the video, as well as apply a transition, in the Timing Inspector. That said, since transitions fade in ad out, they are not recommended for videos.
Adding Animation to a Slide
In addition to video, you can also import animations onto a slide. The animations can either be in Flash (SWF) or Animated GIF (GIF) format.
To insert an animation, go to Media>Animation on the Toolbar.
You will then see the Open dialogue box.
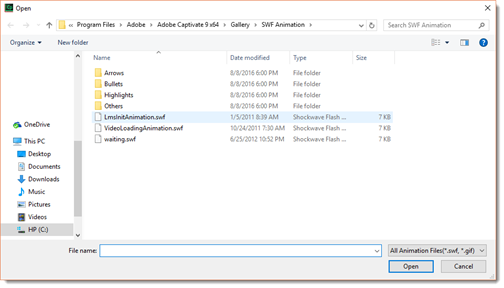
As you can see in the snapshot above, Adobe Captivate provides some animations that you can use in the Gallery's SWF animation folder. You can also use your own.
Locate the animation you want to use on your computer. Click on it to select it, then click the Open button.
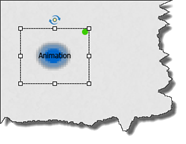
The animation then appears on your slide. It contains the word animation so that you know it's an animation as you continue to work on the slide.
You can then adjust the properties and set the timing for the animation.
Text Animations
Text animations do just as their name implies. They animate text to bring life to it. The good news is that if you want to insert text animations onto your slide, you can easily do so without having to worry about using Flash to create them yourself. Adobe Captivate provides more than 90 text animations that you can use.
To insert a text animation, go to Text>Text Animation on the Toolbar.
You will then see the Text Animation Properties dialogue box, as pictured below.
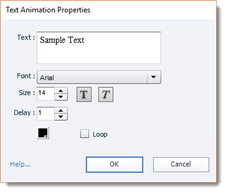
In the Text field, enter the text that you want to animate.
From the Font dropdown menu, select the font type you want to use.
In the Size field, enter a size for the font.
Set a delay before the animation starts to play in the Delay field.
You can also select the font color, as well as decide if you want the animation to loop � or play continually.
Click the OK button when you're finished.
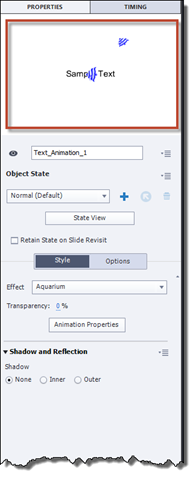
Next, select a text animation by going to the Properties Inspector.
Choose an effect from the Effect dropdown menu.
![]()
A preview of the effect that you choose is displayed at the top of the Properties Inspector.
You can go to Preview>Play Slide on the Toolbar to see the effect play on the slide.