You will want your project to have more to it than just content on slides. If all you were going to include was content on slides, you would be fine with using PowerPoint to create a presentation. Instead, you want to create an eLearning lesson or course, and you need more than just content on a slide. You need tools that enable you to guide and to teach your viewers. In this article, we are going to discuss some of those tools, such as mouse effects, pointer paths, and highlight buttons.
Mouse Effects
Sometimes it's helpful to include the mouse pointer, as well as the mouse click sound, to further guide your readers. This is especially true if you're creating a demonstration of a software program or application, because it helps to guide the viewers along.
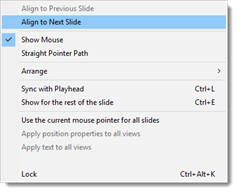
Let's add the sound of a mouse click when we click on Format on the Menu Bar in the slide pictured below.
![]()
To do this, double click on the Mouse object in the Timeline.

Next, go to the Properties Inspector.
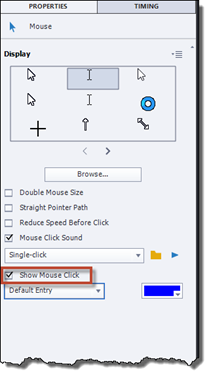
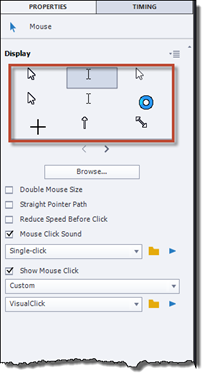
Put a checkmark beside Mouse Click Sound. Select Single Click from the dropdown menu, as pictured below.
![]()
To show the mouse click, check Show Mouse Click.
Select either Default Entry or Custom from the dropdown menu.
![]()
Let's choose Custom.
You will then see a new dropdown menu appear.
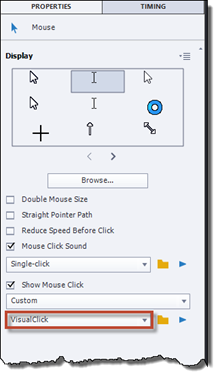
Click the VisualClick dropdown arrow.
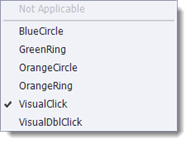
Select a mouse click.
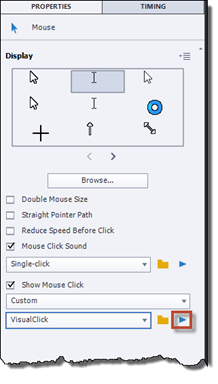
You can preview the mouse click by clicking the Play button.
Editing a Mouse Path
Whenever you record in Adobe Captivate, every move you make with the mouse is also recorded. We saw that earlier in this course when we recorded our actions in Notepad. In addition, we also mentioned that you can edit the mouse path once you're finished recording. This section of the course will teach you more on how to do that.
To edit the mouse path, you can drag the mouse cursor on the screen. Remember, this looks like an "I". Using this method, you can move the mouse path to a different location on the slide.
You can also go to Modify>Mouse, then choose an option.
Change the Mouse Pointer Type
You can also change the mouse pointer type. Right now, it looks like an "I". By double clicking on Mouse in the Timeline, you can change the type of mouse pointer in the Property Inspector.
Simply click on a new pointer to select it.
About Highlight Boxes
Highlight boxes grab a viewer's attention. If you have a lot of content on a slide, a highlight box can direct the viewer's attention to the area of the slide where you want it.
To insert a highlight box on a slide, go to Objects>Highlight Box on the Toolbar.
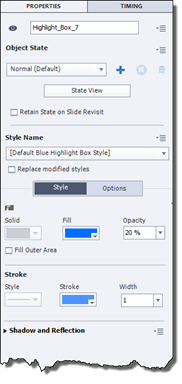
The highlight box will appear on your slide, as shown below.
![]()
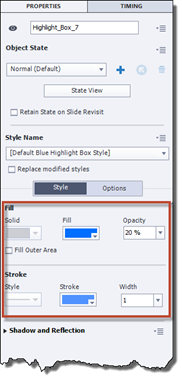
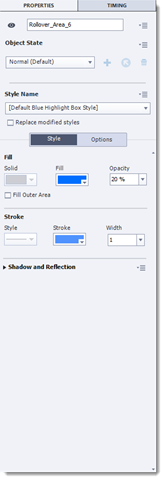
The default style of the highlight box is Default Blue Highlight Box Style.
Highlight Box Styles
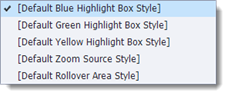
To change the style, go to the Property Inspector, and go to the Style Name dropdown menu.
Select a new style.
You can further customize the style by changing the Fill and Stroke (border of the highlight box) colors.
Resizing and Repositioning Highlight Boxes
You can reposition and resize a highlight box in the same way as we learned to do with Text Captions.
Just as with Text Captions, the highlight box that appears on a slide has handles on the sides and corners that appear as white squares.
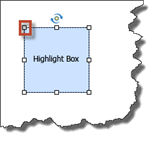
To expand the size of the highlight box, hover your mouse over any of the white squares until your mouse cursor changes to a two-way arrow, then drag outward to expand the size � or inward to reduce the size.
To reposition the highlight box on a slide, hover your mouse cursor over the highlight box. Your mouse cursor changes to a hand. The index finger on the hand is pointing to the highlight box.
Click and drag the highlight box to the location where you want to position it on the slide, then release your mouse button.
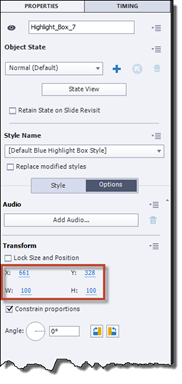
You can also click the Options tab on the Properties Inspector to change the size and coordinates of the highlight box.
Inserting an Image Button
To insert an image button, go to the Object Style Manager by going to Edit>Object Style Manager.
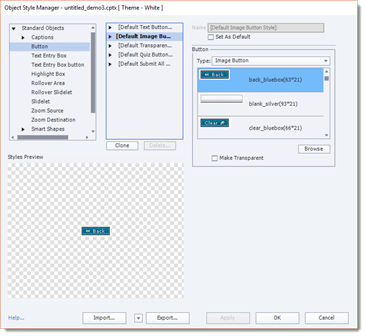
Select Button under Standard Objects>Captions in the first column on the left.
In the second column, select [Default Image Button Style].
To select in image for the button, click the Browse button.
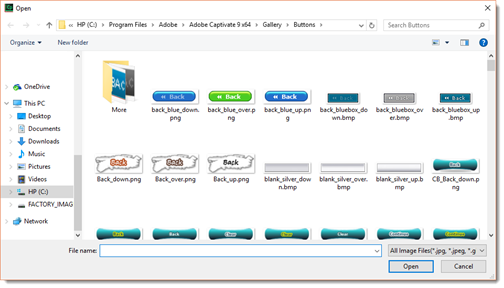
Select the image you want, then click the Open button.
Click the OK button in the Object Style Manager dialogue box.
Next, go to the Toolbar and select Interactions>Button.
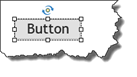
You will then see a button on the middle of your slide.
With the button selected, click on the Actions tab in the Properties Inspector. Remember, if you can't see the Properties Inspector, double click on the button.
In the Styles Name dropdown, select [Default Text Button Style], as shown below.
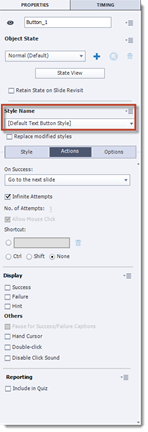
In the On Success dropdown menu, select what you want to happen when the button is clicked.
You can then set other options for the button, as well as the timing. We learned to set timing earlier in this course.
Align Objects on a Slide
You may want to align buttons or other objects on a slide. Just as with other programs that offer the align feature, you can align objects to the left, center, or right of the slide.
To align objects, first select all the objects that you want to align. To select multiple objects, hold down the Control key on your keyboard while selecting objects.
Next, go to Modify>Align.
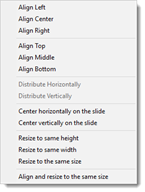
As you can see, you can align the objects to the left, center, or right.
You can also align them to the top, middle, or bottom of the slide, as well as center the objects horizontally or vertically.
Creating Rollovers and Zoom Areas
Rollover captions are very similar to text captions, except that rollover captions contain a hotspot that "rolls over" when a viewer's mouse moves over it. In this article, we are going to learn to create rollover captions, as well as zoom areas on slides.
Inserting a Rollover Caption
Rollover captions are a great way to provide tooltips or other information to viewers. When you create a rollover caption, you will create a rollover area on your slide. When a viewer moves their mouse over the rollover area, the caption � or text -- will appear.
To insert rollover caption onto a slide, go to the Toolbar, then click Objects>Rollover Caption.
You will see the rollover caption inserted onto the middle of your slide, as shown below.
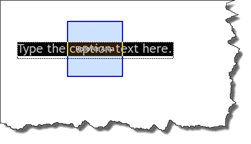
Take a look at the snapshot above. Notice that a rollover caption has two parts when you insert it onto the slide.
It has the rollover caption, which looks just like a text caption.
It also has a rollover area, which is the blue square in the snapshot above. This is the way it will look on your slide. It will display as a rollover caption in your published project.
With the rollover caption selected, go to the Properties Inspector.
Under the Styles tab in the Properties Inspector, you can format the rollover area by changing the fill and stroke colors.
Under the Styles tab, you can reposition and resize the rollover area.
If you want to change the font type, size, or any other attributes, go to the Object Style Manager.

Click Standard Objects in the column on the left, then Captions. Select Rollover Caption.
Format the text on the right, then click the Apply button.
Click the OK button when you are finished.
Next, go to the Timing Inspector.

Choose your preferences for the Display For and Appear After options. Typically, with rollover captions, you want them to appear on the slide for longer than just a second. Since rollover captions are used to provide tooltips and things of that nature, you may wish for them to be on the slide for the duration of the slide.
Next, select if you want to add any effects or transitions to the rollover caption.
Click Preview>Project on the Toolbar to preview the rollover caption.
Rollover Images
Any image inserted onto a slide can be made into a rollover image.
To create a rollover image, go to Objects>Rollover Image on the Toolbar.
You will see the Open dialogue box, as pictured below.
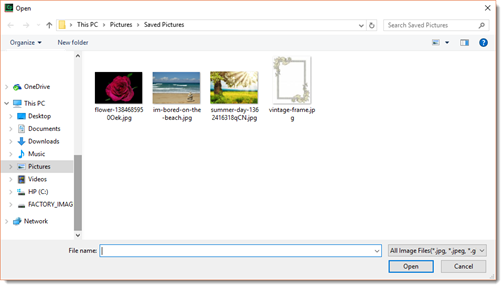
Select the image you want to use as a rollover image, then click the Open button.
As you can see in the snapshot below, two things then appear on the slide: the image and the rollover area. The rollover area is the blue square.
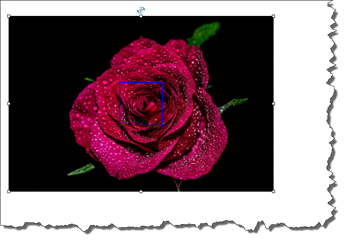
Inside the blue triangle is the rollover area.
Go to the Properties Inspector and the Timing Inspector to set your preferences as you've learned to do in this course.
Rollover Slidelets
Rollover slidelets are mini slides within a slide. Just as with rollover captions, they only appear when the mouse moves over a specific area of the slide. However, unlike rollover captions or images, slidelets can have images, text, audio, and video. You can even attach navigation controls to a rollover slidelet.
To create a rollover slidelet, go to Objects>Rollover Slidelet on the Toolbar.
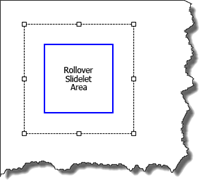
In the snapshot above, you can see the rollover slidelet area inside the blue box and the slidelet around it. Rollover Slidelet area is smaller and contains text. It is the interactive area of the slidelet.
Formatting the Slidelet
The slidelet appears when the mouse is moved over the Slidelet Area or when a viewer clicks in the area.
Now, let's go to the Properties Inspector.
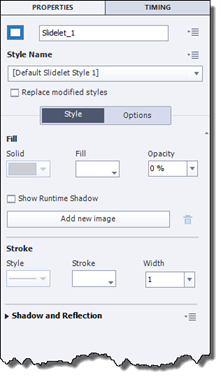
Under the Styles tab, you can format the slidelet or add an image to the slidelet.
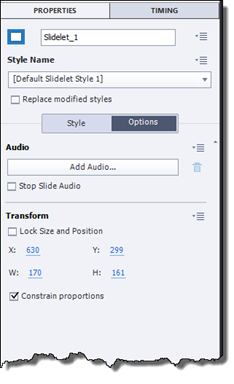
If you click the Options tab, you can add audio. You can also resize and reposition the slidelet.
Next, click the tab for the Timing Inspector.
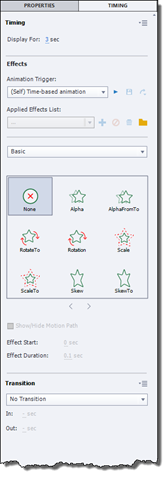
Set the timing for the slidelet, then add a transition or effect if you want.
Formatting the Slidelet Area
The slidelet area is the area inside the blue box. To format it, double click on it to select it. If you can't select it, move the slidelet away from the slidelet area by selecting the slidelet, then dragging it to another area of the slide temporarily.
Next, go to the Properties Inspector for the slidelet area.
Click the Actions tab.

In the On Click field, decide what happens when a viewer clicks on the rollover slidelet.
In the Shortcut field, you can enter a shortcut a viewer can use instead of a mouse click.
In the On Rollover field, decide what happens when a viewer moves the mouse over the rollover slidelet.
Put a checkmark beside Stick Slidelet if you want the slidelet to be displayed even when a viewer moves the mouse away from the rollover slidelet area.
Inserting a Zoom Area
Zoom areas can be used to grab the viewers' attention just like highlight boxes, except zoom boxes grab attention by zooming in on a particular area of a slide.
To create a zoom area, go to Objects>Zoom Area on the Toolbar.
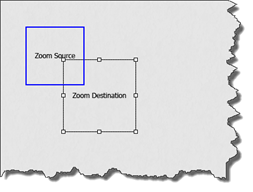
As you can see in the snapshot above, two objects appear in middle of slide: the Zoom Destination and the Zoom Source.
The Zoom Source is the area that will be highlighted on the viewer's screen.
The Zoom Destination will be the enlarged view.
Drag the Zoom Source over the part of the slide that you want highlighted. You can resize the Zoom Source box if you need it to be larger or smaller.
Next, drag the Zoom Destination box to the area on the slide where you want the enlarged area (or zoomed in area) to appear.
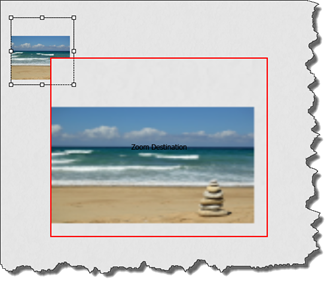
In the snapshot below, we zoomed in on our image. The Zoom Source box is over the image in the upper left corner of the slide.
The Zoom destination box is in the lower right hand corner of the slide.
Now, select the Zoom Source box, then go to the Timing Inspector.
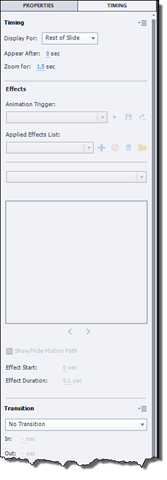
Set the Display For time for the zoom area so it matches your narration, if necessary.
Next, change the Appear After to the time you want.
In the Zoom For field, specify the length of time for the zoom. This is how long the zoom takes.