Whenever you add a field to a report, the records in that field appear in the order that they were inserted into the database. When you sort data in a report, you put it in a custom order so you can better analyze and find the data you need.
Crystal Reports gives you two ways to sort data. You can sort it in ascending order, which means from smallest to largest (A to Z or 1 to 9). You can also sort it in descending order, which means from largest to smallest (Z to A or 9 to 1).
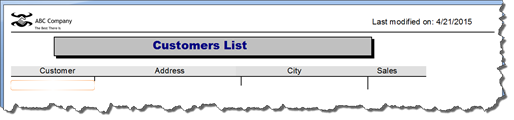
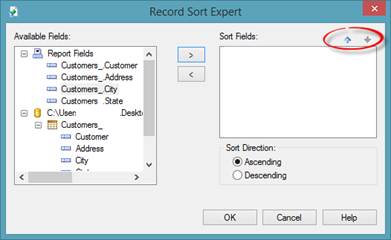
To sort data in your report, go to Report>Record Sort Expert.
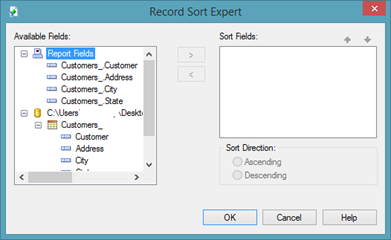
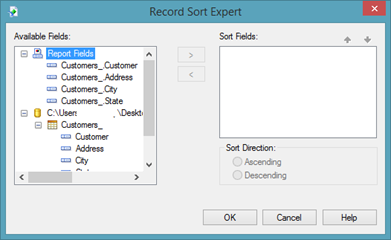
In the Record Sort Expert dialogue box, you will see the fields that are in your report.
Below that, you'll see all tables listed in our data source. Some of these are also in the report, so you will see them twice.
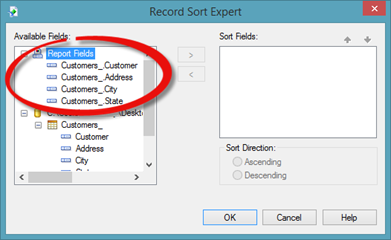
Choose a field from your report that you want to sort by. We want to sort our records by the customer. We will find that field in the Available Fields section. Click to select it, then click the arrow button to move it to the Sort Fields section.
As you can see, it now appears in the Sort Fields section.
![]()
We want to sort in ascending order, so we put a check next to Ascending in the Sort Direction section.
Click OK when you are finished.
Sorting by Multiple Fields
In the last section, we sorted by one data field. We can also sort by more than one data field. Sometimes you may need to do that in order to get an accurate sort.
For example, if you had a field that contained customer surnames, and you sorted the surnames in ascending order, your customers would be sorted from A to Z based on their last name.
However, if you had multiple customers with the surname of Smith, Crystal Reports would not know how to sort those. Of course, you and I know that if the last names are the same, that you would then sort them by first name. Crystal Reports does not know this until you tell it.
To tell Crystal Reports to sort by one field, then the next, you add both fields to the Sort Fields section pictured below.

You then use the sort arrows to tell Crystal Reports which field to sort first, second, and so on.
Click OK when you are finished.
Sorting by Fields that Aren't on a Report
You can also sort by fields that don't appear on your report as long as those fields appear in your data source.
To sort by fields that don't appear on a report, go to Report>Report Sort Expert again.
As we learned in the last section, we see all the fields in our report listed at the top of the Available field section.
However, if we scroll down, we can see all tables that are in our data source. These may or may not appear on our report.

The Country field does not show in our report, so we are going to use that to sort:

Click the arrow button. The field now appears in the Sort Fields section.
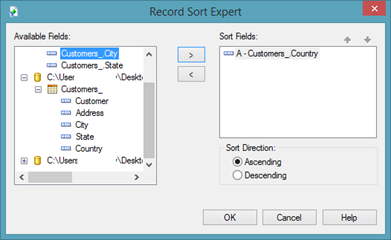
Choose a sort direction, then click OK.
Undoing a Sort
There may come a time that you sort your data, then realize that's not how you wanted it sorted. In fact, you may just want to revert back to the original sort order that appeared automatically when you created your report.
To undo a sort, go back to the Record Sort Expert by going to Report>Record Sort Expert.
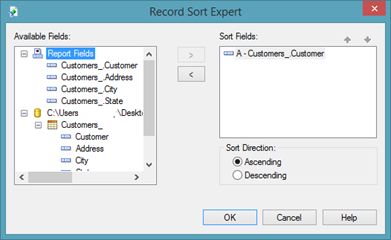
Click on the field in the Sort Fields section that you want to "unsort."
![]()
Now, click the arrow button that points toward the Available Fields section.
![]()
The field is then removed from the Sort Fields section.
If you have more fields in the Sort Fields section that you want to "unsort," follow the same steps to "unsort" those as well.
However, if you have more than one field in the Sort Fields section, you can remove the ones you want and leave the others if you want.
Only the fields that remain in the Sort Fields section will be sorted by Crystal Reports.
Filtering Data
Whereas sorting allows you to rearrange the data in a specified order, filtering allows you to control what data in your report you actually see. When you filter data, you establish filter criteria just as we did when we sorted data. You then filter the data by that criteria so that only the data you want to see appears on the report. For example, if you only wanted to view customers who live in Texas, you would set criteria so that only customers living in Texas appear on your report.
Creating a Filter
To filter your data, first make sure that none of the fields on your report are selected.
Next, go to Report>Select Expert.
You can then choose to filter by record, group, or saved data.
We want to filter by record since we are using our records within the report to filter the data.
The Choose Field dialogue box appears.

As with the Record Sort Expert, you can see that Crystal Reports shows us the fields in our report, then the tables in our data source.
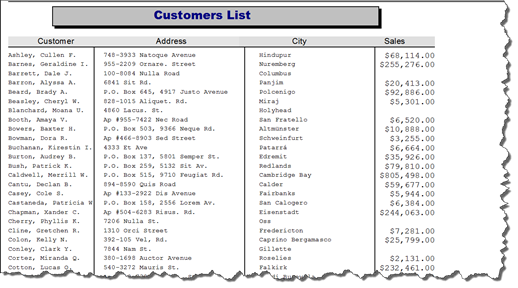
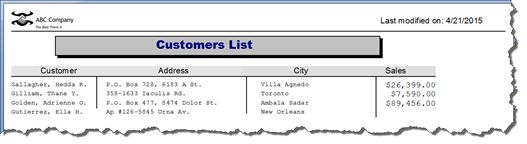
Using the report pictured below, we are going to sort by Customers_City � or the cities our customers live in.

Select the field you want to use to filter data by clicking on it, then click OK.
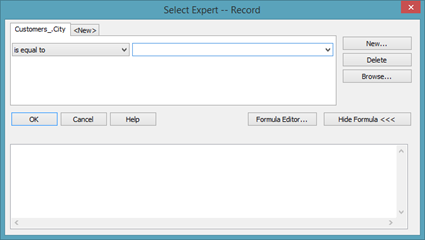
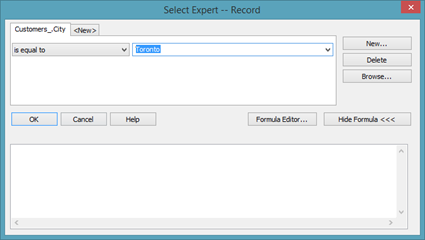
The Select Expert dialogue box appears.
![]()
As you can see above, the tab that is showing is for the field we selected in the last window, the City field.
In the "is any value" dropdown menu, choose what you want to do.
The choices in the dropdown menu are most likely choices you're familiar with when it comes to number values. However, we can also use them for text values. We want to filter by customers who live in Toronto and only Toronto, so we will choose "is equal to."
A text field then appears to the right.
If we wanted, we could type in Toronto. We could also click the dropdown arrow to see all values in the City field.
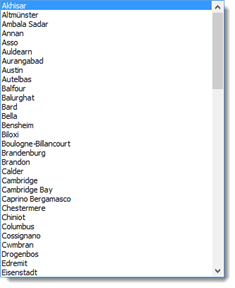
We can scroll down and select Toronto.
Click the OK button.
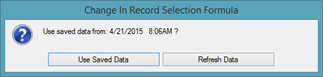
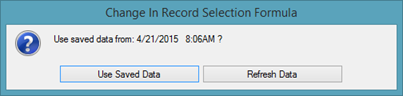
Crystal Reports asks if we want to use the saved data � or the data already in our data sources � or if we want to refresh the data so new data is included.
We want to use the saved data, so we will click on the Use Saved Data button.
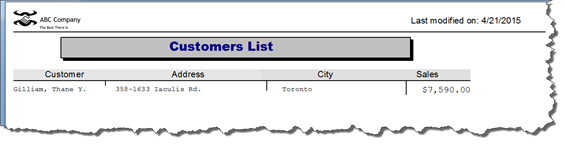
As you can see above, the records of all customers who live in Toronto are then displayed.
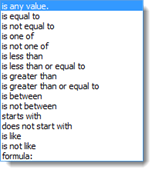
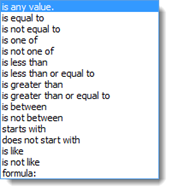
The Comparison Operators for Text Fields
In the last section, we saw a slew of comparison operations that you can use to filter data in your report. They are shown again below.
If we use the same filter criteria, we could choose "is not equal to." Crystal Reports would then list all the customers who do not live in Toronto.
Let's look at the rest of the comparison operators listed.
-
Is one of lets you create a list that you want to use to filter the data. Using our example, you would be able to choose multiple cities.
-
Is not one of lets you choose, using our example, multiple cities NOT to include in the filtered report.
-
Is less than, when used in filtering text strings, will filter all results that come before the specified filter criteria � in alphabetical order. In other words, all cities that come before Toronto using alphabetical order would appear in your filtered report.
-
Is less than or equal to does the same as "is less than," but it would include your filter criteria. In our example, it would include Toronto, as well as all cities that come before it in alphabetical order.
-
Is greater than, when used in text strings, will filter all results that come after the specified filter, using alphabetical order. It's the opposite of "is less than."
-
Is greater than or equal to does the same as "is greater than," but includes the filter criteria. In our example, it would include Toronto, as well as cities that come after in in alphabetical order.
-
Is between allows you to provide two values. Using our example, perhaps we chose Tahoe and Toronto as our values. Your filtered report would show all cities between Tahoe and Toronto in your filtered report.
-
Is not between shows all data that is not between the two values you provide. Using the example above, your filtered report would show all cities that are not between Tahoe and Toronto.
-
Starts with allows you to filter your report by values that start with a letter or a series of letters. For example, we might want to filter by all cities that begin with "T" or "Tor."
-
Does not start with does the opposite of "starts with" and allows you to show all results that do not start with a certain letter or series of letters.
Filtering by Date
Filtering by date, if you have a date field in your report, is much the same as filtering by text.
The important thing to remember is that you don't have to pick a date that's listed in your report when you filter by date. You can filter by any date that you want to enter in the Select Expert dialogue box as long as you enter the date in the month, date, year format.
In addition, when you filter by date, you'll notice that two new comparison operates appear:
-
Is in the period. When you choose "is in the period" for your filter criteria, Crystal Reports gives you a list of pre-built choices as to how you can filter the data. For example, you can use "YeartoDate."
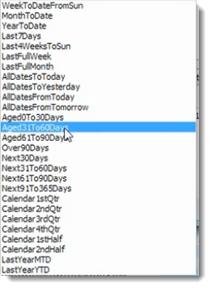
-
Is not in the period lets you filter by dates that are not in the period that you specify.
Creating Filters for Numeric Fields
If you want to filter your report data by numeric fields, you will follow the same steps as you did for text fields.
Go to Report>Select Expert>Record.
Select the field that contains numerical values.
Click OK.
You will then see the Select Expert dialogue box.
Choose your comparison operator. 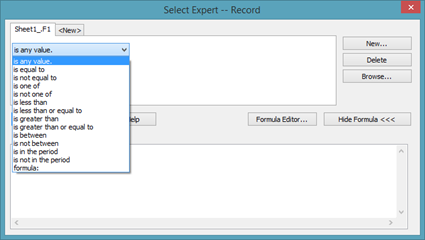
We are going to choose "is less than."
Enter in a numerical value or choose a value from the dropdown list, as shown below.
![]()
Click OK.
Removing a Filter
There may be times when you open a report in Crystal Reports and are unsure whether a filter has been applied to the data. To find out if a filter has been applied, go to the Select Expert.
As you can see in the snapshot below, a filter has been applied to the data in our report.
If you want to remove a filter, click the Delete button.
Creating a Filter Using More than One Field
Although filtering by a field can help you see only the data in your report that you need, there may be times when you need to filter by more than one field in order to see the exact data you need.
Using our report as an example, you may want to see all customers whose names begin with a "C" and live in Toronto.
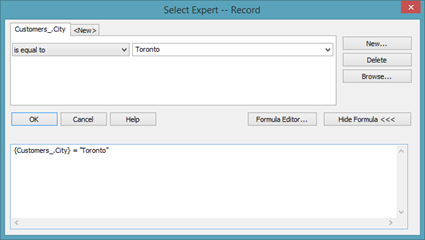
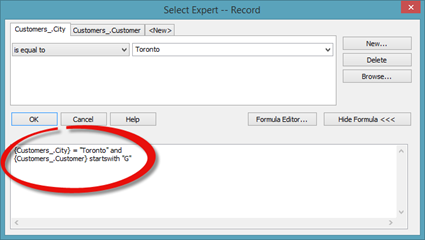
To do this, we are going to go to the Select Expert. First, we are going to select the City field. Earlier in this section, we told you not to select a field before going to the Select Expert, because we wanted you to learn how to create a filter from scratch. However, by selecting a field first, that field shows up in the Select Expert, as shown below when we selected the City field in our report.
![]()
As you can see, we already set up our filter with the comparison operator and the city.
To filter by a second field, click the New button.
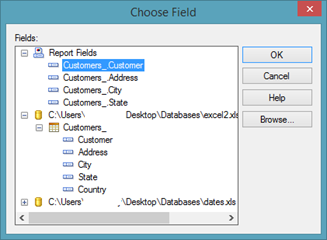
You will then see the Choose Field dialogue box.
![]()
Choose the field in the report that you want to use to create a second filter.
We are going to choose Customer_.Customer, which contains customer names.
Click the OK button.

In the Select Expert dialogue box (shown above), we see a new tab has been created for this field. We can now choose a comparison operator.
We chose "starts with."
We want to filter by customers whose name starts with the letter G, so we type G in.
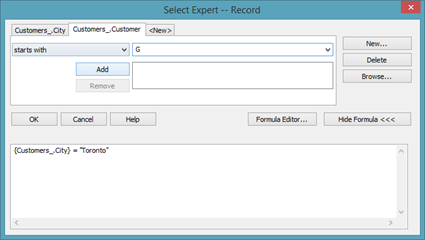
Next, we click the Add button to add "G" to our filter criteria. We can then add more filter criteria if we want.

Click OK.
To use the most current data, click Refresh Data.

If none of our records met the criteria for the filters, we would see a blank record in our report.
Using And/Or in Filter Criteria
In the last section, we filtered our report data by multiple fields. When we created the filters in the Select Expert, we said that we wanted to filter by customers who lived in Toronto AND whose names began with G. The results had to meet both of these criteria in order to appear as the filtered results in the report.
Go back to the Select Expert to see what we mean.

Take a look at the bottom half of the dialogue box which contains the formula.
Notice the "and" in the formula. It is saying that we want to see the data of customers who live in Toronto AND whose last name begins with G. Again, the formula used "and."
However, we could also say "or."
We could say that we want to filter our report data by customers who live in Toronto OR customers whose last names begin with G.
We can simply erase "and" in the formula, and add "or."
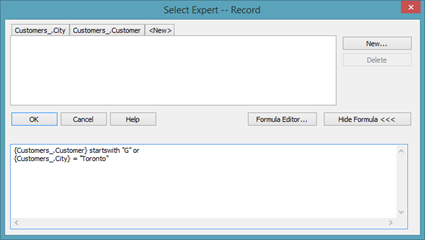
Let's click OK to see how this changes the filtered data that appears in our report.
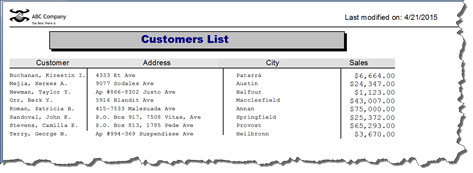
As you can see, our filtered report data now reveals customers who live in Toronto OR whose last name begins with G.
About Wildcards
If you don't know the exact data you want to filter your report by, you can use what are called wildcards.
There are two wildcards in Crystal Reports.
The question mark (?) allows you to search for one character when you're not sure what that character may be.
The asterisk (*) allows you to search for multiple characters when you're not sure what those multiple characters may be.
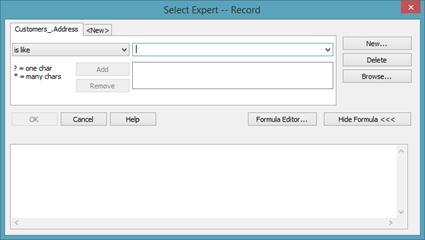
Let's delete the filters we've created thus far in this section, and start over with a new filter using the Address field.
![]()
For this example, we want to filter our data by customers whose address contains "avenue." The abbreviation we've used for "avenue" in our data is "ave."
If we look at our comparison operators, we can use "is like" to create this filter.
We know that the word avenue comes at the end of an address. For example, Willow Way Avenue. However, we do not know what comes before the word avenue.
Since we do know that there will be multiple characters before the word avenue, we type in the asterisk, then "ave."
Click the Add button.

Now click the OK button to filter your report data.
You can use wildcards anywhere in the search criteria. For example: "s*ng".
You can also use more than one wildcard in your filter criteria.
For example, let's say we wanted to find all customers who have an email address that contains "Yahoo."
To find this, we would use "is like," then enter asterisks before and after the word "Yahoo." We know that there may be characters before and after the word Yahoo, so that is why we use two asterisks.
In addition to using "is like," you could also use "is not like." If you wanted to find all customers whose addresses do not contain "ave," you could use "is not like," then enter *ave as we did for "is like." This time, the filtered report would show all customers except for those whose addresses contained "ave."
NOTE: For date fields, you would use the comparison operators In the Period and Is not in the Period. For numerical fields, you would use the comparison operators Is Between and Is Not Between.
NULL Fields
NULL fields are empty fields that may be missing data. If you have an extremely long report, it's helpful to be able to filter your report data to find empty fields, so you can then fill in the appropriate data.
To search for NULL fields, select the field you want to filter, then go to the Select Expert.

Since there isn't a comparison operator for empty fields, choose Formula from the comparison operator list.
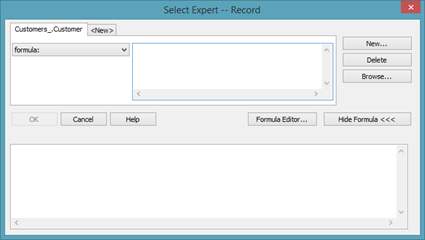
Now you will have to type in the formula.
Since we are looking for empty fields � or null fields � we type "is null()"

Now, inside the parentheses, we need to enter the field name as it appears in the tab � or Customers_.Customer. The field name must be contained in squiggly brackets, as shown below.
![]()
Click OK.
As you can see in our report, we do not have any empty fields.