Many businesses need to purchase products from vendors and enter them into their inventory. This can be accomplished through purchase orders. QuickBooks Online gives you the ability to manage purchase orders so that you can pay your vendors and update your inventory.
In this article, we will take a look at how to make purchase orders. You will see how you can receive a purchase order and also what to do if only part of the order arrives.
Additionally, we will see how you can enter inventory manually. You will learn more about using the Adjusting Inventory Quantities form, which you previous touched upon in a previous lesson, as well as learning how to change the initial inventory amount.
Purchasing Orders
In order to make purchase orders in QuickBooks Online, you need to be subscribed to the Plus or Advanced subscription levels. The lower subscription levels do not support it.
What's a Purchase Order?
A purchase order keeps track of the things that you order. It allows you to compare what you are delivered with what you had ordered so that you can see if they match.
The way that purchase orders work is that you order something from a vendor and then enter the purchase order into QuickBooks Online. The order that you enter into QuickBooks Online should match the order that you made.
Once you receive your order from the supplier, you can match what was received with order to what you were expecting. You will also receive a bill with the order, which you should also match. Bear in mind that the bill and order may not appear at the same time.
After you have received and verified the bill, you will then need to pay it before its due date. With QuickBooks Online, you can use purchase orders to fill in details for checks, expenses, and bills. In order to use purchase orders, you need to enable them, which is what we will discuss first.
Turning On Purchase Orders
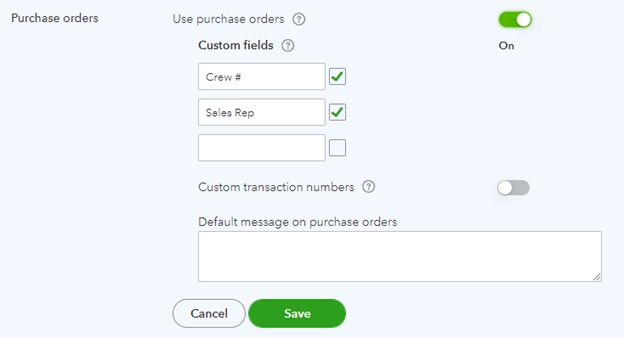
Purchase ordering is a feature that has to be turned on. You can turn it on by going to the gear-shaped Settings icon in the Header and then going to Account and Settings under the Your Company heading. From there, click on the Expenses tab. Turn on the Use Purchase Orders option.
[Figure: Turning on purchase orders]
Below the purchase orders option, you can customize the email message that you will send to the vender when you make purchase orders.
Furthermore, you can customize the order numbers by selecting the Custom Transaction Numbers check box.
Making a Purchase Order
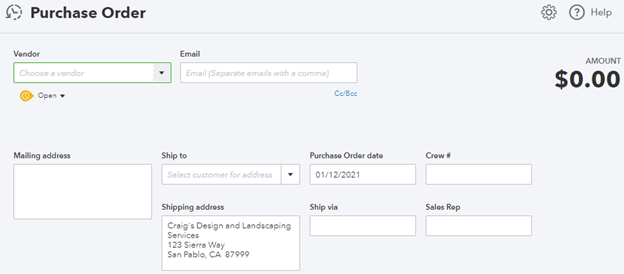
There are several different places from which you can start making a purchase order. One of the easiest ways to access the Purchase Order transaction window is by clicking on the New button in the left-side Navigation Pane and then choosing Purchase Order under the Vendors category.
 [Figure: Adding a new purchase order]
When making a purchase order, the first field asks for the vendor. Choose the vendor that you are buying from in the dropdown list. Next, enter the relevant emails of those who should receive copies of the purchase orders.
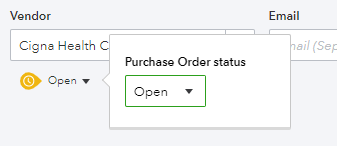
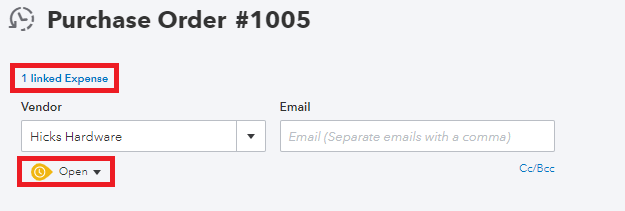
Directly below the vendor name is a status icon that says Open. A new purchase order will default to the open status. It can be changed to closed via the dropdown toggle next to it.
[Figure: Purchase order status]
Several of the other fields will be filled in for you after you have selected the vender, including the mailing address and shipping address. If you are sending this order to a customer, then you can choose their name from the Ship To dropdown. Their address should then replace your address in the Shipping Address field as long as you have entered it in their profile.
At the bottom of the form, you can begin to fill out the items that you want for purchase in the Item Details section. Choose your item from the dropdown in the Product/Service column. Only items that have been marked as being purchasable from a vendor will be shown here.
To check that your items are purchasable, go to Products and Services from the Sales tab in the left-side Navigation Pane. Then, find the item and click Edit in the Action column. Find the area where it says Purchasing Information and check the box next to I Purchase this Product/Service from a Vendor.
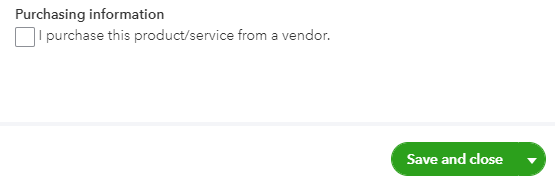
[Figure: Making sure that a product or service can be purchased from a vendor]
Click the Save and Close button to save your new inventory item settings.
Back at the Purchase Order form in the Item Details, the rest of the columns will be filled in automatically from your data in the Products and Services list, however you can manually change the fields here as well.
When you are done with the purchase order, click the Save and Close button at the bottom. You can also send the purchase order right away by clicking the dropdown arrow on the Save and Close button and selecting Save and Send
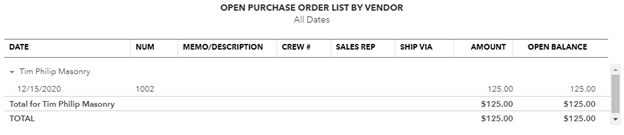
Viewing Open Purchase Orders
You can see a list of open purchase orders in the Reports section. Go to Reports via the left-side Navigation Pane. Once there, there are four reports that give you information about purchase orders: the Open Purchase Order List, Open Purchase Order Detail report, Purchases by Product/Service Detail report, and Purchases by Vendor Detail.
[Figure: Viewing open purchase orders]
The Open Purchase Order List is a report that shows all of your open purchase orders, grouped by vendor. You can also see how the order was shipped and the open balance.

[Figure: Viewing the Open Purchase Order Detail]
The Open Purchase Order Detail report has your open purchase orders grouped by item and account and includes the total amount, received amount, and the open balance.
The Purchases by Product/Service Detail is a report that has your purchases grouped by product or service. Lastly, the Purchases by Vendor Detail is a report has your purchases grouped by vendor
Receiving the Bill for the Order
You may receive the bill for the order either alongside the products and/or services, or you may receive the bill separately. Either way, once the bill is received, you can record it in QuickBooks Online.
You can quickly see which vendors you have open purchase orders with by going to the Vendors page. Get there by clicking on Expenses in the left-side Navigation Pane and then Vendors. At the top is a graph that shows, among other things, the amount you owe in purchase orders. Clicking on the amount will filter the table to only show vendors with open purchase orders.
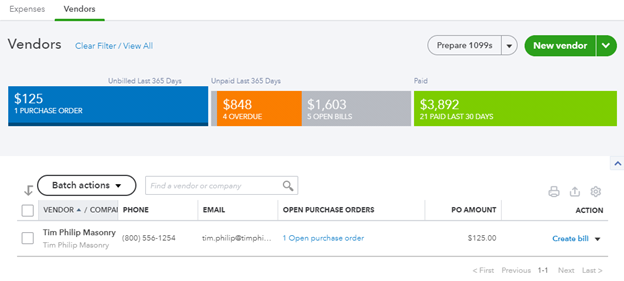
[Figure: Viewing vendors with purchase orders]
When you click on Create Bill in the Action column, you can start creating a bill out of the purchase order. In the Bill form, you will see a pane appear on the right where you can add the purchase order to the bill. Click on the Add button to add it.
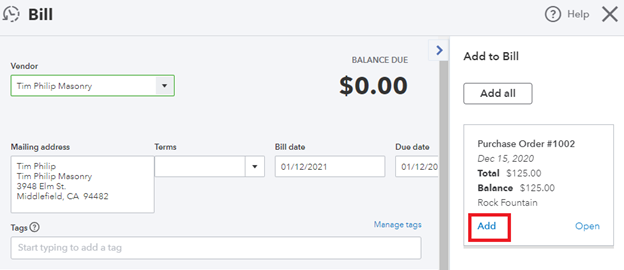
[Figure: Adding a purchase order to a bill]
Set up the rest of the bill the way that you did in the previous lesson on expenses. When you've finished setting up the bill, click the Save button at the bottom.
You can also write a check to vendor that you have an open purchase order with, and the same pane will appear on the right side where you can add the purchase order. Click the Add button to add the purchase order to the check.
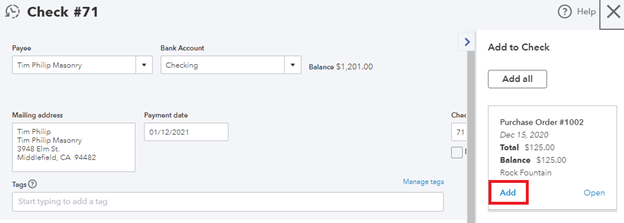
[Figure: Adding a purchase order to a check]
You can finish setting up a check in the same way that you did the bill. Click the Save and Close button at the bottom when you are done.
Once your check is saved, the next time you open up the purchase order, you will see that it is closed and that it is linked to another transaction. Find the purchase order in the Expenses page and click on it to load its information.
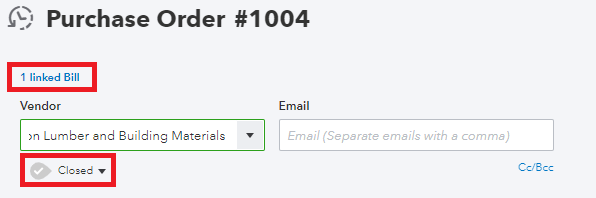
[Figure: A closed purchase order]
Click the X at the top right of the form to close it without saving. Let's now take a look at entering partial purchase orders.
Partial purchase orders
You may be in a situation where you only need to pay for part of a purchase order. That could happen because something wasn't included in the shipment or it the shipment was divided up into separate packages and you will just pay for them one at a time.
In that case, you can add only part of the purchase order to a bill, check, or expense. QuickBooks Online will link many transactions to the purchase order and keep track of them until the purchase order is paid off in full. You can also remove individual lines from a purchase order if you won't be receiving part of the order at all.
To start a transaction that only pays for part of a purchase order, first click on the New button in the left-side Navigation Pane. You can then choose either Bill, Expense, or Check, depending on how you which type of transaction you wish to make. In this case, let's make an expense.
When the Expense form pops up, choose the vendor that you have the purchase order for in the Vendor dropdown. You will then see a pane pop up on the left side with the purchase order. The purchase order has all the items ordered in a list.
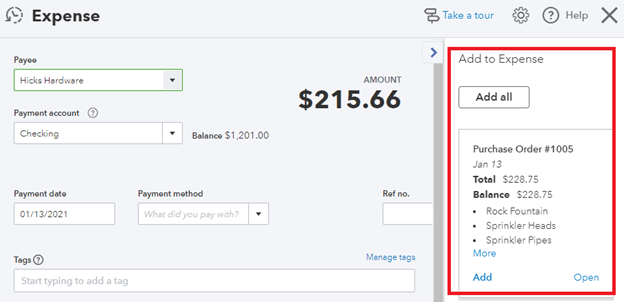
[Figure: Adding a purchase order to an expense]
Click the Add button in the purchase order pane to add everything to the expense. You will now see all the items added to the Item Details table in the Expense form. Now, you can edit the quantity or amount of each item you received. If you haven't received one of the items yet, set its quantity to zero.
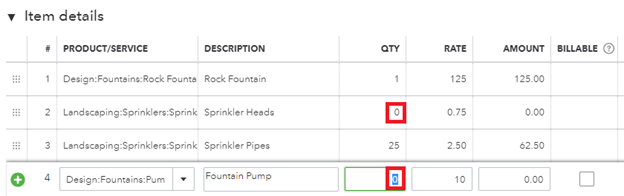
[Figure: Setting the quantity to zero for a purchase order item that wasn't received]
Once you have set some of the quantities to zero, click the Save and Close button to exit the expense form. Now, you can reopen the purchase order from the Expenses page in the left-side Navigation Pane. When you look at the Item Details section, you will see that the items that you received are now closed while the items that you didn't receive are not. The exact amount received will show up in the received columns.
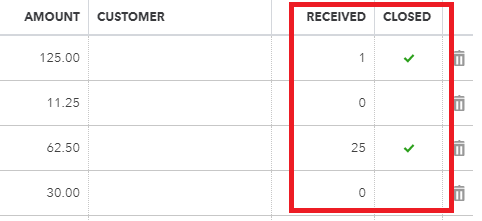
[Figure: A partially-filled purchase order]
You will also notice in the purchase order that it is still considered open and that it has one linked transaction. Clicking on the linked expense link will pop up a panel with all the linked transactions. In this case, there is just one expense transaction, and clicking on it will take you to the expense report we previously made.
[Figure: The purchase order after being partially fulfilled]
At this point, you can continue to make transactions with the remaining purchase order as the rest of it comes in. For example, when you make a new Bill from the New button in the left-side Navigation Pane and set the Vendor to the same as the one before, you will again see the purchase order panel on the right side. This time, you will notice that the total for the purchase order and the balance are different.
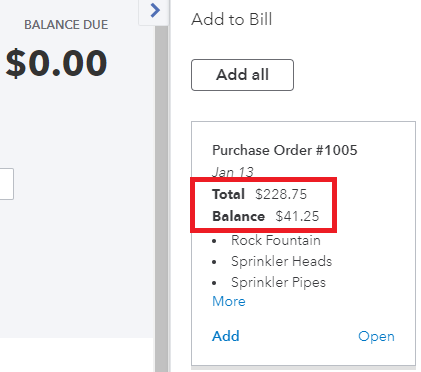
[Figure: Total and balance for the partially fulfilled purchase order]
When you add this purchase order, you will see that it only adds the remaining items from the purchase order that haven't already been accounted for.

[Figure: Adding the remaining purchase order]
You can review how much of a purchase order has been received by using the Open Purchase Orders Detail report. View that by clicking on Reports in the left-side Navigation Pane. At the reports page, start typing purchase in the search bar until you see the Open Purchase Orders Detail report show up as a suggested search term.
Removing a Purchase Order
You can remove a purchase order from the Expenses page. This is reached from the left-side Navigation Pane. To remove the purchase order, find it in the list. In its Action column, click on the dropdown arrow and select delete.
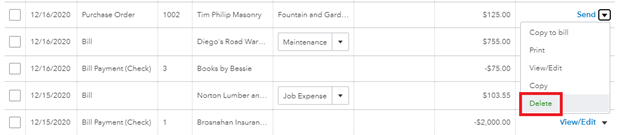
[Figure: Deleting a purchase order]
Editing a Purchase Order
You can also edit a purchase order in the same way that you delete it. Just select View/Edit from the dropdown arrow in the Action column.
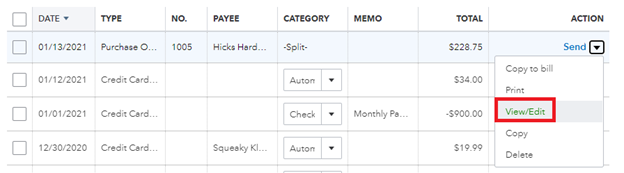
[Figure: Editing a purchase order]
Entering Inventory
Now that you've seen how to work with purchase orders, let's take a look at entering inventory manually.
You may find that there are times where you need to make adjustments to inventory. This can happen often when doing a routine check of inventory. It's also done as an end-of-year task. In order to do this, you can use an Inventory Quantity Adjustment form.
To start making an adjustment to inventory, click on the New button in the left-side Navigation Pane, then click on Inventory Quantity Adjustment. This will cause the Inventory Quantity Adjustment window to pop up.
In this window, you can first change the Adjustment Date, if you wish, as well as the reference number. Next, select the Inventory Adjustment Account from the dropdown, which is usually the Inventory Shrinkage account.
Now, in the Product column of the table, find the product that you want to adjust the inventory for. QuickBooks Online will auto-fill other fields, such as the SKU, description, and quantity.
To update the inventory, you can either enter a new quantity in the New Quantity column or enter a change of quantity in the Change in Quantity column.
For example, if your current inventory for an item in 50, and you want to change it to 45, then you can enter 45 into the New Quantity column or -5 into the Change in Quantity column.

[Figure: Making a change in quantity to subtract the inventory]
When you are done, enter a note into the memo and then click the Save button.
Editing an Inventory Quantity Adjustment
You can also edit an Inventory Quantity Adjustment. To do this, start another Inventory Quantity Adjustment form the same way that you did previously: by clicking the New button in the left-side Navigation Pane and then clicking Inventory Quantity Adjustment.
This time, click the clock icon in the top-left corner of the Inventory Quantity Adjustment page. This allows you to see recent inventory quantity adjustment transactions.
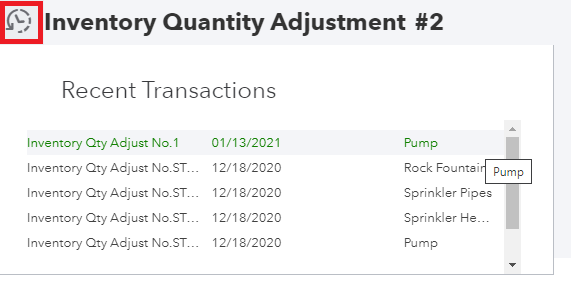
[Figure: Seeing recent inventory quantity adjustments]
In the form, you can see the previous change in the Previous Adjustments table. You can make edits there or you can delete the edits by clicking on the trash can icon in the right-most column. When finished, click the Save and Close button.
Editing an Inventory Item's Starting Value
It's also possible to edit the starting value of an inventory item. For this transaction, you won't be using the Inventory Quantity Adjustment because it is a bigger change.
Instead, click on the gear-shaped Settings icon in the header and then go to Products and Services under the Lists heading. From there, find the inventory item that you want to adjust.
In the inventory item's Action column, click the dropdown arrow and find the option that says Adjust Starting Value. Clicking on this will pop open a warning stating that you are affecting the initial value of the inventory. Click on the Got It button to continue.
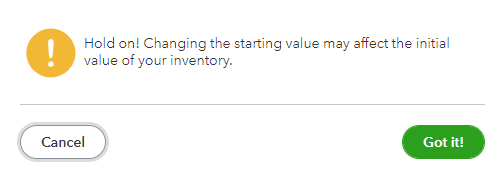
[Figure: A warning screen for changing the initial inventory value of an item]
From the Inventory Starting Value form, you can change the Quantity on Hand, Adjustment Date, Initial Cost, and the Inventory Adjustment Account. You can also add a memo. From this screen, though, you can't change the item's Inventory Asset Account.

[Figure: Editing the starting inventory for an item]
Make the appropriate changes and click on the Save and Close button at the bottom.
In order to change the item's inventory asset account, you need to go back to the Product and Services list. In the item's Action column, click the Edit link. A panel will appear on the right side where you can make changes to the inventory asset account, including other changes such as the description, SKU, category, and picture.
Conclusion
In this article we looked at how you can create purchase orders and track them once the orders are received. You saw that you can receive them using bills, checks, and expenses. You also saw that purchase order can be handled partially in case all of the order is not received at the same time.
Additionally, you learned that there are other ways to adjust inventory, such as by using the Inventory Quantity Adjustment form. You also saw how to change the starting quantity of an inventory item after it has been set.