When running your business, you need a place to go where you can access all your company's accounts and balances. In QuickBooks Online, this place is called the chart of accounts.
In this lesson, we will take an in-depth look at this important feature of QuickBooks Online. Let's first define what the chart of accounts is.
What Is the Chart of Accounts?
The chart of accounts is a listing of where all the money flows in your company. It will let you know when you spent money and what it was on. It also keeps track of the money received and what it was received for.
Specifically, the chart of accounts shows your:
- Income: This is the money that enters your company on a daily basis through sales or income from services.
- Expenses: This is the money that leaves your company such as paying rent or office supplies.
- Assets: This are things such as real estate, vehicles and equipment that your company uses.
- Liabilities: This is the amount that you owe on things you haven't paid for yet, such as loans.
Having an accurate chart of accounts is important because it feeds the data in your reports. If the information here is inaccurate, then our charts will be wrong.
Accessing the Chart of Accounts
There are a couple different ways to get to the chart of accounts. The first way is to click the gear icon in the Header at the top-right of the screen. From there, you can access the chart of accounts under the Your Company heading.
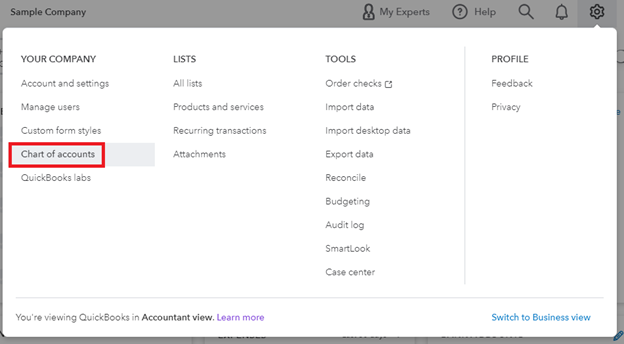
[Figures: Accessing the chart of accounts through the gear icon ]
Another way to access the chart of accounts is from the Navigation Pane on the left side of the screen. Click the Accounting menu item and you will then see a link to the chart of accounts.
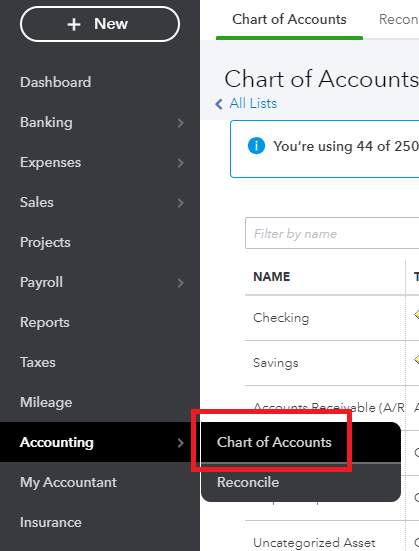
[Figure: Accessing the Chart of Accounts]
Once you are at the chart of accounts, you will see a table with all the relevant information about your company. QuickBooks Online creates the chart of accounts automatically based on the industry and type of company that you specified when making your company file. For a new file, you will need to enter your accounts' opening balances.
At the top of the chart of accounts, you can select to view the chart or reconcile your books with your bank records. Having your accounts reconciled is important because it lets you accurately monitor your finances. Clicking the Reconcile tab will guide you through the process of reconciling your accounts.
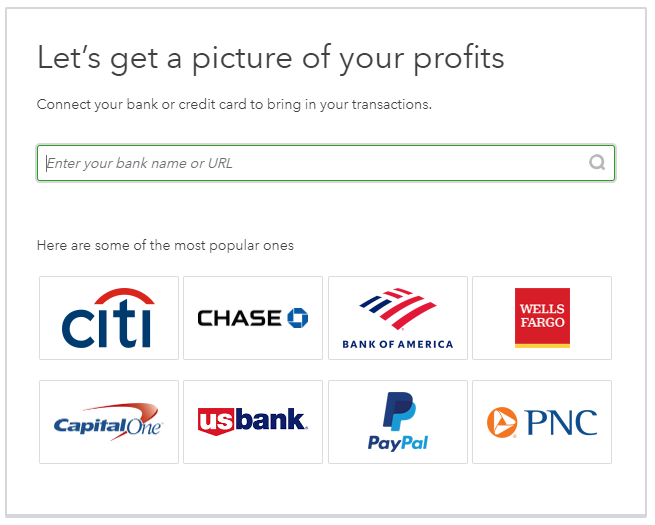
[Figure: Selecting a bank account to start reconciling accounts]
Back in the chart of accounts tab, you will see under the title that there is a breadcrumb navigation link that goes to All Lists. Clicking that will take you to a page of lists, which shows that the chart of accounts can be considered a list in QuickBooks terms.
[Figure: The Chart of Accounts main page]
On the right side above the chart are buttons to run reports and create new accounts. We'll look at running reports in another lesson and making new accounts a little later in this lesson.
There is also a search bar directly above the chart where you can search for accounts by name. This is a much faster way to find the account that you are looking for rather than browsing through the list. For example, if you are looking for anything related to travel expenses, just type 'travel' into the search bar and any related accounts will appear instantly.
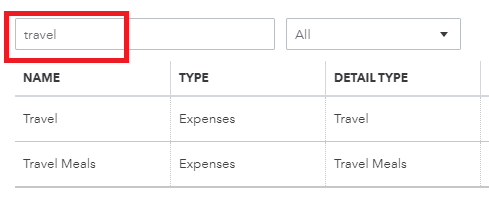
[Figure: Using the search bar to find accounts]
Three more icons to the right or the search bar allow you to do batch editing, print the chart, and change settings. The pencil icon for batch editing makes every name field in the chart editable. The printer icon allows for printing or exporting into another format like PDF. The gear icon for settings allows you to choose which columns to show, including if inactive items should be shown, and also specify how many rows to show in each result.
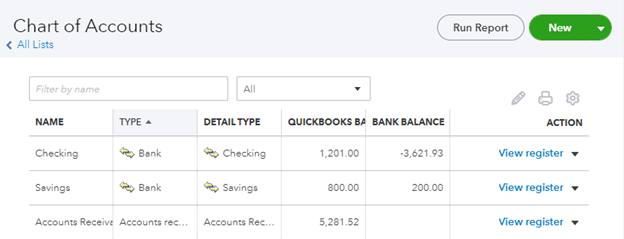
The chart has six columns. The columns are name, type, detail type, QuickBooks balance, bank balance, and action. The chart can be sorted in ascending or descending order by name, type, or balances.
The first column shows the name of each account. The name can be changed to whatever you want.
The second column shows the main type of account it is. There are two main types of accounts in QuickBooks Online: Balance Sheet accounts and Income and expense accounts.
Balance Sheet accounts
Balance sheet accounts will appear on your Balance Sheet report. This includes the assets, liabilities, and equity of your business. The Balance Sheet account types are:
- Accounts Payable (A/P): These track the transactions that are related to money that you owe to vendors. QuickBooks creates this account for you when you pay a bill for the first time. Typically, a company will have just one AP account, although you may have more if your accountant suggests it. Reports and graphs for AP are useful for tracking of the amounts you owe to venders and other outstanding bills.
- Accounts Receivable (A/R): These accounts keep tabs on transactions related to customers that own your company money. Like an AP account, most companies just have one AR account that is created for you by QuickBooks when you make an invoice for the first time. Reports and graphs for this chart are good for showing customers that owe you money, how many invoices are unpaid, and how past due invoices are.
- Bank: This is for keeping track of checking, savings, money market, and petty cash accounts. It can also include money that you may keep locally in a safe or cash register.
- Credit Card: This is for business credit card transactions. You may have several credit cards if more than one employee makes business purchases. You may also have different cards for different purpose, such as one for business supplies and one for travel.
- Equity: Equity represents the net worth of the company. It is the difference between all your liabilities and assets. So if you were to sell all your assets and use that money to pay off your liabilities, then the remaining amount is your equity. You will have two equity accounts created by QuickBooks when you make a new company file: an Opening Bal Equity account and a Retained Earnings account. Other equity accounts that you can create can track owner's equity, owner's draws, capital investments, and capital stocks.
- Current Asset: This is for assets that can quickly be turned into cash. They are typically used up in less than one year. It includes checking accounts, savings accounts, money market, and CD accounts.
- Fixed Asset: This account is for things with a minimum cost to sell if you need access to cash. Unlike current assets, they are more long-term. Examples include vehicles and equipment.
- Other Current Asset: This is for other items that can be converted into cash in less than a year, such as prepaid expenses, employee cash advances, inventory, or loans from your business. You can also add this asset type for deferred income taxes, estimated future income tax benefits, security deposits, and investment property.
- Other Asset: This is for items that don't fit into either Fixed Asset or Other Current Asset. It can represent long term notes receivable and security deposits that you have paid. You can also add this account type for intellectual property, copyrights, patents, and trademarks.
- Long Term Liability: This is for money that your company owes but is not expected to pay back in less than a year. This can be a mortgage or other long-term loans. This can also include bonds payable, lease payments, and deferred income tax payments.
- Current Liability: This is for money owed which is expected to be paid back in under a year. It includes sales tax, security deposits, and payroll taxes. You can add it to track benefits, contracts, entitlements, and salaries and wages. If you have more than one loan, you should create different accounts for each one.
Income and expense accounts
Transactions are typically assigned to one or more income or expense accounts. Income accounts keep track of the money that is coming into your account while expense accounts keep track of the money your company spends.
- Income: This is the money you get from your everyday business activities. It includes sales revenue, fees, or income from services. You can also add income from commissions and income from franchises.
- Other Income: This includes income from other sources, including dividends, interest, and insurance reimbursements. You can also include profits from sales of non-inventory assets.
- Expense: This is for money that is spent by the company on things such as rent, advertising, and supplies. You can track business-related travel costs or dues related to the business.
- Other Expense: Here you can put other expenses that aren't directly related to your business, such as unfavorable legal settlements, penalties, and fees. These occasional expenses are kept separate from your other regular expenses.
- Cost of Good Sold / Job Costs: This includes the raw materials needed to produce the good that you sell. It can include freight charges and labor needed to finish the product. Other things you can add are the costs of attorneys, mail, renting equipment, and purchases made for a customer.
The third column shows a more detailed description of the type. The detailed type options change based on the type. Detailed types help you select and name accounts appropriately so that you know exactly where your money is coming from and going to when you run reports. You will be able to specify the detailed type when adding the account or editing it.
The next two columns are for the QuickBooks balance and bank balance. The QuickBooks balance will represent any transactions entered into QuickBooks, while the bank balance will show the balance from the bank if it is downloading bank data.
The last column is the Action column. Here you will have the option of viewing the register or running a report. The register will let you see every transaction that you've had on that account. Clicking the triangle will give you more options, such as editing the account or making it inactive.
Numbering Accounts
Accounts can also be numbered, which they aren't be default. In order to add account numbers, go back to the gear icon at the top-right. From there, click Account and Settings and go down to Advanced. In the Advanced tab, find the setting for Chart of Accounts.
Click the pencil icon to allow for editing the settings. The first toggle item there will enable account numbers. Turn that on. Also, to have the account numbers show up in the chart of accounts, then additionally tick the Show Account Numbers checkbox.
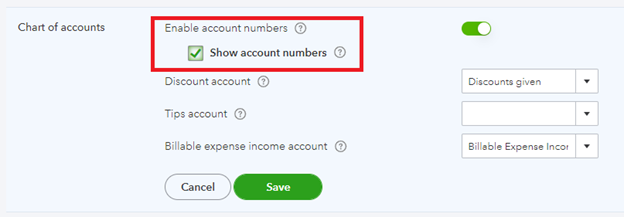
[Figure: Enabling account numbers in the chart of accounts]
Now when you go back to the chart of accounts, you can see a new column added for account numbers. You can edit the account numbers by clicking the pen icon about the table on the right side. That will allow you to edit any fields in the table.

[Figure: Column for account numbers in the chart of accounts ]
Editing Accounts
If you want to edit only one account, then you can click on the triangle in the Action column and then click Edit in the dropdown menu. That will pop open a modal window that allows you to edit only that one account.
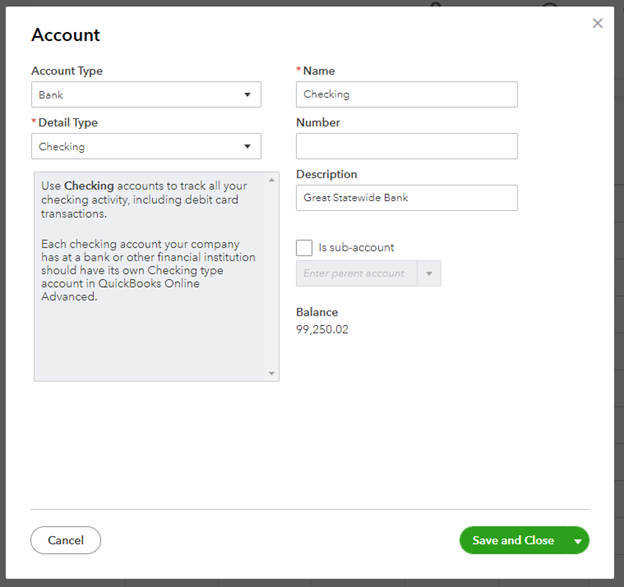
[Figure: The window for editing an account ]
Adding an Account
We'll now take a look at how to add an account in QuickBooks. Start by clicking the New button at the top right. That will pop open a modal window where you can add a new account.
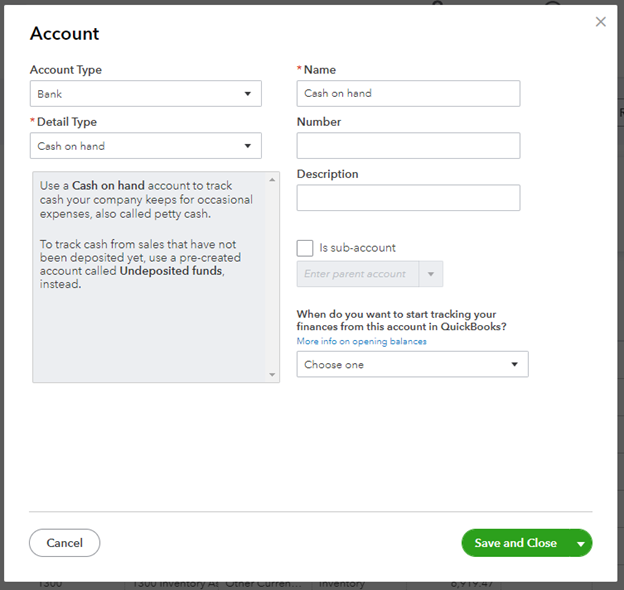
[Figure: The window for adding an account ]
The first thing you need to do is choose the Account Type. Next, you will select the appropriate Detail Type. Using the information in the Detail Type, come up with a descriptive name for the account. You can then enter a description.
You then need to specify whether the account is a sub-account of another parent account. Sub-accounts are just there to help keep your accounts organized. For instance, you can make accounts for phone and water a sub-account of a utilities account. That will make subsequent reports easier to read. If you choose to make this a sub-account, then select the parent account from the dropdown menu.
Lastly, choose when you want to start tracking the finances for the account. If it is a brand-new account, then you can select Today and enter its starting balance. If it's an older account, then select Other and choose the date where you want to start tracking from.
To finish adding the account, click the Save and Close button. If your new account is a bank account, then you can connect it to online banking. This can be accomplished by clicking the Connect Bank link in the Action column's dropdown menu.
Make an Account Inactive or Active
You can make an account inactive so that your books are neat and orderly. This won't delete the account information and transactions, so you can keep a record of it.
If the account is connected to a bank, then you should first disconnect it. Once it is disconnected, you can proceed to making it inactive. In the Action dropdown menu, select Make Inactive. Your account will now be hidden from the list.
If there is a balance on that account, then QuickBooks Online will create a journal entry and move the balance to another account. Also, your transactions with the account won't disappear.
You can change the settings in the chart of accounts to see your inactive accounts. To see your inactive accounts again, click on the gear icon above the table. Select the option to Include Inactive in the Other category.
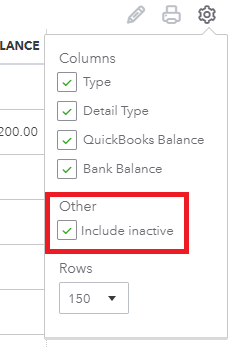
[Figure: Viewing inactive accounts in the chart of accounts ]
You can also make an account active again, however the journal entry created when making the account inactive stay in place. To make the account active, just click Make Active in the Action column.
Conclusion
In this article, you learned all about the chart of accounts. You saw that there are several ways to access the chart of accounts. You learned how to reconcile accounts with a bank and also how to quickly find the accounts you are looking for by using the search bar.
You also learned about all the different types of accounts that are available and how they are put into different categories, such as income, expense, and balance sheet account. and how to add them, edit them, deactivate them, and the activate them again.