The end of a year is a busy time for accounting. You need to close the books on the current year and prepare for the next. Properly handling these tasks will ensure that you can transition from one year to the next smoothly.
In this lesson, we will look at many of the various tasks you need to do at the end of the year. These tasks include:
- Confirming first month of the fiscal year
- Reviewing balances and sending statements
- Clear outstanding deposits
- Review vendor account balances, pay bills, or write checks
- Handle payroll
- Reconcile accounts
- Review inventory
- Run year-end reports
- Distribute profits from the business
- Prepare tax returns
- Reclassify transactions
- Close your books
Upon finishing this lesson, you should have a good grasp on how to prepare yourself for a new year.
Confirming the First Month of the Fiscal Year
Let's start by confirming which month you use to start the fiscal year. QuickBooks Online will clear accounting ledgers based on this month.
First, click on the gear-shaped Settings icon and go to Account and Settings under the Your Company heading. From there, go the Advanced tab and find the Accounting section, which should be at the top.
In the Accounting section, you are able to change the first month of the fiscal year, the first month of income tax year, and the accounting method. You can also choose to close the books, which prevents any changes to transactions before the closing date.
To change values, click on the pencil-shaped icon. Then, set the First Month of Fiscal Year field to January from the dropdown menu, if it isn't already set to that.
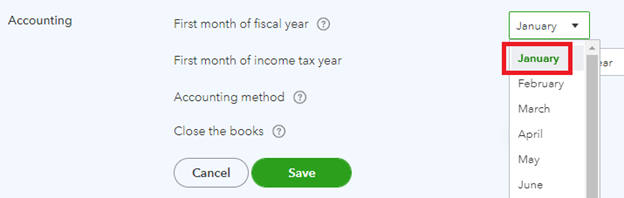
[Figure: Setting the first month of the fiscal year]
Now, click the Save button to finish setting up the first month of the fiscal year.
Reviewing Balances and Sending Statements
Now that you've set the first month of the fiscal year, let's see how you can review balances and send statements. It's also a good idea to check that you have up-to-date information on all of your accounts.
We'll start this process by going to the Reports section in the left-side Navigation Pane. At the Reports page, enter Accounts Receivable Aging Summary or Accounts Receivable Aging Detail into the search bar.
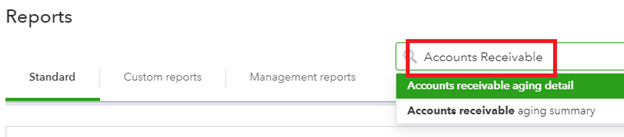
[Figure: Finding the reports to review balances.]
The Accounts Receivable Aging Summary will show your customers that have outstanding balances. The amount of the overdue balance is divided into how overdue each is amount is, from current, 1-30 days, 31-60 days, 61-90 days, and 91 days and over.
At the bottom of the Accounts Receivable Aging Summary, you can see the total amount overdue in each date range.
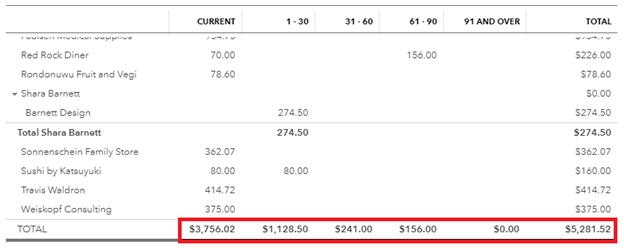 [Figure: Total overdue amounts in the Accounts Receivable Aging Summary]
In the Accounts Receivable Aging Detail report, you can see overdue balances organized initially by days past due, rather than by client. This lets you get a better idea of how much you are owed based on how old the unpaid invoices are.
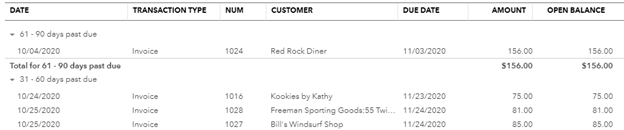 [Figure: The Accounts Receivable Aging Detail]
Once you see which customers have overdue balances, you can send them statements in the same way that you did in previous lessons. We did that by going to the Sales link in the left-side Navigation Pane and then the Customers tab.
Then, you can click the select boxes next to the customers that need new invoices. You can use the Batch Actions dropdown to choose Create Statements.
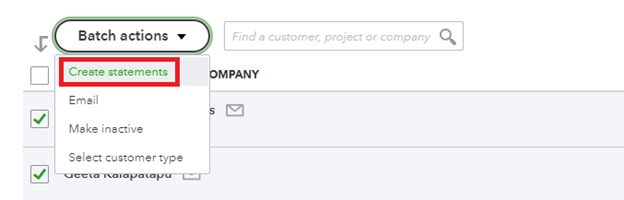
[Figure: Creating batch statements for overdue customers]
On the Create Statements page, select the Statement Type from the dropdown menu. You can choose Balance Forward for invoices that have outstanding balances for a specified date range. You pick Open Item for all open, unpaid invoices from the past 365 days. You can choose the last option, Transaction Statement, for a list of transactions for a selected date range. For this example, we'll choose Open Item.
Then, select the Statement Date, which will be today's date. Click the Apply button.
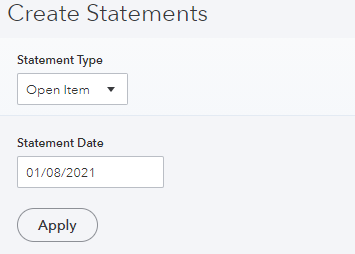
[Figure: Choosing a statement type]
Next, look through the recipient list. Double-check that you have the most recent email addresses for each recipient. When you're ready, click the Save and Send button to send out the statements.
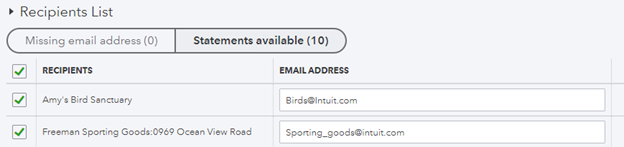
[Figure: Confirming recipient email addresses]
Once you've sent out overdue statements, you'll want to clear any outstanding deposits. We'll cover this in the next section.
Clearing Outstanding Deposits
At the end of the year, you will want to make bank deposits for anything left in the deposit queue. This should clear out your undeposited funds account so it will be counted in the correct year. You can do this by creating a new bank deposit for the funds in your Undeposited Funds account.
First of all, make sure that all payments have been put into the Undeposited Funds account. If you have transactions that you downloaded from your bank or credit card, then you don't need to the Undeposited Funds account for them because the bank already has that information. Likewise, transactions that have been processed with QuickBooks Payments also don't need to go into Undeposited Funds.
For payments received through invoices and sales receipts that aren't automatically processed by QuickBooks Payment, use the New button in the left-side Navigation Pane to start adding them to the Undeposited Funds account before depositing them to the bank.
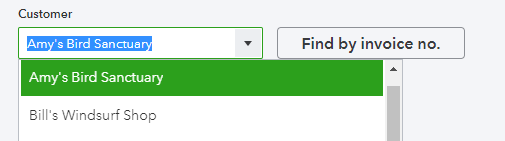
For invoices, click the New button in the left-side Navigation Pane and then choose Receive Payment. Choose the customer's name from the Customer dropdown menu. Then, select the checkbox next to the invoice that the payment is for.
[Figure: Receiving a payment for a sales invoice]
In the Deposit To dropdown, select Undeposited Funds.
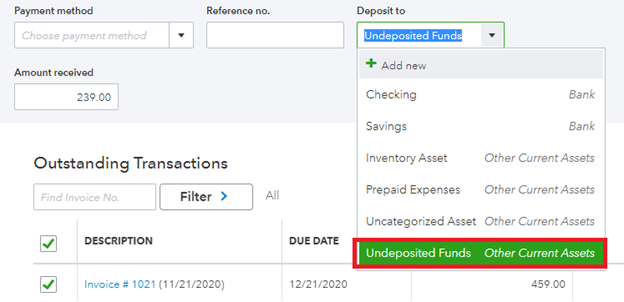
[Figure: Putting a payment into the Undeposited Funds account]
When you've finished filling out the rest of the Receive Payment form, click the Save and Close button at the bottom.
For sales receipts, click the New button in the left-side Navigation Pane and then choose Sales Receipt. Select the customer from the dropdown menu and in the Deposit To dropdown, select Undeposited Funds.
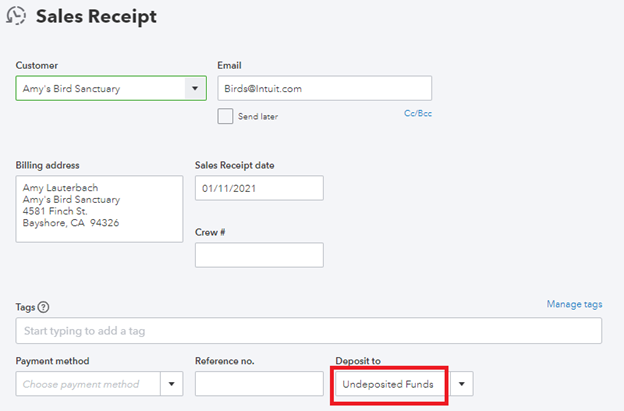
[Figure: Depositing a sales receipt to the Undeposited Funds account]
Click Save and Close to finish putting the sales receipt into the Undeposited Funds account.
Once you have all the funds into the Undeposited Funds account, you then need to make a bank deposit. To start, click the New button in the left-side Navigation Pane and select Bank Deposit.
In the Bank Deposit window, choose the account that you want the money to be put into, such as your checking account.
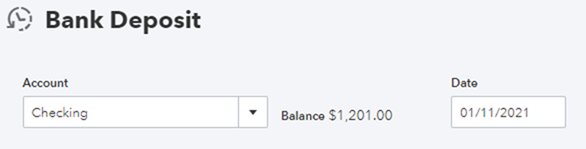
[Figure: Creating a bank deposit]
Next, select all the transactions that will be combined into the bank deposit. When done, click the Save and Close button to finish the bank deposit.
Once you have finished processing your payments and depositing your Undeposited Funds account, you can check the Undeposited Funds account to be sure that it has been cleared.
Go to Accounting from the left-side Navigation Pane and choose Chart of Accounts. At the Chart of Accounts page, scroll down until you find the Undeposited Funds account. You can also search for it from the search bar.
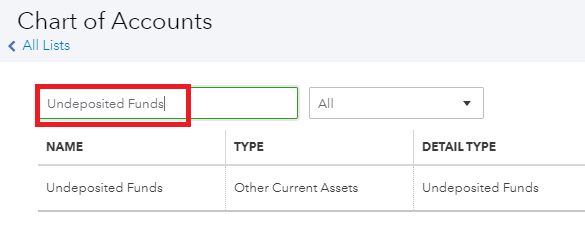
[Figure: Searching for the Undeposited Funds account in the Chart of Accounts]
Select View Register from the Action column. Check that your funds have been deposited.
Now that you've seen how to clear outstanding deposits, in the next section we'll look at reviewing vendor account balances and paying bills
Reviewing Vendor Account Balances
At the end of the year, you will want to address any outstanding bills that you owe and also review outstanding credits, discounts, or products that vendors owe you. You can do this viewing reports.
Start by going to the Reports menu from the left-side Navigation Pane. At the reports page, enter Accounts Payable Aging Summary or Accounts Payable Aging Detail.
The Account Payable Aging Summary will show the total amount of your unpaid bills, grouped by days past due.
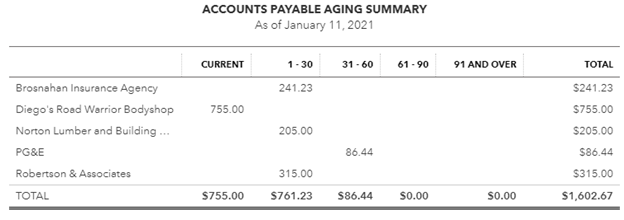
[Figure: The Accounts Payable Aging Summary report]
The Accounts Payable Aging Detail will show your unpaid bills, grouped by days past due
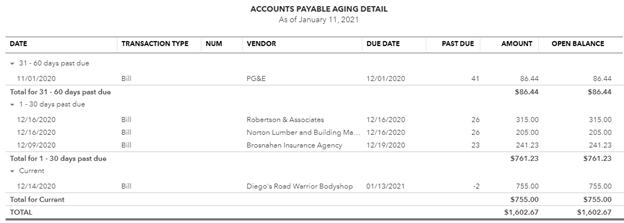
[Figure: The Accounts Payable Aging Detail report]
Once you see any outstanding bills that you need to pay, you can do so by clicking the New button in the left-side Navigation Pane and then clicking on Pay Bills. Pay the bills as we did in a previous unit.
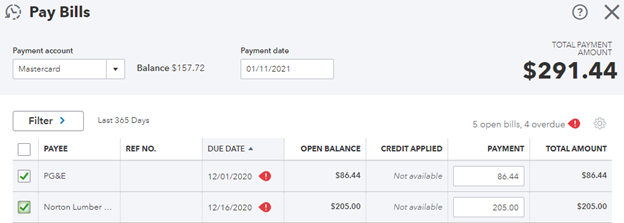 [Figure: Paying bills]
Now that you've seen how to review vendor accounts, in the next section we discuss reviewing inventory.
Review Inventory
During the course of the year, you may find that you have more or fewer of an item than what is shown in your inventory. You can manually adjust the number of items in the inventory without recording a sale.
To adjust the inventory, click on the New button in the left-side Navigation Pane. From there, click on Inventory Quantity Adjustment.
At the Inventory Quantity Adjustment form, enter the date in the Adjustment Date. Select the account in the Inventory Adjustment Account dropdown. A common account to add this to is called Inventory Shrinkage.
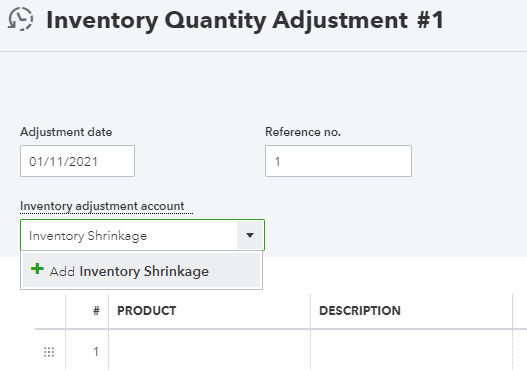
[Figure: Adjusting inventory]
You can then set the products in the Product field, and for each item change the details about the adjustment. Write a useful memo that describes the changes. When finished, click the Save and Close button.
Now that you've made an inventory adjustment, you can also edit or delete one. To do so, click on the Search icon bar in the Header, then go to Advanced Search. Select the account in the Inventory Adjustment Account dropdown.
In the All Transactions dropdown, choose Inventory Quantity Adjustment. Choose Search and from the results, choose the adjustments that you have to edit or delete.
From the resulting screen, you can add new adjustments, edit previous ones, or delete them.
In the next section, we'll look at end-of-the-year Payroll tasks.
Payroll
At the end of the year there are several things you can do with regards to payroll. The first thing you may want to do is to check that their wages and benefits are accurate. You can do this by going to the Reports page from the left-side Navigation Pane.
There are several reports that will let you see information about your employees. These reports include:
- Employee Details - Here you see lots of information including pay information.
- Employee Directory - You can check an employee's personal, work, pay, and tax information.
- Multiple Worksites - You can see the number of employees per month and wages per quarter.
- Paycheck List - You can see all the paychecks that have been created and you can do things like print pay stubs or modify check numbers.
- Payroll Billing Summary - You can see all the charges billed to your online payroll account.
- Payroll Deductions/Contribution - Here you can see employee deductions as well as company contributions.
- Payroll Details - A report that gives detailed information for employees' payroll.
- Payroll Summary by Employee - This is a report of wages, deductions, and tax info sorted by employee or period.
- Payroll Summary - This shows employee's total wages, deductions, contributions, and taxes.
- Payroll Tax Liability - Here you can see state and federal taxes withheld, paid, and owed.
- Payroll Tax Payments - Here you can see tax payments in your payroll account.
- Payroll Tax and Wage Summary - This is where you can see total subject wages, excess wages, and taxable wages.
- Recent/Edited Time Activities - This report will show recently entered or edited time activities.
- Retirement Plans - Here you can see employee and company contributions to retirement plans.
- Time Activities by Employee Detail - This shows how each employee worked with products and services, such as their hourly rates time spent.
- Total Pay - Here you can see the total pay by pay type for each employee.
- Total Payroll Cost - This report shows all the costs required for paying employees, such as their total pay, net pay, deductions, and taxes.
- Vacation and Sick Leave - Here you can see a detailed report of each employee's time off, including how many hours used and their balance of remaining days off.
- Workers' Compensation - Here you can see the wages that were paid for Workers' Compensation.
Those reports can help you verify that their information is correct.
Another thing you may want to do is pay bonuses to employees. You can either add a bonus to a regular paycheck or create a separate, bonus paycheck.
Let's first see how you can add it to a regular paycheck. Start by selecting the Employees tab in the Payroll section which can be reached from the left-side Navigation Pane.
In the Pay section, click Edit. Select Bonus from the Show All Pay Types.
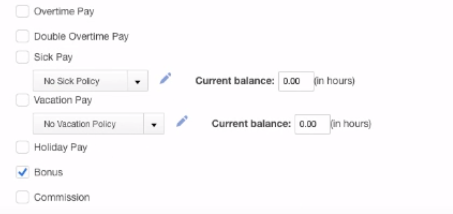
[Figure: Allowing an employee to receive a bonus]
To add the bonus to the paycheck, select Run Payroll. For each employee that gets a bonus, enter that amount into the Bonus field. Click the Submit button to finish payroll with the bonus included in the paycheck.
Now that you've seen how to add a bonus to a paycheck, let's see how you can give a bonus in its own separate check. Issuing a bonus as a separate check has some advantages, including being able to control its tax treatment, being used to pay back wages, and also being presented at a special event.
To start, go to Employees and select Bonus Only, which is under the Run Payroll dropdown. Choose the employee and enter the amount of the bonus. Then, click the pencil-shaped icon to edit payroll option. Choose your options there and click the Apply button.
Choose the As Net Payoptionto notify that the taxes were paid by the employer in the pay stub.
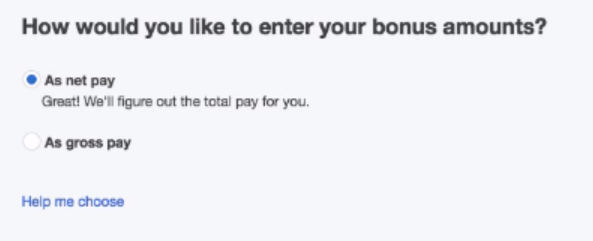
Select Preview and Submit to finish.
In the next section, you will see how to finish reconciling your accounts.
Reconciling All Accounts
If you have been reconciling your accounts every month, then it should be easy to reconcile them all at the end of the year. If you haven't, then you will need to take a little more time to reconcile everything.
To start, make sure that you have all your bank and credit card statements from your financial institutions. You will need to use the financial institution's statements as the baseline of truth which your own transactions should match.
To reconcile your accounts, click on the gear-shaped Setting icon in the Header and then click on Reconcile. From the Account dropdown menu, select which account you want to reconcile.
Make sure that you start with the oldest statement. Check that the beginning and ending balances match. When ready, click the Start Reconciling button.
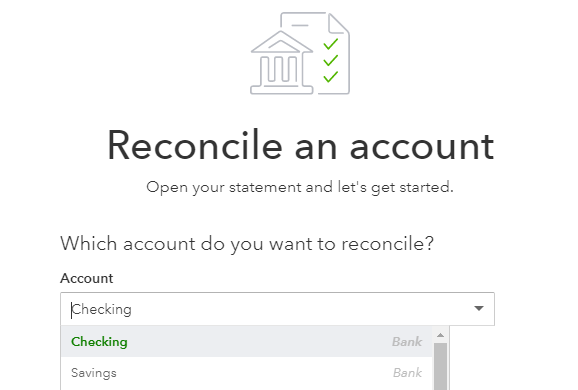
[Figure: Picking an account to reconcile]
Go through each transaction and match your records with the financial institution's records. Do this just as you did a previous lesson. When done, click the Finish button.
The next thing that you can do at the end of the year is run some important reports. We'll discuss this in the following section.
Running Year-end Reports
Running year-end reports will let you see how well your company did for the year as well as check for discrepancies. Two of the most important reports are the Profit and Loss report and the Balance Sheet.
To view the reports, go to Reports from the left-side Navigation Pane. Search for the Profit and Loss report and the Balance Sheet using the search bar above the list of reports. The Profit and Loss report shows your income, expenses, and net income and is also called an income statement. The Balance Sheet show what you own, what you owe, and what you have invested.
End-of-year Tasks to Complete with an Accountant
While there are many end-of-year tasks that you can complete on your own, there are several in which having an accountant is strongly advised. In this section, we'll briefly outline some topics that you should go over with an accountant.
Distributing Profits
You may need to distribute profits to the company's owners or partners. If this is the case, you should have an accountant's help to do so. You will want to have an account called Owner's Equity and Draws to track these payments.
Preparing Tax Returns
Preparing your tax returns is another step that should be done with an accountant, as there are numerous tax laws that an account can help you navigate as well as use to your advantage. You will need to invite your account to view your QuickBooks Online account.
Reclassify Transactions
Another step that you will want to complete is to make sure that all your transactions are classified correctly. An accountant can review or accounts and reclassify transactions so that your Profit and Loss and Balance Sheet are accurate at the end of the year.
Close Your Books
The last thing you should do at the end of the year is to close your books. Once you close your books, they are locked so that no other changes can occur. Once your books are closed you can accurately file your taxes.
Make sure that you've done the previous steps of reviewing accounts, checking any outstanding invoices, expenses, and payments, reconciling accounts, and reviewing inventory quantities.
Once everything is ready, click on the gear-shaped Settings icon in the Header and go to Accounts and Settings under the Your Company heading. Click on the Advanced tab and then on the pencil-shaped Edit icon in the Accounting section. From there, click on the Close the Books checkbox.

[Figure: Closing the books]
Enter the date in the Closing Date field. If you want to be able to make changes afterwards, select Allow Changes After Viewing a Warning and entering a password option from the dropdown menu. Enter and verify a password that will be needed to edit the books after they've closed.
When you're finished, click the Save button.
You've now seen the steps that you need to follow to successfully end your year.
Conclusion
In this article, you learned all about the various tasks that you need to do at the end of the year. You've seen that many tasks are similar to those you do all the time, although others will require the use of an accountant.