The iPad is a tablet computer that's designed and sold by Apple, Inc. There are dozens of different types of tablets on the market nowadays, but the iPad stands apart because it is an Apple product and runs on Apple's iOS operating system. On April 3, 2010, the first iPad was released. Since then, other versions have been released, each with additional features such as a camera, retina display, improved processors, improved display, and more memory. There currently are five generations, including the iPad mini. Each has built in WiFi, and some have cellular connectivity. It doesn't matter which version you have .
About the Latest Version of the iPad
All iPads, no matter what version, have the same look and feel. Your iPad may be a different color, but looks just like the one above in relation to button placement, etc.
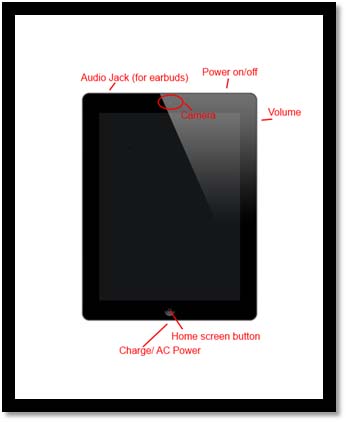
The iPad Exterior
The iPad exterior hasn't changed through the several generations. Below is a picture of the iPad with different parts of the exterior labeled in red:
Turning on the iPad
Setting up the iPad Without a Computer
If your iPad is brand new, learning to set it up might be the hardest thing you ever have to do with it � and setting it up isn't hard either.
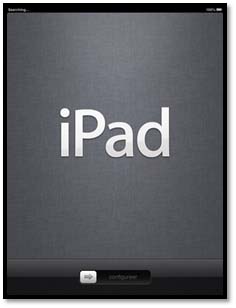
Once you get your iPad out of its packaging, go ahead and turn it on.
Apple will ask you to choose your language. If you're in the U.S., English will be selected by default.
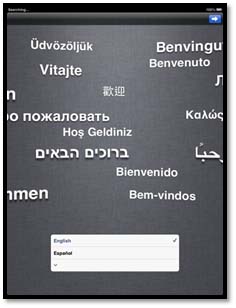
Next, choose your country:

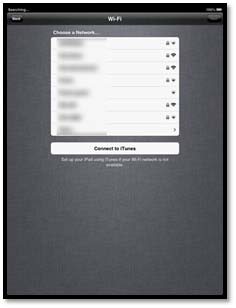
Next, you'll be asked to connect to a WiFi hot spot. If you have WiFi in your house, or you're in a public place, you'll need the name of the WiFi network and the password. If you don't have access to WiFi, you'll have to use your computer to set up. We'll show you how to do that later. For now, let's go through setting up your iPad without a computer.
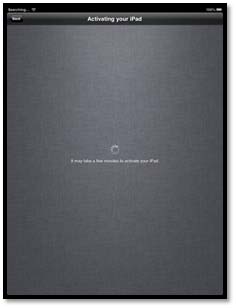
Now you'll see a message that says your iPad is being activated. This can take a few minutes, so don't worry if it doesn't happen instantly.
Once you're iPad is activated, you'll see this screen:
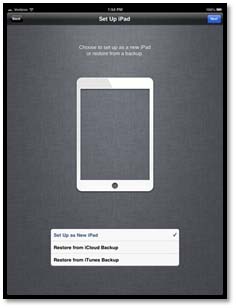
Tap your finger on "Set up as New iPad"
Next, you'll be asked to create an Apple ID, or to sign in with an existing one. You'll need your Apple ID to download apps.
![]()
Now Apple will ask you to agree to its Terms of Service. After that, your iPad will ask you if you want to use Location Services and Siri. It's best just to say yes to both, because Location Services helps you find your iPad if you ever lose it (or misplace it), and Siri is used for dictation, which is also helpful.
Finally, you'll see the screen that tells you your iPad is set up:
![]()
Set Up iPad with Computer
In the last section, we showed you how to set up your iPad without a computer. However, if you don't have WiFi access, you'll need to use your computer and your iTunes account.
This means if you don't have iTunes installed on your computer, you'll need to do that.
Go ahead and setup your iPad as shown above, until you get to this screen:
Instead of connecting to a WiFi network, you'll tap your finger on Connect to iTunes. At this point, you should have your iPad connected to your computer. To connect the iPad to your computer, plug one end the cable that came with the iPad into the USB port on your computer. Plug the other end into your iPad.
Follow the instructions shown to register your iPad.
You can sync applications, audio, bookmarks, books, contacts, calendars, movies, TV shows, photos, notes, and documents. Once you connect your iPad to your computer and iTunes opens, you'll see your iPad listed in the left pane, and an icon that lets you know it's syncing.
iCloud
iCloud is a cloud-based storage service that you can use to store data, such as music and apps on remote computer servers � or on the cloud � rather than using iTunes. This way, backing up your data is wireless and you don't need to connect to your computer and iTunes to do it.
To set up iCloud, first make sure your iPad is running the latest version of iOS.
If you're not sure, go to Settings, tap General, then tap Software Update to see if there's an update available.
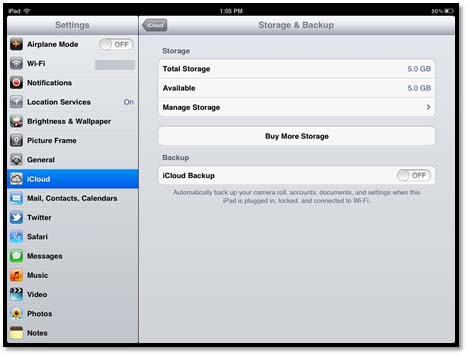
Now, go to Settings and tap iCloud.
If you want to use iCloud to back up your iPad data and settings, tap Storage and Backup.

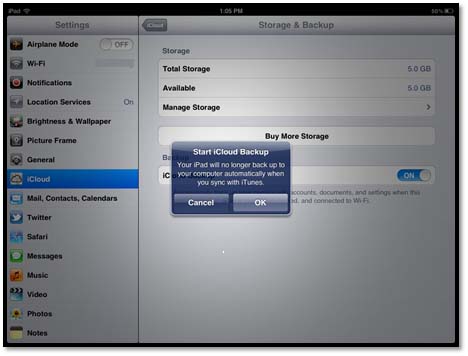
Switch iCloud Backup from Off to On.
Your iPad will give you a message letting you know that iTunes won't be used as the method of backup when you sync with iTunes.
You can also get an iCloud free email account that includes web mail at icloud.com.
To get the email account, tap iCloud on the left in Settings.
Turn mail On.
Your iPad will now ask you if you want to create a free email address.

Navigating Around the iPad
Navigating around the iPad is easy once you understand the interface and become familiar with it. If you have an iPhone, then the iPad is going to seem very familiar to you; the look and feel is very similar.
In this article, we're going to start with the Home screen and show you around the iPad.
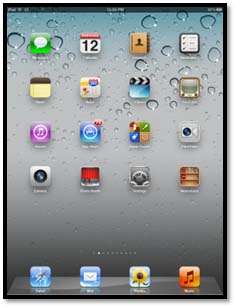
The default Home screen that you'll see each time you turn on your iPad shows the apps that were pre-installed.
At the bottom of your Home screen, you'll see Safari, Mail, Photos, and Music. These are your docked apps and will appear on every Home screen you create.
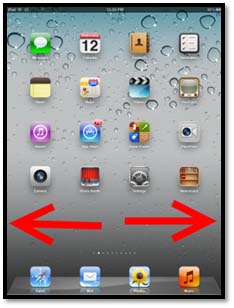
Shown above is your default Home screen. You can have up to 11 Home screens to house the apps that you download.
To return to the default Home screen, press the Home screen button on your iPad. To move between Home screens, simply use your finger to swipe and slide the screens to the left or right, as shown below.
Using the Touchscreen Interface
Unlike traditional computers and laptops, where you open programs, surf the web, watch movies, and enter text by using a mouse and keyboard, the iPad is much simpler. Everything is done with a tap or swipe of your finger. It's much like using your mobile phone.
To open an app on your iPad, choose a field , select an item in a list, tap a link on a web page, or select an arrow to move back one screen, just tap on the item once with your finger.
If you want to increase or decrease the size of a web page or zoom in or out, tap twice.
You also can use a pinch method, by pinching your thumb and first finger together to reduce the size, or by spreading them apart to enlarge the size.

You also can press your finger on the screen, then drag to the left, right, up, or down to move around. This is helpful on web pages.
If you want to scroll up or down a web page, flick your finger on the screen, moving your finger in the direction you want to move.
If you want to move to the top of a page, tap the Status bar at the top of the iPad screen. This is the bar that displays the time, etc.

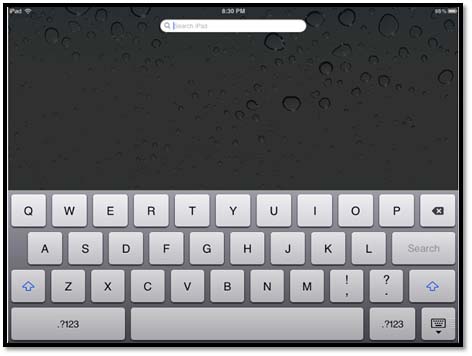
Using the Keyboard
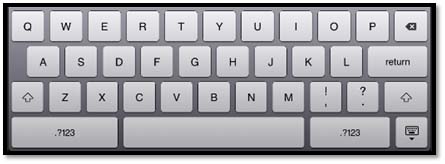
The keyboard automatically appears whenever you're in an area that allows you to enter text, such as the address bar of the web browser, an email message, or a search field.
� To type, simply tap your finger on the key on the keyboard that you want to use.
� Use the Delete key  to delete text to the left of an insertion point if you make a mistake typing and want to edit it.
Note: You can tap your finger in an editable area to move the insertion point.
� Press the Return key to start a new paragraph.
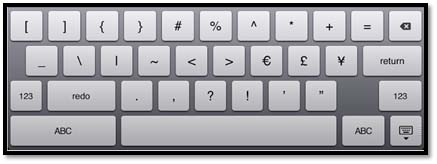
� If you want to type numbers or symbols, press this key:  You'll then see numbers and symbols:
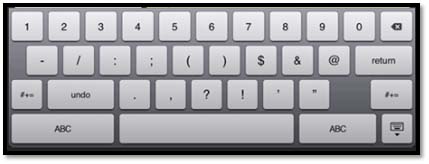
You can press the "ABC" key to return to the main keyboard, or the "#+=" for more characters:
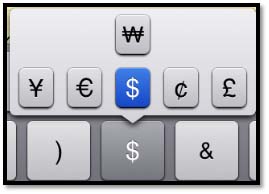
You also can type a variation of symbols. For example, if you press the $ key and drag slightly, a set of alternate currency symbols appears:
� You use the Shift key the same way you do on any other keyboard to type uppercase letters or alternate characters.
� If you double-tap the Shift key, you'll turn the Caps Lock feature on. Tap the Shift key again to turn it off.
� Press  to hide the keyboard.
Select, Cut, or Copy Text
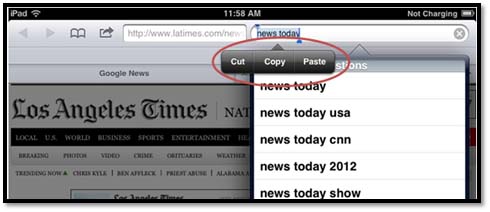
You can now move the magnifying glass around to select a different word. On a web page, you can also move the magnifying glass to select an entire paragraph or body of text. When you release your finger, it will give you an option to copy the text (if you're on a web page) or even define the word.

If you're using the search box, or working within an editable document, such as an email, press your finger down just like in the last section, then select:
� "Select All" to select all the text.
� " Select" to select a word.
� "Paste" if you've already made a selection.
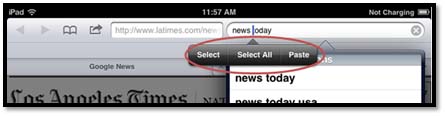
Once you do that, you can either cut, copy, or paste. Remember, cut removes the selection, and copy makes a copy of it that you can paste somewhere else.
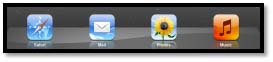
These appear at the bottom of each Home screen. By default, the docked icons are Safari, Mail, Photos, and Music.
You can change the docked icons for instant access to the apps you use the most.
To do this, you're going to move the icons for the apps that you want moved to the dock.
To add icons to the dock, go to the Home screen where the app you want to dock is located. Hold your finger on the app that you want to move. Do not lift your finger until all the apps start to wiggle. All the apps on your Home screen will wiggle when you do this.
Now, using your finger, simply drag the app icon to the dock, then lift your finger. As you can see, your app now appears on the dock.
To stop your apps from wiggling, press the Home screen button on your iPad.
To create a folder, tap and hold on an icon until the icons are wiggling, just as you learned when we docked icons. Now, instead of dragging the icon to the dock, drag and drop it onto another icon.These icons will now be grouped into a folder.
As you can see in the snapshot above, you can now name your new folder.

Tap the Home screen button to stop the wiggling. You'll see your folder on your Home screen.

Locking the iPad
To lock your iPad, simply tap the On/Off button on the exterior of the iPad. Do not hold the power button in or it will power down. Just press and release.
Once you do that, the screen will go in dark and the iPad is in sleep mode.
If you click the Home screen button, you'll see this:
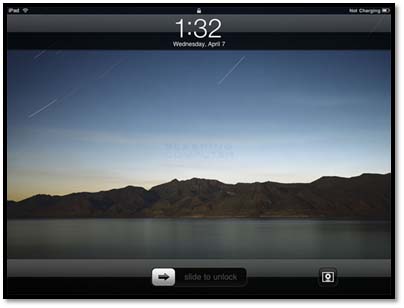
To unlock the iPad, go to the bottom of the screen where it says "slide to unlock" and drag your finger across it to the right. This will take you to the Home screen.
You can print using the iPad by using the built-in wireless printing capabilities found in iOS 4.2 or higher, or by using a third-party app. You can print photos, emails, web pages, etc.
To print, tap the button with an arrow on it. When you do, a drop down menu will appear. Select Print.
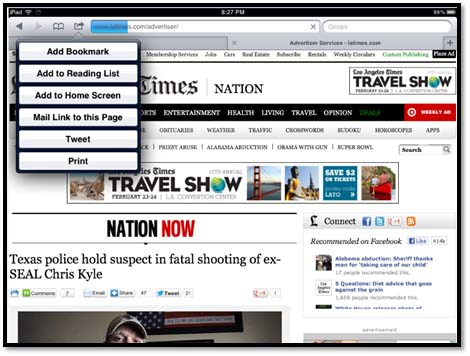
If you haven't printed before, you may have to select a printer before printing. Remember, your printer must be wireless. There's no way to connect a printer to the iPad.
Third-party printing apps will give you more printing options than printing directly from the iPad. You can search for printing apps directly from the iPad.
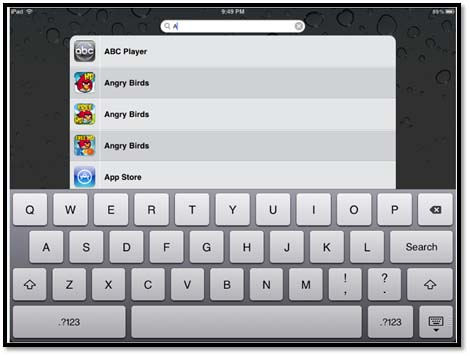
iPad's search feature is located to the left of the Home screen. To get to it, put your finger on the left side of the iPad's Home screen and swipe your finger from left to right.