The iPad settings feature gives you several different ways to configure your iPad. You can go to Settings to troubleshoot problems with your iPad, connect to a WiFi network, get better battery life, or set push notifications for apps. In this article, we're going to explore Settings and teach you how to configure the various options that iPad provides.
To access Settings, tap the icon on your Home screen. It looks like this:

Go ahead and tap Settings to open the Settings screen.
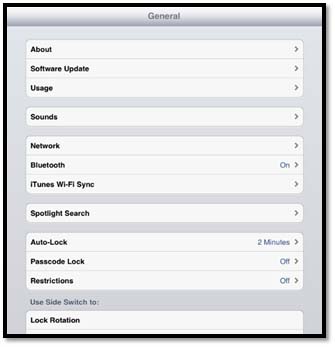
We're going to explore the Settings for iPad in this article, starting with the General settings. Tap General on the left side of your iPad screen. You'll then see this:
Remember, your Settings screen may look slightly different based on the version of the iPad you're using, and things you have installed.
Now let's explore the General settings.
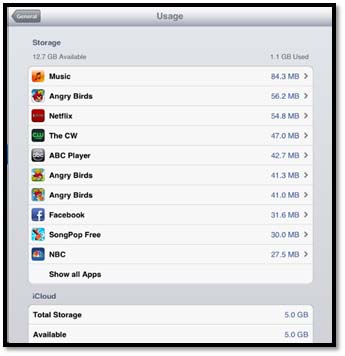
Usage/ Battery Usage
The Usage area of General settings shows you how much space or memory you've used up on your iPad. It also shows you battery usage.
Sounds
Go back to General settings. Now tap Sounds.
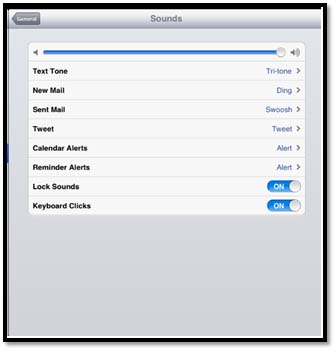
In the Sounds section, you can control the sounds you hear when you receive an email, send an email, send a tweet, tap the keyboard, and etc. You can also adjust the volume of the iPad.
When you tap Network, you'll see the screen below:
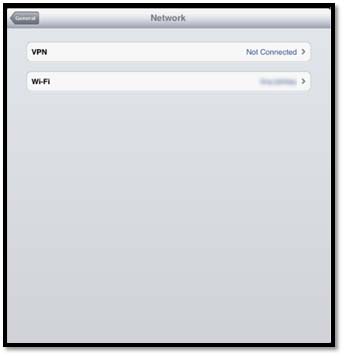
Here is where you will connect to Internet networks. You'll see VPN and WiFi listed. VPN is a virtual private network. These are used within businesses and organizations. If you connected to a VPN, you'll probably need to ask the network administrator for help with these settings.
To connect to WiFi, tap WiFi.
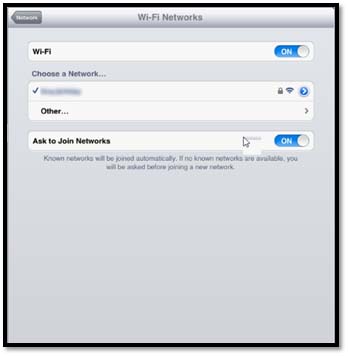
From this screen, you can turn WiFi access on or off. You can also connect to a network.
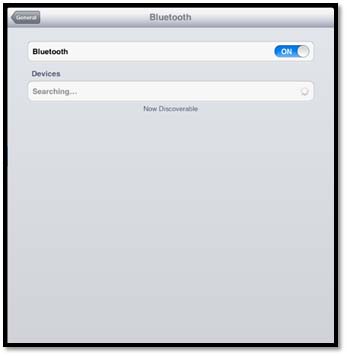
If you use a Bluetooth device, such as a headphone, speakers, or Bluetooth keyboard, you can tap on Bluetooth under General settings and turn Bluetooth on so it will locate your devices.
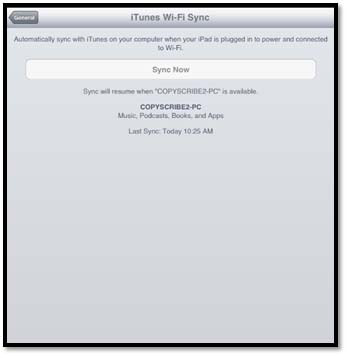
When you connect your iPad to your computer, you can sync all music, podcasts, books, and apps. Simply tap Sync Now.
Spotlight Search
Spotlight search allows your iPad to find matches for search words that you enter as you start to type. If you see a match, you can tap on it. An example is shown below when we typed "A" in the search box.
The Spotlight Search setting allows you to decide which apps or programs you want to use spotlight search.
![]()
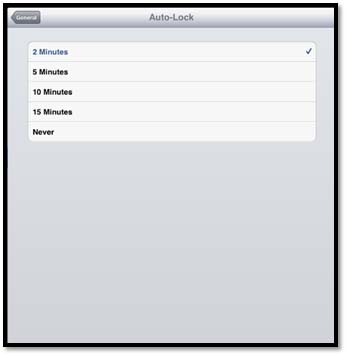
Auto-Lock
The Auto-Lock setting, pictured below, will automatically lock the iPad after an amount of time that you specify. This is to help save on battery life. The longer the time before the iPad locks, the more battery it will use.
Passcode Lock
You could set a passcode that a user would have to enter to unlock your iPad. You set your passcode in the General settings under Passcode Lock.
Tap "Turn Passcode On"
Enter a 4-digit passcode.
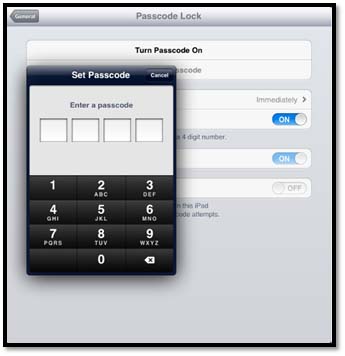
You also can set additional settings that will allow iPad to erase data after a specified period of time, or failed passcode attempts.
You can restrict kids or other users from using Safari (the web browser), installing apps, viewing videos, and TV in the Restrictions area of General settings.
![]()
Tap Enable Restrictions (as shown above). Enter a passcode for the restrictions.
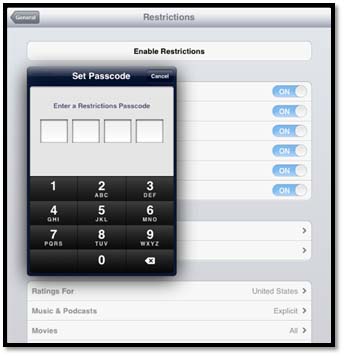
Now, choose the things that you want to set restrictions for under Allow. If you turn off something under Allow, such as Safari, you will no longer see it on the iPad. For example, if you turn off Safari, it will no longer appear. If you turn off Installing Apps, the app store icon will no longer appear on the Home screen.
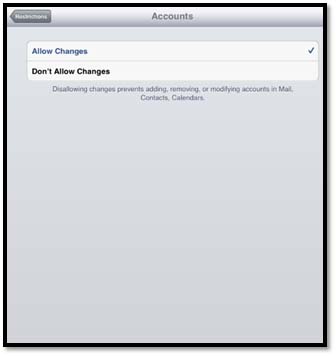
In the Allow Changes category, you can allow or not allow Location or Account changes. Disallowing location changes prevents new apps from using location services.
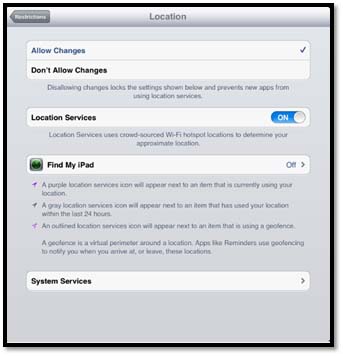
If you disallow account changes, you can prevent changes from being made to mail, contacts, and calendar accounts.
In the Allowed Content Category, you can set ratings for allowed content. Below is a snapshot of the TV show settings where you can choose the allowed ratings:
![]()
In the Game Center category, you can select if you want to allow multiplayer games, or the adding of friends.
If you turn Multitasking Gestures on, you can:
- Pinch to get to the Home screen using four or five fingers. Simply place your fingers on the iPad and pull them together as if you were picking up something.
- Swipe up to reveal the multitasking bar.
- Swipe left or right between different apps.
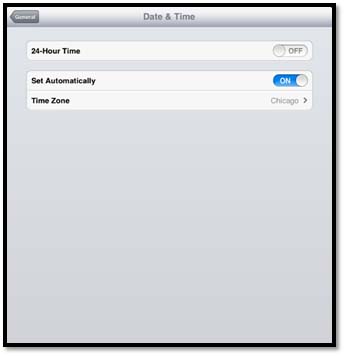
Under Date and Time in the General settings, you can set whether you want to use 24-hour time or regular time. If you want to use 24-hour time (21:30 instead of 9:30 p.m.), turn ON 24-hour time.
You also can choose if you want the date and time to select automatically, or if you want to set it yourself. In addition, you can pick your time zone.
The keyboard settings allow you to specify what happens when you type on the onscreen keyboard � or an external one connected to the iPad.
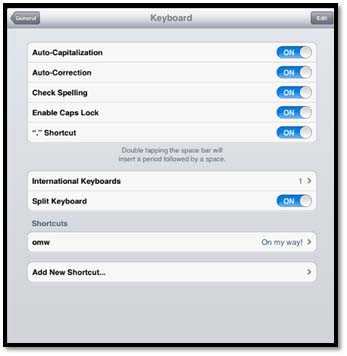
- Auto-Capitalization will capitalize the first word of each new sentence.
- Auto-Correction corrects commonly misspelled words.
- Check Spelling lets you know when there's a misspelled word, much like Spell Check in Microsoft products.
- Enable Caps Lock enables you to use Caps Lock.
- "." Shortcut allows you to simply double tap the space bar to enter a period followed by a space wheneverr you're typing. This makes it easier to end sentences, and it's a timesaver.
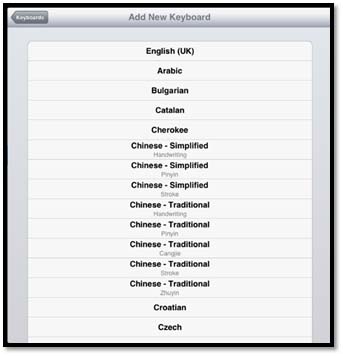
You can also access international keyboards by tapping International Keyboards, then Add New Keyboard.
You can create shortcuts, too. For example, on our iPad "omw" is a shortcut for "On my way!" Whenever we type omw, the iPad will write "On my way!" It will appear in a little box below where we type, so we can tap on it to select it.
Tap Add New Shortcut to add shortcuts of your own.
By default, the settings are based on the country where you purchased the iPad. However, this is where you go to change the settings for languages and regional/calendar formats.
![]()
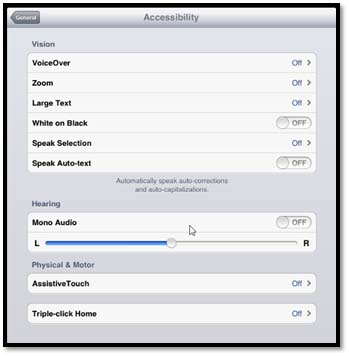
You can adjust the accessibility settings so that users who are visually impaired, deaf, hard of hearing, or have a physical disability can use the iPad.
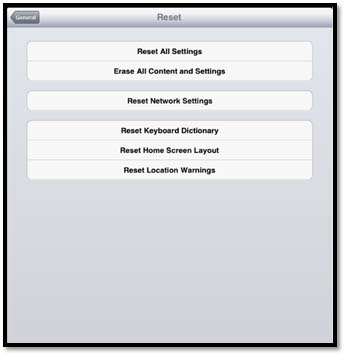
If you want to return to the default settings for your iPad, go to Reset. You can reset all settings, erase all content and settings, reset network settings, reset the keyboard dictionary, reset the Home screen layout, or reset location warnings.
Using Apple's Push Notification Service, app developers can send alerts related to their programs on your iPad. These may be text alerts, but they can be sounds too, and you can receive these notifications even if the app isn't running. This can be annoying and decrease your battery life. However, the iPad does allow you to manage which notifications (alerts) you get from which apps.
To do this, tap Settings on the Home screen, then Notifications on the left.
![]()
To add an app so that you receive notifications, tap an app in the Not in Notification Center, and turn it ON.
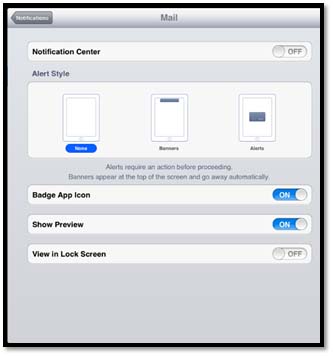
To remove an notifications, tap on it and turn it OFF.
Location Services lets your iPad know where you're at when connected to WiFi. If you use maps or the Find my iPad feature, this is necessary to use.
To turn on Location Services, tap on Settings, then Location Services on the left. Tap the switch to turn it ON. You can also turn on Location Services for different apps, such as maps.
![]()
Adjusting Screen Brightness
Tap on Brightness and Wallpaper on the left-hand side in Settings. From here, you can adjust the brightness of your screen.
Use your finger to adjust the slider (shown below).
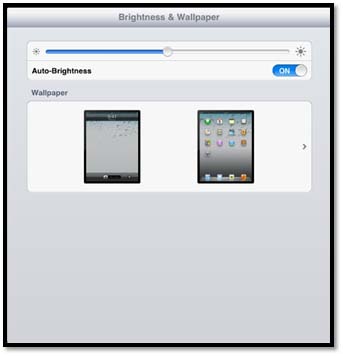
Moving the slider to the right increases the brightness. If you move it to the left, it will decrease the brightness.
Wallpaper
Along with adjusting the brightness, you also can set the wallpaper you want to use on your iPad. The wallpaper is the decorative screen that appears behind your icons on the Home screen.
Our wallpaper is gray with water droplets on it:
Go to Brightness and Wallpaper in Settings, then tap the arrow under Wallpaper.
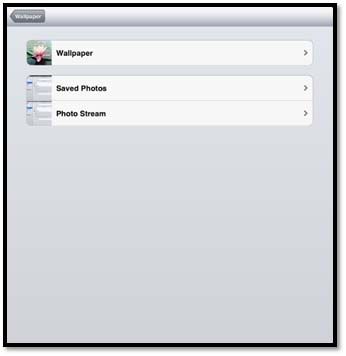
You can use the wallpaper Apple provides or use your own photos.
Find My iPad
If you ever lose your iPad, you can use the Find My iPad feature to locate it. Make sure this feature is turned on in Settings under Location Services.
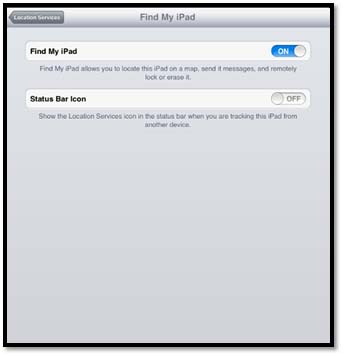
If you lose your iPad and need to find it, all you have to do is log into iCloud from a computer. Click the Find My iPhone icon. Even though you're searching for your iPad, you still click Find My iPhone.
If your iPad is turned on, you'll see its general location on a map.
Next, choose to either send a display message, or play a sound on the iPad.
You can type a message to the person who might have your iPad if it was lost and someone found it. Just make sure to leave a way for them to get in touch with you.
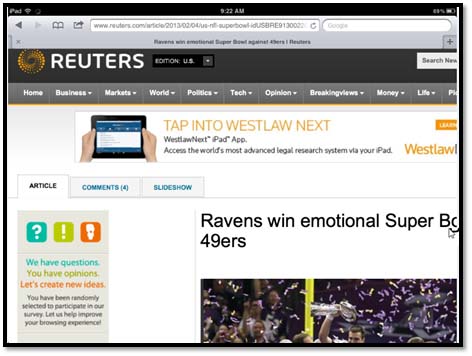
Using Safari, the iPad Web Browser
Safari is the iPad web browser that you use to surf the Internet. By default, the icon for Safari is docked at the bottom of the iPad Home screen. It looks like this:

Tap on the browser to open it.

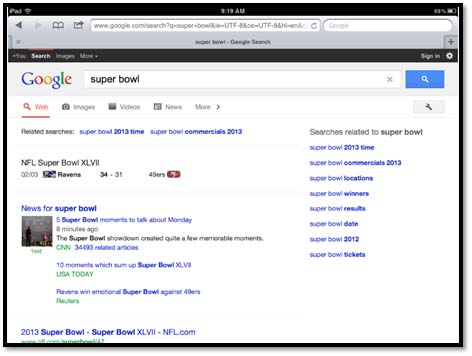
At the top of the screen, you'll see the address bar. To the right of the address bar is a search field. If you enter in search terms, it will take you to a Google search results page.
Scroll down a web page by using your finger and flicking up or down. The faster you flick, the faster and further a page will scroll. That said, if you just want to move a little further up or down a web page, do smaller flicks.
To zoom in or out on a web page, use your thumb and first finger to either pinch your fingers together or spread them apart (with your fingers touching the screen). Remember that zooming in makes a web page magnified, and zooming out reduces the size.

Here's a web page with the magnification reduced (we zoomed out).
Here's the same web page with the magnification increased:
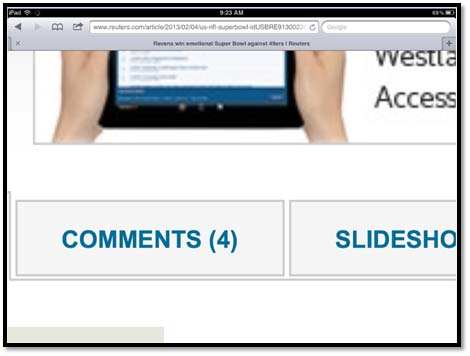
Create a Reading List
Safari gives you a lot of tools to help you organize the web pages you visit and save them for later. One of those tools is the reading list.
Tap the book icon at the top left of the Safari window. It looks like this: .
.
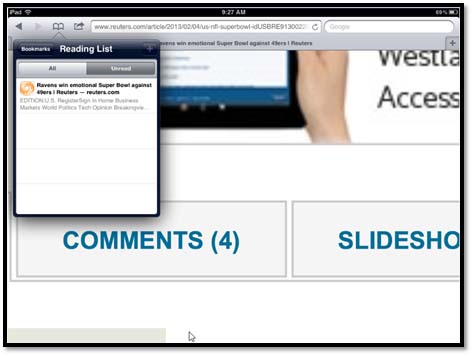
You'll see the Bookmarks menu.
Select Reading List from the menu.
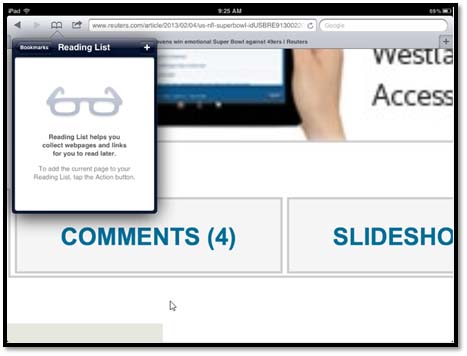
As you see above, we haven't added any web pages to our reading list. The reading list is simply web pages that you want to read later. Perhaps you stumble upon an article while surfing that you want to read, but don't have the time. You can add it to your reading list.
To add a web page to your reading list, tap the action button (the plus sign at the top right corner of the Reading List window.
As you can see, the page is now added to our reading list.
Links
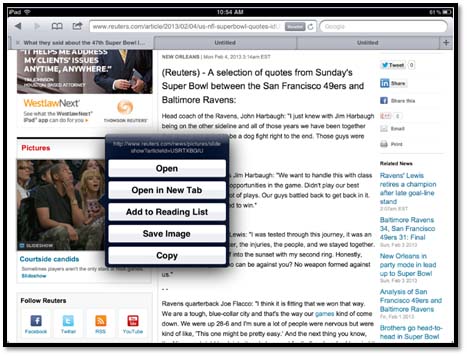
Sometimes you'll see links on web pages or in articles. Links often times appear in blue, and you can tap on links to go to other web pages. On an ordinary computer, you'd click on a link with your mouse. On the iPad, simply tap the link with your finger.
You also can open the link in a new tab, add the link to your reading list, or copy the link and paste it into a message, note, or email.
To do this, press your finger on the link. You'll then see a menu open:
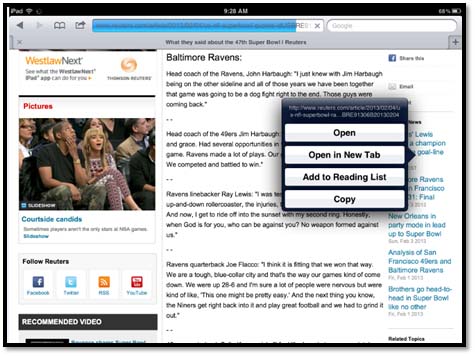
Tap on the action that you want to take. If you select copy, remember to paste the link somewhere else so you don't lose it.
Tabbed browsing simply means you can have more than one web page open at a time. Whereas in Internet Explorer and other browsers, you can have different windows open, in Safari, you can have different tabs open. Each tab displays a different web page. You can have up to nine tabs open at one time.
To open a new tab, you can do one of two things:
You can tap on a link and have the web page open in a new tab (as we did above).
Or you can tap the plus sign in the upper right hand corner of the Safari window  :
:
As you can see, in the snapshot below, we have three tabs open.

To close a tab, tap the X that appears on the right side of the tab. The X only appears if you're viewing that web page for that tab.
iCloud tabs allow you to view web pages that are open on your other devices, such as your cell phone or computer, using iCloud. When you view these pages, they open in an iCloud tab.
To use iCloud tabs, first open a Safari or other Internet browser page on a device that syncs with iCloud.
Now launch Safari on your iPad.
Next, tap the iCloud tabs button. It's the cloud symbol that appears between the Bookmarks and Share button at the top of the Safari window.
You'll now see a list of pages that you have open on other devices. Just tap the page you want to view.The page will open in Safari on your iPad.
You use bookmarks to mark your place so you can come back to it later. It's just like using a bookmark with a paperback book, and it's really just as easy. If you visit a web page that you want to save, perhaps because you want to show someone else or come back to it at a later date, you can bookmark the page. Most people bookmark their favorite pages or ones they visit often, such as a news site or Facebook.
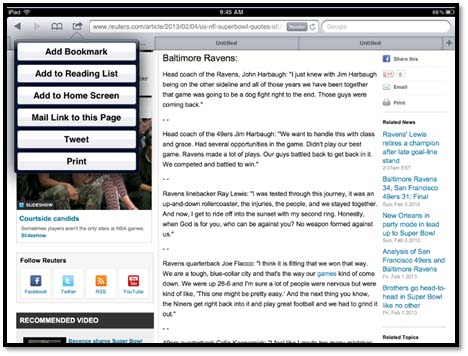
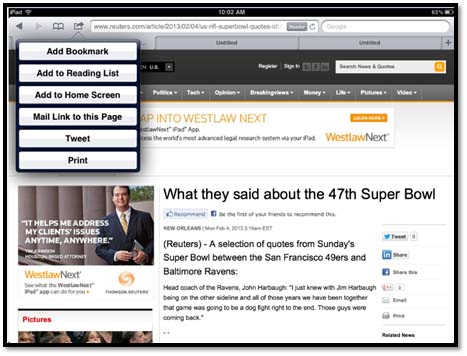
To bookmark a page, tap the Action tab at the top of the Safari screen. It looks like an arrow trying to jump out of a rectangle.
![]()
Tap Add Bookmark.
You can rename the bookmark if you want, so you remember what it is. By default, the name of the bookmark is the name of the page.
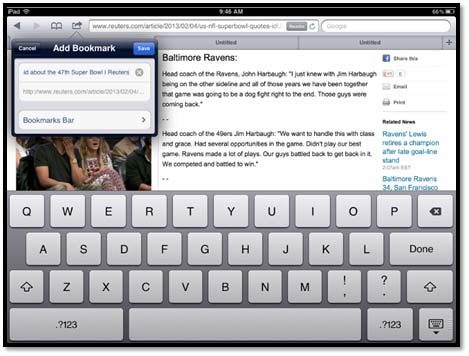
Tap the blue Save button when you're finished.
To remove a bookmark, tap the bookmarks icon (it looks like an open book), then tap Edit. Below, we can see the article we bookmarked: "What they said about the�"
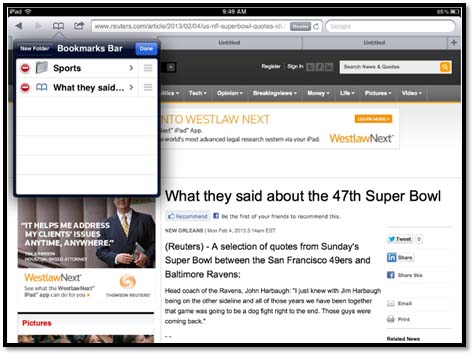
Tap Edit at the top right of the menu window.
To edit a bookmark, tap Edit
 , then tap the bookmark. You can now edit the bookmark.
![]()
To create a folder for your bookmarks, tap Edit, then tap New Folder. Enter a name for the folder.
To move a bookmark up or down on the bookmark list, tap Edit. Next, drag the three bars to the right of the bookmark to where you want to place it on the list.
If you visit a web page often, you can do more than just bookmark it. You can clip the web page, which means you'll add an icon for it on your Home screen. That way, you can just tap on the icon and open the page without having to mess with navigating through bookmarks in Safari.
To clip a web page, open it in Safari, then tap the Action button.
Next, tap Add to Home Screen.
You can now type a new name for your Web Clip if you want.
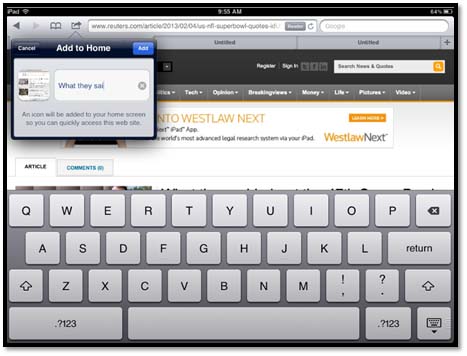
Tap Add.
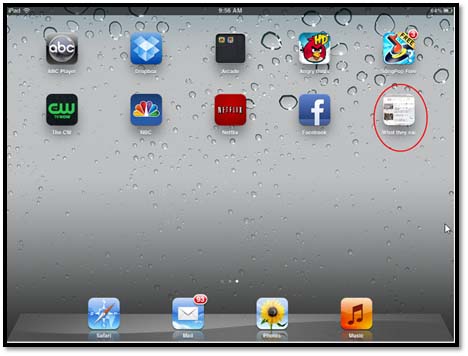
You'll now see the icon on your Home screen.
History is a list of pages that you've viewed recently. To view the history, tap the Bookmark icon, then tap History.
History has two parts.
You'll see a list of pages that you've visited today. These have the Bookmark icon beside them. You can tap on these to go to the web pages.
Below that, you'll see a list of pages by the date that you viewed them. These have a folder beside them.
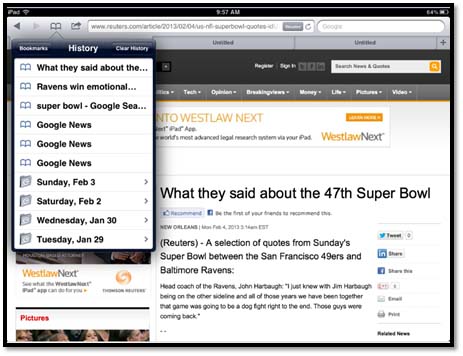
You can tap a date to see the pages you visited on that day. You'll then see a list of sites you visited (with the Bookmark icon beside them). You can tap on any of these to view the web page.
Tap the Clear History button to clear your history.
You can share web pages by email, Facebook, or by Twitter through Safari. In other words, you can suggest other people read the web page you're viewing by sending an email or a tweet.
To share a web page by email, tap the Action button and then tap Mail Link to this Page.
Now, address the email and add a message if you want.
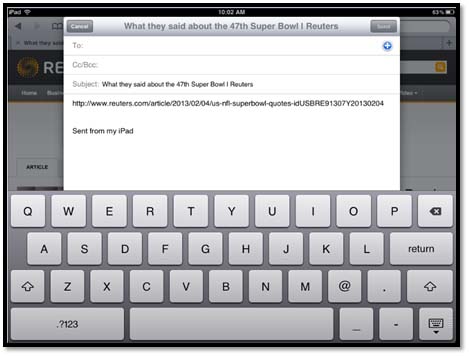
When you're finished, press SEND in the upper right hand corner of the message window.
You can also tweet web pages to Twitter by tapping the Action button, then tapping Tweet.
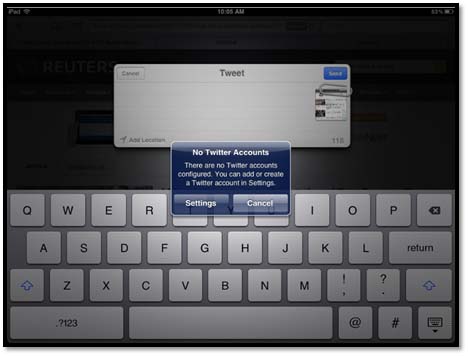
If you don't have a Twitter account configured, tap Settings. If you already have it configured, you can go ahead and create your tweet and push the blue Send button.
To share a web page via Facebook, go to the web page that you want to share. Tap the Action button.
Tap Facebook to share the page.
NOTE: Older versions of the iPad may not offer Facebook as a sharingoption. If you don't see Facebook listed, you can simply press on the link in the address bar, select Copy, then go to Facebook for iPad and paste.
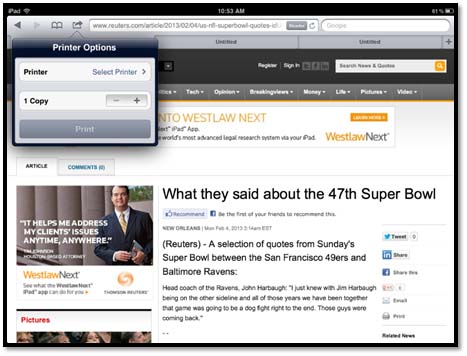
To print a web page, you must first have wireless printing capabilities. Then, go to the web page you want to print. Tap the Action button, then select Print.
You may have to select a printer. Select the number of copies, then tap Print.
You can also save pictures that you find on the web to your iPad.
To save a picture you find on the web, press on the picture until you see the menu open.
Tap Save Image
The image is then saved to your photos on the iPad.
Let's talk about Safari settings. To access Safari settings, tap on the Settings icon on the Home screen, then tap on Safari on the left.
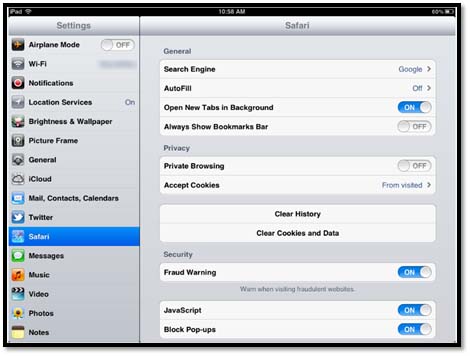
Here you can change the default search engine (Google), turn on AutoFill, have new tabs open in the background, show the Bookmarks Bar, etc. You can also clear your history, block pop-ups, and other things. All the settings for Safari are self-explanatory and based on personal preference.