

Microsoft Word is a documentation tool, so when you open a new file, you're ready to start typing. A blank document is used to illustrate the way Word works but remember that you can always use a template for future documentation. Before you can effectively create formatted, stylized documents, you need to understand the way Word lays out documents and stores files.
Documents and Pages
When you think of Word documents, think of them as a file that can contain one or thousands of pages. A Word file could be considered a physical file that you store in a filing cabinet. The file contains several pages. A health file could contain several pages that explain a patient's condition. A financial file contains several pages documenting an individual's investment portfolio. This is the same as a Word document. The document is a file that contains several related pages.
The advantage of a Word file is that the application keeps track of the words and pages in a file. Instead of manually counting pages in a physical file, Microsoft Word will count words and pages for you.

(Word's page and word counter)
In the image above, the number of pages and words for this particular document is shown (during its creation). These numbers are shown in the bottom left corner of the Microsoft Word user interface. As a matter of fact, if you look around all corners of the user interface, you'll see several tools and messages. In the last chapter, we showed the diskette icon that would save the document when it's clicked.
In the bottom right corner, a tool to control the zoom level is displayed.

(Zoom level slider)
The image above shows the zoom level slider. You can slide it either to the left or right to zoom in our out. The zoom tool makes the document and its content larger or smaller. Zoom in to make content larger. Zoom out to make the content smaller, but more of it fits in the screen. Zooming out is a good way to see what the document will look like when it's printed.
In the top right corner, the basic window features to close or minimize the document are shown.

(Basic windows functions for Word)
Every Window interface has these three functions, and Word is no different. The "X" icon will close the Word window. If you click this button but haven't saved the latest changes you've made to the document, Word will prompt you to save changes, discard them, or cancel the action. If you cancel the action, you're returned to the same Word document without saving changes but without losing them either. If you save the changes, the changes are saved before closing the file. If you discard them, the changes aren't saved but the file is still closed.
The horizontal line at the left of the image is the "Minimize" function. As you know, Windows allows for several opened application and when you're done with one, you can either close it or minimize it. Minimizing a window keeps it open and available but removes it from the active lists of applications. Clicking the icon in the Windows taskbar will maximize Word again and set it as the active window.
The center button is the "Restore" function. Clicking this button restores the application to the original size before you maximized it on your desktop. If you opened the application in a maximized state, then the window is reduced to a smaller size so that you can move it around your desktop. You can also trigger this function by double clicking the title bar at the very top of the window where the file name is shown. Once the window is removed from the maximized state, you can then move the window freely around the desktop.
Page Setup and Margins
To print a page, the content must be within the printer's area to print it on a file. Margins are necessary for any file, and Word sets the default to 1" around all sides of a page. As you type, words will wrap to the next line when they reach the margin cutoff. You can customize a page's setup including margins, orientation and page size.
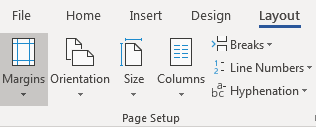
(Page setup controls)
Page setup controls are located in the "Layout" tab in the "Page Setup" category. The image above shows the buttons used to control a page's layout.
The "Margins" button lets you customize each margin's spacing. Word has several presets, but you can make a margin larger or smaller by clicking the "Custom Margin" option. Before you set very small margins, make sure your printer can work with them. If your margin spacing is too small, content outside of the printer's print range won't be transferred from the application to a hard copy document.
A page has two orientations: portrait and landscape. The portrait orientation is the most common and displays a page similar to any printed document. When you create a new Word file, the default orientation is the letter format portrait orientation. For most documents, this is the orientation that you'll use to store your content. Landscape rotates a document 90 degrees on its side. It provides more space horizontally, but the height of the document is much smaller. This orientation is usually used when you create a Word document with long spreadsheet tables of information. It's also common when you create flyers or brochure layouts. Click the "Orientation" button to choose the page layout of your Word document.
The common letter size is 8.5"x11", but other page sizes can be used in Word. If you plan to use a different page size, make sure your printer supports it. Legal size documents are 8.5"x14", and Word supports this page size as well as other custom settings. Click the "Size" button to set a page layout other than the default.
The "Columns" button sets columns within your pages if you plan to publish content in a newspaper style layout. This function is rarely used, but you can set 2, 3, 4 or more columns based on the type of content that you want to publish.
Microsoft Word will create new pages as you reach the bottom of a page and continue adding more content, but you can create a new page by using a custom page break. The "Page Setup" category has a "Breaks" button that gives you several options to add breaks in your content. Suppose that you want to create a title page. You only need one line of text, and then you need a new page added. You could add several new lines to the page, but this makes editing and formatting more difficult. Instead, you can add a page break by clicking the "Breaks" button and selecting "Page." Word will add a break at the point where the cursor is located and create a new page. As you add more content to the title page, the page break moves down without the need to delete and replace any new lines that you've added to the page to force a page break.
You aren't limited to just page margins. You can also control the spacing between paragraphs and each line of text. The "Paragraph" category in the "Layout" tab has several spacing and indent controls.
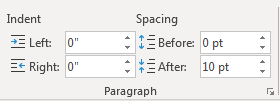
(Paragraph settings for indents and spacing)
You can set custom indent spacing, which happens when you use the "Tab" keyboard key. Word will then automatically format specific paragraphs such as those using bullet points or numbered lists. Spacing before and after paragraphs will determine the automatic space characters above and below paragraphs. In the image above, no spacing is set between paragraphs, so the author must manually add double spacing between paragraphs.
Word settings for your pages will help with print layouts and the way you present your documents. For the most part, default settings are sufficient for any document, but you can use these customizations to create better aesthetics for your documents.


