If photography means writing with light, then understanding light is essential to taking great pictures. But light involves more than just understanding exposure. A seasoned photographer will look not just for interesting objects to photograph, but interesting light.
Take a walk down a lightbulb aisle at the local hardware store. Something that's seemingly simple-the lightbulb-has a lot of different choices. Besides the bulb type like florescent and incandescent, there's also the light color. Do you want bright white, cool white, daylight, or even daylight deluxe?
Like that trip down the lightbulb aisle illustrates, light comes in many different colors-more than you'll even find labeled on a lightbulb box. While your eyes quickly adjust to the color after you screw in that new light bulb in your living room, your camera doesn't have that capability.
The white balance settings on your iPhone compensate for the camera's inability to adjust to the color of light like the human eye can. An accurate white balance will leave objects that are white in real life white in the images-if your white balance is off, those white objects will appear either yellow or blue tinged.
The native iPhone camera app uses an automatic white balance setting. The VSCO and ProCamera apps (and most apps that include manual modes), on the other hand, allow you to set a custom white balance using light temperature on the Kelvin scale.
Light is made up of a rainbow of colors across multiple wavelengths. Light from different sources will contain a different levels of each wavelength, or color. These wavelengths can be measured in degrees on the Kelvin scale.
While the science behind white balance may sound a bit complex, understanding how to use the Kelvin scale to set your white balance is a bit simpler. To get an accurate white balance, you simply match your color temperature settings with the color temperature of the light source. Here's a handy chart from Exposure Guide showing what light sources create what temperatures:
- Sunny day: 10000 - 15000K
- Cloudy sky or in the shade: 6500 - 8000 K
- Clear sky at noon: 6000 - 7000 K
- Daylight: 5500 - 6500 K
- Flash: 5000 - 5500
- Fluorescent lightbulbs: 4,000 - 5,000 K
- Dusk and Dawn: 3,000 - 4,000 K
- Incandescent lightbulbs: 2,500 - 3,000 K
- Candlelight: 1,000 - 2,000 K
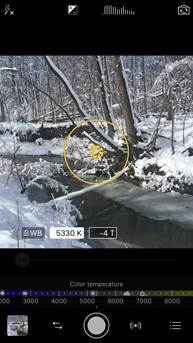
In the VSCO Cam app, you can access the white balance settings by clicking the icon in the lower lefthand corner, then selecting the WB box. Once selected, you'll see a slider. Click the "auto" for automatic settings or adjust the slider for a custom white balance-you'll see the color temperature appear above the slider. As the color temperature changes, you'll see the image on the screen changing-using both the screen and the color temperature chart can help you achieve an accurate white balance when auto doesn't.
The ProCamera app also allows you to set custom white balance and actually has a few more features. Make sure that custom white balance is on by touching the settings icon which looks like three lines in the bottom right corner. Once activated, the white balance setting will be green. Click the settings icon again to return to the main camera.
Now, you'll see an "AWB" at the bottom of your image. To switch from auto white balance (AWB) to custom, tap the AWB. Now, you'll see three options. The first WB icon will switch back to automatic white balance. The second is your color temperature in Kelvins. Tapping the Kelvin setting brings up a slider with the different options. On the ProCamera slider, you'll also see small icons-these are handy reminders for what temperature settings goes with what temperature. If you are outside, for example, click on the sun. Then, drag the slider to fine tune the white balance even more. Use the screen as your guide to help you choose how far to adjust the slider.
The third option in the ProCamera app is for tint. While white balance adjusts how orange or blue the image looks, the tint corrects purple and green colorations. Use this slider to remove unusual color hues that aren't corrected with the white balance slider.
Adjusting your white balance on the Kelvin scale using the VSCO or ProCamera app is a good way to correct orange or blue hues to your image-but if that's all you are using it for, you might be missing out. Remember how color plays a role in the emotion that an image evokes? By using an "incorrect" white balance, you can play on the role that color plays in your image.
Film photographers used warm and cool filters to adjust the color in their images to create a different emotion. Warm filters gave the image an orange hue-it can help create that "warm and fuzzy" feeling or recreate the look of sunset during the middle of the day. But you don't need to buy a warm filter to get that look-simply adjust the white balance slider higher (to the right) to recreate that same look digitally. Unlike using a filter, adding a warm hue using white balance allows you to control just how intense the effect is.
A cool filter, on the other hand, created a more blue hue to images, which tends to create more tranquil emotions. Instead of sliding the white balance slider to those higher numbers, slide it to a lower setting than the existing light calls for to mimic the effect of a blue filter.
Along with varying in color, light can also differ in intensity. Hard and soft light is used to describe the light in an image by the shadows that it produces.
Hard light produces shadows that are abrupt. The shadow from a hard light source will switch quickly from dark to light with a defined edged. Soft light, on the other hand, has a smoother transition from light to dark-there's a gradation instead of a straight line.
Soft light is often preferred because it wraps around a subject, often revealing more detail. In a portrait, soft light tends to be the most flattering, since hard light has a tendency to emphasize skin flaws. But, hard light often creates a more dramatic image. Since there is more contrast in hard light, it also tends to work better for black and white images. There's no right or wrong answer to using hard or soft light-but you should know what look they create and whether that's right for the image you are trying to create.
So how do you create hard and soft light? Soft light is created by light sources that are large and close to the subject. If you take a portrait using window light, moving them closer to the window will create a softer light. You can also soften light by spreading it out of a larger area-that's why professional photographers shoot with white umbrellas over their lights. You probably won't be investing in studio lighting to take pictures with your iPhone though, so another method is to simply recognize what creates soft light. An overcast day creates soft light, since the clouds work like one of those white umbrellas. Shaded areas also have soft light, even on a sunny day.
If, instead, you want the drama that hard light creates, you can move your subject farther away from the light source. A cloudless day will also produce hard light, especially towards the middle of the day. A flash, like the one in your iPhone, is also usually considered a hard light.
When the light is in front of your subject, the person or object you are photographing will be well-lit with minimal shadows. Front lighting is easy to photograph because the auto exposure modes tend to work well in this type of lighting. Lighting an object from the front tends to show the most details.
Side lighting is an excellent way to add depth to an image. When the light is entering from one side, whether that's at a 90 degree angle or a 45 or somewhere in between, there are shadows on the opposite side-this creates more depth and makes an image feel more three dimensional.
While backlighting is the trickiest to master, it can create some great images. The auto exposure mode on your iPhone reads light from the entire scene. When your subject is backlit and the camera is reading the entire scene, your subject will be dark, perhaps even a silhouette. To avoid getting a dark subject, you need to either tap the screen to set the exposure for only your subject, or use manual modes.
Using manual modes will properly light the subject, but then you'll probably end up with a background that is overexposed because of the extreme contrast that backlighting creates. To help prevent that blown out background, turn the flash to on (not auto). By firing the flash, you'll add light to the subject so that the difference between them and the background isn't so extreme. This technique is called using fill flash, and it's one of the best uses for the built-in flash on your iPhone. Using fill flash is often essential for getting decent shots on a sunny day.
So, if backlighting is so difficult, why use it at all? First, it's good to understand because in some scenarios you may not be able to move (or move in time) to avoid backlighting. By understanding how to expose a backlit subject correctly and how to use fill flash, you can still get a good image.
One of the best uses for the flash is when the subject is backlight. A fill flash can also be used to fill in the shadows on a side-lit image as well. The auto flash mode only fires the light when it detects low light scenes, so to use fill flash you'll need to tap the flash icon and select on, not auto. In ProCamera, you simply touch the flash icon until it is lit-marked with an A means auto, an X is off.
But what about using flash to light up a dark scene? Because of how small the flash on the iPhone is, it usually results in obvious shadows when used in dark scenes. That's one of the limitations of shooting with an iPhone, but there are ways to work around that shortcoming. It's best to avoid the built-in flash except for use as a fill flash, but the odd shadows that the flash creates are sometime preferable to blur from limited light-so it's certainly okay to use it if there's no other option and you're getting a bit of blur.
If you notice large shadows appearing around your subject, try moving them far away from from any other objects in the background. Those harsh flash shadows are from the subject blocking the light to the objects behind them. Eliminate any objects behind them, and the shadow doesn't have anything to fall on, so it will seem to disappear.
Part of the beauty of the iPhone is its portability-carrying around lighting gear, even the options designed for the iPhone starts to limit that benefit. Great light in iPhone photography then, isn't about knowing how to create good light, but how to spot it.
As you are are considering what to shoot, look for light by asking yourself a few questions:
- What color is the light here? Should I use a warmer or cooler white balance to create the effect of a warming or cooling filter, or shoot so that white is a true white?
- Are the shadows in this scene hard or soft? Is there a way to change those shadows by moving into the shade, out of the shade or filling the shadows in with flash?
- What direction is the light coming from? Should I move to adjust that direction and create more interesting shadows?
Learning to recognize great light takes time and practice-but by knowing what to look for, you can get a jump start in recognizing scenes with great light. Understanding light also helps you to plan out your shots-like trying a certain photo on a cloudy day because you want soft light.