Sometimes, a great scene just won't fit in the space of the 4:3 iPhone sensor. What then?
The iPhone includes a great feature for capturing wide, sweeping vistas with the Pano, or panorama mode. The Pano mode stitches several images together side by side, leaving you with a wide image that captures the entire scene.
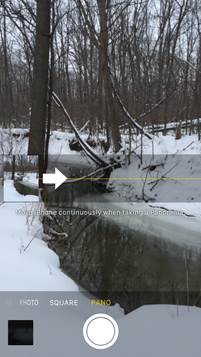
The native iPhone camera app has a panorama mode built in, on iPhone 4S and later models. On the mode slider above the shutter release, slide over from PHOTO to PANO. Your screen will change, adding an arrow with the instructions "Move iPhone continuously when taking a Panorama." On iOS 9, that screen looks like this:
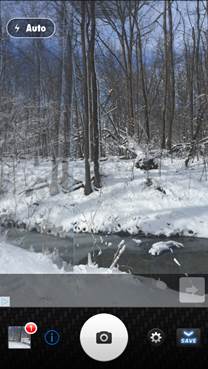
Before you shoot, decide on your composition-what do you want in the photo and what should be left out? Make a mental note of where you would like the image to start and stop. Then, holding your camera vertically, point the camera to frame the edge of that image you have in your mind. You'll be moving the camera in the direction the arrow is pointing-if you want to switch directions, just tap the arrow.
Once you press the shutter release, sweep the camera around to capture the entire view. The iPhone is very intuitive here-the on-screen instructions will help by telling you if you are moving the camera too fast. Try to hold the camera straight as you move without adjusting up or down-you'll want the white arrow to stay on the yellow line.
The iPhone will automatically stop once you've reached the camera's limit, at about 180 degrees, or if you don't want a view that wide, simply press the shutter button again once you've reached where you'd like to stop.
How you hold the camera is very important-it's best to move the camera as little as possible when shooting a panorama. Of course, you have to move the camera a bit when shooting a panorama. Instead of moving your feet, stay in the same position and turn your upper body slowly to capture the entire scene, swiveling at your hips. Remember, try to hold the camera as steady as possible without moving the iPhone up or down.
Unlike the pano mode, the Panorama app by Limit Point allows you to take single photos, then use the on-screen guide to line up the next image. While the app has some limitations, it's free and corrects some of the perspective errors, where straight lines appear to tilt, in the native camera pano mode.
Determine where you would like the panorama to start, then tap the shutter release. The app will record the image, then display a transparent section of that image to help you line up the next shot. Instead of only moving your camera, this app works best if you move your feet. Try to move in a parallel line over, so that you are the same distance from your subject. Move to the right until you see the first image overlap with the next section. Once they start to line up, pause and try to get the two images to line up as closely as possible. Once they line up, hit the shutter release to take the next photo. Repeat these steps until you've captured the entire view. Then, click save on the bottom right to merge the photos together.
By default, the app limits panoramas to three photos, but you can change that in the settings. Tap on the icon towards the bottom that looks like a gear and use the photo limit slider to increase the number of photos you can stitch together. The more photos you stitch together, the larger the file will be-which means more resolution, but slower processing. Under this setting menu, you can also access options to blend the exposures together better as well as how much overlap from that previous image that you see on the screen.
Because you can move your feet instead of just moving the camera, images from this app are less prone to the perspective distortion that makes straight lines appear to curve. If you try moving your feet instead of the camera in the native app's pano mode, the image doesn't stitch up together properly.
Unlike the Pano mode and Panorama, DMD panorama creates interactive 360 degree panoramas. While a typical panorama could be printed on the wall, Panorama DMD instead creates a 360 degree image that you can swipe through to see the entire perspective, like a 360 degree reality.
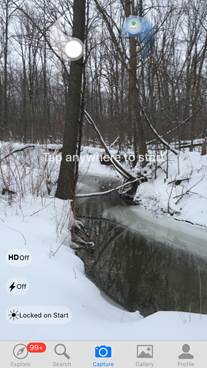
DMD Panorama is also simple to use. To take a panorama, you'll need to tap the camera icon in the bottom middle for the shooting mode. On the bottom left, you can turn HDR on and off, or turn the flash on. The option with the sun icon is for exposure-you can use auto, or lock the exposure so that it doesn't change in between shots as you circle around.
To start shooting, tap the anywhere on the image. Then, move to the the left of right. When you see the ying-yang come completely together, pause and the app will automatically take another image. Continue turning and taking the picture until you've completed an entire circle (the icon in the ying-yang will appear green). Once you've finished, you can save and share the image. If you tilt your phone horizontally, you can turn the phone to view each different perspective of the 360 panorama.
Since a panorama is several photos stitched together, they're more prone to error and odd image glitches. But, most are easy to correct. If you see:
- Gaps or steps in the image: You moved the camera too quickly and it didn't capture the entire image. Reshoot, moving the camera slower this time.
- Odd image shapes: Panoramas can capture views that are even wider than what the human eye can see at once, which creates some perspective errors where straight lines appear to tilt. Objects that are farther from the camera are less prone to these perspective errors, so the easiest solution is to move farther away from those objects. If that's not a viable solution, use another app such as Panorama and instead of staying in one position, take one photo, move to the side and line up the images on the screen. By moving from side to side, you'll avoid those tilting lines. Don't try moving side to side while the image is being taken with the native camera app-the images won't line up.
- Ghosting: If you see what appears like a ghostly figure of an object, that object moved while you were taking the panorama. In general, panoramas should be used for still subjects (we'll talk about an exception next). Since panoramas are several images stitched together, movement will create odd effects in the image.
Getting Creative With Pano Mode
The pano mode is a great feature, but it also lends itself to a few camera tricks that you can pull off without any editing.
Clone a person
In Photoshop, you can merge multiple images so that one person appears several times in the same image. You can achieve the same effect with the pano mode. Start with the person frozen in a position and slowly start to pan. Once you've passed them, have them run around behind you to the other side and freeze in another position. The key is for them to run fast enough (and for you to move the camera slow enough) so that they can get into the second position before you've moved the camera over that spot. While it takes some speed and a few attempts, it's a fun way to create a "twin."
Motion distortion
Anything that moves during the pano mode will get distorted-but that can lead to some fun shots as well. Try moving the camera at the same speed as the subject moves-then have them freeze at the end. You'll end up with a streak ending in that frozen position. Odd? Sure, but it's another one that's fun to experiment with.
The pano mode on the iPhone (4s and later) is an excellent feature that captures wide views without any editing. While the mode is great, using an app can get you even more features. And when you think outside of the traditional panorama, you can use pano mode to get some odd effects, without any editing.