Lightroom makes it easy for you to import your images into the program. You can directly import images that you have stored on your computer, but you can also import images from a memory card, camera, phone, external hard drive, and the list goes on. If you have a device that stores images, and you have a way to transfer those images to your computer, chances are you can import directly into Lightroom.
In this article, we will learn how to:
-
Import from a digital camera
-
Organize copied photos into folders
-
Create an import preset
-
Make a backup file
-
Rename image files
-
Import images from a hard disk
-
Add metadata
-
Import images using drag and drop
-
Import video
-
Import images from Photoshop Elements or another catalog
-
Use tethered shooting
Importing from a Digital Camera or Memory Card
To import images from a digital camera or memory card, you first have to set preferences in Lightroom so that images are imported when you connect your camera or memory card to your computer.
Go to Edit>Preferences, then click the General tab.
Next, go to the Import Options section. Make sure that there is a checkmark beside Show Import Dialog When a Memory Card is Detected.
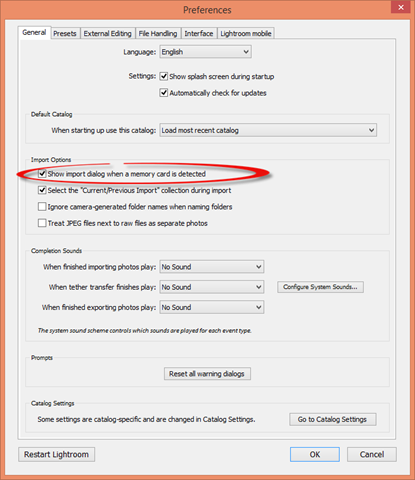
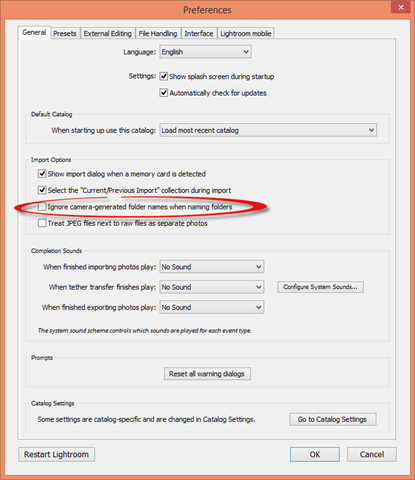
Chances are, when you use your camera to take pictures, your camera creates folders and folder names to store the images. If you do not want to use those folder names, put a checkmark beside Ignore Camera-Generated Folder Names When Naming Folders.
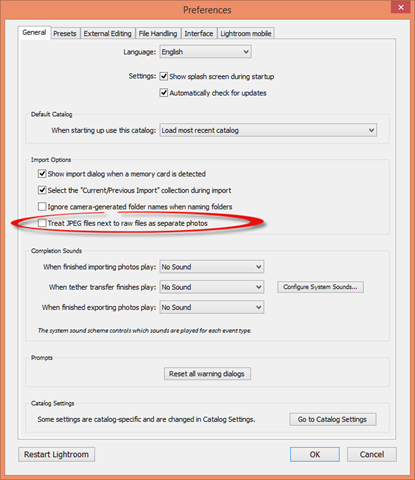
If your camera records RAW images, it may also create JPEG versions. If you wish to import both versions, put a checkmark beside Treat JPEG files next to raw files as separate photos.
Click OK when you are finished.
Now you can connect your camera or memory card to your computer. If you see the AutoPlay dialogue box appear on your computer when you do this, double click on Import Photos Using Photoshop Lightroom.
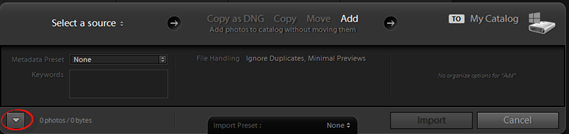
If you do not see the Adobe Photoshop Lightroom dialogue box appear once you have followed these steps, you will have to open Lightroom, then go to File>Import Photos and Videos. However, the dialogue box should appear in compact mode. You can click the downward arrow on the lower left hand side to see the expanded box.
The expanded box looks like this:
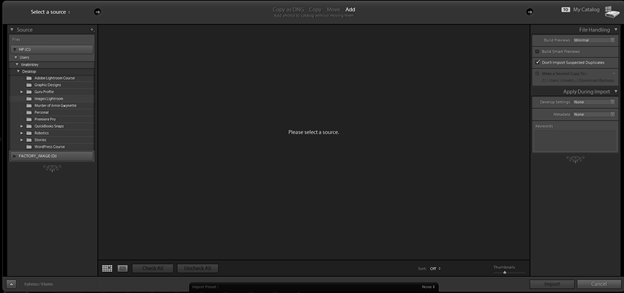
Always start out with the top panel when importing photos.
Go to Select a Source and select the source that contains the images.

Next, tell Lightroom how to handle the files that will be imported. You can choose Copy as DNG, Copy, Move, or Add.

Select the destination where the files will be copied, as well as any keywords or metadata that are applied to the images.

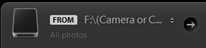
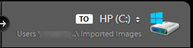
Your camera or memory card should now show as the source or the "To" in the Import dialogue box.
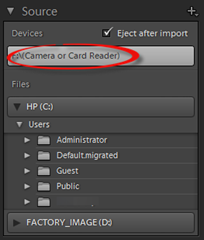
If your memory card is listed as a removable device, such as ours is, go to the Source panel in the Import dialogue box. Select it from the Files list, as shown below. You also want to be sure the Include Subfolders option is checked.
Next, go back to the top panel. Choose Copy from the import type options.

You want to choose Copy so that the photos are copied from the camera or memory card to your hard disk, then added to your catalog. This way, the original photos are left on your camera or memory card.
Below the import options, you will see this:

Leave this on All Photos. However, you can move your mouse over New Photos and Destination Folders to learn what these options do.
Now you can go through the images in the work area and uncheck any that you do not wish to import.
Do NOT click the import button yet. Continue on through this tutorial so we can continue to show you the correct way to import images.
Organizing Copied Photos Into Folders
Before you import images from your memory card or camera, you want to set up Lightroom so that those images are organized into folders for you.
Go to the right panel group. Collapse all the individual panels except for the Destination panel.
Click the plus sign at the top left hand side of the panel.
Choose Create New Folder from the context menu.
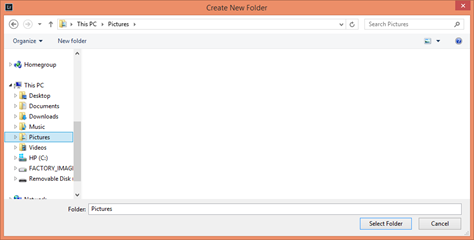
Click New Folder, as shown in the snapshot above to the right of Organize.
Name the new folder Imported Images.
Press Enter.
Make sure the new folder is selected, then click the Select Folder button.
The new folder is then listed as the Destination folder.
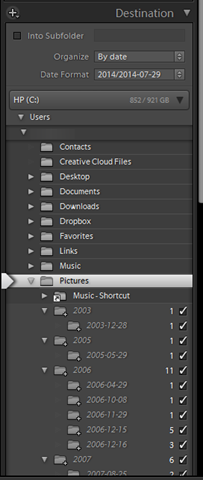
Now you can use the Organize menu in the Destination panel to organize the images as they are copied on your hard disk.
These are your options:
-
Into One Folder . This will copy all images into the folder you just created.
-
By Date will organize them by capture date. The image will be copied into your folder, then organized into subfolders by capture date, based on the date format that you select.
We are going to choose Into One Folder.

Next, click the Into Subfolder checkbox (shown above). Enter a name for the subfolder that will contain the images.
About Import Presets
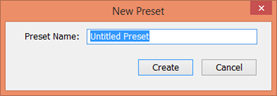
If you are regularly importing photos into Lightroom, you can speed up the process by creating import presets. An import preset can include the source, import type, file handling and renaming options, keywords, and destination.
To create a preset, set up everything in the Import dialogue box, then select Save Current Settings as New Preset from the Import Preset menu. This is below the Preview pane, as shown below.
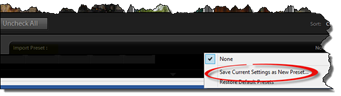
Name the preset, then click OK.
Making a Backup
Lightroom gives you the ability to create a backup of your images at the same time that you add them to the catalog.
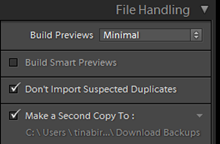
To create a backup, go to the Import Photos dialogue box, then expand the File Handling panel on the right.
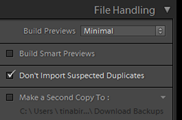
Put a check beside Make a Second Copy To:
Next, click the triangle to the right of the option that you just checked. Select Choose Folder so you can specify a folder for the backup copies.
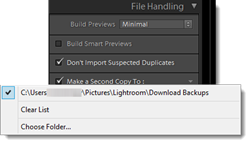
Locate the folder you wish to use, then click Select Folder.
Renaming Files
If you want to rename your image files as they are imported, expand the File Renaming panel in the right panel group.
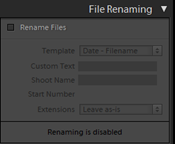
Put a checkmark beside Rename Files.
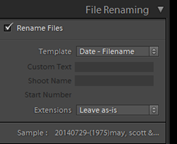
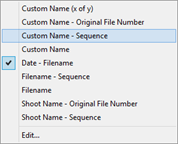
From the template menu, choose Custom Name � Sequence.
Next, type a name in the Custom Text box, then press Tab on the keyboard.
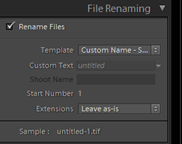
If you look at "Sample" at the bottom of the panel, you can see how your images will be named. The first image will be the name you specified with a "1 following it, the second a "2," and so on.
Now, choose Custom Name (x of y) from the Template menu.
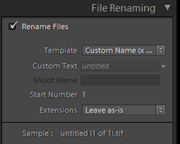
In the snapshot above, you can see the new file name.
Next, choose Edit from the Template menu.
You will see the Filename Template Editor.
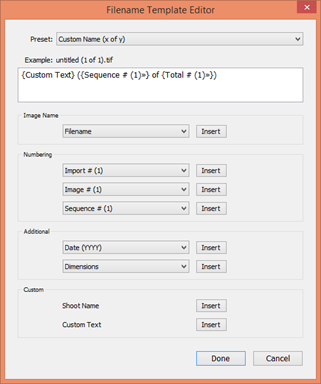
In this dialogue box, you can choose to have filenames that uses the metadata in your images. This includes capture dates, file names, ISO settings, etc.
Click Done when you are finished with changes.
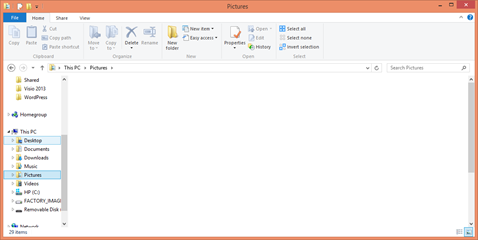
Importing from a Hard Disk
When you import from a hard disk instead of from a camera, you can add them to your catalog without moving them from their location, as well as copy them.
To import images from a hard disk such as your computer, CD, DVD, or external storage:
Go to File>Import Photos and Video.
Next, go to the Source panel on the left and find the folder that contains the images.
Choose Add from the import type options in the top panel.
Uncheck any images that you do not wish to import.
Go to the Source panel. Uncheck the Include Subfolders option.
Do NOT press the Import button yet.
About Metadata
Metadata is attached to image files and provides information about the image, such as flag status, creation date, keywords, etc. You can metadata to your images to make it easier to organize and sort; however, some metadata is already generated for you whenever you take a photograph.
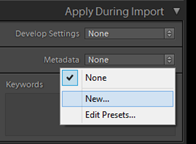
To add metadata, go to the Apply During Import panel on the right.
Select New from the Metadata menu.
Enter a name for the photos you are importing in the Preset Name field (shown below).
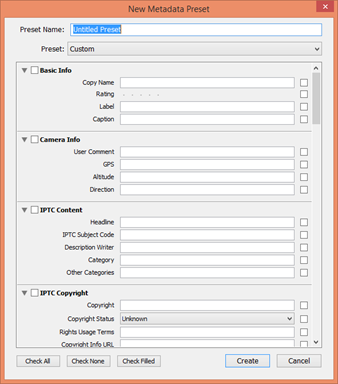
Next, enter any metadata that applies to the images, such as copyright information.
After you import the images, you can add metadata for individual images as well.
Click the Create button when you are finished.
NOTE: If you want to edit metadata, select Edit Presets from the Metadata menu.
Go back to the Apply During Import panel. This time choose None from the Develop Settings menu. Add keywords in the Keywords text box.
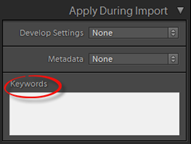
Remember, these are keywords for all images, not individual ones.
Next, go to the File Handling panel. Select Minimal from the Build Previews menu.
When you are finished, you can click the Import button below the right panel group.
Once you click Import, all your images are imported into your catalog. You will see thumbnails of the images in Grid view.
Using Drag and Drop to Import Images
To import images by drag and drop, open Windows Explorer. This is usually shown in your taskbar (on your computer, not in Lightroom) and looks something like this:

When you open Windows Explorer, you will see this:
Position the Windows Explorer so you can see the Grid view in Lightroom behind it.
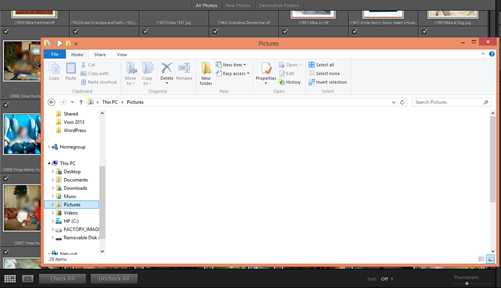
Open the folder that contains images that you want to import.
Go ahead and add any metadata in the Apply During Import panel.
Now drag an image from the folder in Windows Explorer to the Grid view. All images in the folder will appear in Grid view; however, only the one you dragged will have a checkmark above it (to be imported).
You can put checkmarks above all images that you want to import, then click the Import button.
Importing Video
You can also import video into Lightroom. To do this, go to File>Import Photos and Video.
Use the Import dialogue box just as you would for photos, except this time import a video.
In Grid view in the library module, you can go backwards and forwards in your video by moving the mouse over the thumbnails to select a clip.
Just as with photos, you can view a thumbnail in Loupe view by double clicking on it.
Importing from Photoshop Elements or Another Catalog
If you have ever used Photoshop Elements before, you know that Elements also creates a catalog of all your images. You can import those files into Lightroom complete with metadata such as ratings, keywords, and labels.
To do this, go to File>Import from Another Catalog.
Find the catalog on your computer, then click the Open button.
Tethered Shooting
Tethered shooting refers to a process where you connect your camera to your computer. The images you capture are saved to your hard drive instead of the memory card. When you use tethered shooting, you can view the images as you take them.
You can also use tethered shooting and capture images directly into Lightroom using many DSLR cameras on the market today, including many Canon and Nikon cameras � without using any additional software. If your camera is not one that is supported by Lightroom, you can use the image capture software that came with your camera or other third party software.
Here is how to take images using tethered shooting with a camera that is supported by Lightroom:
First, connect the camera to your computer, then go to File>Tethered Capture>Start Tethered Capture.
You will then see the Tethered Capture Settings dialogue box.
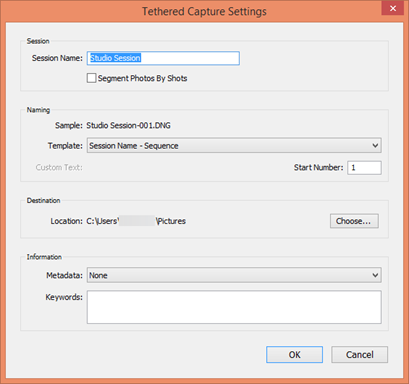
Type a session name in the Session Name filed. A folder will be created inside the destination folder.
Next, choose a naming scheme for the images.
Add any metadata that you want, then click OK.
As you take pictures, these images will show up in the Grid view and the Filmstrip.
To use tethered shooting with other cameras, use the third party image capture software provided by the camera maker and save your images files to a watched folders. Lightroom will take the images from the watched folder and add them to your catalog.
A watched folder is simply a folder that you tell Lightroom to watch. Whenever images are added to it, Lightroom moves them to a location that you specify and adds them to your catalog.
NOTE: Make sure you specify the watched folder to your third party software as the folder where your images should be saved.
Next, go to File>Auto Import>Auto Import Settings in Lightroom.
You will then see the Auto Import Settings dialogue box. Click on the first Choose button to select the watched folder.
Next, put a checkmark at the top of the Auto Import Settings dialogue box to enable Auto Import.
By the second Choose button under Destination, name the folder where our photos will be saved as they are added to your catalog.
Choose a file naming option.
Click OK when you are finished setting your options.