Perhaps this scenario sounds familiar: You stumble across an amazing scene that takes your breath away. You snap several images of the sight, but when you look at them later, they don't have that wow factor that originally took your breath away. So what gives?
The camera isn't nearly as capable as the human eye-while technology is getting closer, replicating an exact scene is hard to do, especially when that scene has a lot of contrast. A camera can only capture a limited range of light in one image. When there is a lot of contrasting light in the scene, one or both of the lightest or darkest areas can't be captured accurately-they'll turn up darker or lighter than they originally did.
The range of light and dark that a camera can capture in a single image is called the dynamic range. Dynamic range is dependent on your camera's exposure settings-so, while one set of settings may capture the mid-tones well, it may turn the lightest areas into white blobs and the darkest ones into deep shadows with no detail. Another group of exposure settings may get the darkest parts of the scene well, but then leave the rest of the image too light. Another set of ISO and shutter speed options will capture the lightest parts of the image well, but leave the rest of the shot too dark.
HDR is a tool that's used when the photographer (or even the camera) recognizes that the light is too extreme to capture all in one frame. By choosing to shoot three (or more) images all at different settings, you can capture a set of images that captures the entire range of light. With digital software or an app, those images can then be merged, creating a photograph that includes a wider range of light than is possible from a single shot.
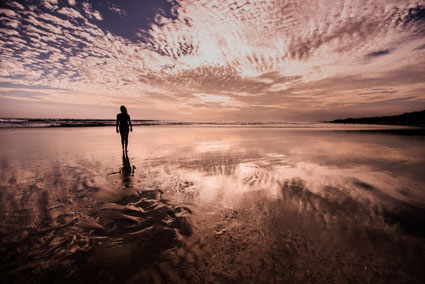
HDR photography has several advantages. The biggest is that, with HDR, you can capture scenes that would otherwise be rather lackluster. You've probably snapped a photo before on a partly cloudy day and noticed that the sky was more gray in your picture, even when it was blue in real life. That's because the sky is much brighter than the land, and the camera can't properly expose both the sky and the landscape in a single image. HDR solves that issue, allowing you to capture the beauty of both.
Often, scenes will also loose quite a bit of detail in the darkest parts of the image. Shadows often obscure the details that we can make out with our eyes, but can't see in that initial snapshot. HDR, besides just allowing you to capture that blue sky, will also bring out more of the detail in the shadows that you couldn't see with the original picture.
But, there are a number of disadvantages to HDR. First, you can't use HDR on a moving subject. If the something in the scene moves in between the photos, the software won't be able to merge them together properly because the images aren't the same. If you try HDR on a moving subject, you'll see what appears to be a ghost-like figure of the object that moved.
While that means HDR obviously can't be used for sports photography, movement comes into play in more subtle ways as well. If you try to create an HDR of an ocean scene or river, the images won't line up because the water is moving. Even wind going through the trees can create ghosting in HDR images. For scenes with moving water or other subtle movement, HDR most be done with long exposure images that blur the movement uniformly. If the waves on the water is blurred from a long shutter speed, then it's possible to merge those images for HDR.
But movement doesn't just come into play in the scene. If your camera moves between the shots, they won't line up properly and you'll wind up with ghosting across the entire image. That means your photo won't be sharp. To successfully shoot HDR, you'll need a very steady hand or, preferably, a tripod to keep the camera absolutely still in between the shots.
The native iPhone app includes an automatic HDR mode that will blend three images together automatically. By tapping the HDR on the top of the screen, you can turn the feature to on, off or auto. On and off allow you to control what image uses HDR and what ones don't. Auto allows the camera to decide when to use HDR. To avoid ghosting from moving objects, it's best to use the on and off settings so you don't use the HDR feature with motion. Since the HDR feature takes the photos in quick succession, you can often just keep your hand steady and don't necessarily need a tripod for this feature.
While the HDR feature on the native iPhone app is handy, it has a few limitations. First, you are limited to only combining three images. Second, since the images combine automatically, you don't have any control over how intense the HDR effect is.
But, once again, the beauty of using an iPhone for photography is that you aren't limited to just the camera features that came installed on your phone. The ProCamera app, for example, has a $1.99 add on that allows you to choose from a number of different HDR preset styles to get an effect closer to what you envision.
Pro HDR X has an interface that looks very similar to the native iPhone camera app. At the bottom, you'll see a zoom option on the left, the shutter release in the middle and settings on the right. At the top, the available options include flash, HDR settings, grid and switching from the rear to front-facing cameras.
HDR is of course what Pro HDR X is about, so start by tapping the HDR option at the top of the screen. Select auto then try snapping a picture-if you are sitting inside, take a photo that includes both the wall and window, since this is a good high contrast test for HDR.
When using an automated HDR preset, the camera chooses the best settings-just like shooting on auto, presets don't always get the best results. That's where the Pro HDR X app sets itself apart from the other options. If the photo you just took didn't offer the best results, tap the HDR option at the top and choose manual instead.
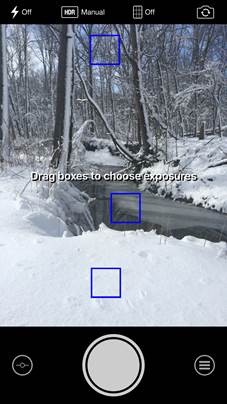
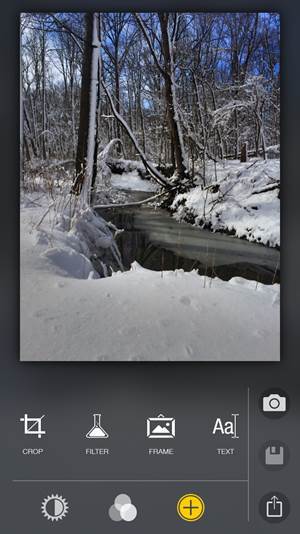
Three blue boxes will pop up on the screen. These blue boxes designate the different exposure settings of the three single photos that are merged together in the final HDR. Pull each of these three boxes to an area in the image that you want to be well exposed-ideally, try to put one box on a light area, one on a dark area and one on a tone in the middle.
If you are still pointing the camera at a window, you'll want one box on the window, one inside but close to the window and the third inside but the furthest from the light. In the screenshot above, placing a box on the sky emphasizes the blue color, while the other two ensure the snow and water are also well-exposed. The areas around the three boxes will be well-exposed in the final image. If you tried the auto HDR mode and there was an area that was too dark or too light, drag a blue box to that area in manual will correct the issue.
By designated the most important areas to expose for in the manual HDR mode, you'll capture results that are more in-line with the vision you have in your head. Once you snap the photo, you'll have the same adjustment options that you did with the auto HDR.
Once the photo is taken, the app will take you to a screen that allows you to customize the way those three photos blend, even using the auto HDR setting. The three icons at the bottom right display the different options-the sun for exposure settings, the three circles for color options and the plus for extras like cropping and filter effects.
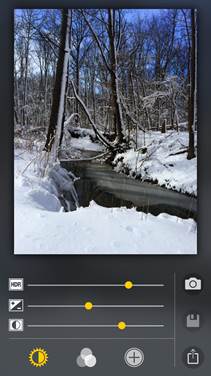
In that first editing panel, the one with the sun selected, the top option will adjust the HDR effect from minimal to intense. Try moving the slider back and forth and watch how the lightest and darkest portions of the image change. This is a good way to ensure that your HDR photo doesn't look overdone. Underneath, the slider with the + and - icon is the exposure compensation to lighten or darken the image. The last option, designated by a circle that's half black half white, is the contrast slider to enhance or reduce how different those lights and darks are from each other.
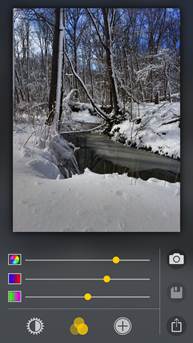
Tapping the icon with the three overlapping circles gives you access to the color settings. The first slider will adjust saturation-if the automated HDR looks a bit too fake, try moving this slider to the left a bit. The next two sliders are tint: one a blue and red and the other a green and purple. These sliders can be used to fix an unusual color hue.
The final plus icon gives you access to other non-HDR editing options, like cropping your image or adding text or a filter, so you don't have to use a separate editing app if you don't wish to.
At the top, the first icon with the arrow allows you to share the image. The second with the floppy disk saves the photo and the third takes you back to the camera (make sure you save before heading back or you'll loose your shot).
There's one more very helpful feature inside the Pro HDR X app-merging together images that you've already taken. This feature works best when used with a tripod to prevent ghosting, since any movement between shots will be noticeable. To use the manual merge feature, click the settings icon in the lower right corner of the camera mode, then tap the icon that looks like a set of photos. You'll be taken to your image library, where you can then choose up to three images to merge together.
Why manually merge images? You can only select three photos to merge, but if you select two or three HDR photos, you'll get an effect similar to merging together six or nine images instead of just three. Most of the time, three photos will work fine, but if those three still aren't getting the level of details in the highlights and shadows, that's another method to try.
In general, you can frame your HDR shots just like you compose a normal shot, but, there are a few tricks that can help you get even better HDR shots:
- Use a tripod. While not absolutely necessary, especially when using the automated HDR modes, using a tripod will lead to sharper shots. Sharpness is one of the things that you can't correct with an editing app, and moving the camera even just slightly between shots will result in a lack of sharpness.
- Use HDR only when it's necessary. HDR is best for scenes with a lot of contrast between light and dark areas. If you take the shot without HDR and you see white areas or very dark shadows, that's a good sign you should try HDR with that shot.
- HDR is an excellent technique for creating more dramatic skies. If you are trying to capture the puffy white clouds or perhaps a storm brewing on the horizon, HDR is a good tool. Since the sky is often much brighter than the land, HDR allows you to expose both the sky and the land properly, without loosing any of those details in the sky.
- Look for over-saturated colors. If your final image looks more like a painting than a photograph, go back and try the shot again, using those sliders in Pro HDR X to bring down some of the saturation and contrast. Unless creating a painting-effect is your goal, use the sliders to recreate what you saw without overdoing the effect.
- Don't forget the rest of the tricks and techniques. HDR is a great technique, but make sure you use it with what you've learned about composition and light-you'll create a much better image that way.