Operating the iPhone video controls is rather simple, but just like in the camera mode, there are a few hidden features that you could be missing out on if you don't explore completely.

To shoot video, simply slide the mode slider in the native camera app over to video. At the top of the screen, you can choose to turn the flash on as a continuous video light and whether or not to use the rear or front-facing camera.
The touch controls for video are identical to those for still photos. Tap the screen to focus. If the exposure isn't quite right, tap the sun next to the yellow focus box and move the slider up and down. Zoom is available, but remember it's digital zoom and will reduce the resolution of your video, so it's best avoided. If you absolutely need that digital zoom, pinch the screen to access it.
The focus and exposure lock feature (which also works in photos) can be very handy for shooting video. Because of the way that the iPhone's focusing system works, in video, the focus may lock and then continue to adjust, even when the subject isn't moving. If you are shooting a stationary subject, this continuous refocusing can be distracting. Locking the focus is a simple solution-make sure both your phone and your subject won't move during the recording though, or the video will wind up out of focus. To lock the focus and exposure, tap the object that you would like to lock in focus and hold until the yellow AE/AF Lock box appears.
While much of recording video on the iPhone is similar to taking stills, video has a few more concepts to understand. A video is made up of frames-basically, still pictures that are recorded very quickly. How many individual frames the camera captures in a single video plays a significant role in the quality of the footage.
When the video camera records more frames per second (or fps), the motion in the video is much smoother. Why? The more frames that are recorded in one second, the smaller the difference is in between each frame. Slower frame rates can make motion appear a bit choppy, especially when recording fast motion.
By default, the iPhone camera is set up to record 30 fps, which isn't the highest quality available. To record the faster, smoother 60 fps video, hit the settings icon from the home screen, then tap "Photos & Camera." Under the camera options, click the "record video" to choose a different frame rate. The best frame rate available on current iPhones is 1080p HD at 60 fps; the iPhone 6S can record 4K video at a higher resolution but lower frame rate.
Concepts in composition such as the rule of thirds will also apply to videos. Just like you don't want to crop a portrait at the subject's joints, watching where you crop in shots of people is important for videography as well. Looking for lines and patterns can also create a dynamic shot as well.
But, there are a few differences in composing a video versus a still shot. A photograph can be shot holding the iPhone horizontally or vertically. Video is a bit different, however. Consider the shape of your TV screen and computer screen-both horizontal. Because video is viewed on horizontal screens, it's best to only shoot video horizontally. That way, whether you view the shot on a computer or TV, your footage will fill the screen, unlike a vertical video.
Video often deals with a moving subject-in your composition, it's important to leave enough room for them to move. If you are using the rule of thirds, leave the empty space in the direction they're headed. This concept also works well for action photography, but is essential to recording better video.
Another video technique using the rule of thirds helps to leave enough "head room." If you place the subject's eyes on the top horizontal grid line in the rule of thirds, no matter how close or far away you are, you'll have a solid composition without leaving too much or too little space around the subject's head. It's generally okay to crop off a subject's hair in a close-up, but avoid cropping their chin-keeping the eyes on the upper grid line even while shooting close will help guide your close compositions to avoid awkward shots.
The iPhone is also capable of capturing slow motion video. In slow motion mode, the camera will capture more frames per second but slow down the rate those frames play. The latest iPhone can record slow motion videos at 120 fps or 240 fps. Recording that many still frames so quickly means taking in a lot of data, however. In order to process all that information, slow-motion video is shot at a reduced 720p resolution.
To record in slow motion, just use the mode slider to swipe over to SLO-MO in the native camera app. You can also go back into the settings and reduce the frame rate of the slow-motion videos to save space, but the default this time gets you the best quality.
Shooting slow-motion video is very similar to recording regular footage, but there's a few differences to understand to get the best results.
First, the camera is capturing 120 to 240 still photos in one second-in order to do that, the shutter speed has to be very fast. Because the frames are being recorded so quickly, slow-motion videos require more light-so if you are planning the shot, try to shoot outdoors or in an area with plenty of light.
Slow-motion videos also don't have sound. The iPhone will catch a bit of sound at the beginning and at the end, but if you want sound, plan to add music or a voice over with an editing app after the fact. Since slow motion videos slow down time, you'll probably also want to use an editing app to trim off any excess-a one second pause will seem much longer in slow-mo.
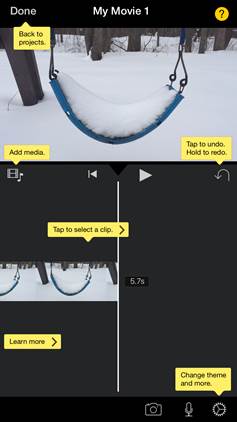
To start editing a video, tap on the footage in the video section. At the bottom, you'll see the same share icon that's in the Photos app-tap it, then tap create movie. You'll be directed to create a new movie, or add the video to an existing project. Alternatively, you can tap the projects tab, and then touch the plus sign to start a new project-you'll be directed to a screen to choose a theme first.
Once you've created the new project, you'll be taken to editing screen. At the top of the screen, you can preview your movie by pressing the play button. Below that, video clips and photos are displayed on a timeline. The timeline is a quick visual representation of your movie-the longer the clip appears in the timeline, the longer that portion of the video is. The timeline also shows the order that your clips are in. You can tap on a video within the timeline to access additional editing options The white line running through the timeline shows where in the video the preview is at-to preview different parts of your project, tap and drag to change the position of that white line.
Just below your movie clip and above the timeline on the left, the music note and film reel icon allows you to add additional videos, still photos or music-simply use the tabs at the bottom to navigate through the media on your device, then tap the element you'd like to add. Photos are added when tapped. For videos and music, tap the play button for a preview and the arrow pointing down to add to your project.
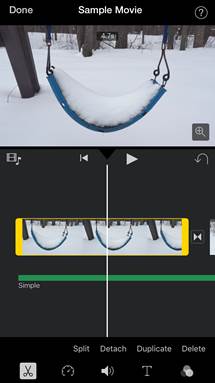
Back on the project screen, to re-order the clips, tap and hold, then drag to the desired spot in the movie timeline. In between clips, you'll also see two arrows pointing at each other-tap this section to add a transition, such as a fade or dissolve effect. You can choose the length of the transitions as well at the bottom of the screen, from between .5 seconds to 2 seconds. To shorten a video, tap on the clip, then drag one of the yellow ends in.
What if you want to add a photo or another video clip in the middle of a recording? iMovie allows that as well. Tap on the footage you'd like to split. Click detach, then split. Move the white line to where you'd like to divide the movie at. (At any time, you can press the play button to get a better idea of where you want to place that white line).
On this same screen (accessible by tapping on a video clip), there are a few more options for mixing your videos together. If you tap detach, then background, you'll see the audio from that clip become a green bar, which you can move so the audio plays during a different portion of the movie. You can also tap options to duplicate the clip, or delete it from the project.
There are a few more options available for editing single clips at the bottom of the screen. Tap the scissors icon, then tap and drag one end of the clip to cut out a portion of the video. Tapping the clock icon will allow you to speed up or slow down your video. The speaker icon allows you to adjust the volume for that particular section of the project. The "T" icon allows you to add text overlays. Once you select the style of type that you'd like to add, click on it in the video at the top of the screen to edit the text. The last icon, with three overlapping circles, adds a filter to that section only.
Once you are done editing the individual clip, tap the timeline or preview to go back to the original editing screen. You can also take a photo to add to your video directly from iMovie, or record sound to add-both options are at the lower right with the camera and microphone icons. The third settings icon at the bottom allows you to add filters, such as black and white or vintage, to the entire movie as well as choose a theme.
While videos and still photos appear as images along the timeline, audio appears as a green bar. Remember, you can add audio by tapping the music icon below the preview-you can choose from audio preinstalled with iMovie, or select songs from the Music app on your iPhone. You can tap on the green bar of audio for additional editing options, just like when editing a video clip, including volume options and choices to speed or slow the audio.
Once you're finished with your edits, click done at the top of the screen. If you decide to make further changes, you can access your video in the projects tab and click edit again. To save the edited video to your camera roll, access it in the project tab, then click the share icon in the bottom middle, then save video, and choose the resolution you'd like to save the project in. Once saved, you can access the edited video from the Photos & Video native app, just like you would an unedited video.
The iPhone is a good tool for shooting video. Combined with an app like iMovie, you can create more than just quick clips. Whether your intention is just preserving family memories or becoming a YouTube star, the iPhone can be a great video camera if you know how to use it.