These days, everyone uses some sort of sound on their computer. They use sounds to watch and listen to videos and movies, as well as to play music. Some even depend on sounds to let them know when they have a new email or another event on their computer is taking place.
In this article, we are going to discuss everything about the Mac that relates to sound. We're going to talk about playing sounds, editing sounds, play back sounds, and even enable your Mac to read to you.
Setting the Volume
One of the most important steps you can take before playing sounds on your Mac is setting the volume. To adjust the sound on your Mac, you can hit the volume controls on your keyboard. You can also click on the  menulet on the Menu Bar. To enable the menulet, go to System Preferences>Sound, then put a checkmark beside "Show Volume in Menu Bar."
When you click on the menulet, this is what you see:

Click and drag the slider up to increase volume. Click and drag down to decrease volume.
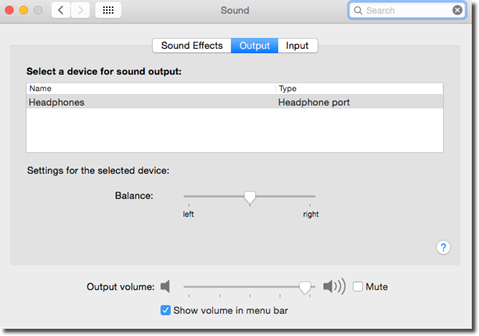
You can also go to System Preferences>Sound, then click the Output tab to adjust the left-to-right balance of your speakers.
About Alert Beeps
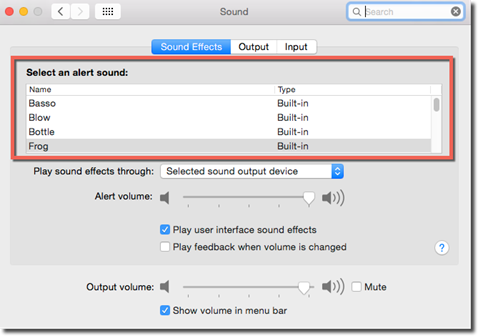
Alert beeps are what you hear when you try to type in an area where typing isn't allowed. To select an alert beep, go to System Preferences>Sound, then click the Sound Effects tab.
You can choose from 14 different sounds.
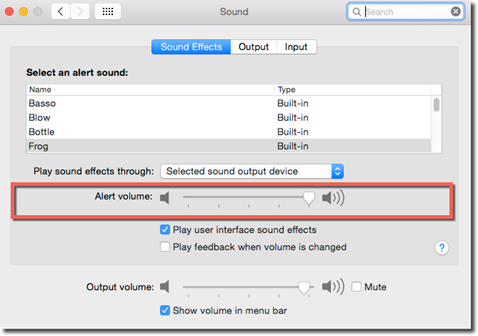
Once you've selected an alert, you can also adjust the alert volume.
Recording Sounds
It goes without saying that to record sounds, you need a microphone. Some Macs have microphones built-in, such as a laptop or iMac.
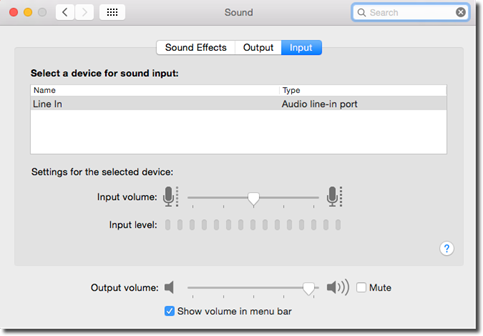
To let the Mac know which microphone you will be using, go to System Preferences>Sound, then click the Input tab.
Once you have your microphone set up, it's time to start recording. You will need software to record the sounds, such as QuickTime Player. You will find the QuickTime Player in your Applications folder.
Once you have QuickTime Player open, go to the Menu Bar and go to File>New Audio Recording.
You will see the following pop up window:
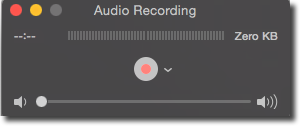
Click the red button in the center of the window to start recording.
When you record, your Mac creates a file for you. By default, it's named Audio Recording.mov, and it's stored in your Home>Movies folder. If you want to trim your recording, open the file in QuickTime Player. If you need to do more editing than just trimming, you'll need GarageBand.
About QuickTime Player
Most people know that QuickTime Player can be used to play movies. However, it can also be used to edit movies or record new ones. You can record your own movies using your Mac's built-in camera or by simply recording what happens on your screen.
To play a movie in QuickTime Player, double click on the movie file. When QuickTime opens, hit the spacebar to start the movie.
When you start to play the movie, you will see a control bar at the bottom of the window.
It looks like this:

Most of the controls in the control bar should be familiar to you. From left to right, there is the volume slider, Rewind, Play, Fast Forward, and Share. The scroll bar at the bottom of the window lets you jump to a different spot in the movie by either dragging the vertical line or clicking anywhere in the scroll bar.
If you go to the Menu Bar, then the Edit menu, you can rotate and flip the movie.
Editing Movies Using QuickTime
In addition to using QuickTime to play movies, you can also use it to edit movies.
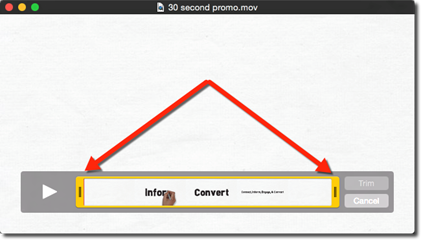
To trim the ends of a video, go to the Menu Bar, then to Edit>Trim.
Use the yellow handles on each end to drag inward and trim either the beginning, end, or both ends of the movie. When you're finished, press the Trim button.
You can also split clips. When you split a clip, you chop the movie into two pieces.
To split a clip, move the playhead to where you want to split the movie in two. Do this by dragging in the scroll bar. Next, go to Edit>Split Clip.
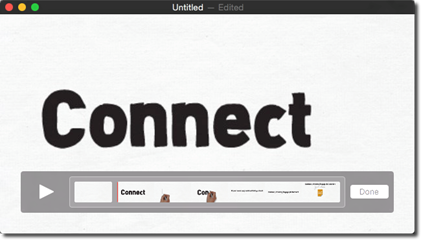
A clips map appears at the bottom of the window showing the two clips. Click the Done button when you're finished.
You can also trim sections of video from the middle of a movie. To do this, split the movie into two, then use the trim handles to trim away the end of the first clip and the beginning of the second.
In addition, once you use the Split Clip feature, you can rearrange clips by dragging them in the map.
If you want to combine two movies into one, start by opening the first movie. To add a second movie to the end of the first, go to Edit>Add Clip to End.
You will then see the Open dialogue box. Double click on the movie file that you want to add on to the first movie.
Recording Movies with QuickTime
You can record movies two ways. You can use the webcam that's build into your Mac, or connect a webcam, iSight camera, or a Firewire camcorder. You can also record a movie of your Mac screen.
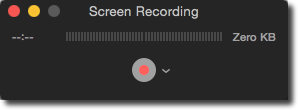
To record a movie, go to File>New Movie Recording. You will then see the recording panel where you can start recording.
To record screen movies, go to File>New Screen Recording in QuickTime.
Click the downward arrow beside the Record button.
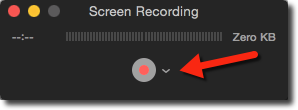
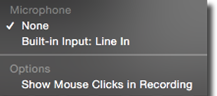
You will then see the following pop up menu to turn the microphone on.
Press the Record button to begin recording.
Click to record the full screen. Drag to record a part of the screen. Stop recording by pressing the stop button in the menu bar.

Your recording now opens in QuickTime.
To save the movie, go to File>Save. This will save your movie in QuickTime format.
You can also go to File>Export to save your movie in a different format.
Making the Mac Read to You
Most Apple programs have the ability to read to you. All you have to do is click to select the text within an Apple program, such as Mail. Right click, then go to Speech>Start Speaking.
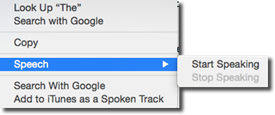
To stop Speech, right click again and go to Speech>Stop Speaking.
If you want to configure how the Mac talks, go to Dictation & Speech in System Preferences. Click the Text to Speech tab.
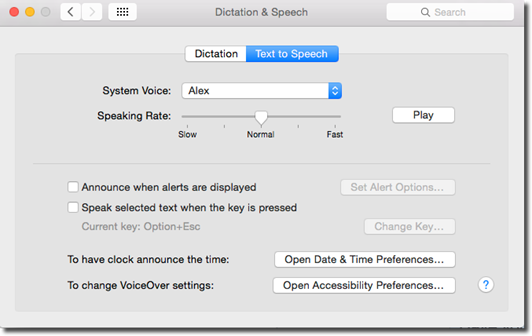
You can choose a new voice and change how fast the Mac reads text back to you. Click the Play button to preview any changes.
You can also have your Mac make a voice announcement when alerts are displayed -- or to speak the text on a page whenever a specified key is pressed.
VoiceOver
VoiceOver is a screen reader for the visually impaired. It reads text on a page, but it also allows you to control all buttons, menus, and other features without touching your mouse.
If you have a trackpad, you can use the trackpad to navigate over the page. VoiceOver will speak whatever is under your fingers. Flicking in either direction will move you to the next thing on the screen. You will also hear a sound when VoiceOver finds blank spaces.
To enable VoiceOver, go to System Preferences>Accessibility.
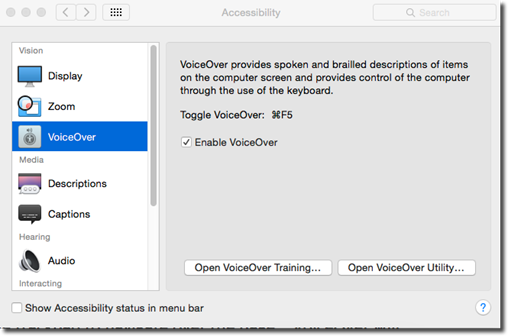
Click VoiceOver on the left, then put a checkmark beside "Enable VoiceOver."
VoiceOver will immediately start talking to you.
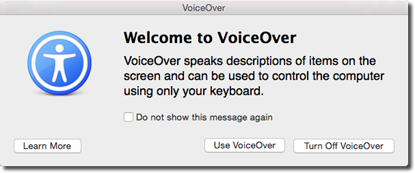
It will tell you to press the Spacebar to learn how to use VoiceOver.
You can also click the "Open VoiceOver Training" button in the Accessibility window.
About Ink
Ink turns your handwriting into typed text. However, to use Ink, you must have a graphics tablet connected to your computer. It won't even show up in System Preferences if you do not.
If you have a graphics tablet, plug it into your Mac. Ink is easy to use.
Go to System Preferences>Ink.
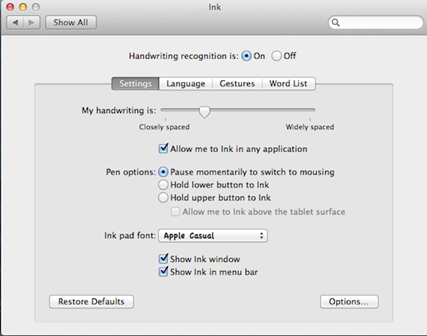
Turn handwriting recognition on, then adjust your settings to match your handwriting and preferences.
Just make sure that "Allow Me to Ink in Any Application" or "Write Anywhere" is checked so that Ink isn't limited to pop up windows.
The Ink window is pictured below. From this window, you can do handwriting or drawing, use text commands, and access settings. Ink must be open for you to be able to use it with other programs and applications.

Safari
Safari is Apple's web browser that comes pre-installed on Apple devices. You can use it to surf web pages, search for information, create bookmarks, and more. However, most of you know what a web browser does, and it's highly likely you've used Safari in the past. In normal circumstances, it might be unworthy of an entire article. This is not a normal circumstance, though, because Safari has been completely restructured for OS X Yosemite. We are going to dedicate thisarticleto learning about it.
Using the Address Bar and Search Bar
In OS X Yosemite, the Address bar where you enter the web address � or URL � of the website you want to visit is combined with the Search bar that you use to search for topics. There is no longer an Address bar, then a Search bar. Again, they are combined. This saves space and makes searching easy; however, it also means you must type out the .com (or .net, .org, etc.) when you want to visit a website like you could with Safari's old smart address bar.
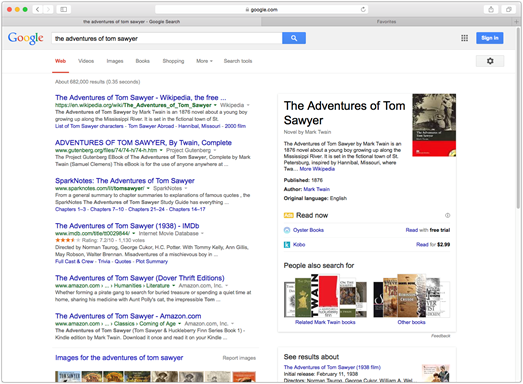
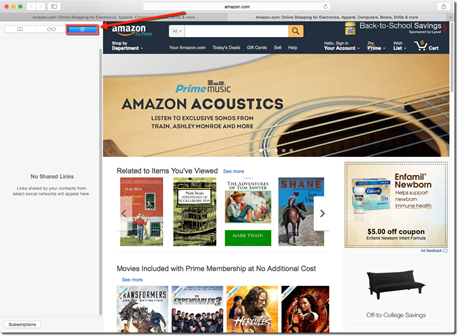
To use the unified Address/Search bar, type in either a URL or a search term. For example, you could type inwww.amazon.com if you wanted to shop for a book. If instead you wanted to learn more about a certain book, you could type in the title, such as "The Adventures of Tom Sawyer."
Safari would return with search results from Google.
Bookmarking Sites
If you visit a web page, you can "bookmark" that web page to visit again later. If you've spent any amount of time on the Internet, this is probably a feature you're not only familiar with, but use often.
To bookmark a site in Safari, go to Bookmarks>Add Bookmark.
You will then see this pop up window:
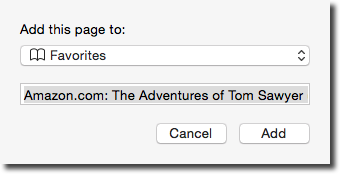
It asks you where you want to store the link to this page. By default, it is set to Favorites. However, you can also choose Bookmarks or Top Sites. We will discuss these in a few minutes.
You can also change the name of the page. You are not changing the name of the page itself, just the name of the link.
When you are finished, click the Add button.
Favorites, Bookmarks, and Top Sites
In the last section of this article, we learned that when you bookmark a site, you can add it to Favorites, Bookmarks, or Top Sites.
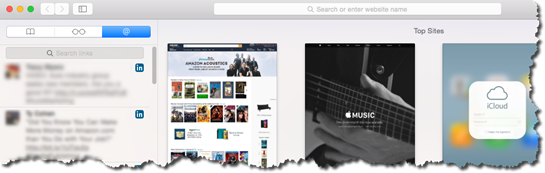
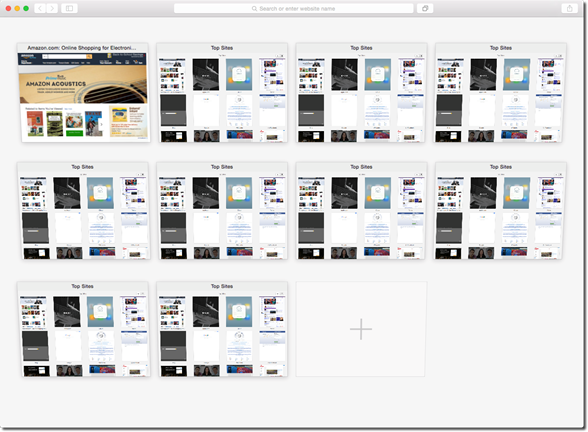
Top Sites is what you see whenever you open Safari and click the Top Sites button, as highlighted in the snapshot below.
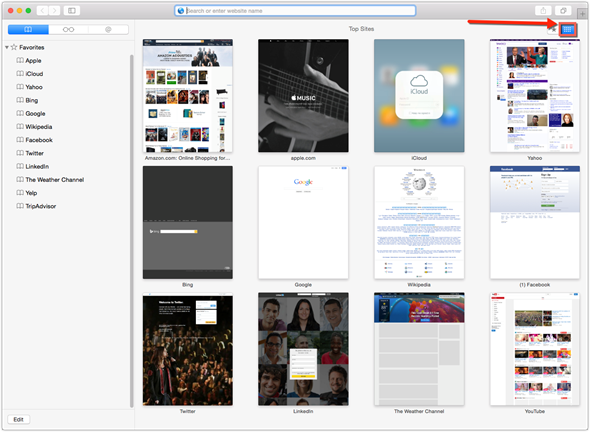
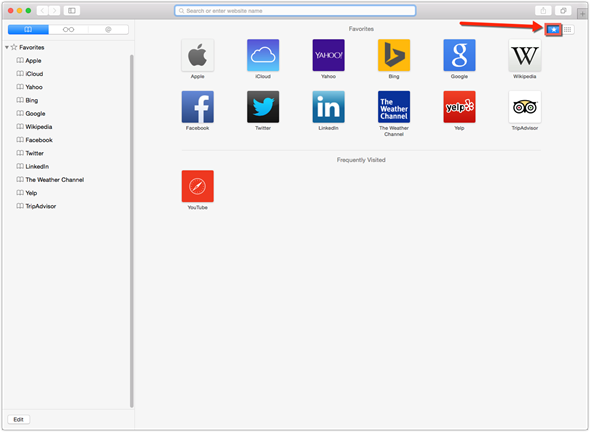
The button to the left of top sites, highlighted below, is the Favorites button. You can also bookmark a page to put it in your Favorites.
Sites that you bookmark and add to Favorites also appear with your bookmarks.
Another way to view your Favorites is the Favorites Bar. It is located directly below the Address/Search Bar.

If you don't see the Favorites Bar, go to View> Show Favorites Bar.
You can view your Favorites and Bookmarks in the Sidebar of Safari. Below we have highlighted the Sidebar button. If the Sidebar isn't visible, click the button to make it visible.

In the Sidebar on the right, you can see your Favorites. Just click the triangle next to "Favorites." You can also see all your bookmarked sites listed. We only have one at this time for Amazon.com.
You can also view your bookmarks by going to the Menu Bar, the clicking on Bookmarks.
In addition, you can create folders to organize your bookmarks by going to the Menu Bar, then Bookmarks> Add Bookmark Folder.
Full Screen Mode in Safari
To use Safari in full screen mode, click the green button � or the Full Screen Button � at the top left of the Safari window.

The Toolbar
The toolbar is found above the Address/Search Bar. Since there is no longer a Title Bar in Safari, the toolbar is at the top of the Safari window. It is pictured below.

You can also customize the toolbar by adding buttons and even removing the ones that currently appear by going to the Menu Bar, then View> Customize Toolbar.
Listed below are the options that you can add to the toolbar.
-
Back/Forward buttons. The Back button points to the left and allows you to return to the web page you previously visited. The Forward button points to the right will take you back to the page you were on before you clicked the Back button.

-
The Sidebar button opens or closes the Sidebar.

-
Show All Tabs shows thumbnails of all tabs you currently have open in the Safari browser. The button looks like this:

When you click it, this is how your tabs appear:
-
iCloud Tabs allows you to open whatever windows and tabs you had open on another Apple device.

-
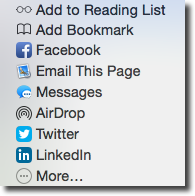
Share allows you to save or share the webpage. The button appears on the toolbar by default. It looks like this:

When you click on it, you will see this pop up menu:
-
Top Sites opens the Top Sites window.

-
Home takes you to the home page you specify in Safari> Preferences> General.

-
History shows a list of sites that you've visited recently in a window.

-
Favorites Bar hides or shows the Favorites Bar.

-
AutoFill. If you click it, Safari will fill in order forms with your name, address, etc.

-
Text Size buttons make the text smaller or bigger with each click.

-
Open in Dashboard. Click the button to select the part of the page you want to use to create a web clip.

-
Mail will open a new outgoing message in the email program that you use. In the subject line will be the name of the site you're visiting. The body of the email will contain the web page.

-
Print prints the web page.

-
Address/Search Bar. Clicking this will show or hide the Address/Search Bar.

-
Flexible Space isn't a button. Instead, you can drag it between buttons on the toolbar to adjust the spacing.

The Reading List
The Reading List in Safari will store web pages that you want to look at later. However, it doesn't just store a link to the page. It will download the entire page so that you can even read it if you're offline. It will also store any other pages you'll need to continue reading the web page.
Your reading list is found in the Sidebar by clicking the tab highlighted below.

To add a page to your reading list, you can:
-
Shift+Click on a link.
-
Click the plus button (+) that appears on the Address Bar when you move your cursor to the far left side of it.

-
Go to the Menu Bar, then Bookmarks> Add to Reading List.
-
Click the Share button. Select Add to Reading List.
Shared Links
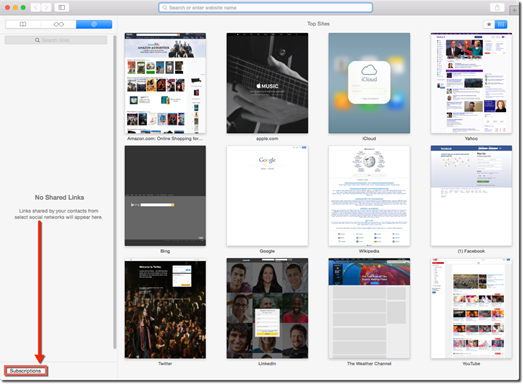
You might have noticed by now that there are three tabs in the Sidebar. We've already talked about Bookmarks and the Reading List.
The Shared Links tab is highlighted below.
The Shared Links pane will display tweets and posts from social accounts, such as Twitter and LinkedIn, that contain links. It also contains any RSS feeds to which you've subscribed.
To link Safari to your social accounts, as well as your RSS feeds, click the Subscription button at the bottom of the Sidebar.
You will then be able to click "Add Account" to add social accounts, as well as click "Add Account" to add an RSS feed.
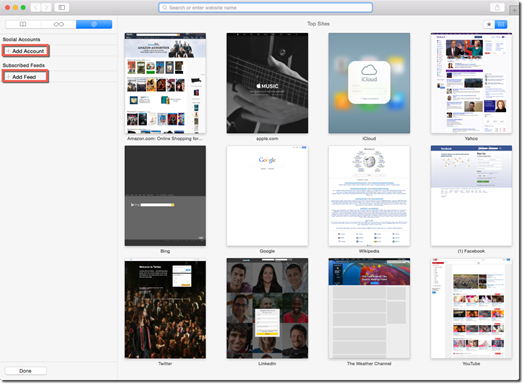
Let's add a social account.
When we click "Add Account," we see the pop up window pictured below.
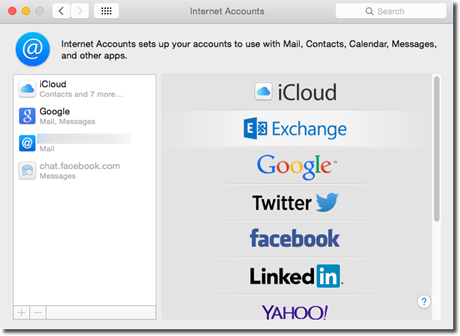
We are going to click on LinkedIn.
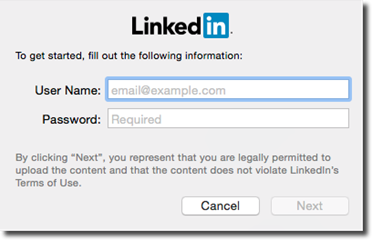
As you can see above, we are then prompted to enter information for our LinkedIn account.
Enter your username and password, then click Next.
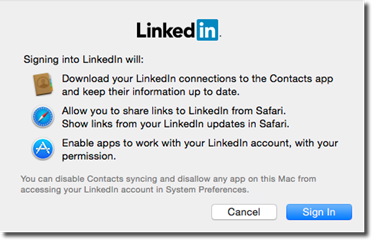
Click the Sign In button.
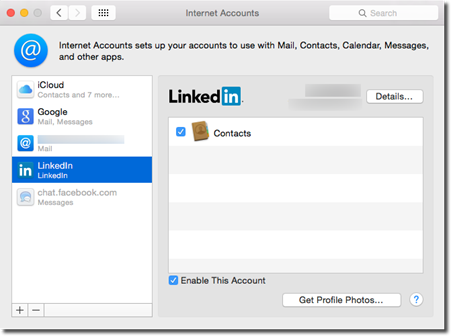
LinkedIn now appears in Safari's Sidebar.
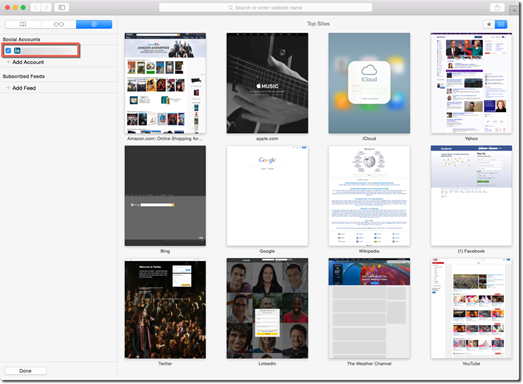
You can then add another account, or click the Done button at the bottom of the Sidebar.
You will now see a live feed from your social account in the Sidebar.