
A notification message is a message you get that lets you know something has occurred, needs to occur, or will occur. When you receive a text message on your phone, your phone notifies you that a text has been received. You also get a notification message when a new voicemail is left for you on your phone.
In OS X, you might get a notification message when you receive email in Mail, or as a reminder when you have an appointment you recorded in Calendar. You might also get notification messages from different apps, such as when an app has been updated. In addition, you can get notification messages if you have a laptop and the battery is dying, if disks weren't ejected properly, and so on and so forth.
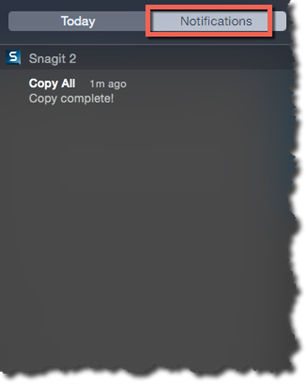
In OS X Yosemite, a notification message appears as a notification message bubble that slides in from the right hand of your screen. A notification message looks like this:
Responding to Notification Message Bubbles
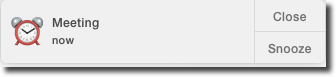
Some of the notification message bubbles that will appear on the upper right hand side of your screen will be interactive, such as the one pictured below.
Interactive notification message bubbles might ask you to either close or snooze a meeting reminder, reply to a message or move it to the trash, et cetera. These interactive notification messages not only ask you for what to do next, they also give you a chance to take action without needing to go to the Dock or Launchpad to open the app.
Getting Rid of The Notification Message Bubbles
To get rid of a notification message bubble on your screen, you can drag it off to the right or right swipe on it. This will get rid of a notification message bubble that appears on your screen.
To turn off the notifications so the bubbles don't appear on your screen, you can use the Do Not Disturb feature in OS X Yosemite. You can make it so the bubbles will not appear at all or just at certain times, like when you're asleep or in a meeting. However, it should be noted that using the Do Not Disturb feature doesn't stop the notification messages. It just stops the notification message bubbles. The notifications will still be put in the Notification Center. They will just be put there quietly.
To turn on the Do Not Disturb feature, go to System Preferences>Notifications.
Click Do Not Disturb on the top left.

You can now:
1. Specify the hours that you want the Do Not Disturb feature to be put into place. For example, perhaps you don't want notifications message bubbles while you sleep, so you set it from 10:00 PM to 7:00 AM.
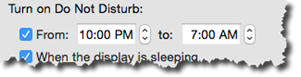
2. Make it to where notification message bubbles do not appear when your computer is sleeping.

3. You can also set the Do Not Disturb feature to take effect when you're mirroring your screen to projectors or TVs.

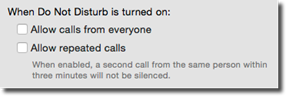
In addition, you can also choose to:
-
Allow Calls From Everyone. If using your Mac as a speakerphone, your Mac will still ring when there's an incoming call.
-
Allow Repeated Calls will allow a call through if someone tries to call more than once in a three-minute time frame.
The Notification Center
Every notification message bubble that you see (or don't see) represents a notification from your Mac or one of its apps. However, it also represents that notification that appears in the Notification Center.
To see the Notification Center, go to the Menu bar and click the icon on the far right side. We've highlighted it in red below.

This opens the Notification Center on the far right side of your screen.
The Notification Center has two tabs: Today and Notifications.
-
Today contains the weather, upcoming appointments, reminders, and widgets such as the stock report and news headlines.
-
The Notifications tab shows all app notifications, as well as messages, reminders, appointments, et cetera.
Click Notifications at the top to see all your notifications.
You can click on a notification to open the corresponding app, or you can click the little X that appears to the far right of the notification to dismiss it.
Customizing the Notification Center
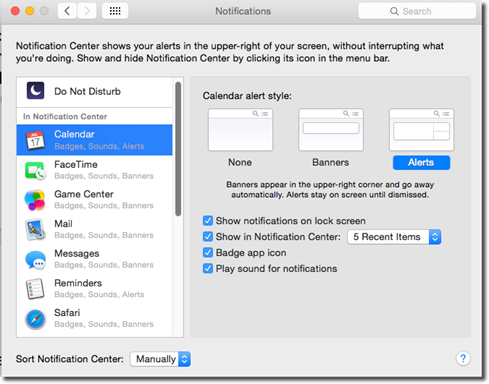
To specify which apps can send notifications to the Notification Center, go to System Preferences> Notifications.

On the left, you will a list of apps that currently send notifications to the Notification Center.
You can click on the name of any app on the left to see the notification settings for that app.
Let's take a look at Calendar.
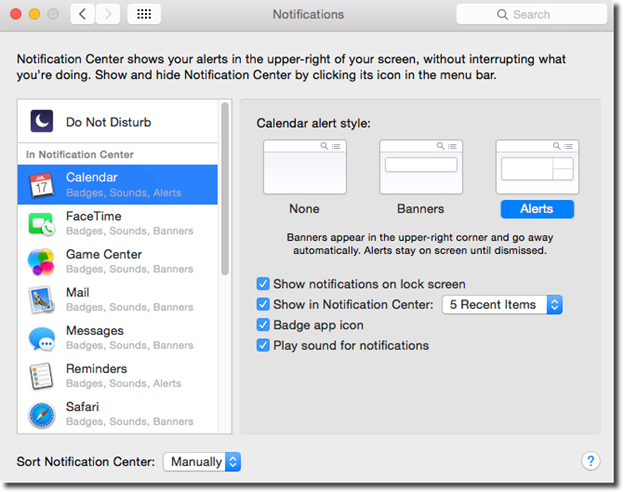
As you can see, you have quite a few options.
You can:
4. Show notifications in lock screen, which means notifications will appear on your lock screen.
5. Show notifications in Notification Center for # Recent Items. This means you have five rows reserved for this app in the Notification Center just for this app and its notifications.
6. Badge app icon will put a red circle with a white number on the app's icon in Launchpad and the Dock. The number will let you know how many times the app has tried to notify you about something.
Working with Data in OS X Yosemite
In this section, we're going to change direction for a bit and discuss data as it relates to OS X Yosemite.
OS X Spelling and Grammar Checker
OS X has a built-in spelling and grammar checker. It's not specific to one program. The same spelling and grammar checker is available no matter what program or file you're using. That said, the same thing is true about the dictionary. If you add a word to the dictionary in one program, it's added to the dictionary for all programs.
To use the dictionary, you can highlight a word or a passage of text, then go to Edit>Spelling and Grammar> Show Spelling and Grammar. You will then see the spell check dialogue box.
If you want to check spelling as you type, go to Edit>Spelling and Grammar>Check Spelling While Typing. In addition, you can fix errors as you type as well by going to Edit>Spelling and Grammar> Correct Spelling Automatically.
You can also check the spelling and grammar of a document after you've finished working on it by going to Edit>Spelling and Grammar>Show Spelling and Grammar.
Words that Mac thinks are spelled incorrectly will be underlined in red. Grammatical errors are underlined in green.
Below is the spell check dialogue box that you will see when you check spelling and grammar in a document � or in a selected part of a document.
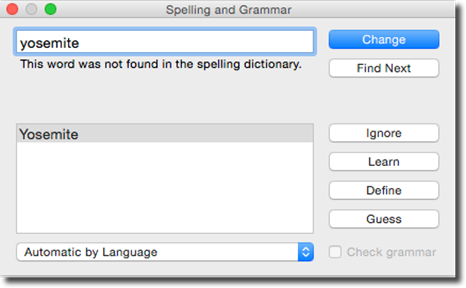
As you can see, the word as it is spelled in the document appears at the top: Yosemite. The suggestion for a correct spelling is highlighted in gray.
To change the spelling to the suggested spelling, click the Change button. To keep the spelling as-is, click the Ignore button.
If you press the Define button, the dictionary will open. This is helpful if you want to make sure you are using the correct spelling of a word (such as principle or principal).
Dictation in OS X Yosemite
The dictation feature is built into your Mac the same way as it is with the newer iPhones and iPads. Also called voice typing, the Mac will type for you as you speak, enabling you to send out emails, messages, and even documents without touching the keyboard to type.
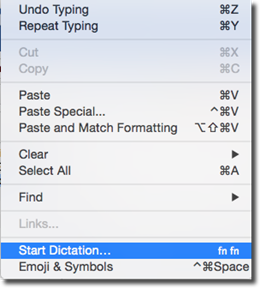
To use the dictation feature, you must first open a program where you are required to type, such as TextEdit, Word, Mail, et cetera.
Next, either press the fn key twice, or go to Edit>Start Dictation.
If you don't have a microphone set up, you will see this message:
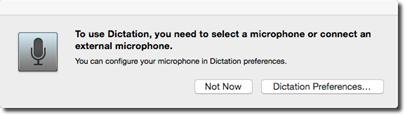
Let's click Dictation Preferences.
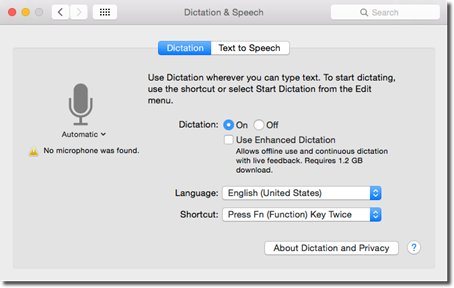
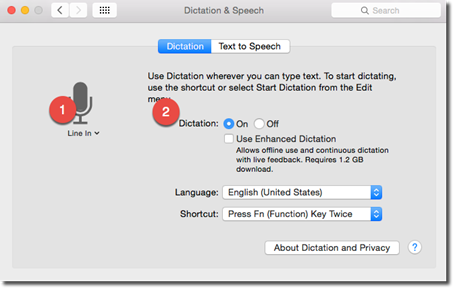
Select a microphone, then make sure Dictation is turned on.
Now, go back to the program where you want to use dictation.
Go to Edit>Start Dictation again.
You will see a tiny microphone at the location of your cursor in the email, message, document, et cetera.

Go ahead and speak the text. Just remember to also speak punctuation. If you want to add a colon, you must say "colon."
When you're finished, press Done. You can also press Return on your keyboard.
Cutting, Copying, and Pasting Data Between Programs
By now, you should already know what it means to cut or copy text, images, or other objects. However, let's do a quick review just in case so we're all on the same page.
-
Cut. When you cut text, images, or other objects, you cut them out of their current location and move them to your virtual clipboard. They no longer appear in their original location. Even though they are stored on your clipboard, you cannot see them.
-
Copy. When you copy text, images, or other objects, you copy it from its original location and move a copy to your virtual clipboard. When you copy, you leave the text, image, or other object at its original location, and move a copy of it to the clipboard.
-
Paste. When you paste text, images, or other objects, you paste them from your clipboard into a new location. For example, you might paste text that you copied from Document A in Word to Document B in Word.
Here's how to cut, copy, and paste in OS X Yosemite.
First, highlight or select whatever it is you want to cut or copy. The easiest way to learn to cut and copy is to highlight or select a passage of text.
Next, go to Edit>Cut or Edit>Copy. You can also use Command+C for Copy or Command+X for Cut.
Go to where you want to insert the text (or image, et cetera) that you just cut or copied. This may be another document, program, or a different area in the same document. Go to Edit>Paste or press Command+V.
Using Drag and Drop to Move Data
In addition to the Cut, Copy, and Paste commands, you can also rearrange sections, paragraphs, sentences, or even letters by simply dragging with your mouse, then dropping whatever you dragged into a new location.
To drag and drop data, highlight whatever you want to drag and drop. Click and hold the mouse button down in the area that's highlighted for about a half second. Whatever you highlighted will become slightly blurry when the mouse button is held down.

You will also see a green circle with a white plus sign. This lets you know you can now drag and drop the selection.
Next, keep the mouse button held down while you drag to another place in the document, another document, or another program. Release the mouse when you've reached the desired location.
Moving Files Between Macs and Windows-Based PC's
There are more than several ways that you can transfer or share files between two Macs or between a Mac and a Windows-based PC. We've listed some of the methods below with brief explanations when needed.
-
Email. This is by far the most obvious way to transfer or share files. However, email may not be a good option for larger files.
-
Cloud Storage. Cloud storage services such as Dropbox, iCloud,
-
Flash Drive
-
Bluetooth
-
CD or DVD
-
Network. Through a network using AirDrop or another file sharing program.
-
FireWire Disk Mode/Thunderbolt Disk Mode. This feature lets you turn one Mac into an external hard drive for another Mac and makes it easy to transfer data. You must have a FireWire or Thunderbolt Jack on your Mac in order to use this feature.
Using FireWire or Thunderbolt Disk Mode
Let's pretend that you want to use your MacBook as an external drive for your iMac. You would follow these steps:
1. Connect the FireWire/Thunderbolt ports of both computers with a cable. You will need a FireWire cable.
2. On the computer that you will want to use as an external hard drive, go to  >System Preferences. Click on Startup Disk.
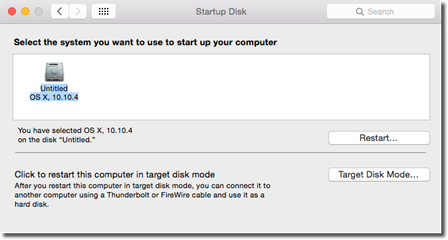
3. Click on the Target Disk Mode button, shown above. When you see the confirmation box, click Restart. When the computer restarts, you will see a gray Firewire icon bouncing on the screen. Now, if you look at the other computer (in our example, the iMac), you will notice that hard drive icon for the MacBook on the desktop.
NOTE: When you reboot the computer you used as an external hard drive, it will load from its copy of OS X.
Time Machine
Time Machine is a potential lifesaving feature in OS X that allows you to create a backup of everything on your computer. This includes system files, apps, photos, emails, documents, and music.
To use Time Machine, you need a second hard drive, such as an external hard drive, Apple TimeCapsule, another internal hard drive, or a partition of a drive. The second drive needs to be bigger � or have more space � than the drive you want to back up.
NOTE: You cannot use a CD or startup drive for Time Machine.
The first time you connect your second drive to your Mac, you will see this message:
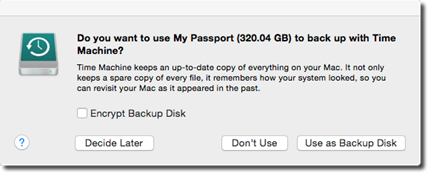
If you want to use the disk to back up with Time Machine, click Use as Backup Disk.
You will then see the Time Machine window in System Preferences (System Preferences>Time Machine).
Time Machine will appear as turned on. Your Mac will start backing everything up to your backup drive.
You can also turn Time Machine on by going to System Preferences, then clicking Time Machine, as shown below.
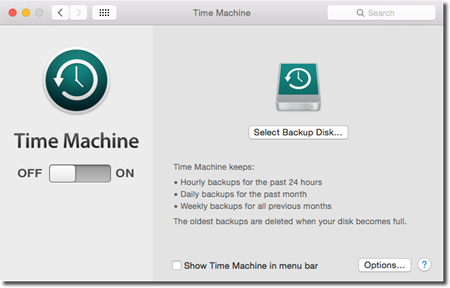
Turn the Time Machine on and select a backup disk.
Once you have Time Machine turned on and your backup disk selected, Time Machine will check your Mac every hour. If any changes have been made, those changes get backed up. If anything happens, you can roll your system back to a specified hour.
At the end of a 24-hour period, you will have 24 hourly backups. Those backups will be replaced with a daily backup. You will no longer be able to roll back to the 24 hourly backups, just the daily backup. After a month, the 30 daily backups will be replaced with a monthly backup.
What Happens If You Don't Have Your Backup Disk
Time Machine used to work best if you always had your backup disk with you. If you were away from home with your MacBook or didn't have your backup disk with you for any reason, you lost the ability to perform the missed backups. However, this isn't the case anymore. A feature called local snapshots will make backups on your computer's hard drive until you can connect to your backup disk. Once you connect to your backup disk again, the local snapshots will be merged with your backups.
Recovering Files from Time Machine Backups
If your files get deleted or damaged, and you need to restore a backup, click the Time Machine icon either in the Dock or from the menulets and select Enter Time Machine.
You will see a stack of windows slide down your screen, as shown below.
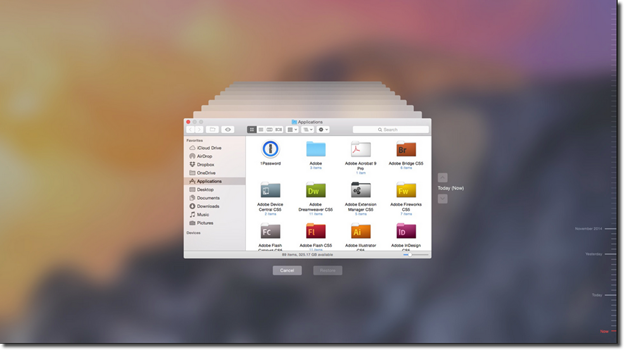
The front window that you see is the Finder window. Behind it are other Finder windows. Each is a snapshot of the window at the time of backup.
You can click a window to see what's in that window. You can also drag your cursor through the timeline on the right, as highlighted below.
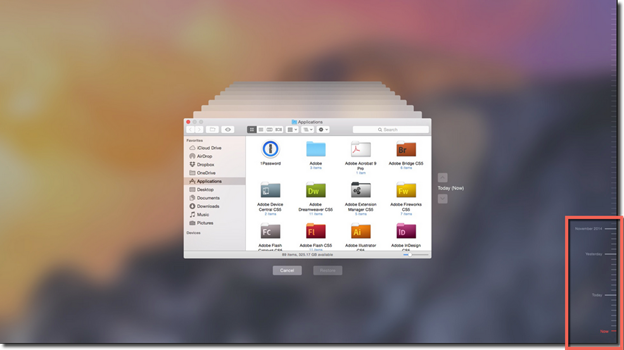
You can also click one of the arrows. The one that points to the past will take you to the most recent window that's different from the way your Mac is at that moment.
In addition:
-
As you go through different windows, you can look at the bottom of the screen to see where you are in time.
-
You can use Quick Look to look at documents and make sure you have the right version.
-
You can also use the search box in the Finder windows.


