Hiding the Mouse
Having your mouse path and pointer on the screen does not make a lesson feel interactive. The viewers feel like they should be watching what you do rather than interacting with the lesson. That said, the first step in converting a demonstration to a simulation is getting rid of the mouse on the slides.
Take a look at the Filmstrip.

A mouse icon in lower right hand area of slides shows that the mouse appears on the slide. We want to hide the mouse so it doesn't appear on the slides. However, we have to do this one slide at a time.
To do this, select a slide where the mouse appears.
Next, go to Modify>Mouse>Show Mouse to turn Show Mouse command off.
Encouraging Interaction by Changing Phrasing
When you create a demonstration, the text captions tell viewers what you are doing. Your text caption might say, "watch as I click on the Design tab to add a page color."
To create a simulation, you want to tell them what to do next, such as, "Click on the Design tab and go to the Page Color button".
If you've created a demonstration that you want to convert into a simulation, changing the text captions is easy enough to do. You can simply use the Find and Replace feature in Adobe Captivate to change the wording.
To use the Find and Replace feature, go to Edit>Find and Replace.
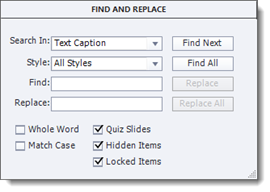
In the Search In Field, let Captivate know the type of object for which you want to search, such as text captions.
![]()
Click the Style dropdown and select the styles you want to search. We are going to choose All Styles.
![]()
In the Find field, enter the phrase you want to find, such as "Watch as"
In the Replace field, enter the phrase you want to use as a replacement.
Click the Find Next to find the next instance of the phrase you want to find.
Click the Replace All button to replace all instances of the phrase.
Click the "X" button in the upper right hand corner of the Find and Replace box to close it.
Inserting Click Boxes
Instead of telling viewers how to complete an action, a Click box lets the viewer actually perform the action. For example, the viewer might click on a menu item in Notepad.
To insert a click box, go to Interactions>Click Box on the Toolbar.
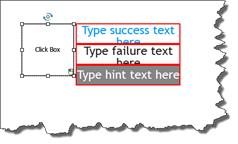
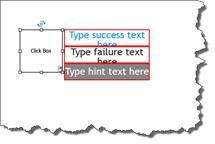
The click box then appears in the middle of the slide, as pictured above. The square area on the right hand side is the click box area. This is where viewers will click. You can resize the click box area if needed.
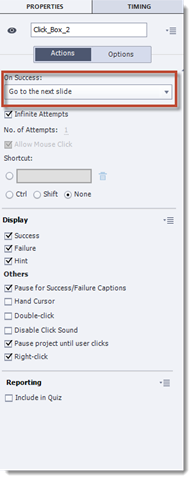
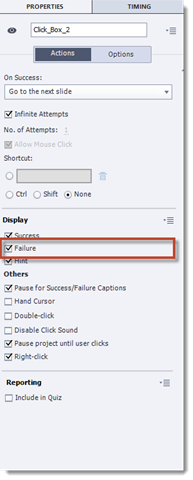
At the bottom right of the click box area, you can see a mouse badge. The left mouse button is green by default, which lets you know that the click box is activated by a left click. To make it so it's activated by a right click, go to the Properties Inspector. Click on the Action tab, and put a checkmark beside Right Click, as pictured below.
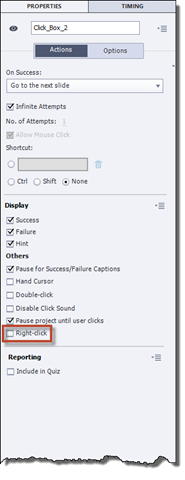
When the click box area is activated by a right click, the right side of mouse badge appears as red.
Next, specify what happens when the click box is successfully activated.
To do this, go to the Properties Inspector, and click the Actions tab again.
Go to the On Success dropdown and select what happens.
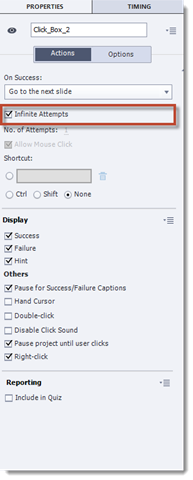
Since this click box allows the viewer to click on an item in your lesson, you want them to be able to click until they get it right. For this reason, put a checkmark beside Infinite Attempts.
Again, you want your viewers to be able to get it right, so you want to give them messages (or captions) to help them accomplish that.
Go to the click box on the slide. Type in a hint to help them click in the right place.
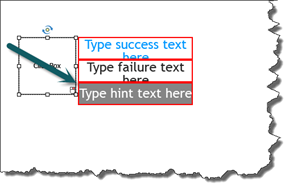
Make sure the Failure box is checked in the Properties Inspector, so that a Failure caption appears if the viewer clicks outside of the click box area.
On the slide, type in a failure message that lets the viewer know what they needed to do for success.
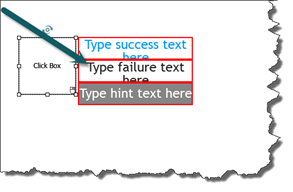
Finally, type in a Success message on the slide. This will appear when the viewer clicks in the click box area.
Use the Timing Inspector to set the timing, transitions, and effects.
Text Entry Boxes
Text entry boxes allow viewers to type in data. Captions are used in coordination with text entry boxes. The captions respond to what the viewers type.
To insert a text entry box, go to Text>Text Entry Box on the Toolbar.
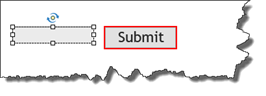
The text entry box appears in the middle of the slide, as you can see in the snapshot above.
A text entry box has two parts: the text entry box in which viewers will type � and a Submit button. The appearance of the text entry box is controlled by the Object Style Manager and by going to Edit>Object Style Manager.
Let's set the properties for the text entry box.
To do this, double click the text entry box to bring up the Properties Inspector.
Click on the Style tab, then put a checkmark beside Validate User Input.
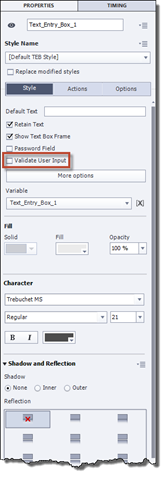
When you select Validate User Input, a dialogue box will appear below the text entry box on the slide.
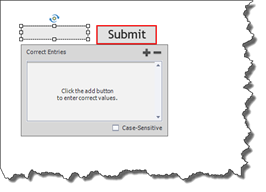
This box allows you to input correct answers. The viewer must type in one of the correct answers that you provide.
To add correct answers, click on the plus (+) sign inside the dialogue box.
Type the correct entry.
We have typed in the word "Yes".
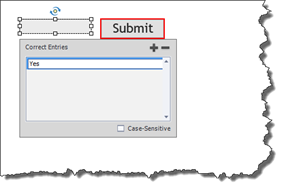
Hit Enter.
You can click the plus sign again to add another correct answer.
Next, you want to make it so that whatever the viewer types in the text entry box is erased if they start the lesson over.
To do this, go to the Properties Inspector.
Click on the Styles tab, then remove the checkmark before Retain Text.
![]()
Also, make sure:
-
Show Text Box Frame is checked so that the text box is visible to viewers.
-
The Password Field checkbox should be checked if the viewer will be typing in a password. The text they enter will appear as asterisks.
Click on the Actions tab in the Properties Inspector and set your preferences for the text entry box.
Select Text Entry Box, the Properties Inspector Action tab to specify an action for the box On Success field.
Make sure both the Infinite Attempts and Failure Caption boxes have checkmarks beside them.
![]()
Type in the Failure caption on the slide. The Failure caption should let the viewer know what they did wrong.

Creating Quizzes on Adobe Captivate
What good would it be to create eLearning lessons in Adobe Captivate if you couldn't also create quizzes to test what your viewers have learned? In this lesson, we're going to learn to create quizzes in Adobe Captivate, including quizzes with multiple choice and true false questions.
Working with Quiz Object Styles
The first thing you need to do before creating a quiz is to set up the object styles in the Object Style Manager. By doing this, you are ensuring that all the questions in your quiz will have a consistent look.
Quiz questions in Adobe Captivate appear on question slides.
To edit the style, go to Edit>Object Style Manager.
Go to Quizzing Objects, then Captions in the column on the left.

Select Correct Caption.
Edit the style if you want. You can change the font type or size. You can align the text in the caption, add bullets, etc.
Click the Apply button.
After you click the Apply button, go back to the column on the left and format the other quizzing objects.
Click Apply after each object.
When you're finished, click the OK button.
Setting Quiz Preferences
By setting quiz preferences, you can control things such as the navigation of the quiz, as well as success/completion criteria, and pass or fail options.
To set quiz preferences, go to Quiz>Quiz Preferences on the Menu Bar.
Click on Settings on the left.
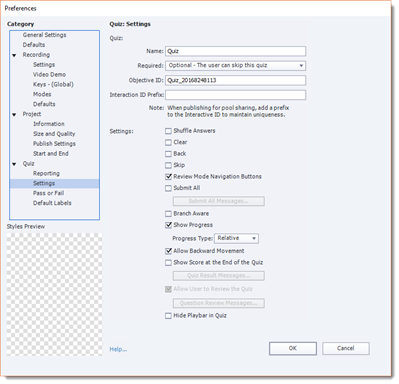
In the Name field, enter a name for the quiz. This will help you identify quizzes if you have more than one in a project.
In the Required dropdown menu, select an option:
-
Optional � The User Can Skip This Quiz makes it so taking the quiz is optional.
-
Required � The User Must Take This Quiz to Continue means the viewer must complete the quiz before advancing to the next slide.
-
Pass Required � The User Must Pass This Quiz to Continue means the viewer must pass the quiz before advancing to the next slide.
-
Answer All � The User Must Answer Every Question to Continue means that the viewer can only advance to the next slide after answering all of the questions.
In the Objective ID field, enter the ID of the quiz to which the question slide belongs. If you create a master quiz that contains several quizzes, this field will let you know from which quiz a question comes.
In the Interaction ID Prefix, enter a prefix for the Interaction ID's. Interaction ID's are assigned to every action a viewer takes during a quiz. If a viewer answers a question incorrectly, an interaction ID is assigned. If they answer it correctly, an interaction ID is assigned.
Under the Settings section of the Preferences window, check if you want to:
-
Shuffle Answers. If the question slide has more than one answer, the answers will be shuffled if the viewer sees the question slide again.
-
Submit All lets viewers review and edit questions already answered and submit them simultaneously.
-
Branch Aware. This calculates a final score based on the answers in the branch. For example, a project could have a quiz that branches into two modules that each contain a quiz. The viewer's score would be calculated using the questions in both quizzes unless the Branch Aware box is checked.
-
Show Progress lets the viewer know the question number they are on in the quiz.
-
Allow Backward Movement lets viewers go back to previous question slides.
-
Show Score at the End of the Quiz lets viewers see their score after they finish the quiz. Click the Quiz Results Messages button to customize the messages they see.
-
Allow User to Review Quiz allows viewers to view the quiz after they've finished and the score has been displayed.
Next, click Pass or Fail on the left hand side of the Quiz Preferences window.
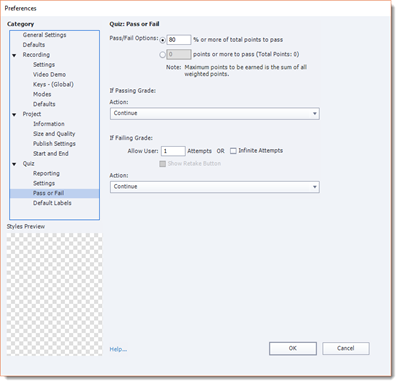
The options here are self-explanatory. Select your preferences, then click OK.
Inserting Question Slides
There are nine different types of question slides in Adobe Captivate. Each type of question slide represents different types of questions you can add to your quizzes.
The types of question slides are listed below. They are:
1. True/False
2. Multiple Choice
3. Fill-in-the-Blank
4. Matching
5. Short Answer
6. Sequence
7. Hot Spot
8. Rating Scale (Likert)
9. Random Question
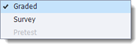
All the question slides can be graded except for the Rating Scale question slide. Since the Rating Scale is more of a survey, there isn't typically a correct or incorrect answer.
To insert a question slide, go to Quiz>Question Slide on the Menu Bar.
You will then see the Insert Questions dialogue box.
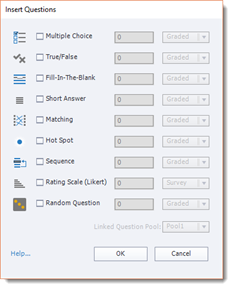
Select the type of question slide you want to insert.
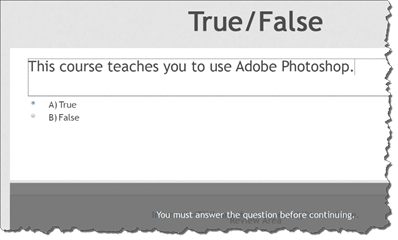
We are going to select True/False.
Enter the number of True/False questions you want to create. We are going to create one question.
NOTE: You can also select more than one type of question slide for your quiz.
Click the OK button.
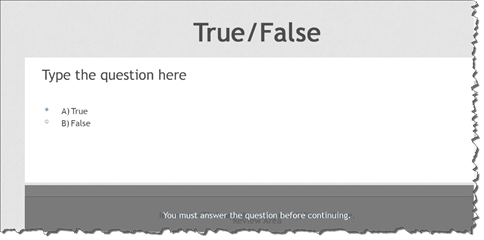
Click on the slide where it says "Type the question here". Double click inside the object to see the mouse cursor.
Type the question for the quiz.
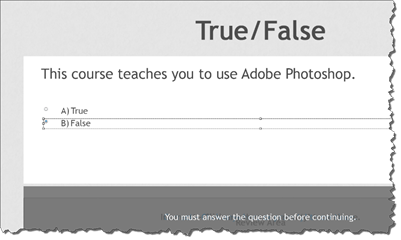
You can resize the text box if needed.
Next, click the correct answer so the correct circle is filled in.
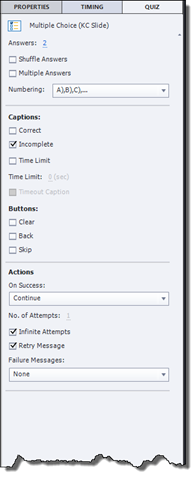
Now, go to the Quiz Inspector. It's grouped with the Properties Inspector.
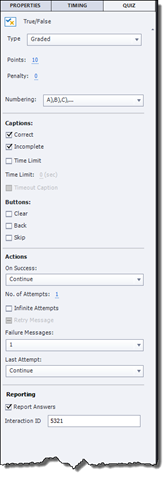
Choose the type of quiz from the Type dropdown.
Choose the number of points the question is worth.
Select any captions or buttons you want to appear, then select what happens when the viewer takes the appropriate action in the On Success dropdown menu.
Inserting Knowledge Check Slides
Knowledge check slides are similar to question slides, except they're not graded. They're used to assess what your viewers have learned without actually giving a quiz.
To insert a knowledge check slide, go to Slides>Knowledge Check Slides on the Toolbar.
You will then see the Insert questions dialogue box.
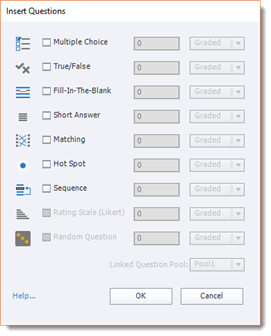
To insert a knowledge check question, choose the type of question, as well as the number of questions, just as we learned to do with question slides.
We are going to choose Multiple Choice.
Click the OK button.
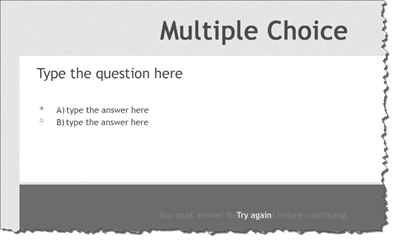
Click on the "Type the question here" text box, then double click to see the mouse cursor. Type in a question.
Next, click the text boxes for the answers, and type in different possible answers.
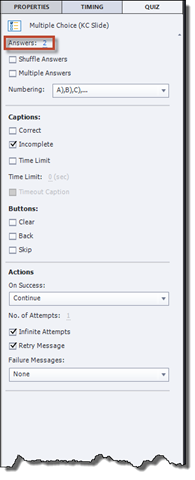
Right now, the question contains two possible answers. If you want to give more possible answers, go to the Quiz Inspector.
Change the number of possible answers in the Answers value field by clicking on the value.