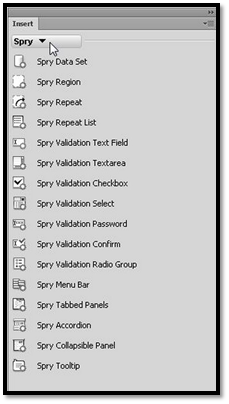
Dreamweaver gives you access to widgets. These widgets are called the Spry Framework for AJAX. AJAX stands for Asynchronous JavaScript and XML. The Spry Framework for AJAX is a JavaScript library that you can use to add interactive features, such as collapsible and tabbed panels, dropdown menus, and form validation features.
You'll find Spry in the Insert panel. Just click the downward arrow beside Common at the top and choose Spry.
|
Create a Dropdown Menu
To create a dropdown menu using Spry, put the cursor on your page where you want to create the menu.
Go to Insert>Spry>Spry Menu Bar.
In the dialogue box that appears, select Horizontal or Vertical.
Click OK.
Now enter your text for the items.
Click on the blue Menu Bar tab. You'll find this on the top of the menu bar you inserted in the design area. Click on it to display the settings in the Property Inspector.
If you want to change the name of an item or a subitem, select the item in the Property Inspector, then type a new name in the text field. You'll find this on the far right hand side of the Property Inspector.
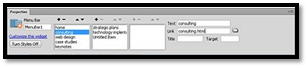
Next, if you want to link a menu item, first select the item name, then enter a URL in the Link field.
To add an item, go to the Property Inspector and select the + sign at the top of the item field.
To add a subitem, first select the item you want it to appear under, then click the + sign in the item box that's to the right of the selected item.
When you're finished, choose File>Save. Dreamweaver will then show you the Copy Dependent Files dialogue box. Click OK to generate the related files.
Create Collapsible Panels
It's easy to create collapsible panels using Spry. First, go to your document and place the cursor where you want the panel to appear. Then go to Insert>Spry>Spry Collapsible Panel.
Next, click and drag so the word Tab is selected. Replace it with the text you want in the panel's tab area. Click to select the word Content also, then enter text or images into that area.
Now click the blue Spry Collapsible Panel tab. This is located at the top of the panel in the design area.
Go to the Property Inspector. Choose Closed from the Display dropdown menu. Choose Closed from the Default State dropdown menu too. This means your panel is closed by default when the web page loads.
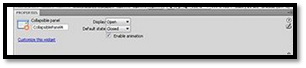
To make the panel open and close whenever someone clicks the tab, click the Enable Animation check box.
Go to File>Save to save the page. Click OK to generate related files in the Copy Dependent Files dialogue box.
Create Tabbed Panels
To insert a tabbed panel, click your mouse in the document where you want to panel to appear, then go to Insert>Spry>Spry Tabbed Panels.
Click then drag to select the word Tab. Replace it with text you want in the panel area.
Next, click on the blue Spry Tabbed Panels tab in the design area to open the Property Inspector.
If you want to add tabs, click the + sign in the Property Insepctor. To change the order of tabs, select the tab name in the Property Inspector, then use the arrows located in the Panels field to rearrange the order.
Specify the tab you want to display when the page is loaded under the Default Panel dropdown menu.
Add content by selecting the word Content in the main area of a tab panel, then add text, images, etc.
When you're finished, go to File>Save to save the page. Click OK to generate related files in the Copy Dependent Files dialogue box.
Spry Validation Widgets
You can also use Spry validation widgets to create form elements with built-in validation features. For example, you can use a text field validation widget so you can verify someone has entered the right amount of digits for a phone number. This is helpful to make sure forms are filled out as correctly as possible.

To use a validation widget, first place the cursor where you want to widget to appear.
Go to Insert>Spry>Spry, then choose the type of validation you want to use. For this example, we're going to use a check box to make sure that a check box is selected.
If you don't already have a form tag in your page, the Add Form Tag dialogue box will appear. If you want to create the form tag as you create the box, just click Yes.
Now, enter the validation requirements in the Property Inspector. If you want to require that users select a check box, select Required from the Preview States in the Property Inspector.
Managing and Publishing Your Sites
However, before we do, we want to show you how to test your site for errors, as well as how it looks in different browsers so that when you upload it to the Internet it is ready for your visitors to see it.
Find and Fix Coding Errors
Dreamweaver's site reporting features allow you to find problems with links, empty tags, untitled documents, and other errors that are important to fix. When you use the site reporting feature, Dreamweaver will generate a report for you to review.
To do this, make sure all your documents are saved, then go to Site>Reports.
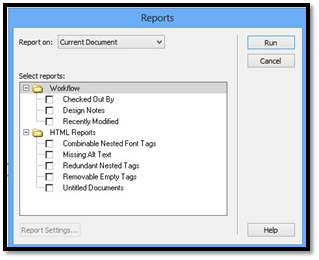
From the Report On dropdown list, choose an option. We want to want to run a report on the current document.
Next, go to Select Reports and check the reports you want, then click the Run button.
Below is a copy of our report:
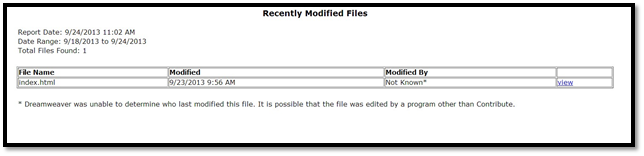
You can view the errors in your document to fix them using the Property Inspector or another feature. Make sure you save your file when you're finished.
Testing Your Site
Adobe's BrowserLab is used to text sites. It's impossible to test your site on your own, without Adobe's help, unless you have several computers with different operating systems and browsers.
Adobe BrowserLab lets you text your web pages in the most common browsers to make sure your site looks good to whoever is viewing it. To use BrowserLab, go to >Edit>Preview in Browser.
When you use BrowserLab, you'll see the results in a screenshot that has previews of each page in each browser.
You can also test your site in different browsers using the Document Toolbar. Click the Preview/Debug in Browser window and choose a browser.
Setting up the Server Information for FTP
FTP stands for File Transfer Protocol. It sounds like a complicated term, but it's not. It is simply the method you'll use to transfer files from your computer to the web. If you've ever copied a large file from one location on your computer to another, then this won't be totally foreign because FTP does the same thing � except it copies your website files to your website on the Internet. All you have to do is set up your FTP with a little information.
The information you'll need to set up FTP includes:
- The name of your FTP host. If you don't know this, contact your web hosting company.
- Your user name
- Your password
Once you have this information, it's time to set up an FTP server. To do this, go to Site > Manage Sites.
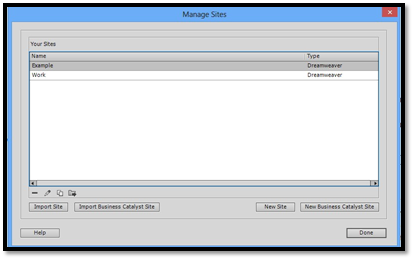
Choose your site, then click the Edit icon. It looks like a pencil.
Click on Servers on the left hand side.
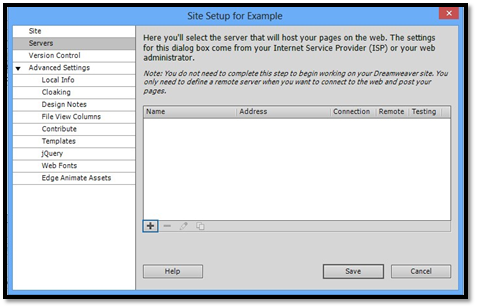
Click the + sign (selected above).
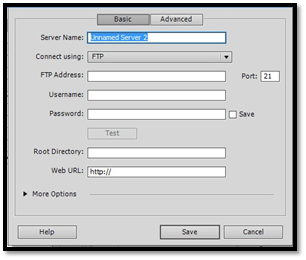
Enter a name for the server.
For Connect Using, make sure FTP is selected.
Enter the FTP address provided by your web hosting company.
Enter the username and password that you use to access your FTP server.
After you have added this information, click Test to try it out. If the test was successful, Dreamweaver will tell you so. If not, double-check your login information and ftp address.
Enter your root directory, then your website URL.
Click Save.
The File Panel Options and Viewing Remote Files
The Files panel gives you a quick and easy way to manage and transfer files to and from your remote server. What's more, Dreamweaver can automatically compare your local and remote folders and add and delete files where necessary.
Let's take a look at the Files panel and examine the options available to you.
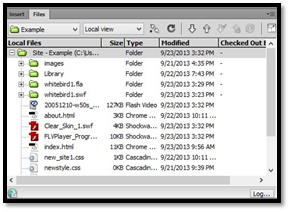
The basic Files panel appears in the panel dock and looks like this:
If you don't see the Files panel, click Window > Files.
Notice that there are two drop-down menus at the top. The one on the left is called the Site menu. It allows you to choose a site and view all of the files associated with it. It also gives you access to all of the files on your computer.
The Drop-down menu on the right is called the Sites Files view. There are four options associated with it, Local View, Remote View, Testing Server view and Repository view. This option allows you to see the files associated with your site in that directory. For instance, if you select Local view, you will see the files that reside in the site folder on your computer. Remote view would let you see the files in your remote folder.
Now take a look at the icon that looks like a plug. This is called the Connect/Disconnect button  . Click it to connect to a remote side.
Transferring Files To and From a Server
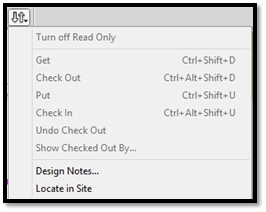
Dreamweaver makes transferring files to and from a server a cinch. Take a look at the arrow buttons on the files panel.  The down arrow is called the Get button, and the up arrow is called the Put button. The get button retrieves files from your remote site, and the put button transfers files from your computer to your remote site.
Getting Files from Your Website
In the Files panel, select a site and choose Remote View. Dreamweaver will automatically connect to your site and you will see all of the files on your server.
Now select the files you'd like to copy and click the Get button  .
.
Dreamweaver will ask you if you'd like to download dependent files. Dependent files are the images and other files that are referenced when a browser loads a document. If the dependent files are not available, the image or other file will not load. A place holder and an X will appear in its place. If you already have copies of the dependent files in your local folder, click No.
If you're using the Check in/Check out feature, Dreamweaver will retrieve a read-only copy of the file. We'll talk more about the Check in/Check out feature in a moment.
Putting Files
Putting means to transfer files from your local folder to a remote host � or your website. This is done in much the same way that you get files.
From the Files panel, select the files you'd like to upload. Click the Put button  . Dreamweaver will automatically transfer the files.
Working with the Synchronize Button
The synchronize button  is similar to the get and put buttons except it compares the files on each site and only transfers those that are new or have changed since the last download.
To use the synchronize button, select your site and then select the specific files or folders you'd like Dreamweaver to update. Skip this step if you'd like to synchronize all of the files.
Now click the Synchronize button . A menu box will open.
Here, you can choose which files to synchronize, and how to synchronize them. The Synchronize menu lets you choose whether to copy only the selected files (as shown above) or the entire site.
There are four options available in the Direction menu. You can choose to put newer files to the remote site, get newer files from the remote site, or both get and put newer files.
Click Preview to synchronize the site. Dreamweaver will then compare the files from your remote folder with your local folder. If the newest versions of each file is already in both locations, an alert will let you know and no files will be updated. Otherwise, you'll see a dialogue box that shows which files will be updated.
Click OK to update the files, or choose one of the other options. The synchronize button on this screen only marks the selected file as already synchronized.
Enable Cloaking
Cloaking a file allows you to exclude it from operations that ordinarily affect every file or folder in a site. Furthermore, cloaking can be temporarily disabled if want to an operation to affect every file.
To enable cloaking, select a file or folder in the Files pane, and right click on it. Then select Cloaking>Enable Cloaking. Alternatively, you can right click on it and select Cloaking > Settings, then select the Enable Cloaking box.

Take another look at the example above. Note the Cloak files ending with box. With this box you can choose to cloak all files of a certain format.
To cloak an individual file or folder, select it in the Files panel and right click on it. Select Cloaking > Enable Cloaking. A cloaked file will appear with a red line through it in the Files panel.
Working with Design Notes
Design Notes are notes that are associated with a specific file, but stored separately. Design notes can be used to save extra information associated with a file, such as comments, original file names, and to just keep track of information that isn't included in the document. For instance, you might want to save the formula used to come up with a particular figure.
Design Notes can be created for each document or template, as well as for each applet, ActiveX Control, image, Flash movie, Shockwave object, and image field in your document.
To add a design note to a page, click the File Management button (up and down arrows) in the Document Toolbar, as shown below:
Click Design Notes.