With a digital camera, photographers have to transfer the files over to the computer and open up a program to edit the images. But, the iPhone is both a camera and photo editor in one, which significantly boosts both the versatility and simplicity.
Editing images allows you to both fine tune things you didn't catch as well as add effects you couldn't otherwise achieve with an untouched image. Both the iPhone's native app and the wide variety of editing apps available from third parties spell out immeasurable options when it comes to perfecting your photo.
First, good editing will never replace good photography. It is always better to get it right as you shoot, than to go back and edit later. But, that doesn't mean editing doesn't have a place in photography. So what can be edited, and what can't?
Exposure can be adjusted in an editing app, but is best when only minor adjustments need to be made.
Focus cannot be fixed later. There are some sharpening filters, but they won't be able to fix a shot that;s out of focus.
Blur also cannot be fixed in photo editing. You have to get it right as you shoot by using a faster shutter speed. While you can't take blur away, you can add it in editing for different effects.
Color can be edited with an app. Getting the white balance correct as you shoot is ideal, but editing apps will give you options for saturation and tint that you can't adjust before you shoot.
Composition can be fixed to a very limited extent. Cropping your photo in an editing app will reduce the image's resolution. Since the iPhone's resolution isn't particularly big to begin with, cropping is best kept to a minimum, or you'll end up with a pixelated photo.
There are hundreds, if not thousands, of different apps that you can use to edit your images. While some of them are great and some not worth the space they take up on your phone, most have similar terms and techniques that they share. These same terms and techniques are used on desktop computer programs, like Photoshop, so they're worth understanding-master these ideas, and you can successfully use a number of different programs to edit your shots.
Exposure - This term contains the same idea whether you are shooting or editing. Exposure is how much light enters the camera. Using exposure sliders in an app will lighten or darken all the entire image, similar to using exposure compensation as you shoot.
Shadows - The shadows are the darkest parts of the image. While adjusting the exposure changes the entire image, applying a shadow adjustment affects only the darkest tones in the image. In many apps, you can lighten or darken the shadows with a slider.
Highlights - Highlights are the opposite of shadows-they're the lightest area of the image. Using the highlight slider will lighten or darken only the lightest tones in the photo.
Brightness - Like the exposure slider, using the brightness adjustment will lighten or darken your image. So what's the difference? The brightness setting doesn't affect the entire image universally. The mid-tones (or the tones that are between shadows or highlights) are the most effected, while the shadows and highlights aren't as dramatically impacted. Use this slider if you want to brighten your image, but without brightening the shadows or highlights as much.
Contrast - Contrast is how different (or how similar) the tones in your image are to each other. By increasing the contrast, you make different colors and light levels pop. Editing options like highlights and shadows will also adjust how much the colors and shades stand out, so save the contrast adjustment for the last step.
Clarity - The clarity adjustment option is like a contrast slider that only affects the midtones. Using this slider won't deepen the highlights or shadows in your image, but will help those middle colors stand out from each other.
Black Point - Some apps also have an adjustment option for the black point. Remember, a single image can only capture a certain range of light. The black point slider expands (or narrows) the range by defining the limits of the blackest parts of the image. Simply put, the black point will darken or lighten the blackest portions of the image. Sliding to the left reduces contrast while sliding to the right enhances it.
Saturation - Saturation is how deep the colors in your image are. Imagine a glass of water and a bottle of food coloring. Just one drop of food coloring is minimal saturation, two dozen drops is very saturated. You can use the saturation slider to make the colors in your image pop, or slide to the left for a more muted, neutral look.
Vibrance - Vibrance is very similar to saturation. While saturation enhances all the colors in your image, the vibrance slider will adjust the only the more muted colors, helping to bring them out while keeping the colors that are already bright where they are.
Cast - This adjustment, which is included in the native photo app, helps to adjust odd color casts in your photos.
Temperature - Temperature is another term for white balance. Using the temperature slider will fix blur or orange hues in your image.
Tint - The tint slider is similar to the temperature slider, only it corrects magenta or green hues instead of blue and orange.
Sharpen - You can't correct an image that's out of focus or has motion blur. But the sharpness slider can help to define the edges of the objects in your photos. The sharpness slider adjusts on a pixel level to give objects a more defined edge. Use the sharpness option carefully, it's easy to overdo.
iOS 8 introduced a number of new photo-editing features on the native camera app. Edits are easy to add with a software update, so the list of options may very well expand as Apple releases new updates. But, there are some good corrections you can make currently without downloading a new app.
To access the iPhone's editing features, either tap the photo you just took from the native iPhone app in the bottom left corner. Or, click on the photos icon from the home screen. Select a photo, then tap edit in the upper right corner.
In the upper right corner of the editing screen, you'll see a magic wand icon. This is a one-touch adjustment that automatically adjusts the entire image. Sometimes this feature works well, but just like shooting with auto exposure settings, automatic adjustments have their limitations. Click to try it, then click again to remove the edit if it doesn't work well.
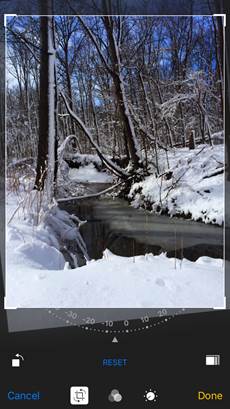
In the bottom toolbar, the first icon is a crop feature. Apple recently added a feature that not only allows you to crop the photo, but straighten it as well. Touch the wheel at the bottom of the photo to straighten the image, moving to the left or right to tilt the photo. This is a great tool for fixing shots where the camera wasn't held perfectly straight. Straightening the image will crop the photo slightly, which reduces the resolution a bit, so keep that in mind as you edit.
If your composition wasn't quite right, a crop can help eliminate distractions or change the shape of your image. Touching the white corners and dragging them in while still inside the crop mode does just that. The more you crop, the more resolution you'll loose though, so keep cropping to a minimum.
You can also change the shape of your image by cropping. Tap on the icon that looks like overlapping squares on the bottom right to bring up a menu of the possible aspect rations (for a refresh on aspect rations, revisit lesson five on composition). If you plan to print the image, you can choose the aspect ratio that you'll print at so that you have control over what part of the image crops in that new ratio. For example, a 4:5 aspect ratio will correctly crop an 8x10 image. Aspect ratios can also simply be used to get a square image or narrower rectangle. Remember, adjusting the aspect ratio is still cropping and will reduce the photo's resolution.
To flip an image, tap the icon on the lower left in the crop mode-it looks like a square with an arrow on it.
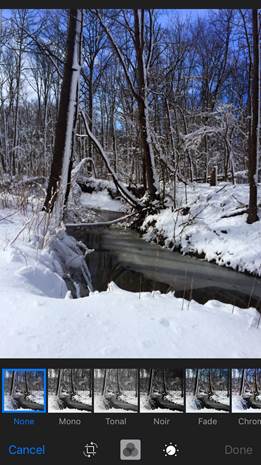
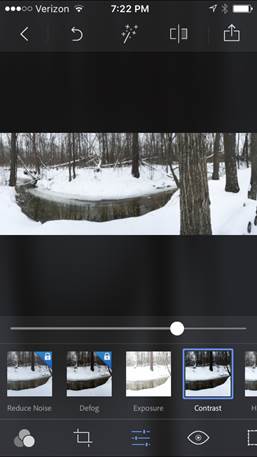
The second icon on the bottom toolbar (three overlapping circles) stores all of the filter options. Each filter will include a small preview of how the image will look with the adjustment applied. Filters are a good way to create an aged film effect. If you decide you don't like the filter on that particular image, just tap the "none" option.
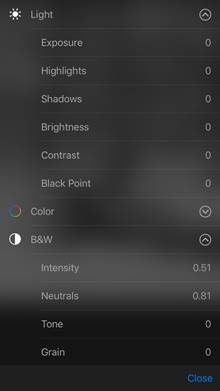
While you can use a black and white filter, there's another option that offers more control over how your color image converts. The last icon on the bottom toolbar (which looks like a sun) contains options for adjusting the light, color and black and white. Tapping each option will bring up even more options-for example, tapping the light option gives you exposure, highlights and shadows corrections. (Once you correct it, tapping the list icon brings you back to the other options).
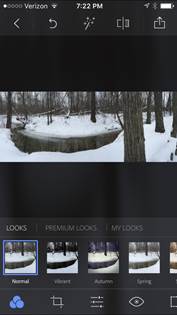
There's a wide variety of different editing apps available for the iPhone, all at different levels. But if you want more than one-click filters, one of the best apps is Photoshop Express. Photoshop is the household name for desktop image editing programs, and the free Photoshop Express app puts a handful of those tools onto your iPhone.
The postage stamp icon displays the different border options. A vignette is a lightening or darkening around the edges. The app also offers thin borders, borders with bevels and a Polaroid-style border.
The final option in the bottom menu is the healing feature, indicated by a band-aid icon. To use this feature, zoom in (place two fingers on the screen together then pull them apart) on an imperfection-for example, a zit in a portrait or a glare off a piece of glass. Then, tap the imperfection and the program will take information from the surrounding areas to correct it.
At the top of the screen, you can click the first icon to go back to your camera roll. The curving arrow is an "undo" button. The magic wand is a one-click fix, which again may work sometimes but often doesn't get the best results. The icon with the rectangle split by a line switches between your edited photo and the original, so you can see all the changes you've made. The icon on the top right allows you to save or share.
Photoshop Express is a good tool, but does have its limitations. Some other good image editing apps include:
-Pixlr offers a few more advanced features than Photoshop Express. The interface is a bit tougher to learn, however.
-PicsArt allows you to add more things to the photo than Photoshop Express. You can add blur, lens flares or creative text.
-Snapseed is a popular iPhone editing app. It's simple to use and contains a good range of features.
The apps we've recommended for using manual modes, VSCO cam and ProCamera, also have some editing options included.
The Key To Good Editing: Finding A Happy MediumEditing apps are great ways to improve your photos, but they can also destroy them. As you edit, weigh each choice-does the change improve your photo? Does the edit make your photo look fake? Most new photographers tend to over-edit, so if you're not sure, err on the side of caution.
When you edit, save the photo as a new version. That way, you can compare the original and the edits and make sure you really did improve the shot. If you find you over did the editing, you can always start over with the original photo.