Exposure is a basic concept that photographers need to grasp in order to take full control over their images. Don't worry if you don't remember the specifics at first, it will take a bit of practice and you can keep referring back until you could spout off the meaning of exposure compensation, ISO and shutter speed to any unsuspecting stranger.
Exposure is actually subjective-there's no "perfect" exposure. One photographer may think an image is too bright, while another thinks the same exposure is dead on. But while exposure is partially a matter of opinion, there are a few exposure errors that are generally considered incorrect for most shots.
Clipping is one of those exposure errors. The camera can only capture a limited range of light at a time. Try pointing your iPhone camera at a window. See how the window is so bright, that it's white? Meanwhile, most of the objects inside are probably a bit too dark. That's because the difference between the light from the window and the light inside is too extreme-the camera can't capture the entire range.
The white that you saw in the window is referred to as the image's highlights, or the brightest parts of the image. The darkest areas of the image are the shadows. An ideal exposure will still allow the viewer to see some of the details in both the highlights and shadows.
Clipping occurs when you can't see the details in the highlights, the shadows or even both. A clipped highlight will be so overexposed, that it's a white mass in the image while a clipped shadow will be pure black.
The histogram is a tool that shows you whether you have clipped the highlights or shadows in your image. A histogram takes all the pixels in the image, then arranges them on a chart from dark to light. This is a histogram from the ProCamera app (which we'll talk more about in a bit):

You'll see tall and short peaks representing how much of that particular shade is in your image. But, the part of the histogram that you really need to pay attention to is the edges.
When that chart is cut off at the left edge, it is underexposed and you've clipped those shadows, loosing the detail to black. If you've clipped the highlights instead, you'll see taller peaks on the right edge, like in the example above. The ProCamera app will make the line on the edge red if you've clipped your highlights or shadows. If you haven't clipped the highlights or shadows, you won't see a red line.
While the histogram may seem like a daunting concept, the basic use is pretty simple: just watch for the red line. One on the left means too dark, on the right too light. The histogram helps you determine if you need to adjust the exposure to avoid loosing the detail in the lightest and darkest part of the image.
Manual modes will both help you avoid clipping and allow you to set the shutter speed or ISO that suits the situation best. Since the iPhone doesn't know if you are shooting action of still objects, the automated mode in the camera app doesn't always get great photos. By choosing your own ISO and shutter speed, instead of using auto, you have the flexibility to create great images even in tough light.
That's where one of the advantages of using a smartphone for photography come in-there are multiple app options that give users much more flexibility than the original camera app, including manual modes.
VSCO Cam is currently free in the app store, yet offers a few nice features that you don't get with the native camera app. The biggest issue is that the VSCO cam app currently doesn't have a histogram. But, if you want to practice getting good exposures without spending any money in the app store, this is the app to download. The VSCO app includes a few options for sharing images and participating in community discussions, but for now, click the last option in the first menu to access the camera.

At the bottom of the camera screen is a slider that controls a number of different settings. Clicking the icon in the bottom left corner allows you to choose just what setting that slider controls:
- Sun icon - Exposure compensation
- WB icon - White balance
- Plus sign icon - Manual focus
- ISO icon - Adjusts the ISO, or how sensitive the camera is to light. Remember, a high ISO is more sensitive to light, but also causes images to appear noisy.
- Circle shutter icon - Adjusts the shutter speed.

Touching the "auto" box to the left of the slider will put that setting in auto mode, while adjusting the slider gives you full control over that setting. For example, if you are shooting action and your subject is blurry, you can choose the shutter speed icon, then slide the control to the left to find a shutter speed that will freeze the motion.

In the VSCO app, there's also a handful of settings at the top of the screen in the shooting mode:
- Dotted circle: Tap to show or hide the top menu
- Lightening bolt: Tap to turn flash to off (unlit), on (lit), auto (fires only in low light, marked with an A) and continuous or torch (marked with a T)
- X Box: The third icon will turn the screen guides guide on and off. There are four options: off, grid, square (for composing a shot that will keep the important details in the square shape shown on social media platforms), and the horizon guide (which helps ensure you are holding the camera straight).
- Filled circle: This controls the touch to shoot feature. If the circle is lit, you can touch any part of the screen to take a picture. If the circle isn't lit, you can use the circle at the bottom middle of the screen or the volume controls.
- Padlock icon: This will lock the white balance setting, so it doesn't change in-between images.
- ADV icon: This turns the advanced options at the bottom of the screen on and off. If you can't see the controls at the bottom of the screen, hit this button.
- White/Black icon: This option changes the color of the menus in the app from black to white and vice versa.
- Box With Arrows: Close the top menu using the first dotted circle to see this option, which switches from the rear to the front-facing camera.
The VSCO app also has a few touch controls. Like the native camera app, you can touch a portion of the image to both focus and base the exposure off the light hitting that object. To adjust them separately, tap the screen with two fingers instead. You'll see two red circles, both labeled, and you can drag them around the screen one at a time to adjust the focus and exposure points.
One last thing-to access the photos you just took, click on them in the box in the lower right corner (you should see a small preview).
Pro Camera 8 currently costs $4.99 in the app store, but it offers a few more features than VSCO cam and an interface that's a bit simpler to navigate-since most of the controls are labeled with both words and icons, you don't have to remember what each icon represents.
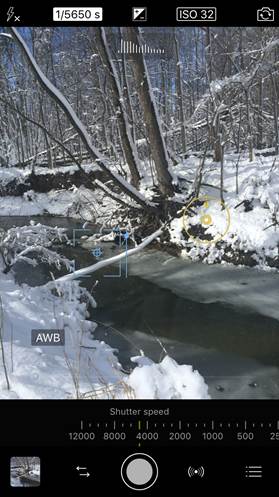
Let's start with the controls on the bottom of the screen. At the very left, you'll the last photo you took-simply click on it to access your images. Next to that is an icon with two arrows-tap to adjust your shooting mode. The options here include video, photo, HDR, Lowlight+, Lowlight, Selfie, and Scan (for QR codes). The middle circle is the shutter release, to take a picture. The fourth icon is a second shutter release with an extra shooting feature-you can choose between anti-shake, which will trigger the camera once you are holding the phone steady, or the self-timer to delay the shot.
The final icon on the bottom of the screen gives you access to the settings, to turn all the advanced features on and off:
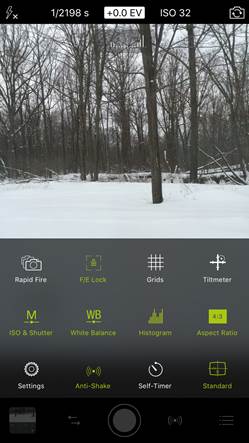
- Rapid Fire: Turns the burst mode on and off to take a single picture or a series of images
- F/E Lock: Allows you to lock the focus and exposure so it doesn't change between shots. Tap on the screen to indicate where you want the focus and exposure to lock, then move the blue box to adjust focus and the yellow to adjust exposure as needed.
- Grids: Turns the shooting grid overlay, which assists in composition, on and off.
- Tiltometer: A tool that indicates when you are holding the camera level.
- ISO & Shutter: Flips through the different manual mode options
Manual: When the M shows in the icon, you are in full manual mode and can choose both the shutter speed and ISO.
Shutter and ISO Priority mode: When the SI shows on the icon, you can choose to set either the ISO or Shutter speed and the camera will automatically choose the other setting. Tap the ISO or Shutter speed at the top of the screen to choose which one you want to set.
- White Balance: Adjusts the white balance or color temperature in the image.
- Histogram: Turns the histogram display chart on and off.
- Aspect ratio: Allows you to change the shape of the image that you are photographing from a various types of rectangles or a square.
- Settings: Gives you access to additional options, like whether to tag the GPS location in your images and whether to use the volume buttons to take the photo.
- Anti-Shake: Turns the second shooting option next to the regular shutter release to the anti-shake option. If you press the anti-shake, the camera won't take a picture until it detects that you are holding the camera still.
- Self-timer: Turns the second shooting option to the timer, which delays the image by ten seconds. The flash and a series of beeps will help you count down the seconds if you can't see the screen.
- Screen display: The final option toggles through different screen modes. All of the options we've discussed are visible in the standard mode. If you find the controls too daunting, you can switch to medium or light modes, but you won't see all of the shooting options.
Pro Camera 8 also has a few options at the top of the screen. Tapping the lightening bolt icon will turn the flash to on (lit) off (marked with an X) and auto (with an A).
The next few controls in the top screen allow you to adjust the exposure settings-but first, make sure that you are not in auto by going back into that shooting menu by tapping the icon on the bottom right and making sure the ISO and Shutter is lit green and says M. Once in manual mode, the shutter speed and ISO will appear at the top. Tapping the option will bring up a slider at the bottom allowing you to adjust that setting. As you adjust the settings, you'll be able to see the image get lighter or darker as a result of those changes.
If you go back to that menu and select the SI mode instead, you don't have to choose both ISO and Shutter Speed. Tap on the setting that you want to choose, then the camera will choose the other. This can be a handy tool-if you know you are going to be photographing action, you can just choose a shutter speed that will help freeze the motion without worrying about ISO. Or, if you want to keep noise to a minimum or shoot in limited light, you can choose only the ISO.
In between the ISO and shutter speed settings is a box with a + and - sign-that's the exposure compensation. If you are in SI mode, you can use exposure compensation to perfect the exposure while still only choosing one setting. If the shot is too bright, you can choose a negative exposure compensation; too dark, a positive one. Just like when you change the shutter speed or ISO, you'll see the image on your screen change with a preview of those settings.
At the far right of the top menu bar, the camera icon will switch from the front to rear-facing camera.
ProCamera 8 also includes the touch-to-focus feature. Tap the screen once to select both the focus and spot meter to the same area. If you'd like the spot meter to be on a different portion of the image, simply tap and drag one of the boxes away from the other, then you can move them around separately. The focus is indicated by the blue square and the spot meter by the yellow circle.
If you are only using the camera app that came with your iPhone, you're missing out. More advanced camera apps will allow you to fine-tune your exposure by setting the shutter speed and ISO. ProCamera is a top option because it also includes a histogram, but VSCO cam is a solid free app as well.