Using Elements, you can also add text to images. This can be fun if you want to be a little creative or even if you need to add text to explain an image.
In this article, we're going to spend time learning how to add text to your images, as well as the different options that you have in Elements when you add text.
Entering Text
When you enter text onto an image, you can choose to add horizontal text - text that goes across the picture - or vertical text that goes from top to bottom.
To add text, we're going to use the Text tool in the toolbox. It looks like this:  .
.
The Horizontal Text Tool is shown by default.
To use the Vertical Text tool, right click on the Text tool and select Vertical Text Tool  .
.
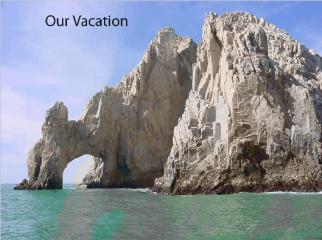
To create a line of text in your image, click on the place in the image where you want to insert the text.
You will see a white square with a blinking cursor.
If you want to create a paragraph of text, simply drag a rectangle across the screen in the place where you want the paragraph to go. This will create a text box. (If you don't use a text box, just hit Enter to add a new line.)
In the options bar, set your options, including font, color, and size. You can warp text and create other effects in the options bar too.
Now, your text is entered as its own layer.
When you're finished, click the background layer it in the Layers Palette.
Selecting and Moving Text
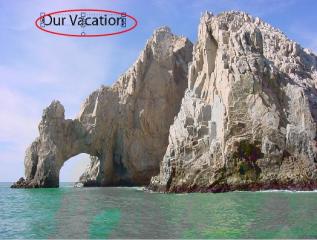
Once you input text, you may want to move it to another place in the image. You can do this by either moving the text box or selecting the text and moving it.
Let's learn how.
If you have created a text box, to move the text box, you have to move the layer. Remember, your text is its own layer.
To move a layer, we select the layer in the Layer Palette, then go to the Move tool in the toolbox. Then, click on the small little circle in the middle of your text box. Drag the text box to its new location.
If you don't have a text box and need to move text, simply use the Move tool to drag the text to where you want it in the image.
NOTE: If you don't want to move the text, but simply want to select it so that you can delete or edit it, just left click your mouse and drag it over the portion of text that you want to edit. The text will appear highlighted.
Create a Type Mask
If you right click on the Text tool in the tool box, you'll notice that there is also a Horizontal Mask Tool and a Vertical Mask tool. These allow you to create a selection out of text.
To create a type mask;
- Select the layer in which you want the selection to appear. Don't use a text layer.
- Choose either the Horizontal Mask Tool
 or the Vertical mask Tool
  .
.
- Select any additional options from the options bar.
- Type your text.
- The type mask now appears over the active layer.
More Tools
Sponge Tool
The Sponge tool  is used to bring out or mute the color of an object or an area of an image by saturating or desaturating it.
To use the Sponge tool, click on it, then set the options in the options bar.

Set the size and pixels of your brush.
Then select the mode and whether you want to saturate or desaturate.
The flow determines the strength of the tool. The higher the number, the more strength the tool has.
Filters and the Filter Gallery
Filters are used to clean or touch up images. You can also use them to add special and distortion effects. When you apply a filter, you can easily change the mood or tone of an image.
In Elements, the filters are found in the Filter Gallery. Go toFilters>Filter Gallery.
The Filter Gallery shows thumbnails of each filter and what it will look like when applied to your image. It also lets you apply a filter more than once to strengthen its effect.
Perhaps the best way to show you how filters work for your images is to show you by example. Since we already have the picture in the snapshot above, we'll use it for this example.
Next to the image in the Filter Gallery, you have a menu that gives you your options.
You can choose from any of these types of filters:
- Artistic
- Brush Stroke
- Distort
- Sketch
- Stylize
- Texture
Let's click on the Texture filter folder.
Now the thumbnails are displayed, as shown below.
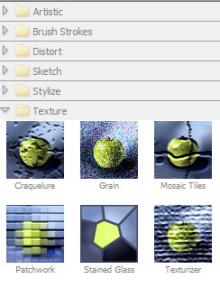
This gives us our options to texturize.
We're going to select Mosaic Tiles.
Below you can see the result.
To the far right, we can further specify our preferences for the Mosaic Tile filter.
We can change the tile size, grout width, or lighten the grout.
Let's enlarge the tile size and increase the grout width.

You can see how much the filter changed the mood of the image. Then, you can also see how adjusting our preferences for the filter also changed the image.
Filters can be fun to use. Take the time to experiment with them all.
The Clone Stamp Tool
In Elements, you can use the Clone Stamp tool to duplicate objects, paint over objects, or remove imperfections.
The Clone Stamp tool  is located in the toolbox. If you can't see it displayed, it's located with the Pattern Stamp tool
  which we'll learn about next.
Select the Clone Stamp tool, then set your options in the options box.
Move the cursor over the part of the image that you want to sample, then hit Alt+click.
This will duplicate the pixels in that area.
Now drag or click to paint.
The Pattern Stamp Tool
The Pattern Stamp tool paints with a portion of your image, a portion of another image, or a preset pattern.
Set your options in the option bar before using the Pattern Stamp Tool. If you want to use a preset pattern, you'll select it here.
Next, drag and paint the pattern over the areas of the image that you want to paint.
The Healing Brush Tool
The Healing Brush repairs large areas of imperfection simply by painting over them.
The Healing Brush  is located in the toolbar with the Spot Healing Brush
  .
.
Select your brush size and other options in the options bar.

The mode that you set determines how the pattern blends with existing pixels.
Normal puts new pixels over the existing.
Replace preserves film grain and texture at the edge of the brush stroke.
Source determines the source to use for fixing pixels. Sampled uses pixels in your current image. Pattern uses pixels from a pattern that you choose in the Pattern palette.
Aligned samples pixels and doesn't lose the current sampling point, even if you release the mouse. If you don't select Aligned, Elements will sample pixels from the initial point whenever you stop and restart painting.
After you set your options, move the cursor to the point in the image that you want to sample, and press Alt+click.
The Spot Healing Brush Tool
The Spot Healing Brush tool  removes small imperfections and blemishes from your images. You can click once on a blemish to do away with it, or click and drag to erase it from the image.
To use the Spot Healing Brush:
Set your options in the option bar.

Select a brush size that is just one size bigger than the blemish you want to remove so that you can remove it in one click.
Check Proximity Match to use the pixels around the edge of the selection to find an area to use as a patch.
Check Create Texture to use all the pixels in the selection to create a texture that will fix the area.
Click the area in the image that you want to fix or click and drag over a larger area.
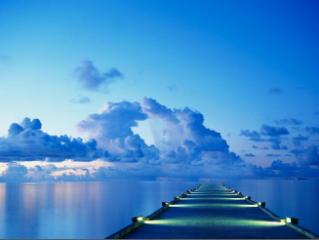
Let's use an example to show you how this tool works.
In the picture below, we're going to remove the shelter at the end of the dock.

The first thing we're going to do is select a brush size that's just a little bit bigger than the shelter so we can cover it in one click.
The Straighten Tool
The Straighten tool  is used to realign an image vertically or horizontally. It will also resize or crop the canvas to allow for the realignment. This tool can be used when you have a photo taken at a tilted angle.
Let's learn how to use the Straighten tool.
In the toolbox, select the Straighten tool, then go to the options bar.

If you want to straighten all layers in an image, select Rotate All Layers, then choose an option from the Canvas Options. This is only available if you select Rotate all Layers.
These are your options in the Canvas Options menu:
Grow or Shrink Canvas to Fit will resize the canvas so that it fits the rotated image.
Crop to Remove Background removes any blank background that is visible after straightening.
Crop to Original Size keeps the canvas the same size as the image was originally.
Next, to straighten the image either:
- To align horizontally, draw a line in the image to represent the horizontal edge. Find an object in your image that looks like it's horizontal, and drag along it to straighten.
- To align vertically, draw a line in the image to represent the vertical edge.
Adjust Skin Tone
Sometimes in an image, the skin tone of the people pictured isn't correct. Maybe it's too dark or too light. In this section, you're going to learn how to adjust skin tones in your images.
To adjust skin tone, go to Enhance>Adjust Color>Adjust Color for Skin Tone.

When you click OK, Elements will automatically adjust the skin tone. However, if you want, and as the instructions above tell you), you can also move the sliders to get the tone that you want in your image.
Color Curves
When you adjust color curves, you improve the highlights, midtones, and shadows in each channel of your image.
As you adjust the color curves, you can view the before versions of your image to get it exactly as you want.
To adjust color curves, go to Enhance>Adjust Color>Adjust Color Curves.
Select a style.
Use the slider to adjust the color curves. Use the before and after snapshots to help you achieve the desired effect.
When you achieve the results that you want, click OK.
We're going to use the photos above for an example, and adjust the color curves so you can see the effects.
By switching the style to Increase Contrast and moving the sliders, you can see the improvements we've made. The colors are more crisp and vibrant now.
Save Images
You have two choices when you save an image that you've edited.
You can go to File>Save and save the file under the same name and format. When you do this, the previous versions will be erased.
You can also go to File>Save As. When you select this option, a dialogue box will pop up. It will request a new file name, and it will also give you the chance to change for the file format.
For example, if your image is currently a jpeg, you can change its format to gif, bitmap, png, or any number of other formats.
When you've made your selections, click OK to save the file.
Color Variations
If you're going to publish an image to the web, it's helpful to see what your colors will look like on the web. Remember, different devices show colors differently. This includes the Internet browser windows and your monitor.
To see how the colors in your image will appear, go to File>Save for Web.
Select the optimization settings.
Click the  just to the right side of the optimized view and view the document panel menu.
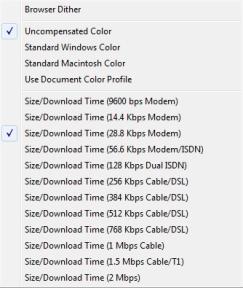
Uncompensated Color will show the image without any color adjustments.
Standard Windows Color will adjust the colors to that of a standard Windows monitor.
Standard Macintosh Color will adjust the colors to that of a standard Macintosh monitor.
Use Document Color Profile will show the image with its color profile, if one exists.
Click OK when you're finished making changes to save your file for the web.
Photomerge
Photomerge helps you correct scenes in your images that have exposure problems. You can use this feature to blend two photos together to get a final photo that is perfectly exposed.
Here's an example. If you have a photo with a window in the background, you usually wind up with overexposed scenery that's either inside the room or outside the window. If you want good exposure of outside scenery -- or of darker objects in the room, you can use Photomerge by taking two photos of that same scene with two different exposures -- and combine them to perfect the exposure.
To use Photomerge:
Cntrl+click on the photos in the Project Bin that you want to use.
Select two photos (or a maximum of ten), then go toFile>New>Photomerge Exposure.
Elements will analyze the photos. This window will appear in the Palette Bin:

If you choose Simple Blending, you cannot change the exposure settings. The merged photo will appear in the workspace.
Smart Blending allows you to adjust settings using sliders. You can adjust Highlight Details, Shadows, and Saturation.
We're going to use Smart Blending for this example.
When you're finished, click Done and Photomerge will create your output image.