
With only a few emails, finding the email that you're looking for isn't difficult, but imagine having thousands of emails and you need to find just one. Sifting through all of your email to find the one that you need can feel like searching for a needle in a haystack.
Creating Folders
On the left side of your Outlook 2019 interface, there is a section labeled "Personal Folders File." The Outlook OST file stores these folders. By default, several folders are automatically created for you, but you might want to create your own to customize and organize email.
(Personal Folders File context window)
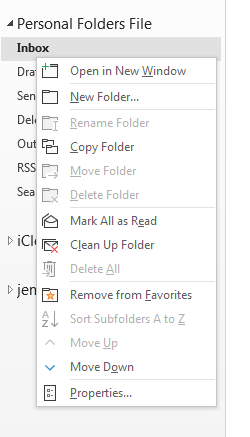
The image above is a context window shown when you right-click the "Inbox" folder. Notice that you have several actions that you can perform on the inbox. The "Inbox" folder is the primary default folder created. This folder is where all incoming mail is sent when new mail arrives. You can create rules in Outlook to send incoming email to a specific folder, which will be covered in lesson 13.
Behind the context menu is several other folders created when you set up Outlook. Drafts, Sent Items, Deleted Items, and Outbox are the main folders created when you set up Outlook. These folders are found in most email services, so they match one-to-one with your email services.
There is often confusion between the "Sent Items" folder and the "Outbox." Both folders display emails that you send from your Outlook software, but they have one slight difference. An email is placed in the "Sent Items" folder when it is successfully sent from your local Outlook software to the outgoing email server. Occasionally, the outgoing email server is unavailable, your network connection is no longer working, or your computer is not connected to your Wi-Fi service.
When you click "Send" in Outlook,
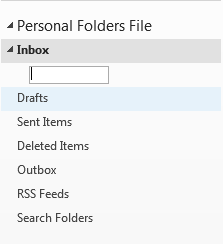
Click "New Folder" in the context menu, and Outlook will prompt you to give the new folder a name.
(Create new folder prompt)
Type a name in the text box and press "Enter." The new folder is now saved in your Outlook Personal Folders File. After you create these folders, emails are not automatically sent to them. You must drag and drop an email from your inbox to your new folder.
You can create folders within folders (subfolders) to better drill down from a main folder category to a subcategory. Just like you can create a subfolder in Windows, Outlook lets you create subfolders within main folders. You can create them the same way as creating the main folder in your Outlook inbox. Right-click the new folder that you created and click "New Folder" from the context menu. You'll be prompted to enter a name for your new subfolder.
Unless you have a rule set for email to send certain ones to these new folders, you need to manually move emails from the inbox to the new folder. Outlook's main view shows a long list of emails as they are delivered to your inbox. When you click the email, a view that shows the email message displayed.
To move an email from the inbox to a customized folder, instead of clicking the line item in Outlook, click the message and drag it to the new folder location in the "Personal Folders File" section. The email will disappear from your inbox and no longer be visible if the inbox is the actively selected.
Copy a Folder
Should you accidentally create a folder in the wrong location, you don't have to immediately delete it. You may also want to reorganize your folders after you've used them in a specific location and accumulated several emails, so deleting them are not an option. You can, then, copy or move a folder to a new location.
When you copy a folder, you take a mirror image of it and post it to a new location. This is distinct from moving a folder. Moving a folder means you copy the original folder, delete it from its current location, and paste content to a new location. When you just copy a folder, you create two mirror images of the folder and its content. You can then delete one copy if you wish, and this would perform a similar action to the move function.
Archiving Folders
As you continue to use Outlook, your folders and personal files grow. Although emails and text files do not take up much space, using Outlook for years could increase your Outlook files to several gigabytes in size. Additionally, when users add images and media in your messages, these files are much larger in size than text and can increase a file size from only a few kilobytes to several megabytes. Once you accumulate these larger email messages, you can have an email inbox and folders increase in size to several gigabytes.
To manage your Outlook inbox after several years of accumulated messages and create a backup of older ones, you can use the Outlook archive feature. To use this feature, right-click the inbox and select "Properties." A window displays. Click the "AutoArchive" tab.
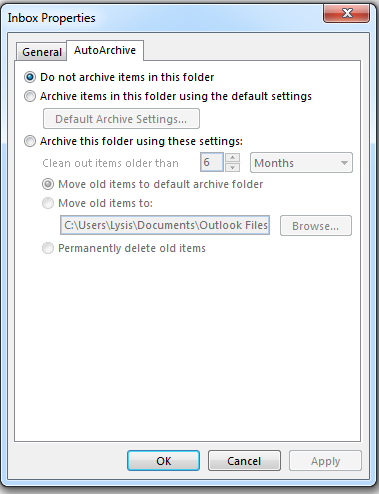
(The AutoArchive feature)
Notice that by default the folder is not archived, but you can make changes to these settings including the option to choose previous settings that you've already configured or creating new configurations in the third section of this window.
If you've never configured an archive procedure, choose "Archive this folder using these settings." Use this configuration when you want to configure an archive every several months and move it to a specific folder.
The first configuration asks you to set the duration of an archive. The default is six months, but if you have hundreds of emails sent to you every day, it might be better to archive your inbox more frequently.
The next configuration is to set the location of the archive folder. This can be any folder on your local computer. It can even be a folder on a mapped network drive on your computer but should the network connection fail then you will be unable to archive your folder. It's best to archive your email on a local computer and then move the files to a backup on your network.
The final option lets you set Outlook to delete email messages after being archived. If email messages are taking large amounts of space on your computer, then you could delete old email but then you lose your local copy and won't be able to search them unless you load the archive. Choose this option if you are sure that you no longer need a copy in Outlook when you archive messages.